zKars
Supporting Member
-
Joined
-
Last visited
Everything posted by zKars
-
16 x 1.5 mm thread. I think we did this already on hybridz... Lets play a game! What other thread(s) on an s30 are 16 x 1.5mm?
-
Definitely a 280z tach by the plug and mounting technique. Which year? I'm leaning toward 77-78 by the font on the face, but some else might chime in. Likely work on any 280z with a matching plug. The tach connections are the same for all 75-78 280z, +12v (blue), ground (Black) and a trigger (Blue/White, all harness side, not tach wires) from the negative side of the coil (via a 2.2K ohm resistor), so any 280 tach can be made to work if the plugs are not the same. Jim
-
I confirm the 2.2K ohm value. Easy to find. 1/2 watt is plenty. Jim
-
Other than the length of the pigtail, I believe yes. Each wire is easy to trace, you can match them up. The 73 block just can't be mounted in the stock location. I have a nearly perfect long tail fuse block if worse comes to worse. PM me for details. Jim
-
Bad news. The seller just decided not to sell the car. "Went out to take more pictures for us, then remembered why they bought it in the first place". Too bad for us, wise move on their part. Jim
-
Zed I have 92 Z32 seats in my 73. They mount too high for my 6 ft' dness and required that I cut down the body seat mounts. I replaced the floor crossmember with a 2 x 1" steel channel welded in, that bought me about 1.5" and removed the rear mount pads to mount the rear through the floor. I had to modify the seat rail mounts extensively, as stock, they mount to a non-flat floor in the Z32. Other than about 8 hours cut weld and fab work, they bolt right in! The power drivers seat is about 3x heavier than a stock Z seat, but man are they comfy on my aging butt, and they look good too! Best of all, the shape of the seat cushion where it meets the backrest pivot area fits well with the 240 shape floor pan shape behind the seats to allow the seats to be pushed nearly as far back as the stockers. PM your email and I'll send some pics. Jim
-
Do a search here on "gas tank" and/or "Vapor tank" and you will find great information. Has been discussed many times. There are great solutions including how to remove the vapor recovery tank and many of the related hoses. All the best. Jim
-
There are only two common sizes for wheel nuts. 3/4 and 13/16. They are likely 13/16. The wheel wrench may be in the car, in the storage bins behind the seats. Good luck in CO!
-
Head bolts are 10 x 1.5 mm Do NOT go cheap on a tap and die set. Excellent advice. Go buy a 10 x 1.25, 8 x 1.25 and 6 x 1.00 as well for 98% of the other bolts in the car. Jim
-
Nice work Jeffrey! Another option is to find a speedo from a Canadian 77/78 (for sure) 280Z. They already have a factory metric speedo face. Canada went metric in 77 'ish, and this spawned the requirement. I have done this swap to my 240. I also have the tach from the same car, so the fonts match. Wouldn't some over-seas Z's have metric gauges as well? Would be nice to get a scan of one of those faces. Next time I have mine out I'll do it. Jim
-
Sailor Shipping from Alberta is quicker. Let me know if you want one. I'll send for the price of the postage. Let me know at z240@shaw.ca Jim
-
What year you need? I have a few replacements. z240@shaw.ca Jim
-
Thanks Carl! Sound like pretty good shocks. Now I'm very tempted to try them. Anybody want a set of Illumina's? Jim
-
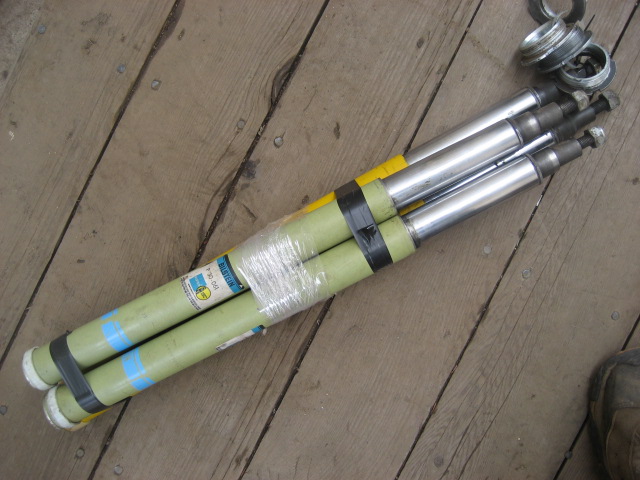
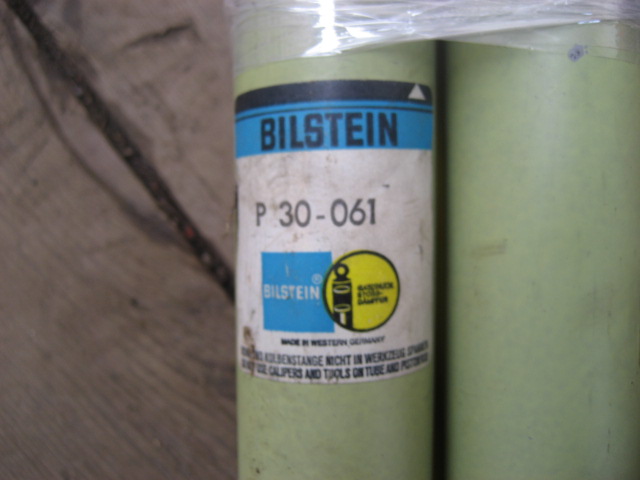
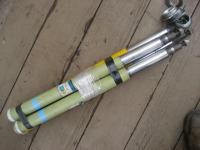
Everyone: I took apart a rusty sad example of a 73 the other day, and found what appear to be a decent set of Bilstein strut inserts waiting to be rescued. Part numbers are P 30 061 (front) in green and P 30 062 (rear) in yellow. The posts on Bilstein shocks for Z's are far and few between, but they seem (ed) well regarded. And as far as Bilstein themselves, they seem to be long since NLA from them. Their action feels smooth in both directions, nice and firm, there is no signs of rust or abuse, the strut gland nuts are clean and came out easily. There, that's everything nice about them that means absolutely nothing about how they might perform when actually in a car. Worth the risk to throw them in my car and see what they are like? I have illumina's and really don't need them, but if they are a bit softer, might be worth it. Anyone have any clue how they "rate" (a little shock humor there...) compared to their contemporary counterparts? Jim

-
Sorry for the attitude. Must be the beer... Yes I have them. To be safe, send me a pic of the one you want. Is it the 4 holer? Two brake, one clutch, one vent line? btw, your green on butterscotch combo is my dream car.. Pretty..... Send me details to z240@shaw.ca Jim
-
How many would you like? What color? I have blue overspray, orange overspray, oil covered, dirt covered, and black. Like they is hard to find or something, sheesh... Let me know!
-
Jeff I have several B spacers, and crush washers. Drop me a note or pm me for details. z240@shaw.ca Jim
-
Well there are only a few "commercial" parts suppliers in Canuck land, but most are a bit of a specialty supplier. All of these guys are on the west coast in and around Vancouver. www.zeddsaver.com/ (Norm - Restoration parts) www.modern-motorsports.com (Ross - Custom performance parts) www.new-datsun-parts.com (no experience) You've heard about Charlie now (above). Depends on what you're looking for, you can always place a want to buy ad. There are plenty of active z owners with used parts in Canada too. Anybody know of anyone else? Jim
-
The most common issue is the cable breaks, in which case you will be lying under the car, reaching up into the latch mechanism with a "tool" to manually release it. No fun. Now since your latch is just stuck, probably just barely mis-aligned, you have a couple of options. First, have a friend push down hard and maybe bounce on the hood right above the latch while you yank the release handle. The intention is to get movement that will release it. Ever had the grill off of the car in front? If not, those 5 phillips head bolts may not be easy to remove (assuming that's a 240 in your picture there). Try anyway. If they come out, take it off or loosen the bolts that hold the hood to the hinges (not the hinges to the body), which may give the hood a little wiggle room so that you will be able to push/pull/wiggle the hood and pull the release handle and get it to open. Maybe you can get to them from under the air damn/valance without removing the hood. Darn tough either way. Other than that, pull as hard as you can on the release handle. Try a good fast hard yank, rather than a steady hard pull. Then get mad and really pull hard. When that cable breaks, get under the car with a "tool', and start pushing probing, and cursin.. and prayin.. Jack up the car safely and get some room. Good luck. Jim
-
Have to wade in here with some personal experience with triples and fuel pumps and regs. First piece of advice on return style regulators. Read the spec sheet!! I put in a new Mallory fuel pump and that Holley 12-804 reg and all was fine; For a while. Pump was a little noisy, but tolerable. One day about 25 hours of run time, the pump just plain quit. Took it out, and on the bench it would run for a while, then quit. Let it sit, try again, same thing; run, not run, run, not run, pumping water into and out of a bucket. Okay, must have burned it up. What's next.... "I'm gonna do it right" (famous last words) I went out and bought a Mallory 4309 return style reg (1-4 PSI), plumbed it with with 6AN hose all the way to tank. I welded AN fittings on the tank outlet, and return lines, even used the front vent tube instead of the intended return line tube, as its diameter is about the same as the outlet tube, about 1/4-5/16" IIRC. It ran, but could not get the pressure to stabilize. Try all kinds of things. The pressure would stay up, then over about 15 minutes, it would fade off to nothing, stranding me! Sit for a while, fires back up, just make it home before it dies again. NOW WHAT!!! ArRRRGGGG! Finally read the instructions. (imagine that). "Mininum 3/8 ID hose (8AN) to and from the tank for pumps upto 100 GPH, 1/2 hose above that!!!!". No way what I had was going to work with the smaller than 3/8 ID tubes at the tank, no matter what size hose you want to use. Choke! With nothing that "worked", I stuck a mechanical style pump back on the head so I can get around until I figured out what's going on. Well I'll be damned if that car didn't run like a champ, and QUIET, at any throttle setting you wish to push to. I am still running that stock mechanical pump... Have nice stainless AN stuff going into to those 1/8NPT fittings on that pump too. Real purdy... Did I mention I have triple 44 Mikunis and 3.1 stroker to feed? Oh, and I have a really nice Mallory fuel pump and return style reg for sale if any one needs one... Its' going real cheap.... Jim PS. Did this last spring just before a car show. I get there and start talking to a buddy from out of town about my whoas trying to get to the show. Wouldn't you know, he tells me almost the identical story about his efforts to get a fuel system to work. I ain't alone....
-
Gang: The quality and service life of the SEM vinyl dyes, if applied correctly, is very good. With these panels being "new" I would expect surface prep to be easy. Black can be made blue pretty easy. Matching the color is the skill part, but I'm sure it can be done with some experimenting and guidance from a good auto-paint supply company local expert or your own willingness to try. I guess we'll wait and see if more panels magically reappear from Nissan Canada in a few weeks to fill the void once more. Jim
-
Ben and everyone who has now received the door panels, you are very welcome. Glad to help. Good ol' Datsun parts... The shipping estimate on that auction to me is $200 US! Well he's right, the shipping is not $100! And the sad part, someone will likely buy them.. How can reach that poor guy.....
-
How many would you like? I have a small collection. $25 and shipping work for ya? Should be about $20 in the mail. Let me know! Jim
-
I am co-incidently doing the same repair. Must be "fix the frame rails" week. I too have a bad passenger side, good driver side. Stupid leaking batteries, time and water entrappment. Grr.... As an aid to re-positioning the T/C mounting cup in the "right" place, I am planning on temporarily re-installing the K-member, control arms and T/C rods . With the driver side T/C mount still in the stock position, it should help to place the passenger side mount in exactly the right spot. If you do this as well, remember to measure carefully to get the K member square to the frame first. Maybe measure from front to the rear suspension on both sides to a nice reference point to get the distances the same. Did you have to make a new pocket in the new frame rail where the k-member mounts? I made two, (don't ask why...) and could make another in an hour (practice makes perfect) or so if you need one! Hope this helps! Good luck with the repair. Ain't fabricatin' and weldin' fun? Jim
-
There is only 35 minutes left in the auction! Thank God you brought this up! It will look soooo good in my glove box. Thanks! Or I can go by an organizer and get my black sharpee out and make for own! I so confused. What to do. Jim