zKars
Supporting Member
-
Joined
-
Last visited
Everything posted by zKars
-
Check two things. 1. The hazard switch itself. Take it apart and check the internal contacts for corrosion. Your lucky, yours is in the console and easy to get to. 2. There are a few connectors that are under the dash on the passenger side foot well, actually at the firewall, near the hear core. There are two or three in a bundle there. Pull the connectors apart and look at the pins inside. I've run into several of these things that have gotten wet from leaking heater cores that have turned the pins in those connectors to green meanies... 3. And of course the turn signal switch itself in steering column could need cleaning as well. Get the wiring diagram and do some tracing and see what is common with the problem. Good luck!
-
Another unsecured battery accident. You're lucky its not all up in smoke. Those things are heavy, bungee cords don't cut it. 78's have another pair of fusible links for the fuel injection on the battery side of the relay bracket right beside the battery. The fuel injection and fuel pump relays are under that bracket as well. Here's hoping all those fusible links did their job...
-
I'm going to be the devils advocate here. Why don't all the SU carb guys in the hotter climates complaining of similiar symptoms? Should be real common to all "float bowl" users.... I have this issue too with my Mikuni 44's The time it takes to get it to start is directly propotional to length of time it sits. Mechanical pump or electric. 24 hours, no wait time at all. 48 hours, maybe 15 sec of cranking, 7 days, maybe 40 seconds of cranking. I have a check valve too. How can something this pretty be so tempermental? Maybe that answers my own question....
-
I'm sure its possible. With just the right tools, the right light, with an extra pair of hands, with the spring still around the plunger shaft, with the right patience.... with enough beer... It's a balance between your, sorry, 'his', fear of the unknown and having a whole day and more patience than I have, to try to get that tensioner back where it belongs and the chain back on... Dawg7, since you're friend is so anxious to learn and do, I say take this as an opportunity for learning about what's under the front cover and how to properly mechanically time a L engine. enjoy!
-
I've heard stories its possible, but frankly, I'd never attempt it. Off comes the cover. Take the rad out, it makes it much easier. Really. Especially when you have to take the balancer off the crank. Remind 'him' of the two 10 mm headed bolts between the head and the front cover that tend to hide in crud and get forgotten. And the two at the base of the cover into the block, just above the oil pan, especially the one behind the oil pump, which has to come off anyway. Tell him he's not alone. This right of passage has been experienced by many many before him.
-
Whoa Ken, run, don't walk from that one... Not good. It is hard to extrapolate that to the rest of the car, just because the floors got wet and rotted doesn't mean the whole thing is like that, it depends SO much on the storage condition, but if it was outside all this time, keep looking....
-
-
Kevin: Welcome to the forum and apparently to the land of early 260's! I've never seen so many early 260's come up for sale in my life, all in Alberta. I've personally run across 5 or 6 in the last couple of years. Please be extra vigalent about rust on these cars before buying one. The #1 most expensive part of the restoration is rust repair and paint, so start with the most rust free example you can find, even if it means going to the US to get it. Spending $5-6K on a good 240 body in Alberta is worth it in the long run. There are a couple on Kijiji right now. Before you purchase I'de be happy to have a look at the cars with you to give you an informed opinion of cost and time to restore them. Both of the cars you are mentioning have rust issues that I can see from the pictures. The white one not run since 98 will need the most work. Parts specific to early 74 260's parts are hard to find, 2+2's even more so, due to the very limited production. That said there isn't too much that all that specific, bumpers, wiring harness, emblems, etc depends on your plans for the car, ie stock restoration, or just make it run, look good and have fun with it. Drop me a note to z240@shaw.ca and I'll give you a phone # so we can chat more. Happy to answer any and all questions you may have and to support your restoration in any way I can.
-
The color will grow on you. Bid man, Bid! The current bid is way undervalued. IMHO....
-
On/Off working/not working is 95% ignition probabilty. About the only exception is random fuel supply cut outs due to plugged lines or sticky float valves that come and go but they tend to act differently. Read on. Couple of questions to clarify. 1. Given a 30 minute hypothetical drive, what percentage of the time is it running fine vs running bad? You mentioned its good initially then the problem starts up, but does it randomly go back and forth between good/bad over the remainder of the drive? 2. How quickly does it toggle from working fine to working bad? Is it near instantly or does it get progressively worse over over a period of several to 10's of seconds? Near instant = ignition, slowly fades to bad = fuel going away. Pull the vent hose off the top of the front carb fuel bowl lid and get a thin stick about 3 in long that will fit in the hose barb that sticking straight up now. Poke it in there and see if you can feel a nice freely bobbing float as you poke it up and down. You're making sure the float is free to move with this easy trick. If you feel a dead end, ie no bobbing, then the bowl is empty or the float is stuck. Pull the top off the front carb float chamber and remove banjo bolt. Check the condition of the filter screen inside the banjo fitting and see what crud is lurking in the float bowl. Pull the float valve and check the needle tip for deterioration, crud caught in there, and has free motion. If after a lengthy drive with this problem coming and going, if the front carb is to blame, the front three plugs may look different than the back three. Just a clue here. Good luck! Don't give up.
-
Go to Google, then to Images, and type in "240z front hub" Lots of pretty pictures
-
John will be racing in the E-Production class for sure. I agree Carl, surprised there aren't more $10 contributors. Spent more than that on gum last week... The EP final is 1:00 pm Sunday Sept 22. Consider making it a weekend of fun at the historic Elkhart Lake "Road America" circuit. I'll be there all weekend to cheer ALL the competitors on. Full race schedule is posted here: http://www.roadamerica.com/userfiles/file/2013%20Schedules/2013_Runoffs_WORKING_Schedule_1_30_13.pdf
-
-
The Konig front cap fitment for me was two fold. The interference was in the space between the wheel hole and the hub casting that prevented the plastic tangs on the cap from going all the way on. Once I ground a very small relief circle into the hub around the wheel opening, the wheel bearings caps only needed a tiny flattening to clear the depth of the cap.
-
Welcome back to the addiction. Knew you would be back. Nice choice of vintage. What part of Canadia are you from? There are lots of us brethern near by likely with lots of extra's to share. The site you were searching for is zhome.com Yes, its Carl's baby. Let us know more, and post pictures of your new baby. Welcome!
-
Yup, I was dreaming about the .75 pitch. 4 x 0.7 is the correct pitch. Definitely not 8-32 though
-
4mm x 0.75. Slight chance they are 5 x .8 can't check till I get home. One or the other for sure.
-
Few things come to mind looking at all the evidence so far. 1. Since the cam bearings are supplied by the same oil path as the lobe holes, I'de be curious to look at the #1 cam tower bearing/cam bearing and see if it looks any different (ie worse) than the other four. 2. And along the same lines as #1, judging by the way oil gets to those lobe holes, if its only #1 not getting oil, then its a plug/restriction right there in that hole in that lobe, or #2 would be having problems too, as they share a common supply bore down the length of that cam. Therefore, I think, if you see the same oil volume coming out of #1 lobe as #2 in just-crank condition, then its not a lack of oil supply to just #1 that's causing this. 2. After it runs for few minutes, is there noticably less oil sitting around/on/over that lobe than any of the others? There is such a flurry of oil flying around under there under running its hard to imagine you would able to tell any significant difference. Also says that oil can even get #1 just by splash chance and keep it alive for more 1500 miles... 3. A close up magnified view of the first pic in post #10 of the rocker pad worst wear area is showing breakout and fracturing. I'm thinking the hardening of that particular rocker surface is not up to snuff and it gave out. 4. Also note the wear/damage is not even across that rocker surface, but is concentrated in ~ 25% of the width. Tells me the rocker pad is not flat across its width or is not hardened evenly. Just some thoughts. hope the rocker switch solves the mystery.
-
Just what every guy with a 68 Nova wants. A weber side draft bolted to his 4 barrel intake. Wait, maybe if he used a high rise manifold and had the weber sticking out of the hood, with the stacks facing forward! Now that is a dream come true! Might need a friends hand to do a triple face palm. (get it , "triple weber face palm", huh? ) ROFL
-
Perhaps you are just using terms they are not familiar with, but any exhaust shop that doesn't know how to properly hang the exhaust they are installing, regardless of make of car, should be avoided at all cost.
-
and the winner of the "what thread size is that " contest, is, no surprise, Jon! perfect 5/8 x 18tpi thread.
-
Wade I need $23.96 for postage on the expertly packaged TC rods. Paypal me $25 and we'll call it even. z240@shaw.ca Thanks! Jim
-
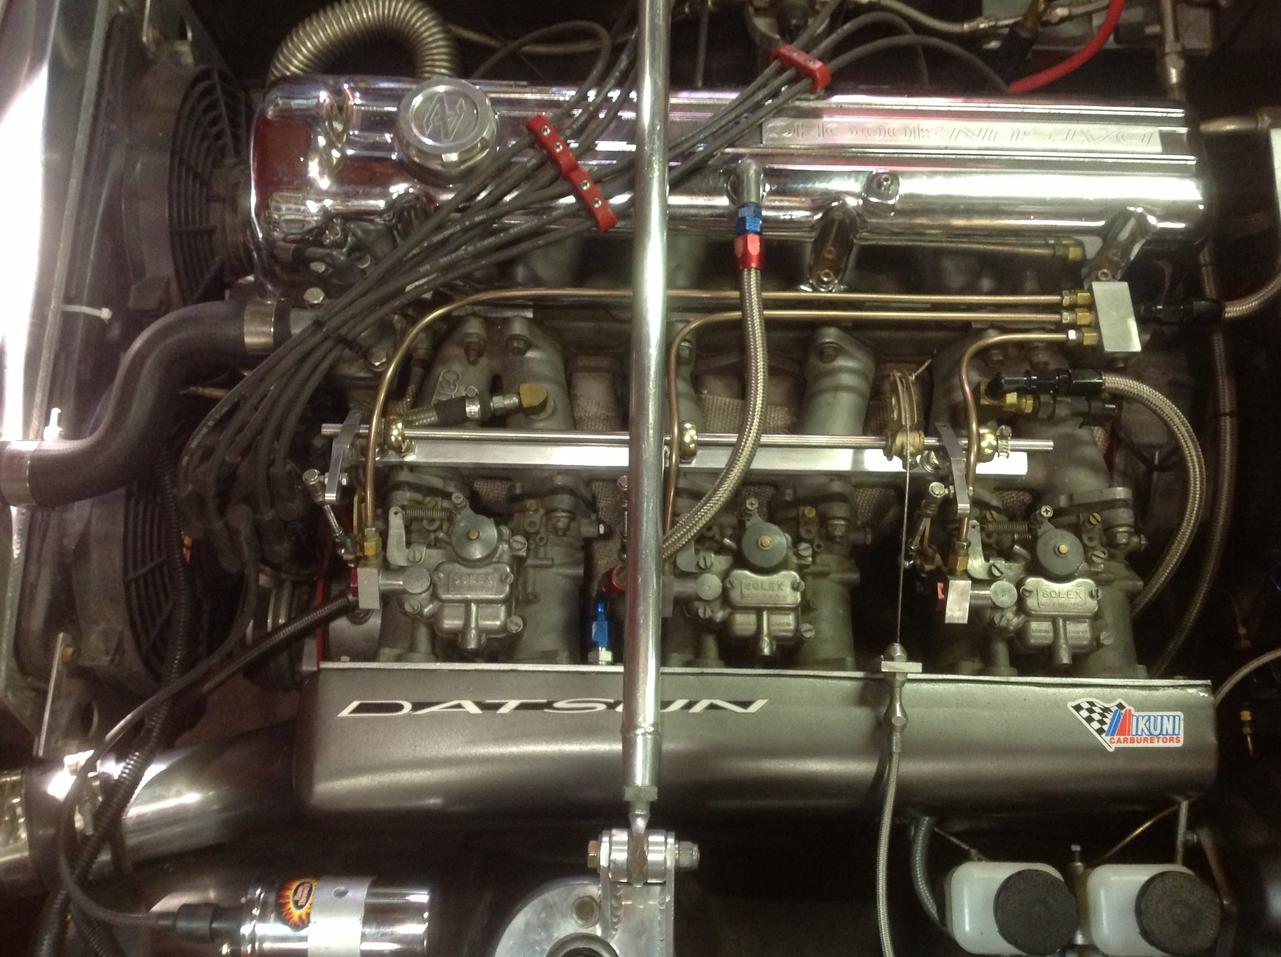
Eureka! Problem solved. The two inlets on top of the fuel bowls are both safe to put fuel in. The one that sticks straight up is the bowl vent (connects to air cleaner) the more complex one on the side/top that is angled is the fuel inlet. The very top of the round dome with the black plastic knob is where you add damper oil, you didn't somehow connect that to the gas supply did you?
-
oh oh. I'de be removing the oil pump drive spindle and driving the pump with a drill and 3/8 rod with a flat ground on the end while watching the oil flow from every cam lobe. That way you get higher pressure and flow rate than while cranking. Remove the rockers so you can see them all flowing (or not) at once. Judge from there. Can I rush ship you a fresh stage 3'ish stock regrind and more fresh rockers? Hmmm, never thought of offering a cam rental service before....
-
The ceramic thing is your ballast resistor. Cracked is not critical, there is a fine resistor wire underneath it that can't be broken. the ceramic is just a heat proof place to put that wire as it gets hot doing its job. If the wire between its two terminals is broken, then the coil is not connected.