Leaderboard
-
.JPG.cfcada9cf1c1b502df3f5f2f2ca3ff36.JPG)
SteveJ
Free Member7Points9,646Posts -
Captain Obvious
Free Member4Points10,081Posts -

dutchzcarguy
Free Member2Points2,677Posts -
HusseinHolland
Free Member1Points1,031Posts


Popular Content
Showing content with the highest reputation on 09/18/2023 in Posts
-
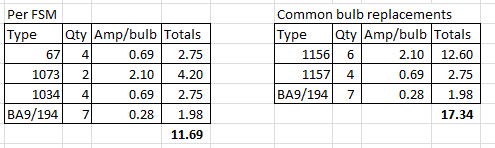
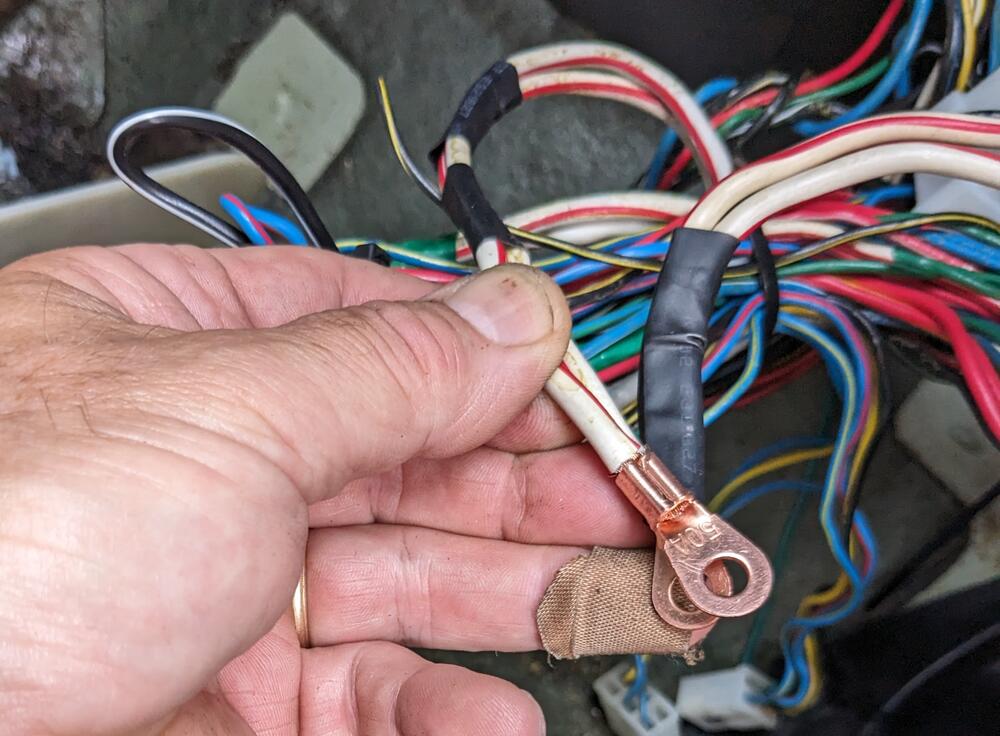
The contact that is at the point of melting is the load side of the fuse. The line side has enough copper to spread the heat out. I know I posted in the past about the amount of current that runs through this circuit. I'll put it out there again. The design of this circuit is marginal. Using the specified bulbs, this is approximately what the current is in the circuit with incandescent bulbs at 12VDC. The circuit is rated at 20A, so the fuse is fine, but if a previous/current owner used the wrong bulbs in the side markers (either to make the car more visible or due to ignorance), the current goes up quite a bit. This is why I push for LED replacements. This goes double for owners of 73-76 cars as they use a smaller connector at the steering column, and I've seen that connector burned up too many times. After replacing the bulbs with LEDs, the fuse should be downrated to 10A. I can get the current down to around 3A or less on my cars with LEDs for all the marker and gauges lights.
 4 points
 -
2 pointsOkay.. My question would be: But was that a original part or did someone think it would be better/nice to have one there.. Does it excist on the fiche of the 240z? EDIT.. oeps.. i see that you found that on the fiche in answer #733.. I really don't know it's been 23 years since i opened one up.. I asked BING for a picture.. he/she is looking for one and i report IF it gets one haha.. I think you better make one yourself of a inner tube of a cartire. maybe jfa.series1 has a pic.2 points
-
Actually that's not exactly the case either... If your cap seals to the can now, you have effectively capped off all the vacuum lines. However, if the cap does NOT seal to the can (which is what I suspect), you have now introduced a vacuum leak of unknown volume when you are at light cruise on the gas pedal. The size of the leak will be determined by how well the plastic cap seals to the canister. And I suspect that cap seal is not that good since you took out the diaphragm material (because it interfered with the screw head). You will get good idle performance because the purge valve is closed, but at partial pedal position, when the purge valve is opened, you may run way leaner than designed. Not a good situation. OK, I think I've given this enough thought for today.2 points
-
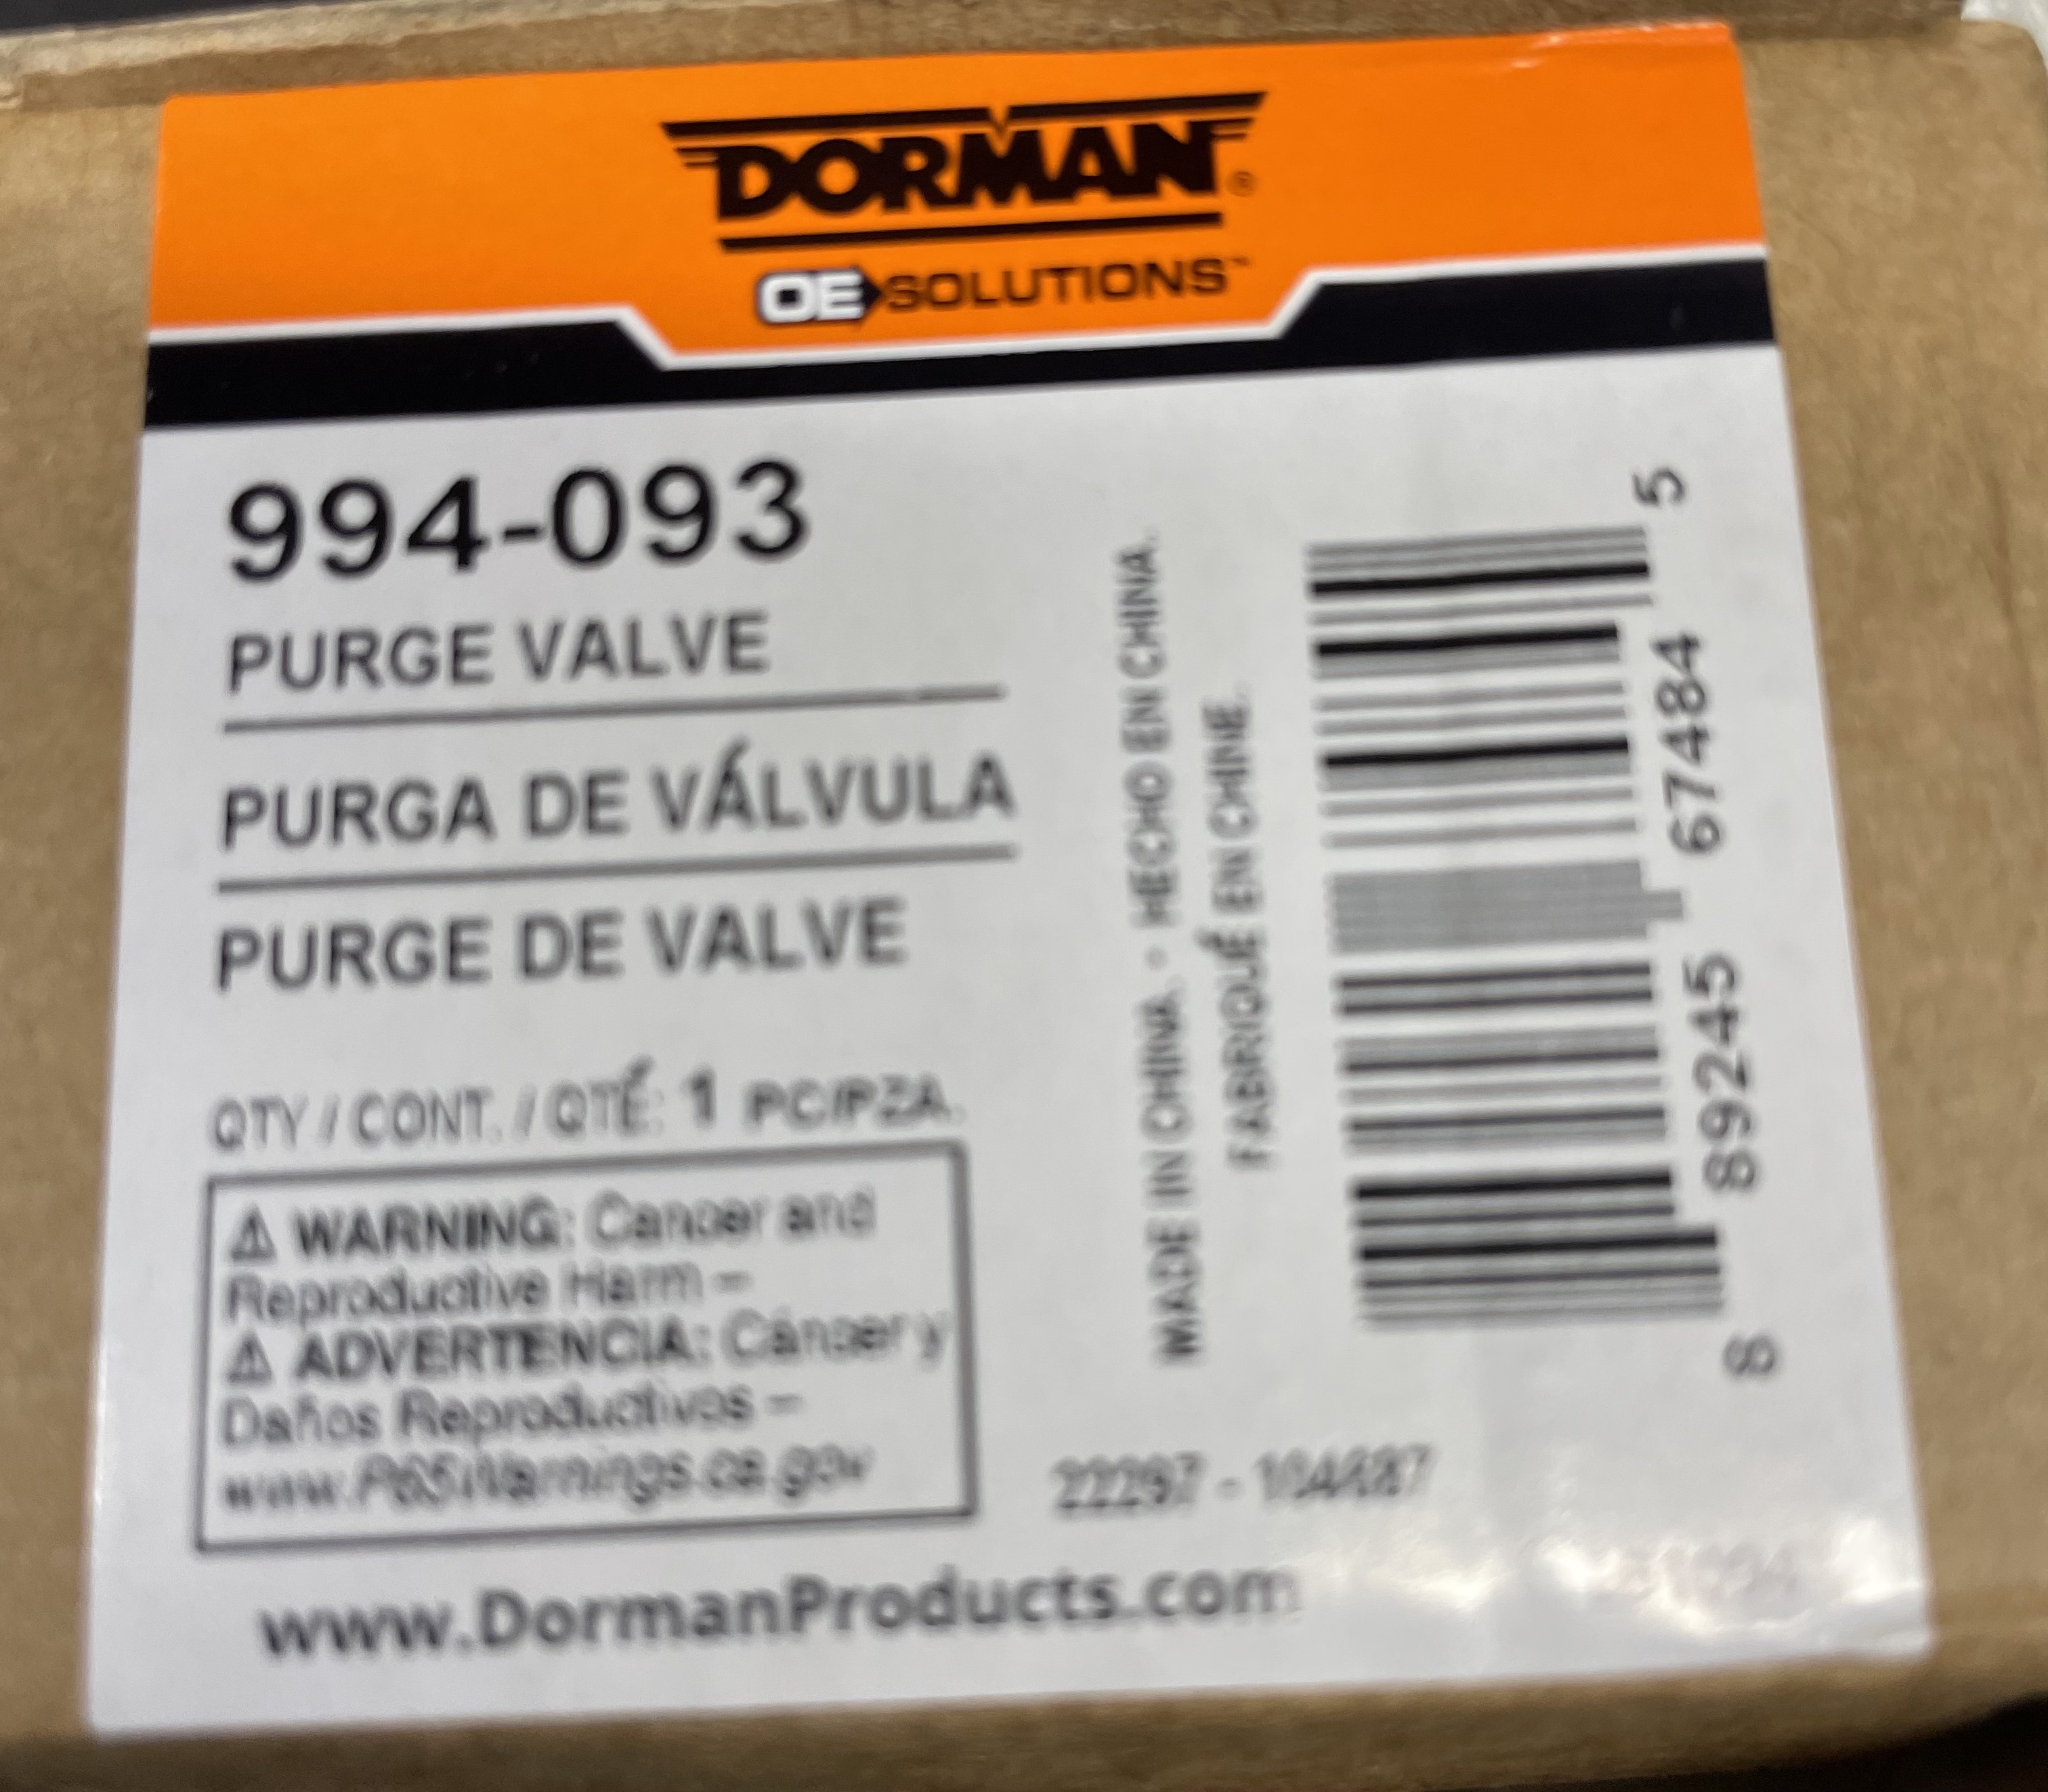
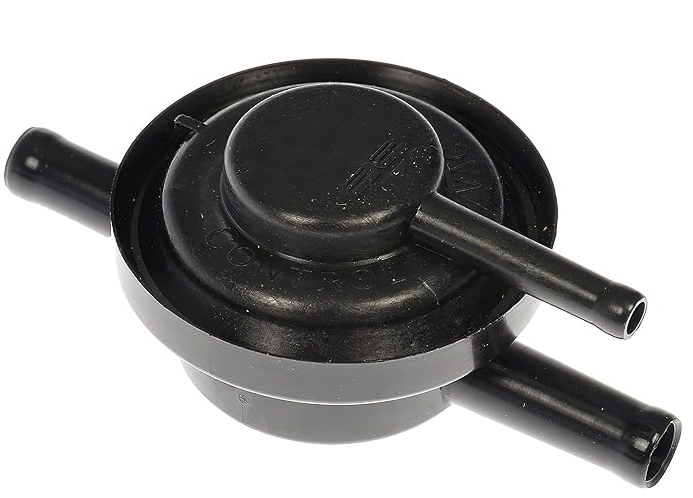
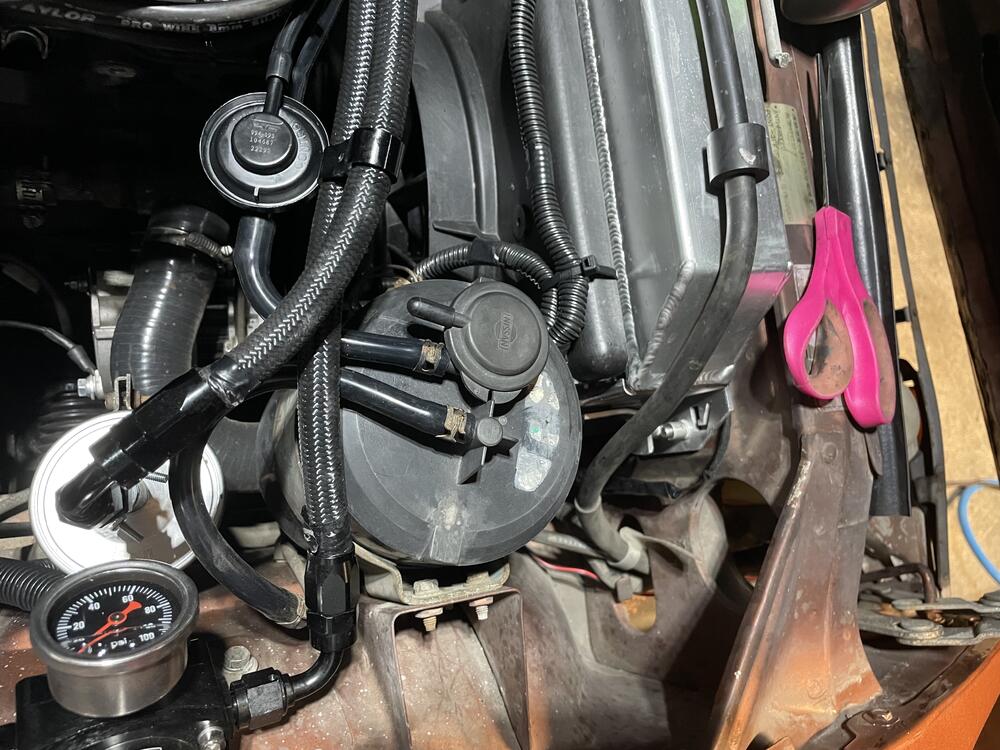
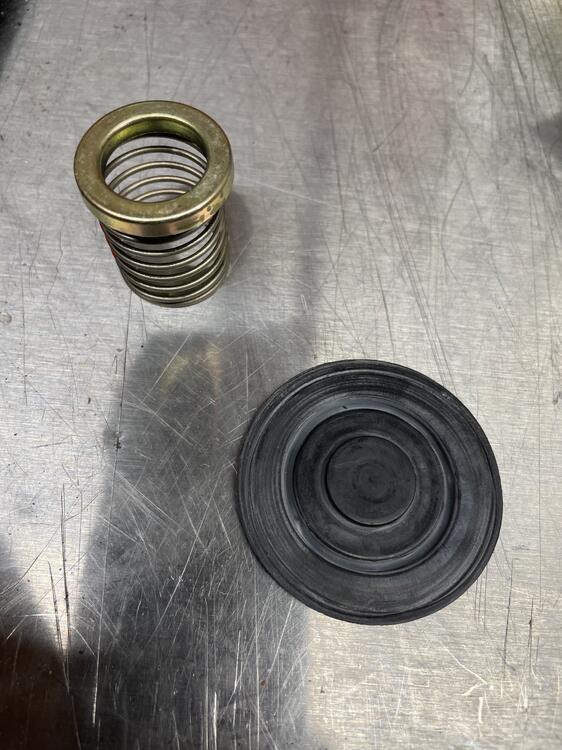
I have not seen a fix for the OEM vapor canister on the 280z posted. I found a way with new parts to still use the OEM one and have it functional. Back ground, I have a 77 and have been chasing running issues. I was focused on vacuum leaks due the a poor idle and erratic performance. I found the vapor canister as culprit because it never closed the purge line at idle and caused a large vacuum leak. I wanted to keep the canister to not have gas venting from the tank when sitting. Check out this video on the canister for knowledge and how to test: The vacuum leak was from the line labeled "purge" - since that goes into the intake and the stock purge valve did not work. The smaller line on the top labeled "dist vac" comes from a T in the front of the TB and T's also with the distributor vacuum advance (1977 model) - this only gets vacuum when the TB blade is open, which then will open the purge valve to allow the vacuum to purge the fumes accumulated in the canister. I actually had purchased another used canister and it still had the same vacuum leak issue. Instead of chasing used parts or retrofitting from another vehicle, I wanted something new and easily available. I found an external vent valve to use to solve the issue. This would take place of the original unit on top of the canister. This along some sealer/gasket maker is all you need (assuming your vacuum lines are in good shape): $22 on Amazon for the Dorman unit. This is closed by default until vacuum is applied to the top port (just like OEM) You add the Dorman unit between the engine and canister: Then for the top of the old purge valve, under the cap is a rubber diaphragm that seals or allows vacuum to pass (which was inoperative). Remove the internals, seal the top cap with sealer/gasket maker along the edge and use a vacuum cap for port. Internals under the cap for reference: Hope this helps others Summary Recap: 1) purchase external purge valve 2) install between canister and intake. + take dist vac line from the top of the canister purge valve and plug into new external valve 3) Remove top cap on the canister purge valve. Remove internals, seal the cap back down to the canister and plug the port with a vacuum cap

 1 point
 -
I've never taken thermal readings, but less current flow results in less heat. I have not seen signs of overheating in the parking light circuit in my 260Z since I changed to LEDs 12 years ago.1 point
-
Captain Obvious, your summary of my wiring is correct. I was pretty sure my logic on how I connected it was correct, just wanted a second opinion. Thanks. I don't really think my current issue is ignition related. I think it is more fuel related. Maybe more carb tweaking. I checked the plugs and 1-3 appear to be running rich, 3-6 appear to be more in the normal range. Next I'll try leaning out the front carb and then rebalance. Other possibility may be float adjustment but I think I was pretty accurate when I adjusted them. I'll try the easy stuff first.1 point
-
1 pointRockauto is cheaper, even when you take shipping into account. Also, you can always search for a 5% discount code for RA. https://www.rockauto.com/en/moreinfo.php?pk=488596&cc=1209260&pt=4588&jsn=8371 point
-
I did this modification back in 2020, and it has been running like a sunshine. I can't remember how I eventually hooked up the wiring, but I have no issue revving all the way up. I did jump the ballast resistor as per Eurodat’s instructions. If you guys want me to re-check my config on the (early) 1976 California 280z let me know, I can make some photo’s.1 point
-
He had a thread about the car. He did the math on selling it for parts and chose a price for the whole car. I think that eBay is the wrong place for the car though. That's a local market car and Craigslist or Facebook Marketplace are better for local markets I think.1 point
-
That is a very strong offer - and looking forward I don't see the market getting stronger any time soon.1 point
-
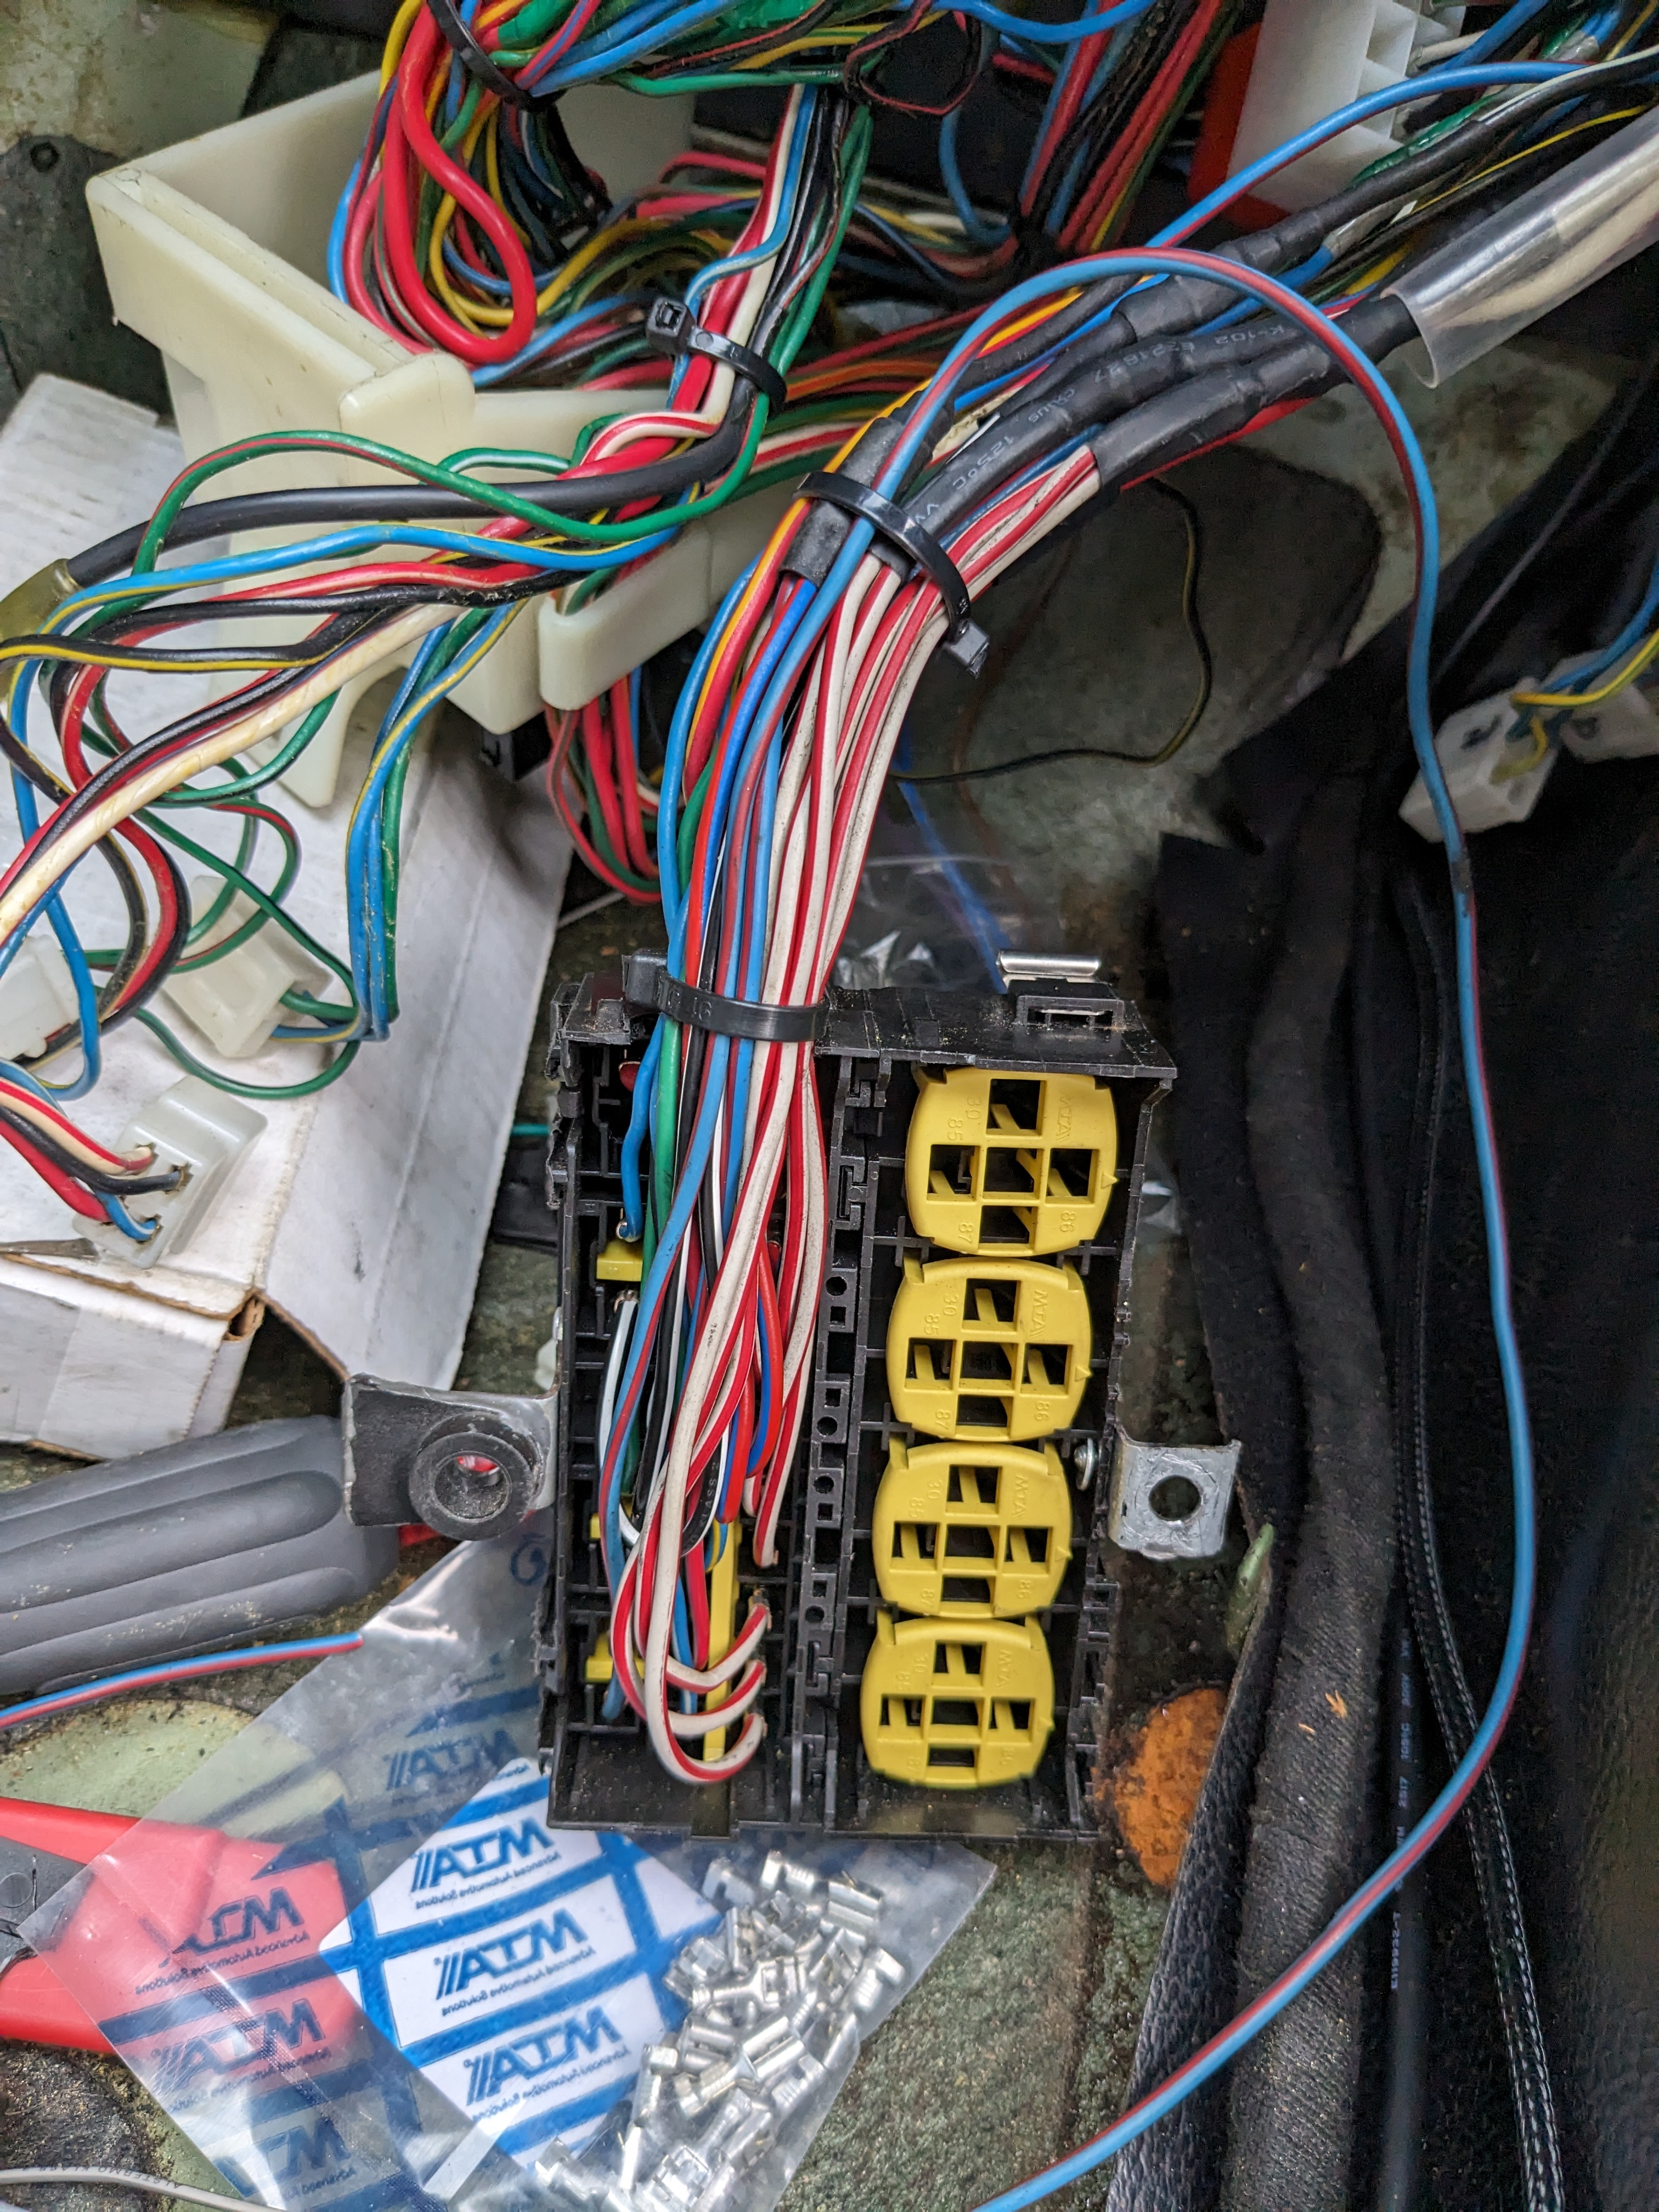
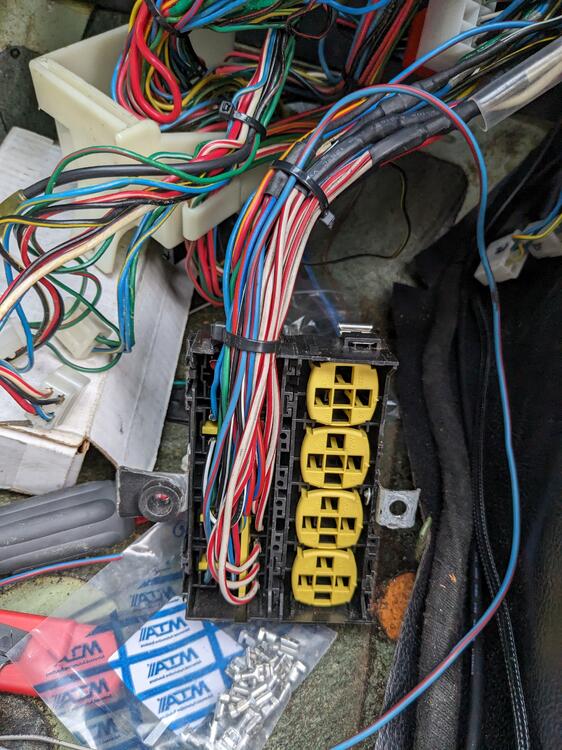
Adding switched power to one relay to be used to switch the blower fan on low (1) speed when AC is engaged Spliced the main battery feeds to run to the ancillary power strip before going to the new fusebox Going to use a Volvo fan speed resistor in place of the 3 speed non AC setup I have. I'll modify the blower casing to fit it. Opening only has to be altered slightly. Difference is this mounts from the outside, vs the stock resistor being bolted on the inside. Top 4 pins are speeds 1-4 next 2 pins are full speed, bottom 2 are output to blower motor

 1 point
 -
But I don't want to come off as if I'm poo-pooing the idea. I actually think it's a pretty neat concept to a common problem. So... How would you utilize that Dorman purge valve to accomplish what you were trying to do? Take the screw back out and silicone the cap (with no diaphragm) onto the canister so it doesn't leak. Maybe use the original diaphragm along with silicone to help with the cap sealing, but cut a half inch hole in the center of it first. You want the cap to seal to the canister but you do not want the diaphragm to be able to block off the little hole where you had the screw. One other detail is that you have ruined the metered orifice in the canister by running the screw in, so you would need to use the spare can you picked up instead of the one you had the screw in. So bottom line? Replace the can with the spare (with no screw this time) and put the cap on in some fashion such that it completely seals along the perimeter, but cannot and will not ever block off the hole in the post in the center.1 point
-
I'm really sorry, but unless I'm missing something, this modification does not work. Sure, it will get rid of your previous vacuum leak, but only because you have effectively plugged all of the hoses. You could have just capped off the vacuum lines at the throttle body and the intake manifold with rubber plugs and the end result would have been the same.1 point
-
So the strange and interesting stereo modifications to my car by one of the previous owners continues... It was a rainy afternoon today, so instead of a Sunday drive I decided to try and figure out why the in dash stereo is inoperable. Fuses seem to be in place and working order. I pulled the center console and low and behold the head unit is not only not connected, it is a Craig 3146 model. This unit looks like an aftermarket stereo - wasn't Hitachi and/or Clarion the OEM suppliers to Datsun/Nissan? As I recall, my 1983 810 Maxima had a Clarion head unit. The Craig unit looks to have been manufactured in 1977 and has a 9-pin connector instead of the 6 pin connector. The chassis wiring connector seems unmolested, but there is no splice piece, connector, or wiring between the head unit connector and the chassis connection. 🤷♂️So either it was removed or never installed for fear of having to cut the factory wires. While it would be cool to have a functioning old school stereo, I don't think I'll be figuring out how to get the old Craig unit working. I think I either want something close to OEM with Bluetooth functionality or I will just blank off the radio and enjoy the sounds the engine and exhaust makes when I drive. In other findings, I may be in the market for a new rubber shift boot, as mine is pretty well disintegrated enough that I can see my garage floor beneath it. Also, my center console is cracked, may want to replace it or try to glue it back together. .1 point
-
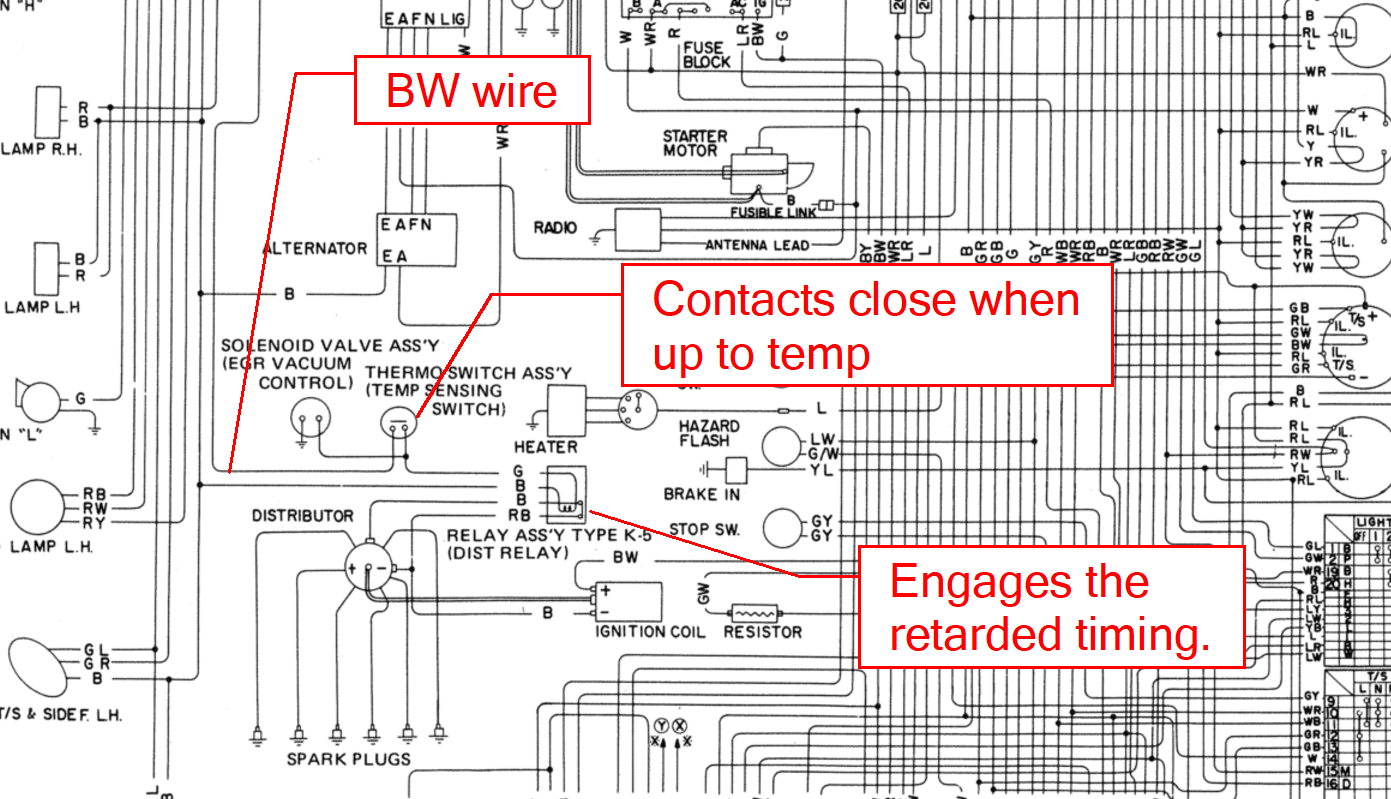
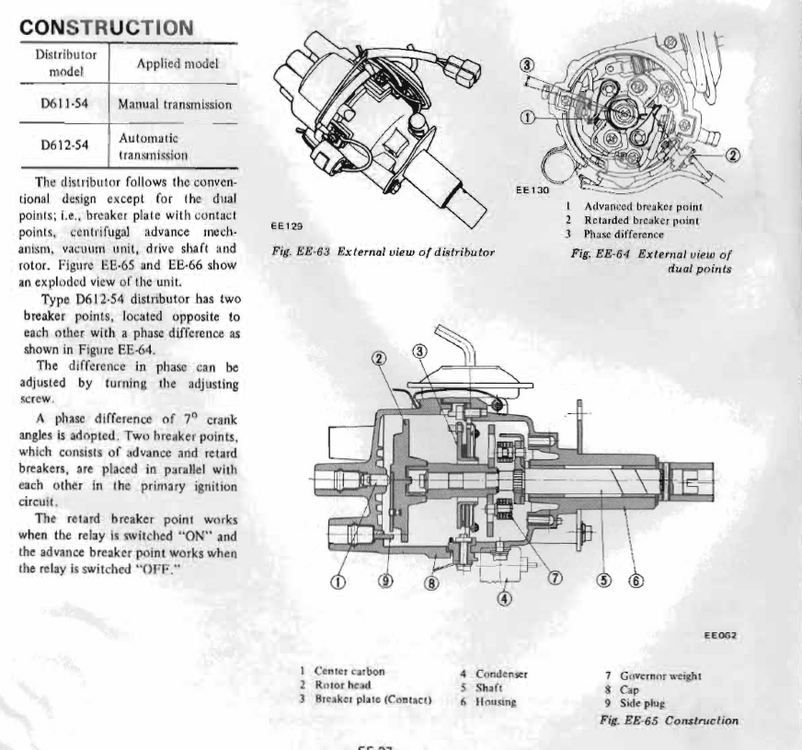
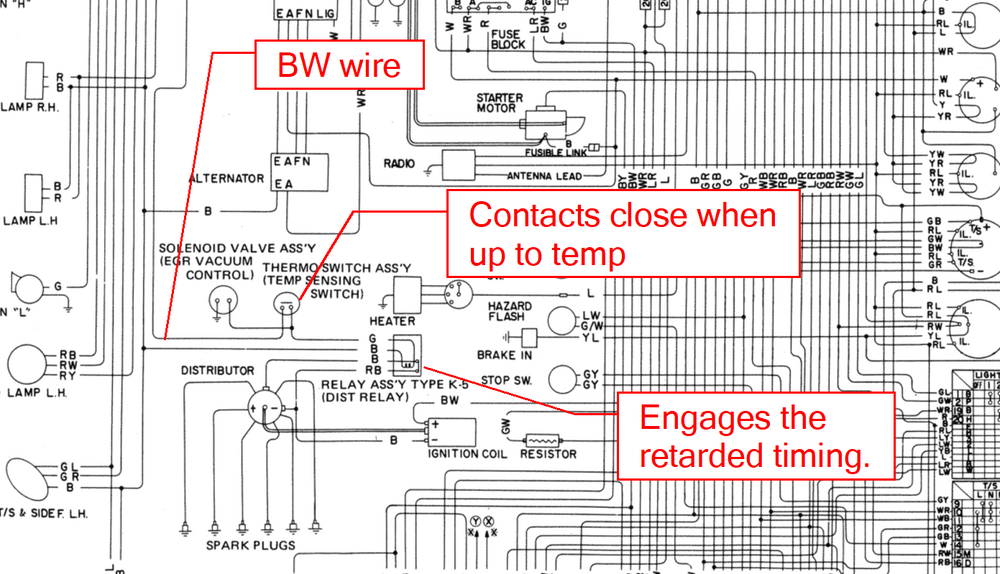
I'm not going to verify my sanity nor anyone else's. This may help explain the erratic behavior. From the EE section of the FSM: (Note what it says about the dual points.) So when the engine comes up to temperature, the timing is retarded for the automatic transmissions. Here's how it looks in the wiring diagram: As @Yarb said, use one set of points. Tune to that. Be happy.
 1 point
 -
1 pointThe headlight gasket is between the headlight bucket and the inner fender. There was evidently another seal between the sugar scoop and the fender. I have never seen one. Would love to see an image of what it looked like1 point
-
Green Z on Ebay https://www.ebay.com/itm/394871508806 $3,770 Reserve not met...0 points