All Activity
- Past hour
-

-
Well. I have blown out my fuel lines and replaced the fpr. The car started would idle terribly and the engine would not accelerate i let it run some and then checked the plugs AND THEY WEREN'T FOWLED! Next thing I did was a smoke test on the vacume sytem there seems to be a significant amount of leakage past the throttle plate as I introduced the smoke into the intake behind the throttlebody, yet it poured out as if the throttle was open. Any advice about ? Is it a faulty bccd aar? It doesn't seem right to me . So next I went back to the continuity tests in the fsm , but when I got to air flow meter pins the pins in the harness are empty. (Where as the schematic lists them as being used by the air flow meter .) There are pins at the indicated location for the airflow meter temp sensor. But there is no continuity .(6 and 27) I suppose I will go on with the continuity tests but if anyone has a 77 specific fsm continuity test sequence for the airflow meter it would be greatly appreciated. Well. So it goes thanks again everyone!
- Today
-
 Ha, fantastic. Thanks Steve.
 -
 If you can get to Harbor Freight tomorrow, here's a coupon for the large and small picks: https://go.harborfreight.com/coupons/2025/07/184225-69592/
 -
Thanks Guys, some excellent advice on tools, approach and lubricants. I'll get on it tomorrow and post some feedback on how it goes. Thank you.
- Yesterday
-
 opw678w joined the community
 -
Get a couple of 90 degree picks, 1 large & 1 small. Round off the tips so you don't poke through the hose. First, work the small one around the lip of the hose to break it loose. Then, follow up with the larger one. After you break the adhesion, put some silicon grease on the larger pick and work it around again. Try the tongue-and-groove pliers to twist back and forth until it breaks free.
-
 If the worst should happen and you damage the filler tube I have a used one in excellent condition that I will let go at a very resonable price.
 -
 Be patient. Space heater to warm the whole thing up? (Here, this time of year, we wouldn't be having that problem...) I wouldn't use pliers. I'd try prying the end of the filler hose away from the tank (or the tank away from the filler hose - which ever way you want to look at it.) with one or two long prying tools (whatever works to catch the edge of the hose without harm - thin or wide) Long screwdrivers? Flat pry bar? Regular pry bar? Non-metallic pry tool? But you do need to somehow break the "bond" that the rubber has made with the steel inlet tube. Then treat the filler hose with Meguiar's Hyper Dressing...
 -
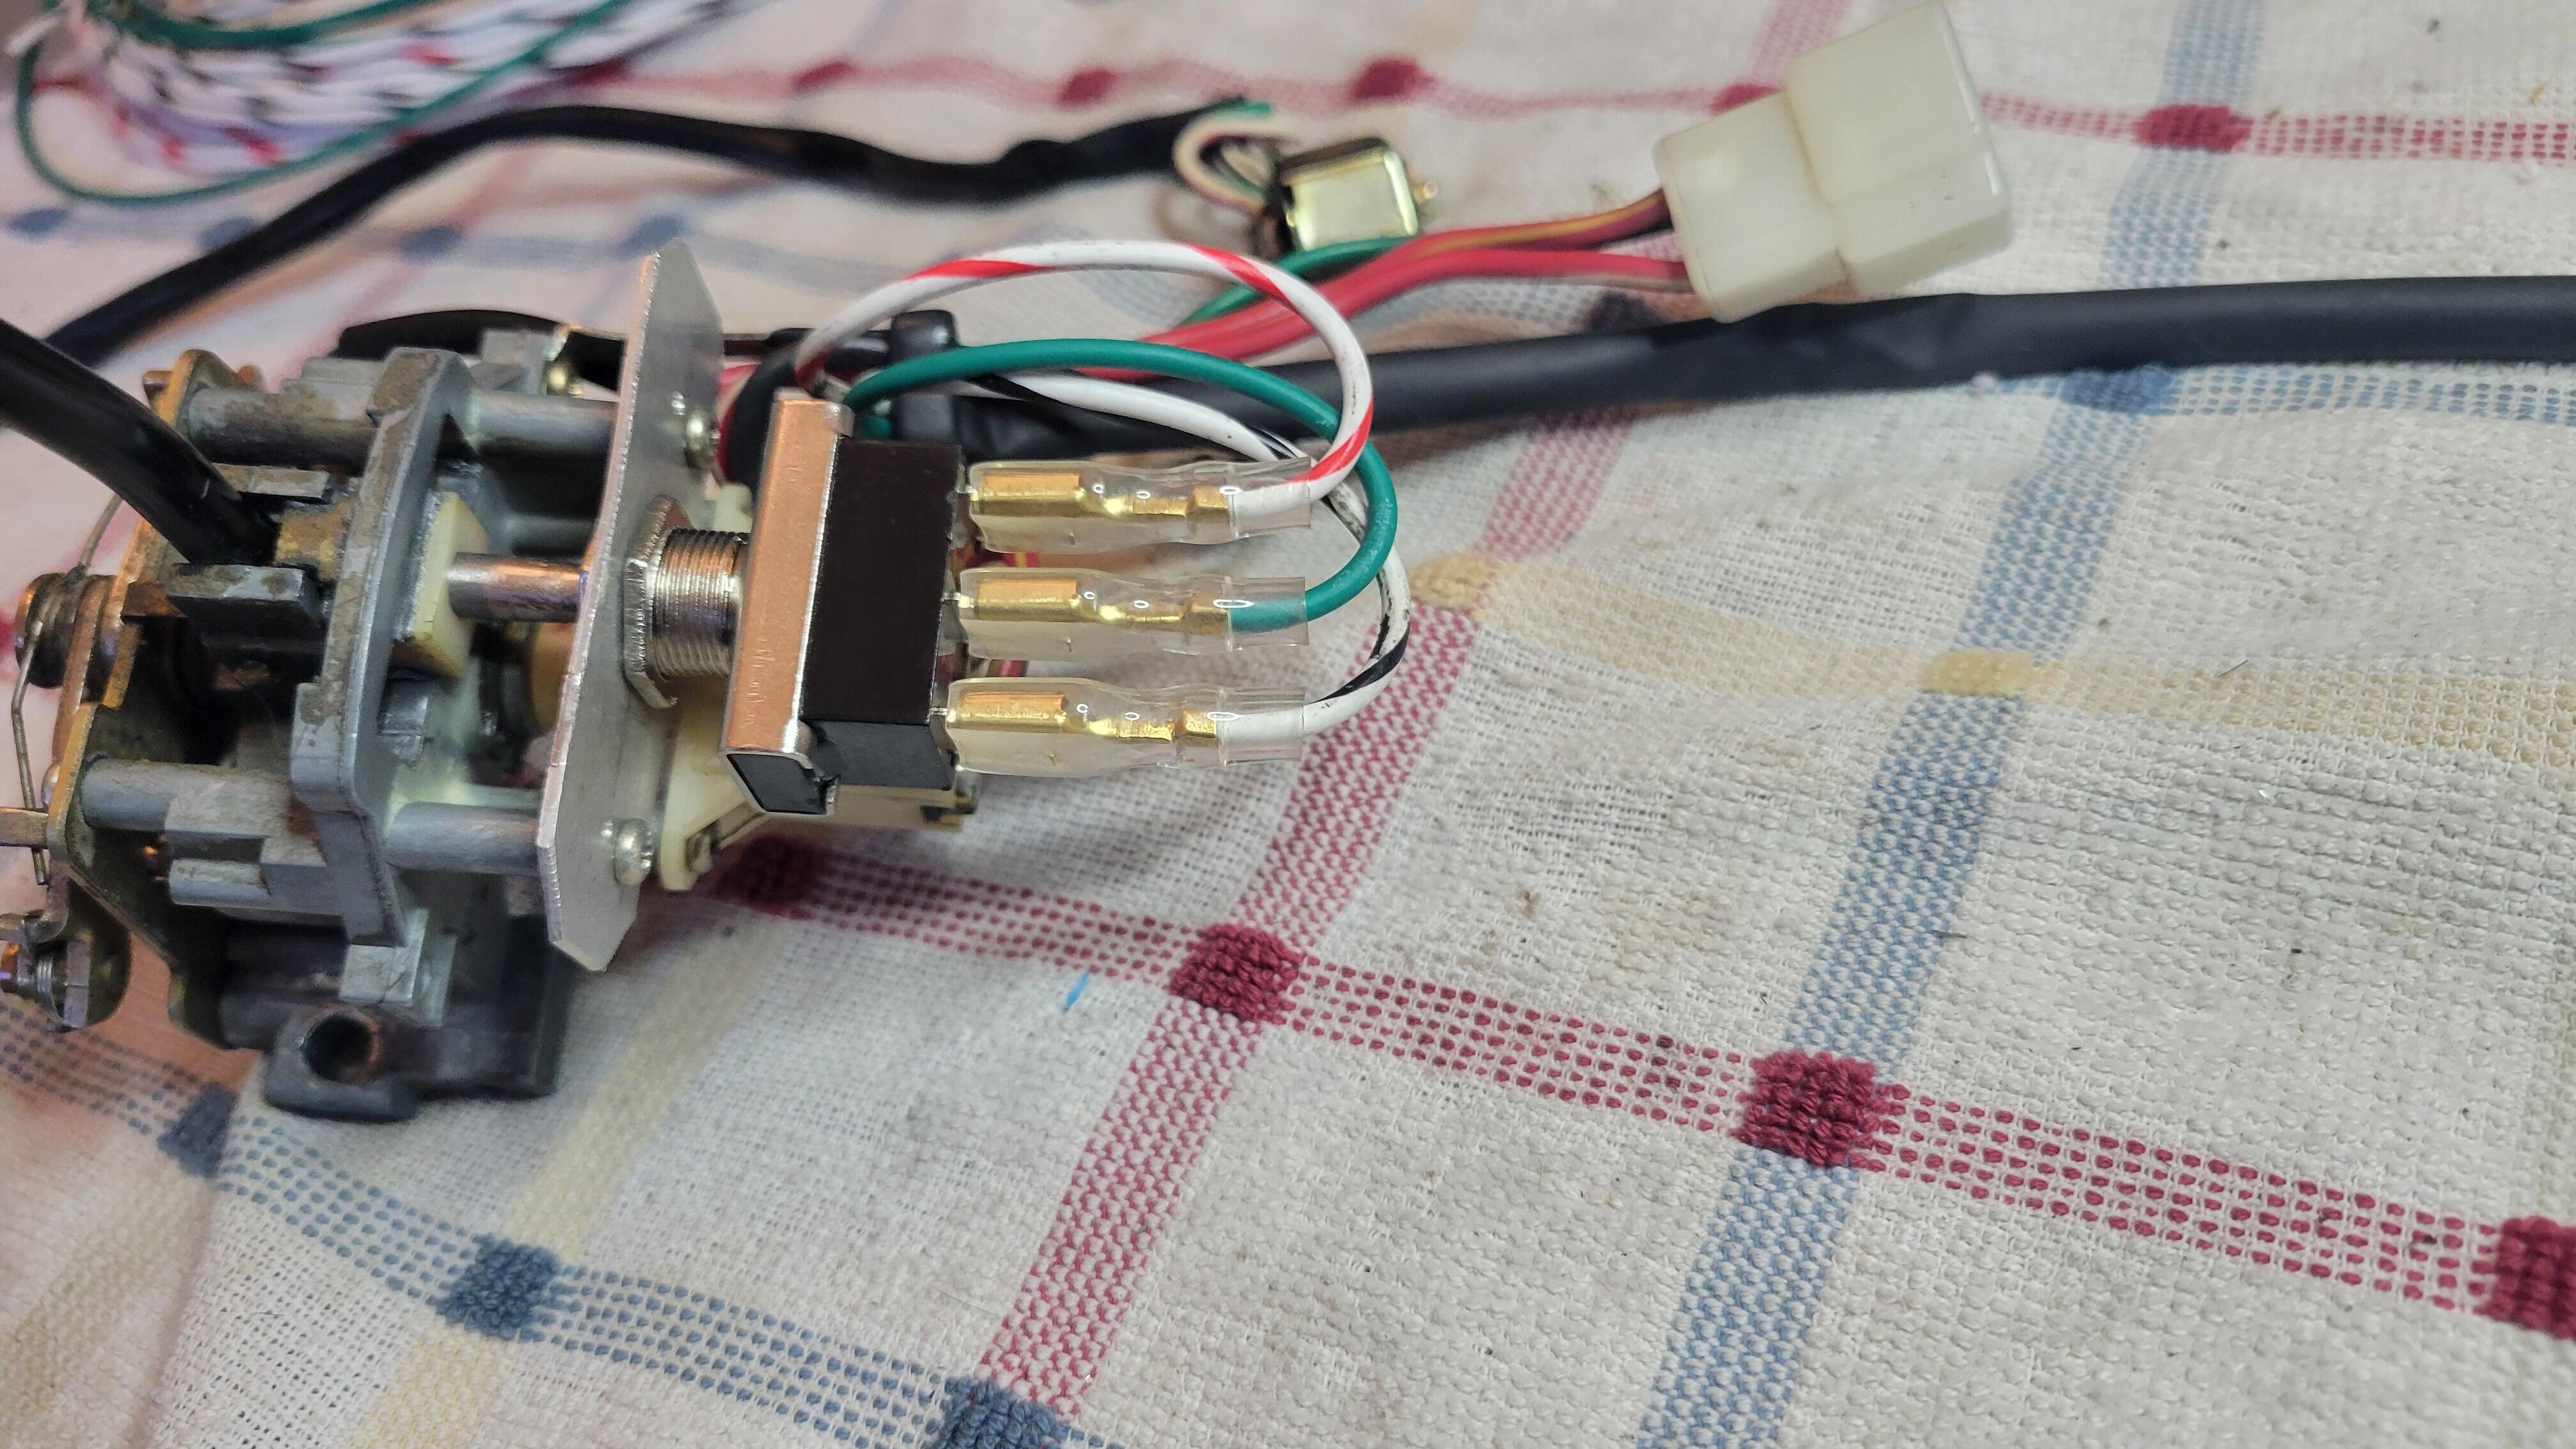
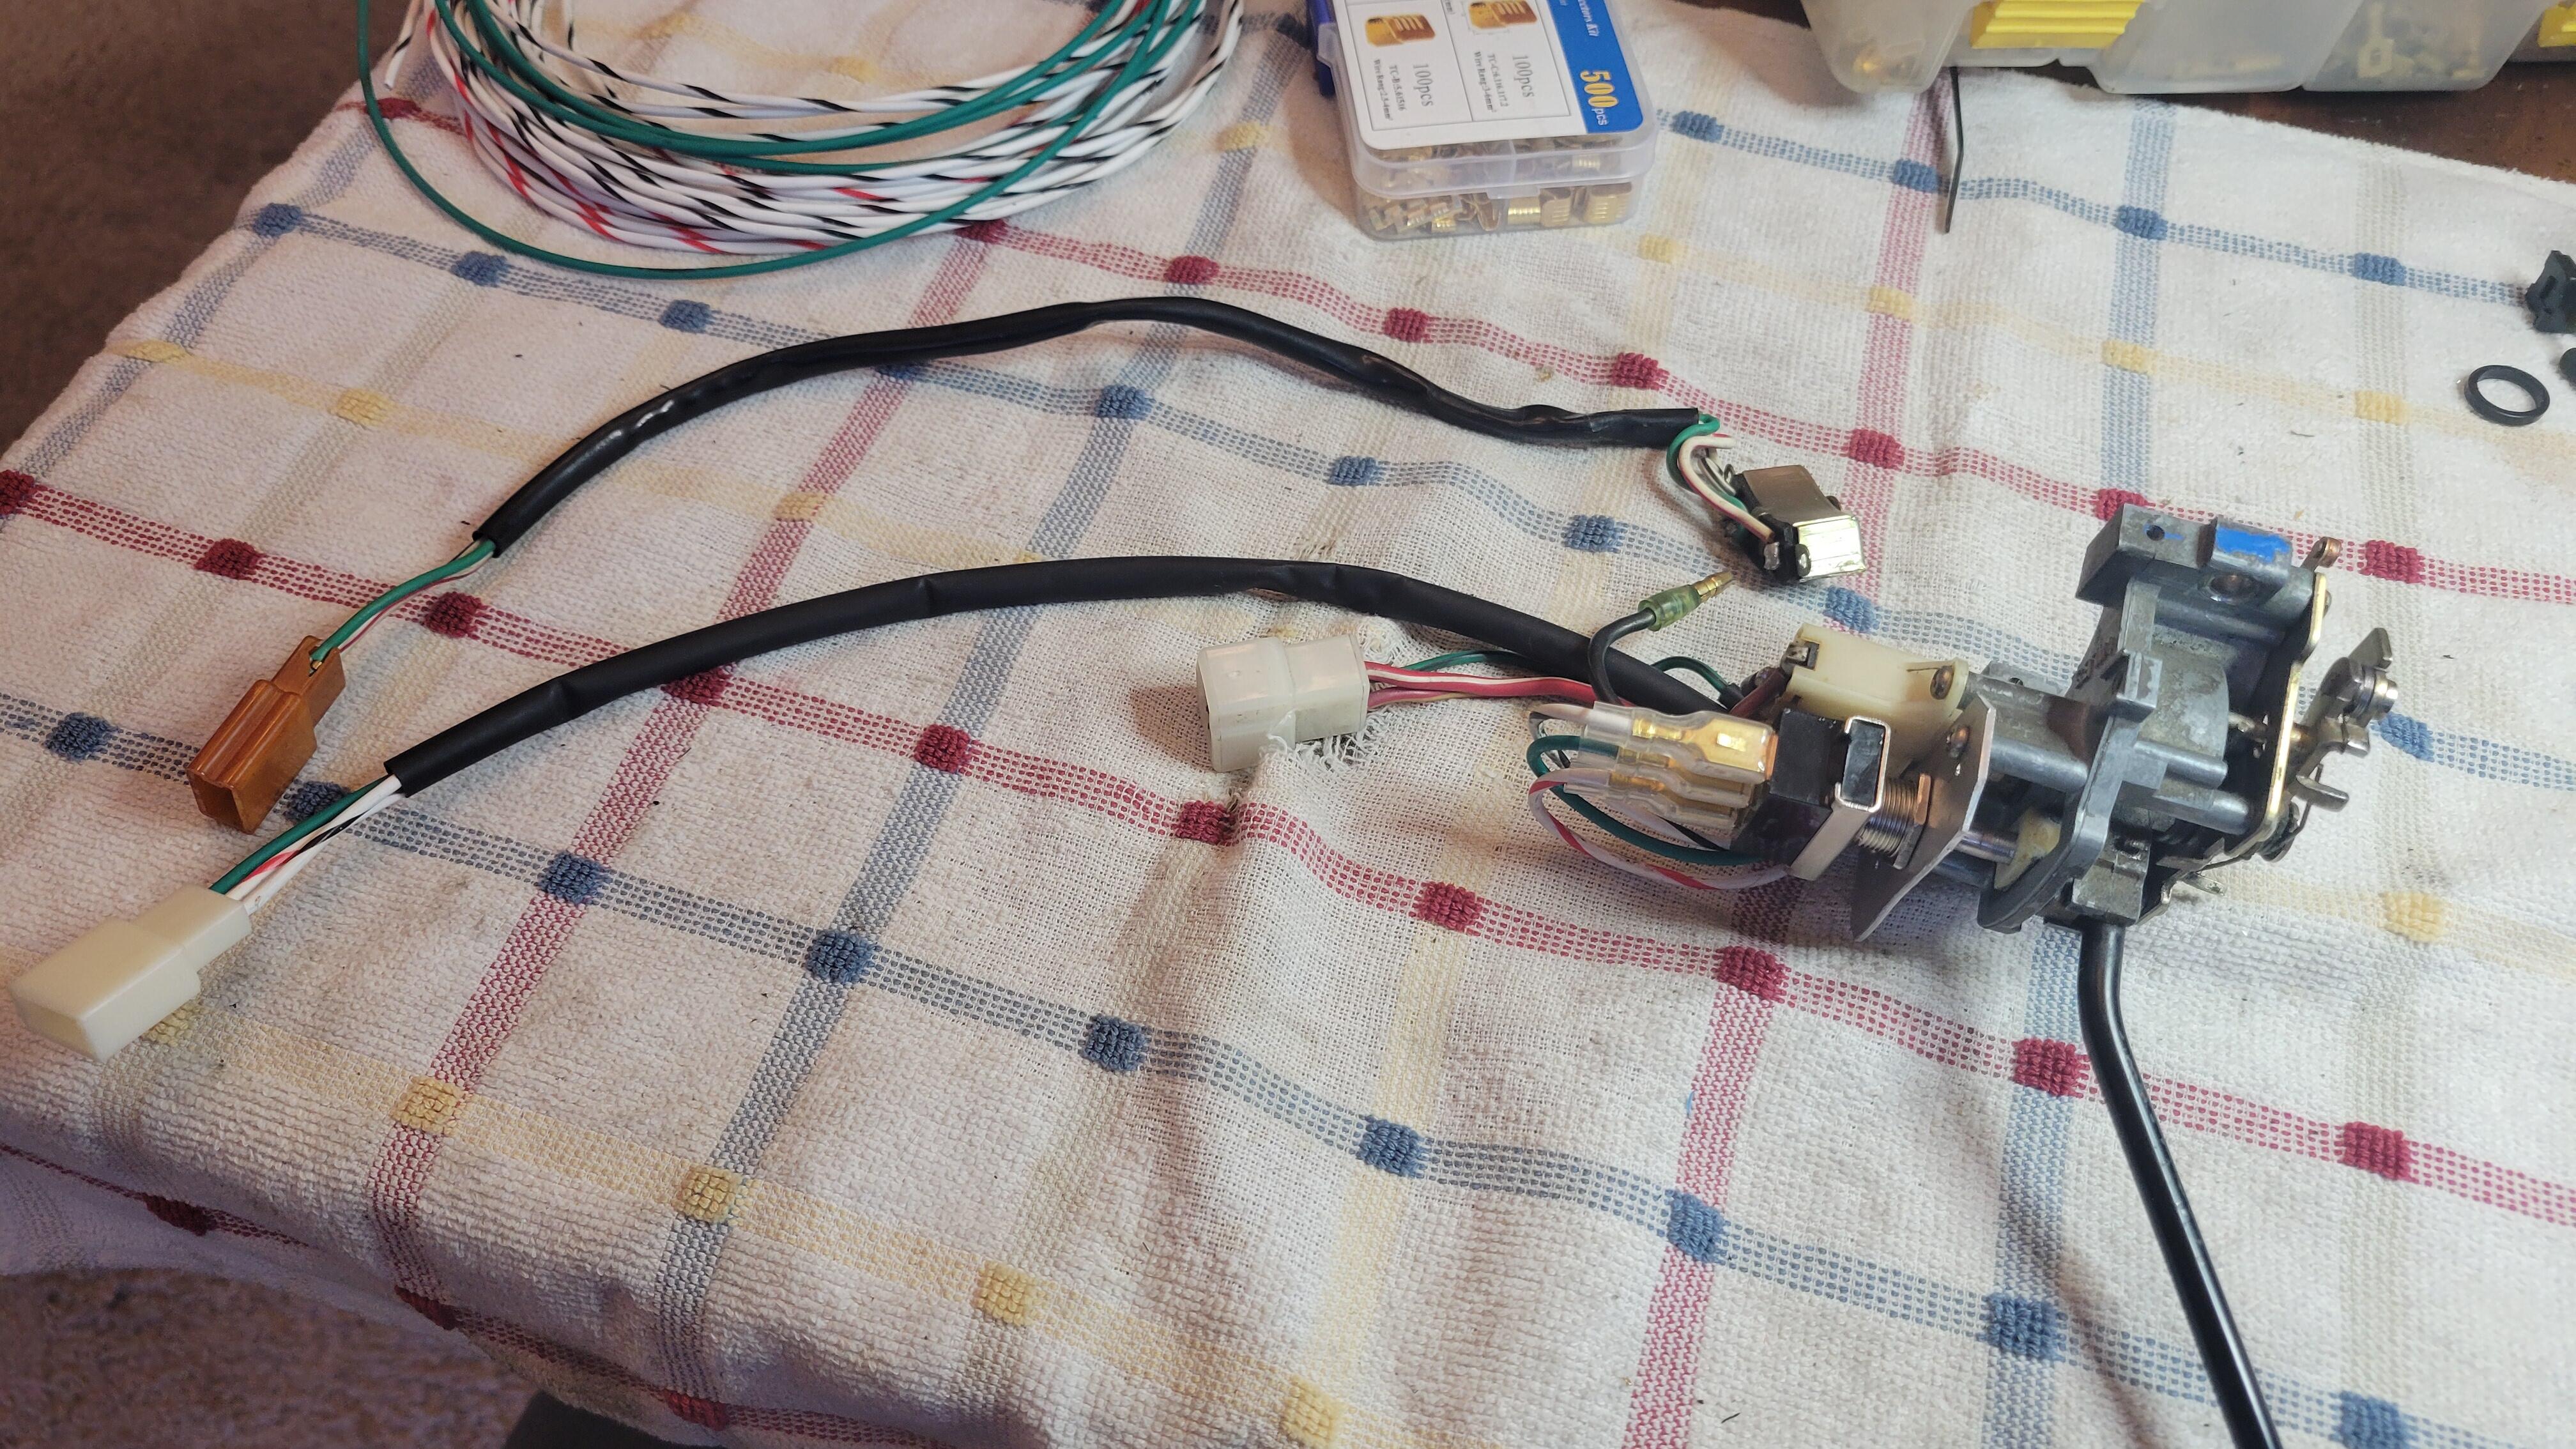
Found a picture that I took in the "let's see if that would really work" phase. In this picture the "mounting plate" (thin piece of flat aluminum) wasn't trimmed such that it would fit the clamshell. That took a bit of further modification to the shape of that plate. But it did prove that the toggle switch would be actuated by the stock turn signal components. I do not have dimensions without disassembling it. I also think it required a bit of trim on the switch handle for the end of it to fit properly in the "plastic thingy" of the turn signal assembly. (plastic thingy - which happens to be on thingaverse as a 3d printable item...) I got this metal toggle at O'Reilly but they can be had everywhere. You can see that the stock switch is much more compact and a little searching might find a smaller toggle than this one - and possibly with less protrusive electrical connectors... I wanted something simple and common.


-
I am replacing my gas tank (rust issues) with a new one from S30. I have everything unhooked but the main filler hose that is connected to the tank. I've used slip joint plies that won't budge it and also gentle heating with a heat gun. The tank has been empty for months and i blew a bunch of air through it first. Also afraid that if I get the rubber too soft I might just deform it with the pliers. It looks like new main filler hoses are going for about 125 to 175 dollars so I want to avoid that. Right now the tank is just hanging loose under the car on a support I've set up. Any ideas are welcomed.
-
I didn't replace the turn signal - just the switch. And it can only be done relatively simply in the '74-'78. 240Z switches have too many contacts and functions intertwined with the overly complicated hazard switch to be replaced by a simple three position rocker switch. If I didn't have to take mine apart in the 100+ Arizona heat, I'd take a picture. I'll see if I can find the post that put me in that direction - it was not my brainchild.
-
-
Ha! That links back to a post I did almost 7 years ago about using pop rivets to secure the sqeegee rubber to the belt molding, similar to how I did the replacment fuzzy strips to the door panel. @Patcon Charles, If you need some info I can pull off a molding and get some pics of the pop rivets.
-
 Here's what I came up with. Sorry to be late Charles. https://www.google.com/search?q=chrome+door+trim+window+sweeps+classiczcars.com&sca_esv=4aa233782b511ba8&rlz=1C1VDKB_enUS1121US1121&ei=sHp2aOugI72TwbkPlr_I2Qg&ved=0ahUKEwjruOPMnb-OAxW9STABHZYfMosQ4dUDCBA&uact=5&oq=chrome+door+trim+window+sweeps+classiczcars.com&gs_lp=Egxnd3Mtd2l6LXNlcnAiL2Nocm9tZSBkb29yIHRyaW0gd2luZG93IHN3ZWVwcyBjbGFzc2ljemNhcnMuY29tMggQABiABBiiBDIIEAAYgAQYogQyCBAAGIAEGKIEMggQABiiBBiJBTIIEAAYgAQYogRIpV9Q5QZYnztwAXgAkAEAmAGBAqABwhKqAQYwLjE3LjG4AQPIAQD4AQGYAhKgAqgSwgIOEAAYgAQYsAMYhgMYigXCAggQABiwAxjvBcICCxAAGIAEGLADGKIEwgILEAAYsAMYogQYiQXCAgUQABjvBcICChAhGKABGMMEGArCAgQQIRgKmAMAiAYBkAYJkgcGMS4xNi4xoAeNT7IHBjAuMTYuMbgHoxLCBwYwLjQuMTTIBzo&sclient=gws-wiz-serp
 -
 Thanks Jim! Thanks for the input Garrett. I was using google exactly that way and couldn't find it...
 -
-
-
 majesticescort joined the community
 -
 No biggie, just funning. There are some maybe's. I have a bunch of switches, just not marked as to what they are from. I rely on the visual differences. Graphics, plugs, wires, etc. They did change the switch plugs over the years too. I purchased the headlight and the parking/taillight harness from Dave Irwin long ago and have not had a problem since. I have H4 headlight bulbs and bright tail/ side lights. I did open and clean all my switches myself as well. Made all the difference. Still working well.
 -

-
-
- Last week
-
-
-
For me at least, this has been an extremely common problem. On BOTH my personal car and many - if not all - the Z's that came through the shop and throughout the Z community here in Phoenix. Yes, there may be too much amperage going though those contacts as resistance builds up in the wire and connectors BUT: What I have found in every turn signal switch I've repaired (and that has been MANY) is - The original chrome plating on the solid contacts (non-moving) has worn off due to repeated electric arcing across the contact. When you clean the carbon off it leaves a nice brass contact surface that fouls MUCH more quickly. Therefore, depending on your use, you get another 6 months to a year or so before you have to repeat the contact cleaning process. Then your flashers work well enough for a time and have to be taken apart again. (and, you can only un-bend and re-bend those metal tabs that hold the switch together a certain number of times...) My flasher switch (which I have absolutely no idea if it was original to the car) worked well for a few years before I had to take it apart and clean the carbon fouled contacts. Then it became a 6-9 month cycle. I finally got tired of that and bought a different turn signal switch assembly off the internet. I was delighted that it worked well and lasted for quite a few years. I'll remind everyone that I daily drive my 260Z so my T/S get a fair amount of use. (I got this Z running and back on the road Spring of 2009) DROPPING THE AMPERAGE going through the switch will definitely help the contacts to last longer (foul less). But I don't think it's necessarily the ultimate answer. In my case, that didn't last forever either, and I am done with taking the stock switches apart and cleaning, and cleaning, and cleaning the contacts. SO, I followed another dudes post somewhere and replaced the stock switch with a standard metal 3-position rocker switch mounted such that the arm of the rocker is operated by the stock turn signal arm mechanics. Did it about a year and a half ago and I've been very satisfied with the operation. I can buy another one practically anywhere if I ever need to replace it. Under the clam shell you'd never know it was swapped looking at it. That was my solution. I will say too that MY 260Z IS HEAVILY MODIFIED and is not trying to be original in it's representation at all. In fact lately I have replaced my entire engine bay harness and replaced all the stock wiring connectors with Deutsch connectors. As well as a new engine harness built for a different ECU and sheathed with Raychem. The SECOND thing I will mention: IF you remove the actual switch from the turn signal assembly and push it's little "nubin" that sticks out from side-to-side you'll notice that it goes full motion and insures that the rocker piece(s - if you have a 240) inside will spring solidly onto the fixed contacts EVERY SINGLE time. Now screw it back onto the assembly and watch it's movement. Even when the assembly parts are NEW, they won't move the switch fully from side-to-side! That sliding piece of plastic with the hole moves enough generally to cause the rocker to fall one way or another, but NOT full motion. As that piece of plastic wears against the metal it makes that action more and more sloppy. It affects the action one direction MORE than the other. SO, your LEFT SIDE SIGNAL going away is common. Usually it won't just disappear - it'll become "finicky" and works sporadically usually requiring you to move the T/S lever again or wiggle it to get it engaged (and the V-shaped bar to teeter all the way to one side). I may have pictures of the turn signal switch disassembled but I'm sure they can be found on the interweb. I tried a few things to combat that problem as well, but in the end moving to a new toggle switch solved both problems.
-
 justinreyes1996 joined the community
 -
 It's a bit spotty... You may have to try it after a page refresh. I need to run some upgrades soon and I'll let you know if it's more reliable ...