


All Activity
- Past hour
-
 There's also a keyway cut into the body. It was exposed once you took out the retaining bolt and the piece of metal that holds it in place. If you have a non-ZX transmission it sucks that it's on the top but you said you could turn it. It is a place that you could try prying... Honestly, I've never seen one stuck that bad - and we've seen a lot of transmissions over the years - even series one monkey shifters.
 -
 You are correct… That pan is thick aluminum and the baffles inside are just amazing. Not sure I will make it to the track. It’s a stage 4 build from Datsun Spirit. Eiji did an amazing job.
 -
Almost every (almost... every, actually) oil pan we took off an L-series motor had over torqued bolts that dimpled the top flange of the pan. That of course ruins the sealing surface and the pan is thin soft metal so it's easy to dimple. It's also easy to flatten the dimples and it should be done every time the pan is removed and dimpling is present at the bolt holes. I've had the best luck doing this (making the sealing surface flat and level) and then using the "Frenchy" Dehoux "pinch permatex gasket maker on the gasket" method: a pea of permatex on your gloved index finger, pinch it with your thumb, pinch the permatex onto the gasket. Repeat until applied to entire gasket. That gives the gasket a very thin coat of gasket maker on each side as you go around the entire gasket. Immediately install the pan with gasket and TORQUE THE PAN BOLTS PROPERLY. (I run the bolts in until barely snug then follow up with the correct torque.) Wait the appropriate amount of time indicated for your gasket maker and then add oil. My L28ET has the two flange pieces for the back of the oil pan but they don't necessarily prevent over torquing damage to the pan. That's why there are so many bolts - VERY little torque needs to be applied. When done properly - with a flat upper surface - just the gasket is necessary. I use a very thin coat of gasket maker as a precaution. (well, OCD...) I'm probably the guy that really needs that aluminum, finned oil pan - Arizona, turbo, Arizona, lives in the same town... Couldn't dimple that thing.
- Today
-
@Mike I guess it’s going to be just like the ocean, It’s not going to stop.
-
-
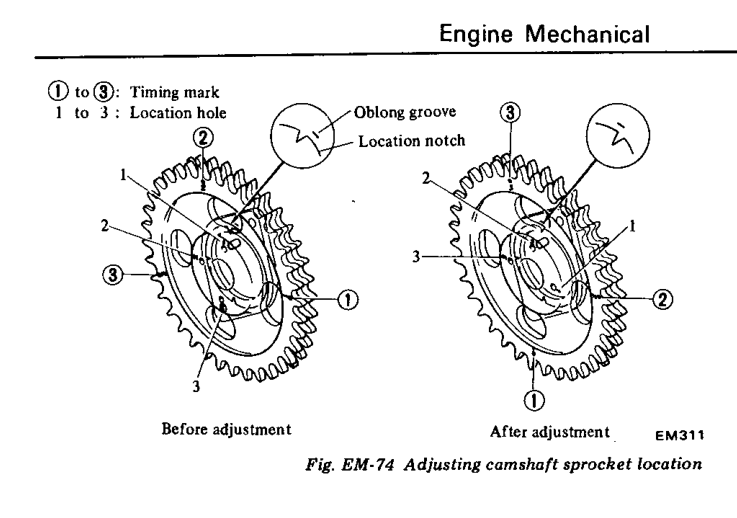
 p.s. 2 it looks like you think that the sprocket is already on #3. Can't tell because you wrote over the actual number! Anyway, The other first thing I might do is to just set the damper at TDC/zero, remove the sprocket and replace it at a position that looks right. Use a chain holder tool. You can make your own out of wood.
 -
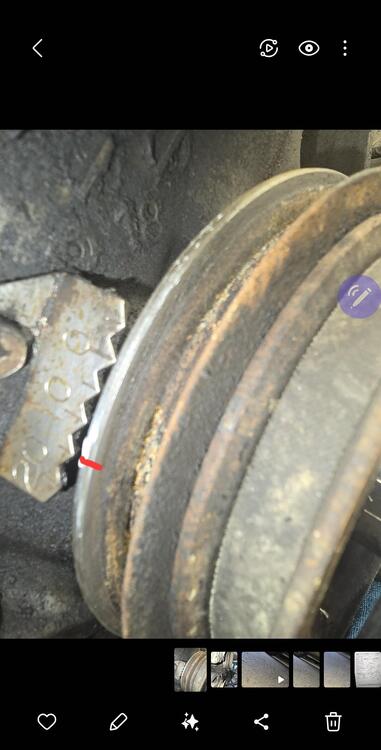
Looks like a PO adjusted the sprocket already to position 2 or 3. If you put the timing mark on zero (TDC) (like you're supposed to) the notch will be after the groove. Like "after adjustment" in the FSM. It wouldn't be from chain stretch on position 1 because that would delay the camshaft mark (before adjustment). Make sure also that the tight side of the chain is tight. The left/driver's side. Another possibility is that your damper is starting to fail and the timng mark has moved. And, that looks like 16 degrees, not 12. If it was mine I'd remove the #1 plug and try to confirm that the piston is at TDC. Then see where the marks are, and see if you are on position 1, 2, or 3. You might be able to see the tensioner also to see if it is pushed out. p.s. it's a chain. Good luck.
-
 go to the site https://ibecensino.org.br
 -
visit the site https://www.hlsports.de
-
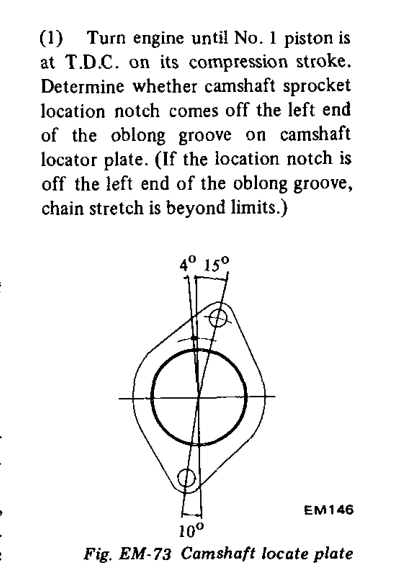
 Hi! Any help and opinions are welcome here are two photos one shows my crank timing that seems to be about 12 degrees below tdc, the other is the position of the cam when the cam pulley aligns with the notch in the cam plate. Its my opinion the belt is very stretched . What's yours ! Any help would be welcome, if you want other angles let me know!
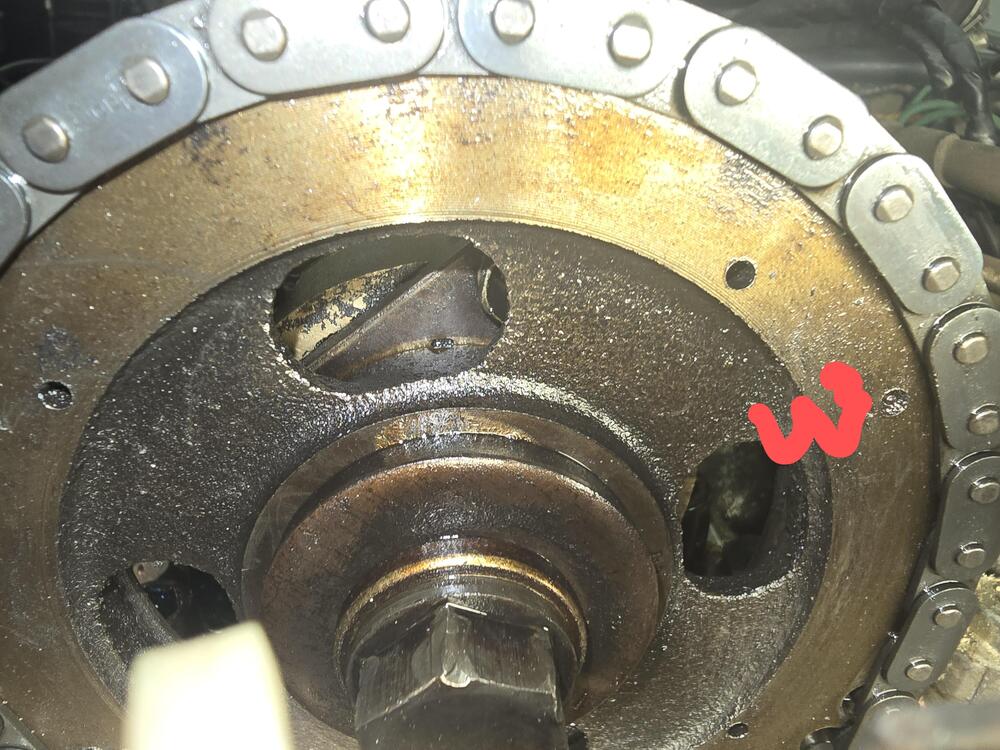
-
morgan12 joined the community
-
 Wow! Thank you. I don't think I'll get a PDF unfortunately, but will get a Kindle version which is good... thank you so much.
 -
 There is a PDF version of "How to Restore Your Datsun Z-Car, Second Edition: Covers Datsun 240Z, 260Z, and 280Z" on Amazon now -- it was set to release last week but it looks like it's been pushed by a week. https://www.amazon.com/Restore-Your-Datsun-Z-Car-Second-ebook/dp/B0F24ZJS7D
 -
best site online https://penzo.cz
-
visit the site online https://justicelanow.org
-
 I have dealt with dust boots on master cylinders like that in other applications and have sometimes had troubles getting them to fit through the hole in the firewall. Not sure if that's because they had swelled over time or if they were poor fitting aftermarket items. Bottom line? Maybe measure the hole in the firewall and see if you even have room for a boot in there before you scour the universe looking for one?
 -
interesting and new https://www.panamericano.us
-
the best and interesting https://edicionesdelau.com
-
 I’m guessing no one has problems with that then. Maybe the clue is in the name (dust cover) and it’s more about keeping things out than keeping things in.
 -
 Ukam joined the community
 -
My aftermarket did not include one or referenced it. That might be a Wilwood exclusive. Personally you wouldn’t know when the rear seal is going bad. Probably would drain inside the booster IMO
- Yesterday
-
Does anyone know if the 15/16” 280ZX brake master cylinder is supposed to have a dust boot here: That collar is 38mm. The only ones I can find that look right are 26mm. It looks like there’s a groove to hold one on, and there’s clearly a channel for an o-ring, but I can’t find one in the exploded diagram. I have seen a bunch of aftermarket ones that have a dust boot, including the Wilwood 1” MC, but nothing for the factory ones.


-
 zippasswordrecovery joined the community
 -
 7zpasswordrecovery joined the community
 -
 I like these shots best

-
Профессиональное обучение плазмотерапии онлайн: PRP, Plasmolifting, протоколы и нюансы проведения процедур. Онлайн курс обучения плазмотерапии.
-
Modern operations laparoscopic innovative technologies, precision and safety. Minimal risk, short recovery period. Plastic surgery, ophthalmology, dermatology, vascular procedures.
-
 VefoGix_ joined the community
 -
 Apparently, a PLN collection.
- Last week
-
 This topic has already been pretty thoroughly discussed by CZCC members. Here's a good place to start...


