madkaw
Free Member
-
Joined
-
Last visited
Everything posted by madkaw
-
 Confirming info I found on this and my methodology . I measured about .0065 pulling in and out on the rotor assembly . Book says .0057 max . We all know how hard it is to torque these . Would you torque an older assembly the same as installing a new one if it didn’t make spec ? Trying to find my fish scale to measure that spec. I do have the slightest vibration I can see in the mirror. I’m pretty sure I redid these when I did my Wildwoods and that was 20k miles .
-
-
Wasn’t me . I made a thread here many years ago about this subject of dual oiling systems , but I think it’s lost . There’s been man stories of lost cams . With all the variables , it’s hard to attribute a wiper lobe to one thing . Spray bars -to me - are problems just waiting to happen
-
I’ve never lost a cam - but heard many stories
-
I would NOT recommend running both . Just stick with a internally oiled cam . It’s hard for the system to put out enough volume for both . I think the cam spray bar is ineffective when using both . The oil barely reaches the lash pads - at least the tests I did. Maybe with my Kameari pump it might work . Simple test is to drop out your drive spindle on the dizzy and drop in a drill with something to drive the pump . Get your mechanical oil pressure gauge hooked up where you can see it . Fire up your drill and watch your pressure and your oil flow . I made a valve cover with a cut off top to watch without oil getting everywhere . Ive done this test using the modified valve cover while the motor was running . I wouldn’t , and haven’t started a motor without performing this test . I’ve have never lost a cam yet . I’ve had a Schneider , ISKY , and now a Bonk cam . And I use Rotella truck oil - nothing fancy
-
So I got my 12si alternator and didn’t have my mount modified yet , so I did the sketchy mount where you flip the clocking . The beauty is that it bolts right up with one spacer , flipping the adjuster bracket and a longer 8x1.25 bolt . Sucker charged right from idle , which I read might not happen . Might be the way I wired it , but it’s still a one wire set up basically . Drove it around and it showed 14.5 volts pretty consistently with electric fan and all my other goodies . Haven’t driven at night , but will try that tonight . I did get the proper mount modified , so about to try it . I’ll be watching for drains on the battery .
-
Yes - my 9/71 is titled 71 . Transition month for sure
-
well I was thinking about doing the AC Delco swap but using the 12S. I was going to ask for one of the mounting brackets from you @zKars, but now I read about the drain and wonder if I made a mistake . the original reason for coming to this thread was ask about the wiring. in every thread I've found on 1 wire, I've not seen a schematic. Sounds silly for a 1 wire, but I've read you should upgrade to 8 gauge wire directly to the battery? I've also read that these do better with the sense wire connected . I actually have read that 3 wire is best. How does this wire work with the original wiring running to the inside of the car and the amp meter? Any examples I can see? As far as why GM alternator. New sent to my house is 70$ -thats not a reman. Oriellys couldn't find a zx anywhere . I run electric fans and EFI and a 200watt stereo. I've read both the stories of battery drain and those that never have had issues.
-
Z car depot is correct . So you have the studs and you just need nuts . I like the copper ones ZCD sells . Or some good ole nut and washers
-
I run OEM studs . I’ve used the SS stud kit from ZCD - I believe - also . I have also used there copper flanged nuts - and they do stay tight . Tight enough to bring the stud out sometimes . But no washers to fiddle with .
-
Not sure that’s true . The position it sits below the floor hole is awkward either way. IMHO just a flip wouldn’t be much better . Angled upward towards the hole would be best . Deleted all together would be better . The other hose is available for the front vent . Even if that hose becomes NLA, it could be done easier them the top rear vent . I just did this job on a 71. Replaced all vent lines so it is fresh on my mind . The top rear vent is a mother .
-
You didn’t completely delete the vapor system because you left one of the vent tubes . The vent tube you left is the hardest to connect . Im also not sure how you delete all the vents and the fuel tank can properly operate and breathe. There has been members here that have deleted the vents and have had fuel cavitation from lack of air to vent the tank . One vent line might be enough and I think the OEM system seems too much . I also am glad you are making these and I am not nit picking your effort . I just did a tank vapor system with all new hoses and the one in the top back is the worse to do . That why I wish you left the other two . Good luck and thanks for your efforts
-
Yep - you deleted the wrong vents . You should have kept them two and deleted the one at the back of the tank . Nissan still sells a vent hose for the front vent and the side vent doesn’t need a formed hose . The vent you kept is he hardest one to duplicate and reach . Too bad
-
Cliff - you crack me up . you know I couldn’t figure this signature stuff out earlier because unless my I Pad is sideways I can’t see my sign in . Thanks for the help . Maybe someday you will be as cool as me.
-
-
Wish I could figure out how to change my signature - it’s outdated
-
My son has the perfect filming car . His Model 3 will out run me all day , but also quietly film me . Third gear pull.
-
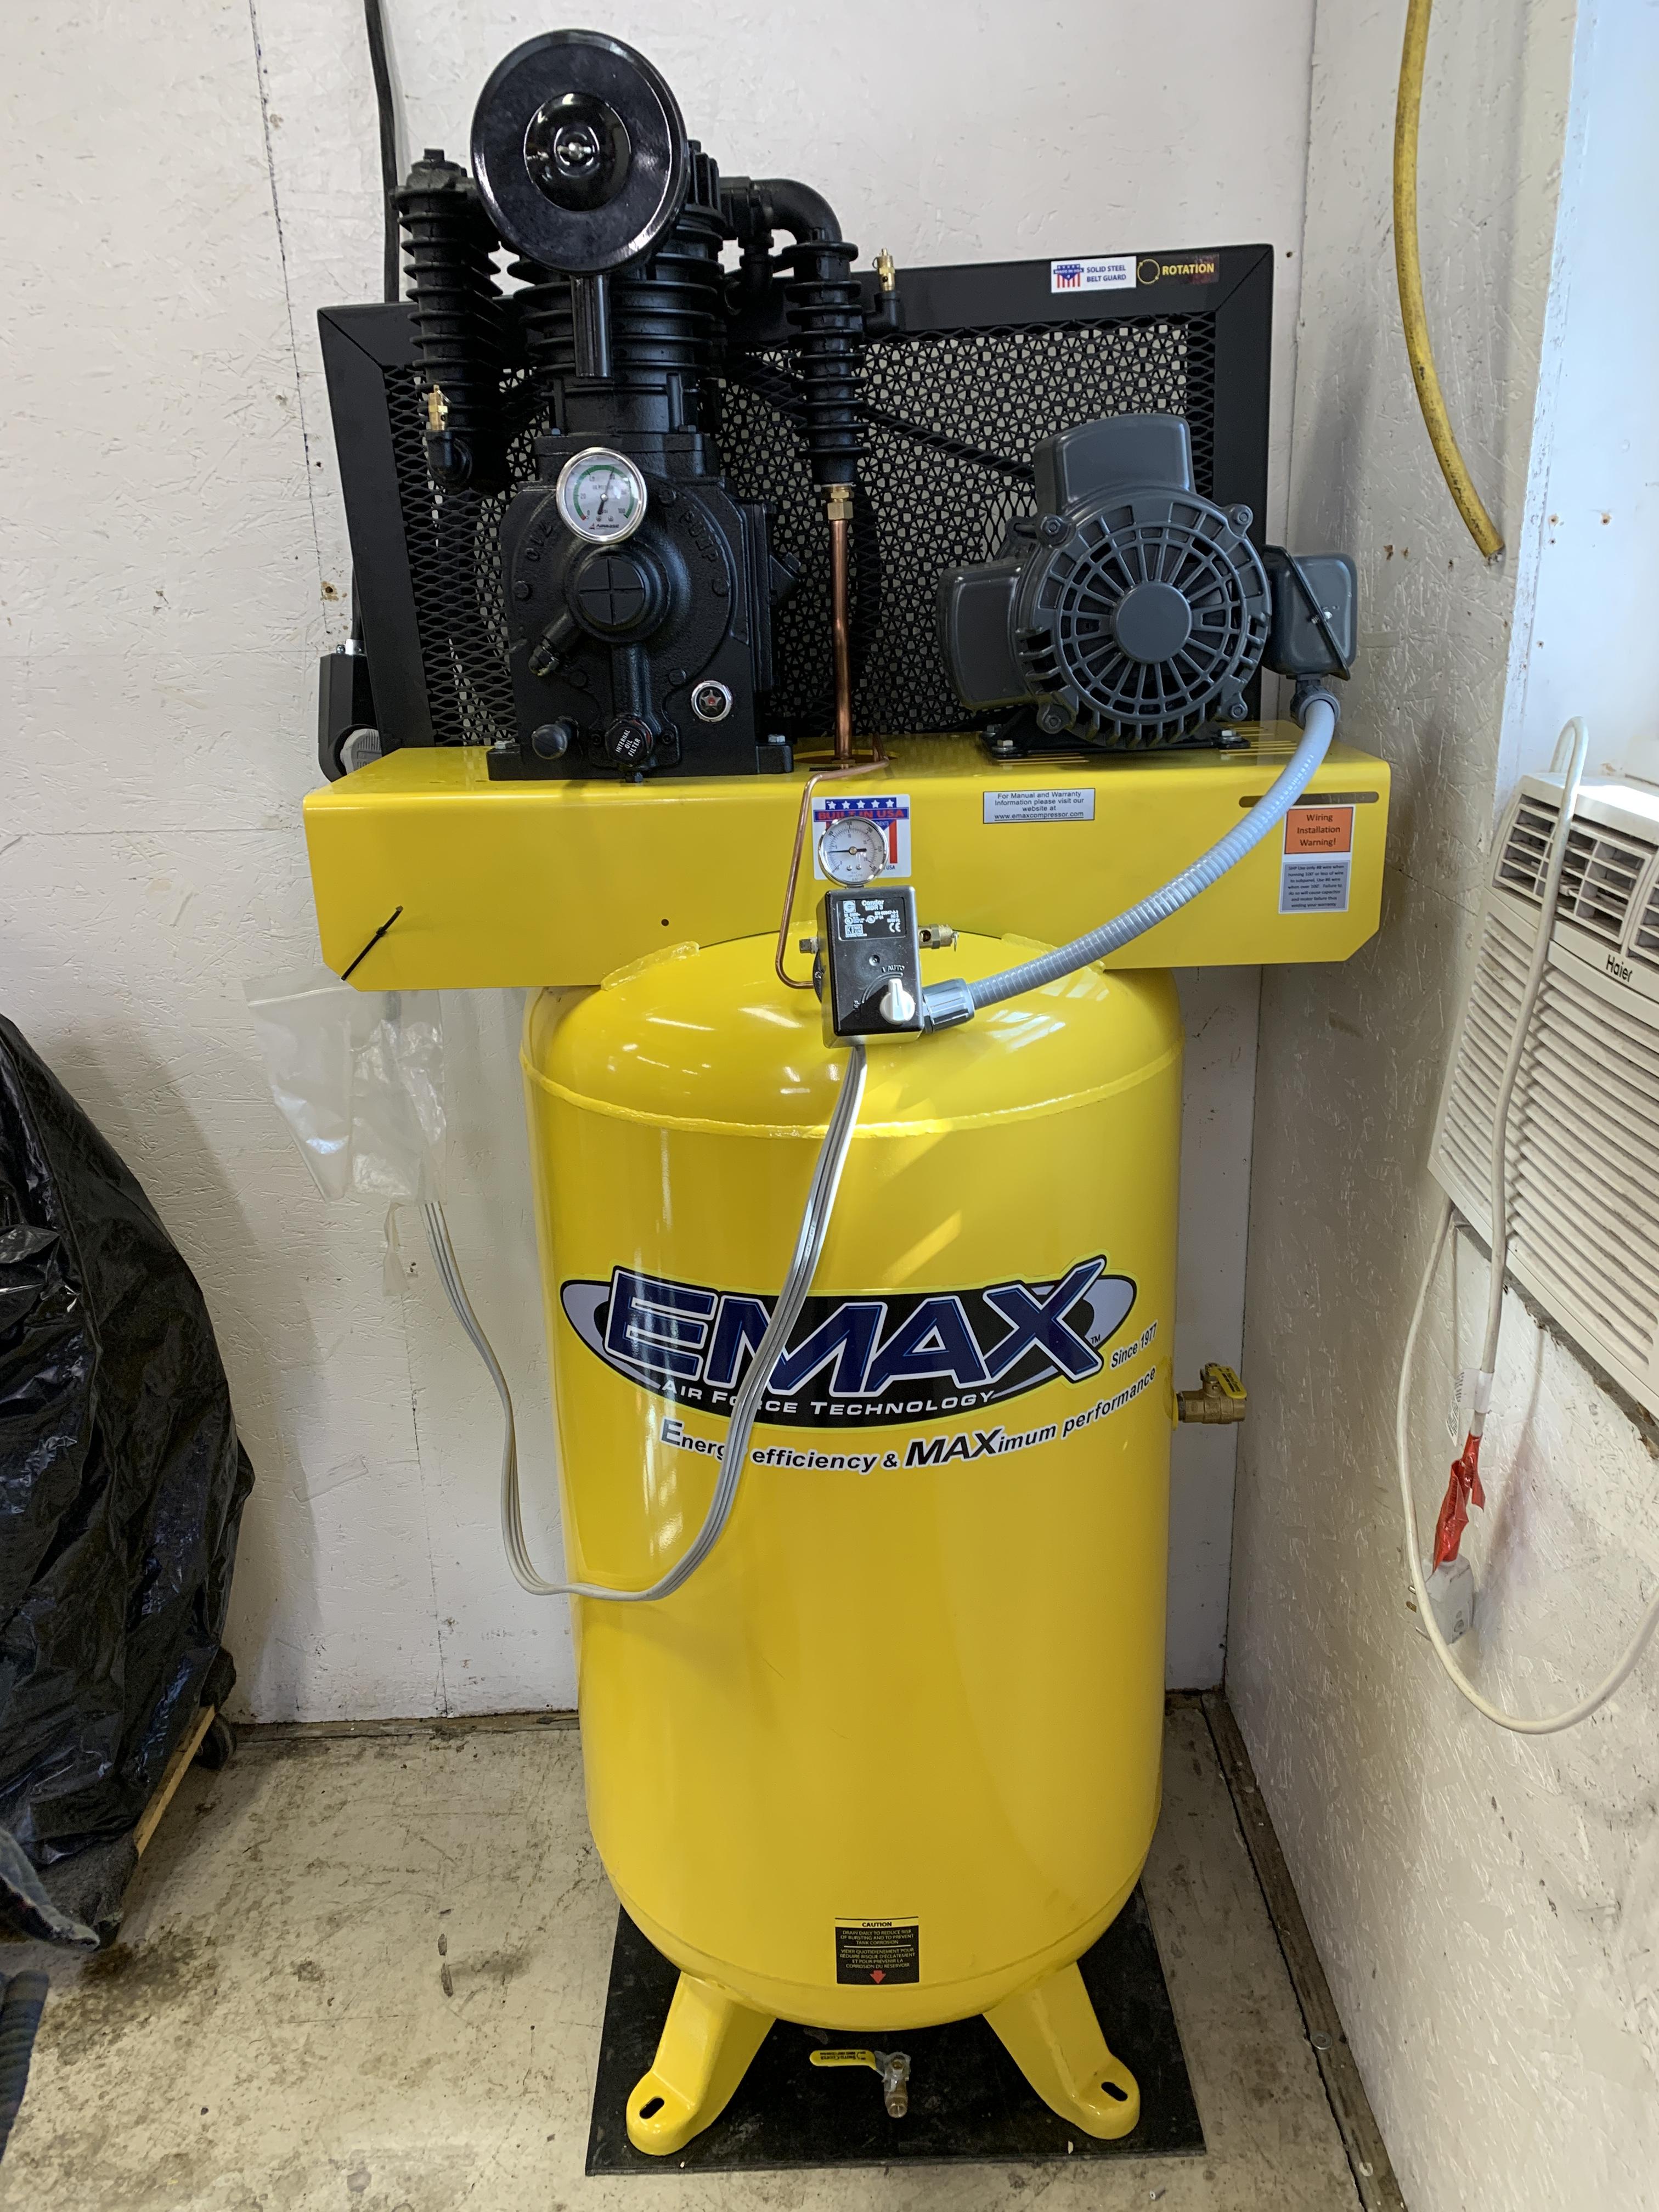
I also like the condenser idea . I still get a lot of moisture even with my compressor . After years of inadequate compressors I finally put out the bucks . 2k if you want something to run a blaster and not be struggling . 5 year warranty parts and labor ! That’s 80 gallon - 19cfm at 90 psi. And suction type blasters “suck” especially from HB. Watch some you tube videos on modifying them

-
Well since you are on here I’ll ask you about the floor sections . I contacted you by email and you did not respond . The rear section of floor board that covers behind the rear seat rail - do you sell it separate ? I bought the kit and thought it would come with that section - but it did not . I reached out to you and you didn’t respond.
-
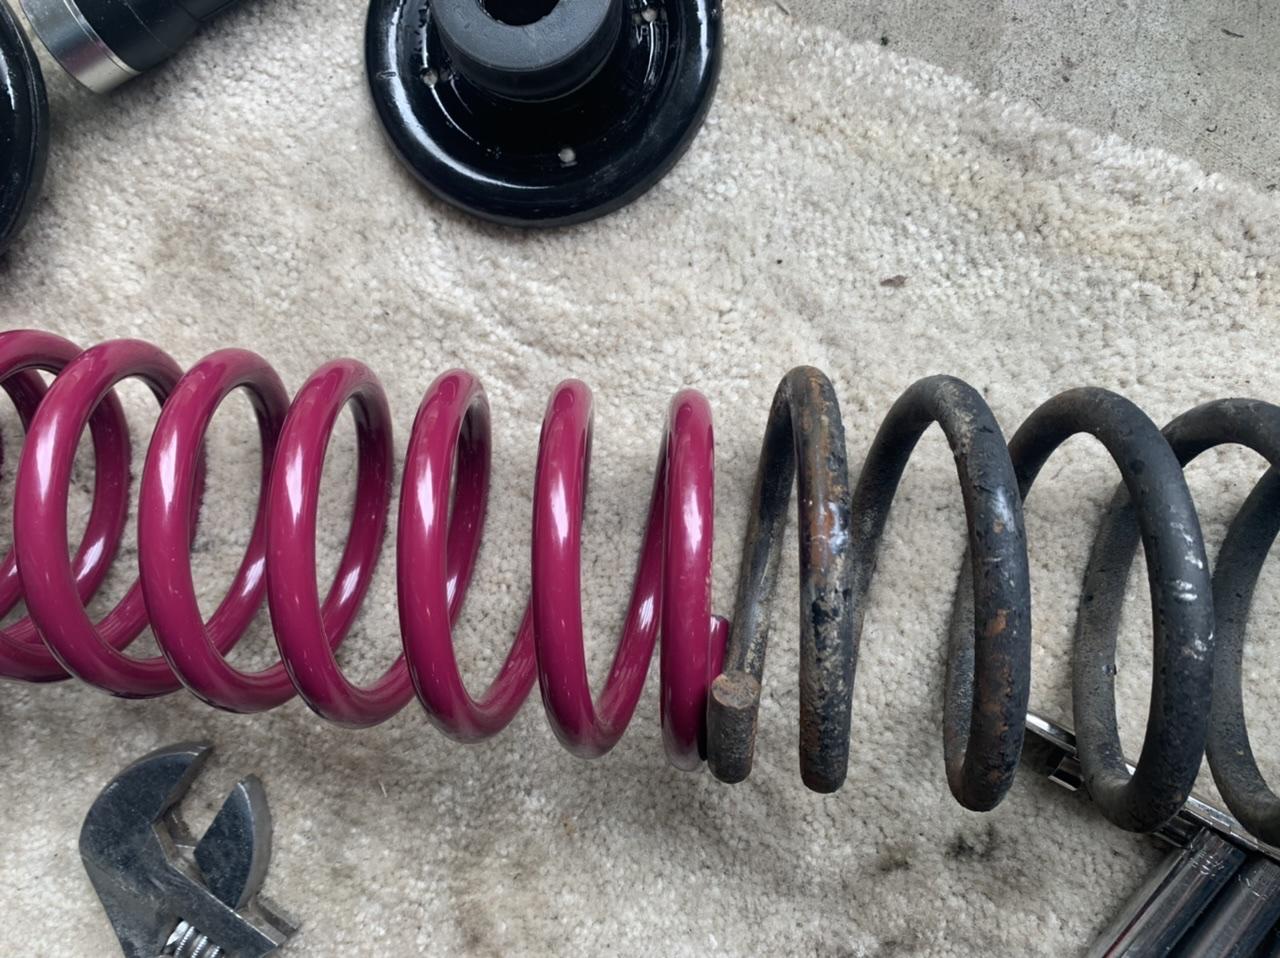
Yep - kind of disappointing they didn’t get that right . My ST ‘s are a better fit , but they are not progressive.
-
The seller said he’s sold hundreds of sets . I asked on FB and heard back from several that they are running them with good results . I wanted to make sure I didn’t get the wrong part . I think they are too small in diameter for the perch’s , but I guess they seat good enough to run. They need to be at least 1/4” bigger .
-
That’s a stock spring .
-
I’ll just jump on this thread . Ordered new Votglands and KYBs for a 71 . Spring diameter is smaller by a good 1/4” - so they don’t want to seat a full coil in the perch - especially the top hat .

-
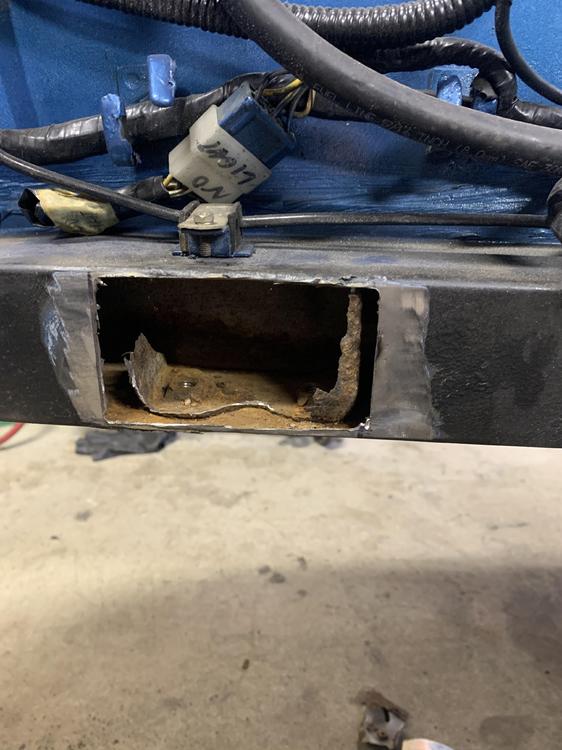
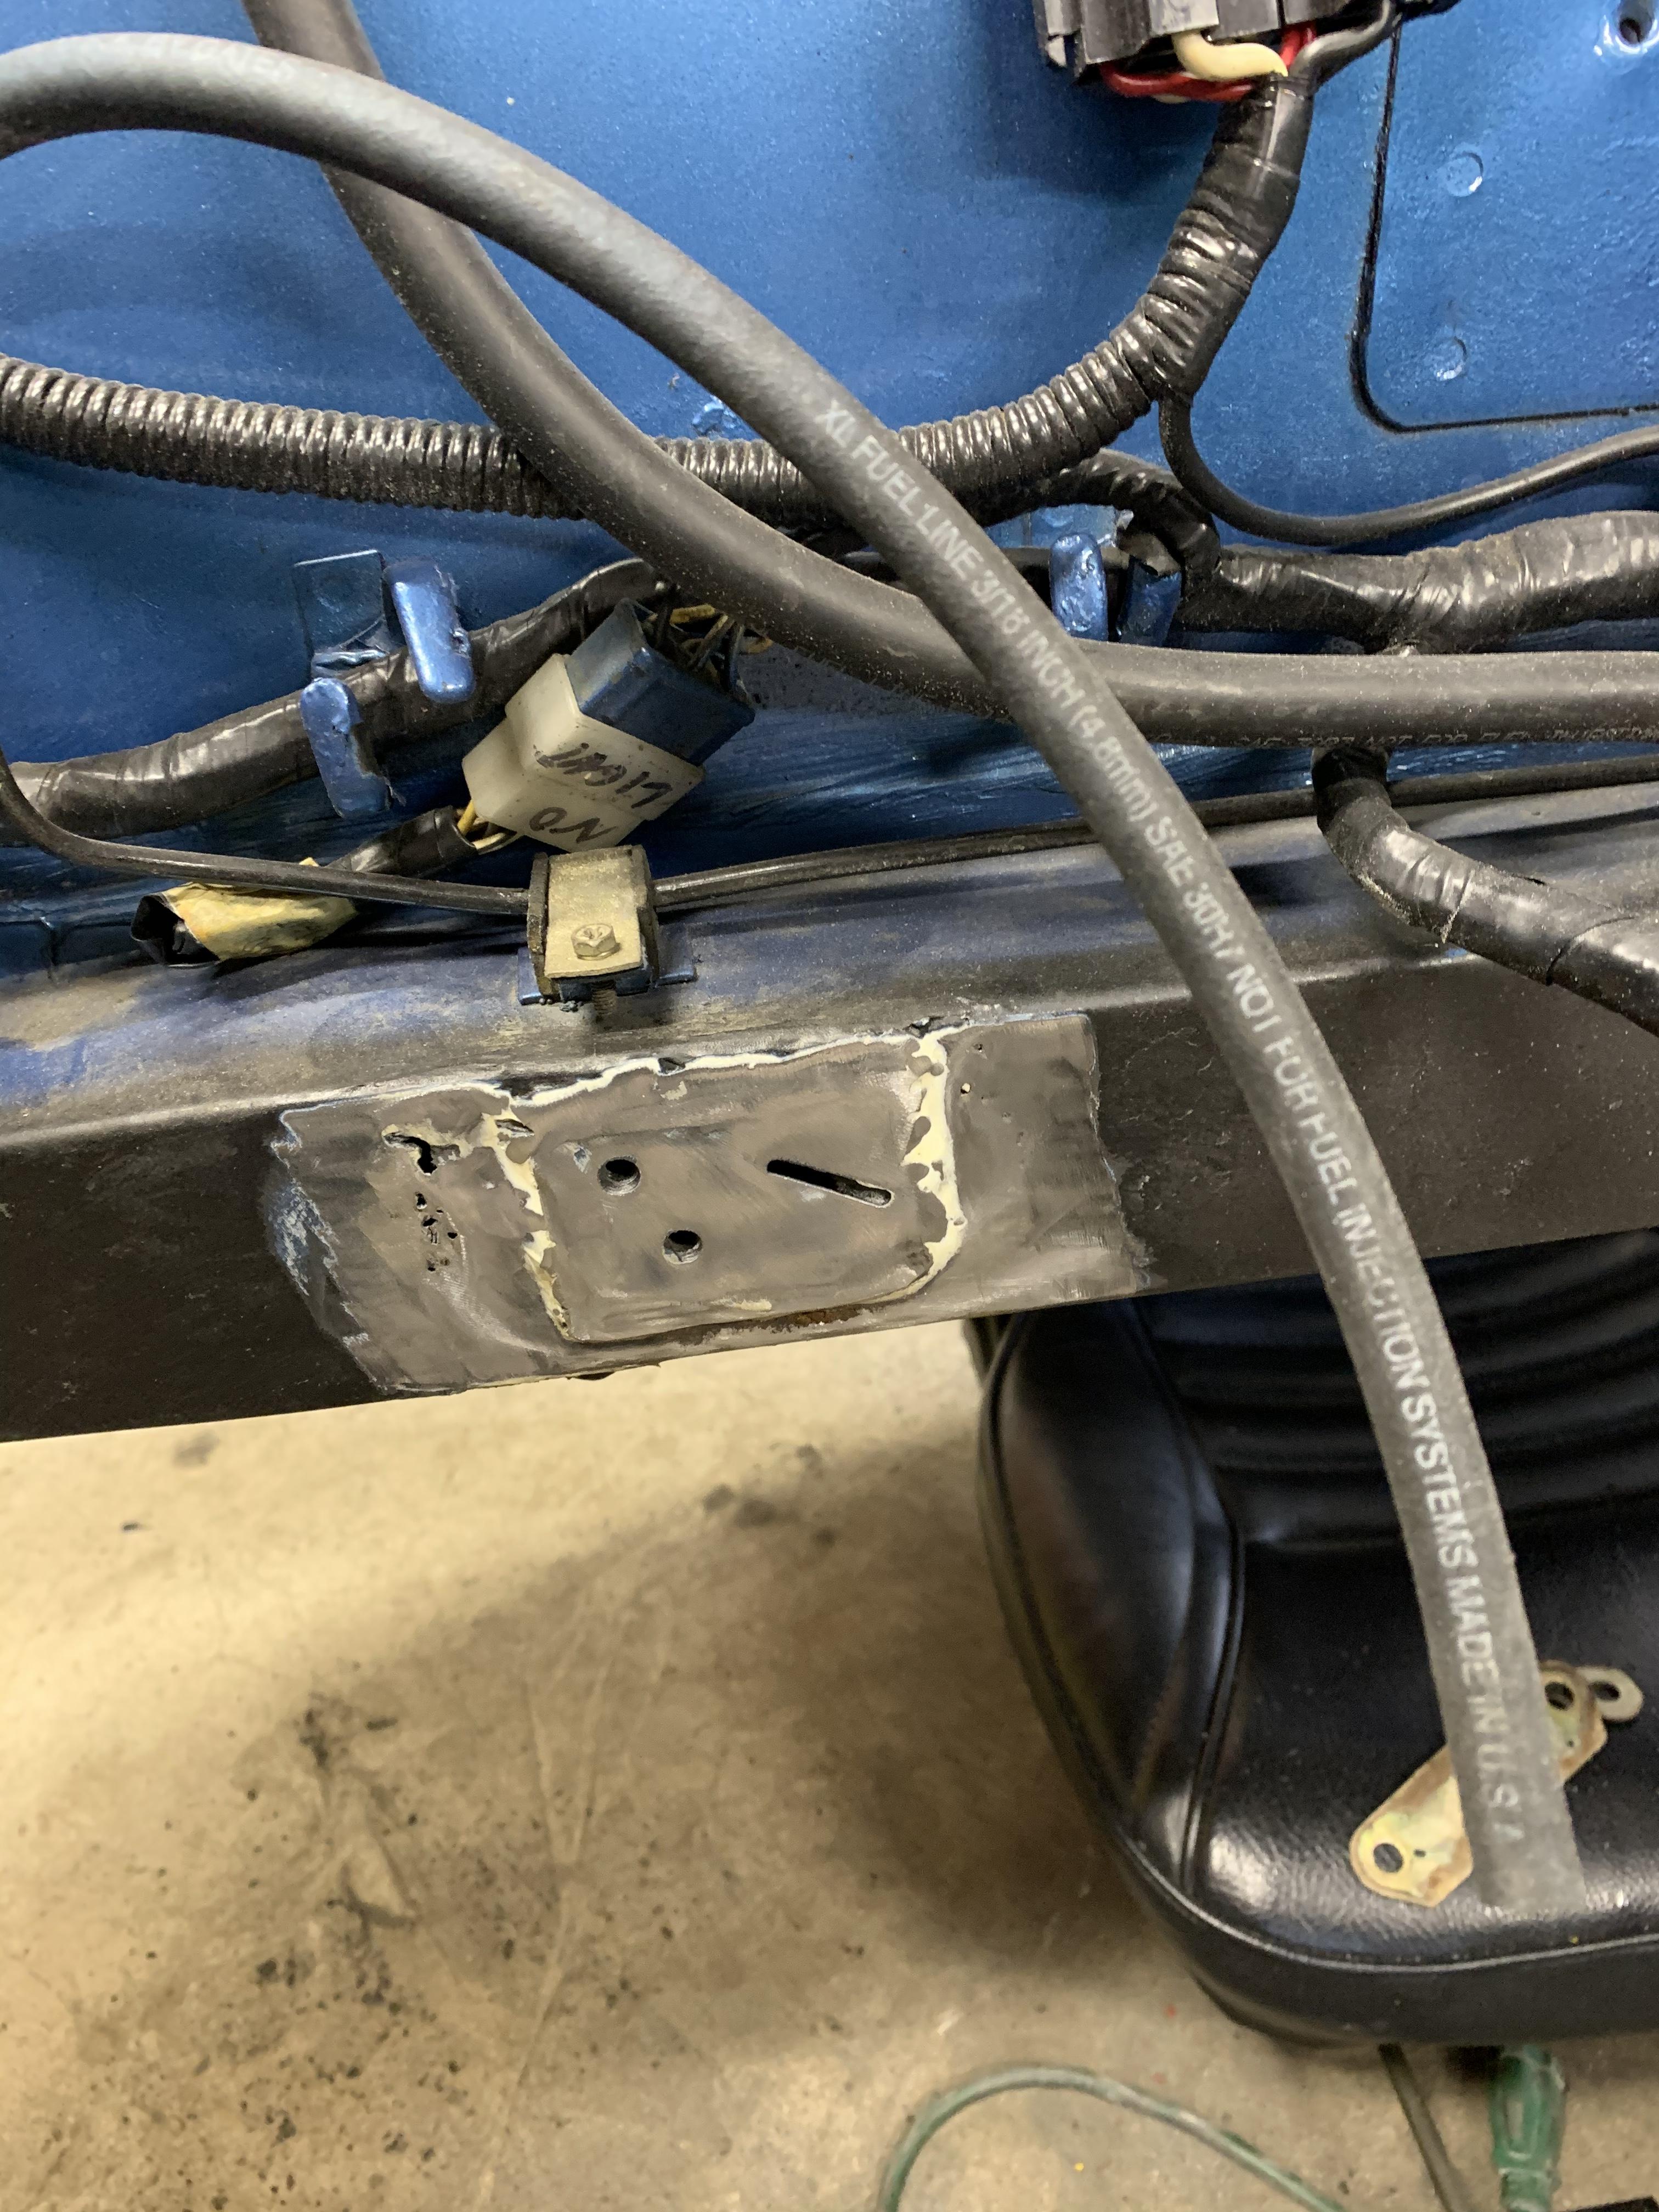
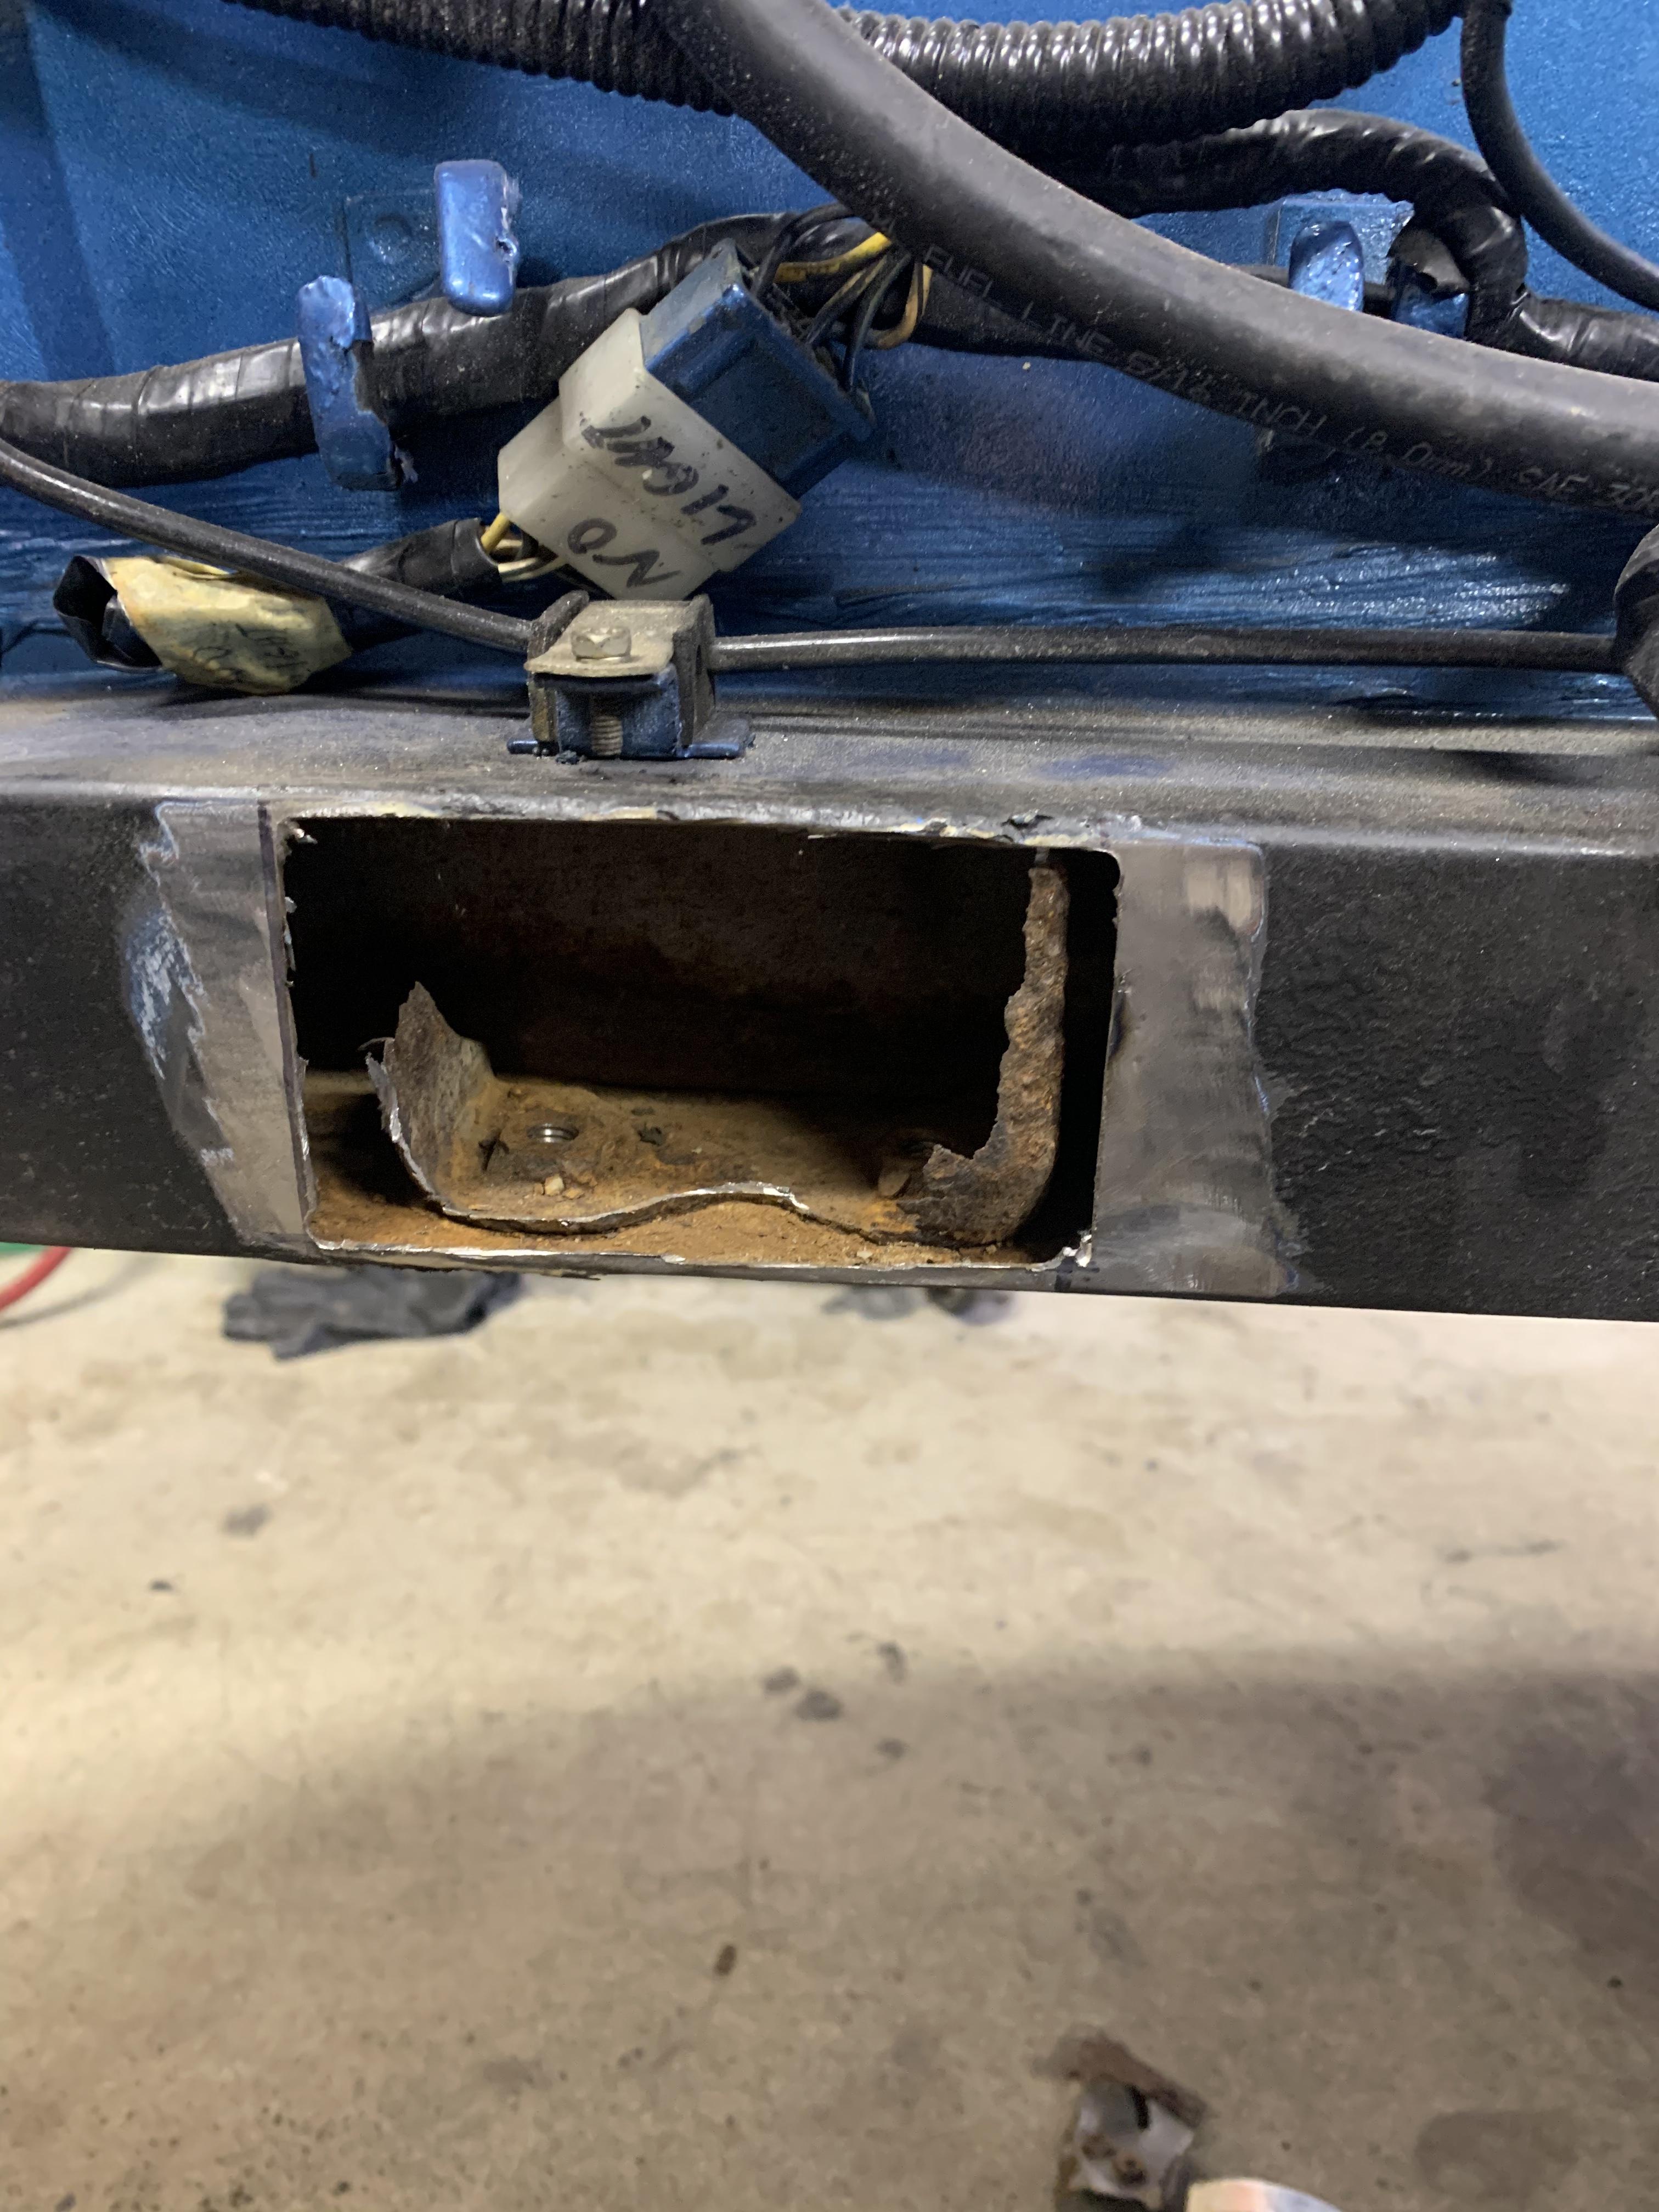
Thanks guys . I’m bending up a piece now that I will plug weld from the bottom and inside the rail ( outside wall) , and eventually will attach it to the inside wall with plug welds. I’ll post pics as I go along . I pulled out the nutplate and there wasn’t much to it or left of it . It came out too easy .
-
I’m trying to repair this frame rail around the sway bar attachment point . Trying to get an idea of the shape of the original nut plate that is spotted in. looks like a box shaped nut plate with maybe 3 sides ? The metal was rough on the outside rail , someone had did a bad patch job . Looks like about 3 spot welds on the bottom of the rail . Maybe the box had a front side that was spotted to the frame rail /engine side ?