JLPurcell
Free Member
-
Joined
-
Last visited
Everything posted by JLPurcell
-
 Hey guys its been awhile, but I feel the need to put in my two cents on this one. I had the pleasure of working, as part of the safety crews, in the Rahal-Letterman pits. Racing is all about the sponsorships!!! and hype is part of the game. “Greatest Spectacle in Racing†“Racing Capital of the World†Whether it is accurate is up for endless debate but it has created the largest purse and prestige in racing which drivers from all over the world and all forms of racing have been drawn to compete for. But back to the point, Danica; she is the real deal! She is not a poser! Remember “when the green flag drops the bullshit stops!†I have raced myself as well as worked on the safety crews at the Indianapolis Motor Speedway for quite a few years and you see drivers and posers come and go, Danica is a driver! As to the comments as to Danica posing for a magazine, what a bunch of sexist BS. Have you never seen the ads or photos of the male drivers in tight jeans etc… give me a break! Racing is all about selling yourself, without the big sponsor dollars it doesn’t matter how good of a driver you are! JLP
 -
Eric, I have found Todd Walrich at Wolf Creek Racing to be a great source of knowledge as well as parts for the Mikuni Carbs. You can email him from his web site: www.wolfcreekracing.com Hope this helps. JLP
-
It is according to what you want. If you want that classic Z with original optional up grades the FIA's are the way to go. On the other hand if you are looking for the best performance you can get for your dollar the later upgrades are probably what you want. If you decide not to buy the FIA's let me know, I like the original optional upgrades myself. "2 cents". JLP
-
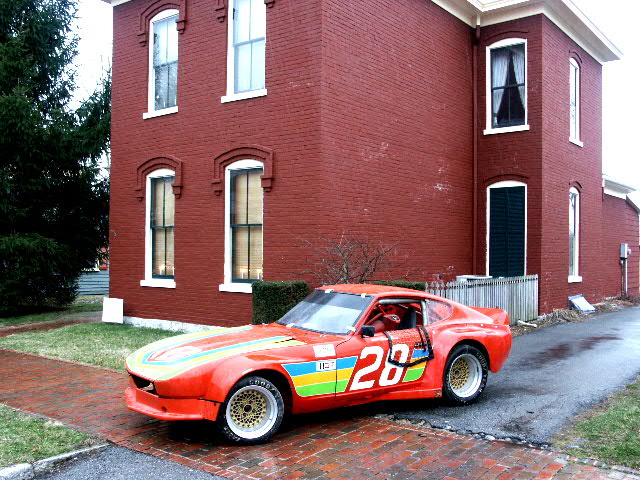
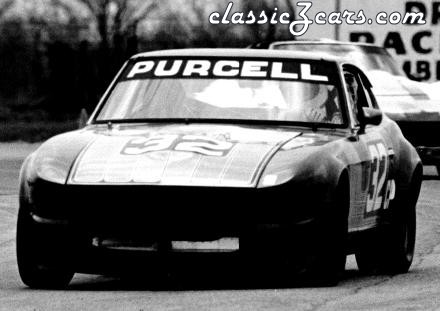
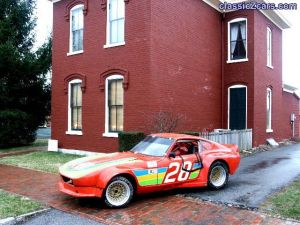 Recent picture of the 00029 car for the House and Car Thread. Purchased in 1976, CP car last campaigned in 1986 IMSA. JLP
 -
Home "CIRCA 1870" HLS30 00029 Z "CIRCA 1970" "ENJOY THE RIDE"

-
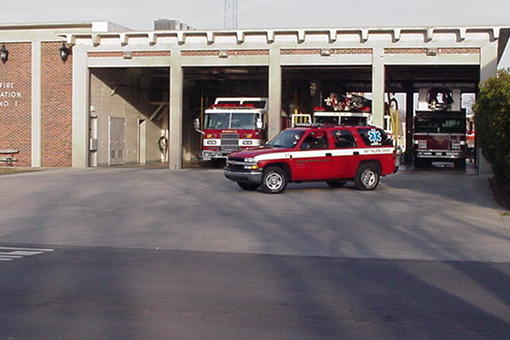
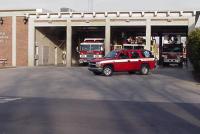
This is my car at the "BIG HOUSE" (Station #1) JLP
-
Yes, in english interface is defined as "forming a common boundry of two bodies or spaces". So in english if we want too different items to work together we want them to "interface". I believe this is how you are wanting to use the word. JLP
-
I had a great “CAR DAY" yesterday. :knockedou I went to a day of training after being reinstated on the Track Rescue Crew for the Indianapolis Motor Speedway. I worked on the crews for ten years and took a three year break. I am looking forward to all three of this years events especially the F1 race. I have worked both the Indy 500 as well as the Brickyard 400 many times but never the F1 race. I don’t know what the new rules are for my taking of photos but I will try to post some detailed photos of the cars from all three events as the year progresses. :classic: JLP
-
The real question is will be worth more or less when it becomes known as the first "STEROID" record ball????
-
I just noticed these NOS headlight covers on ebay. $$$$$ Looks like they have been listed less than a day and already at $350. :stupid: (WOW) Item# 4534911997 JLP
-
Take a look! $$$$ ebay auction # 4534911997 NOS :love:JLP
-
I believe it means that considering the Time-Space Continuum you might just be your own great grandfather. JLP
-
Fast is keeping the other guy in your rearview mirror, on the race track where excessive speed belongs. :knockedou JLP
-
After sorting through the jabs and cuts I have gained some insight about V8 conversions from this thread. (Thanks Carl) Although they still do no appeal to me I have gianed some respect. It takes at least two to tangle folks and it seems we want to blame one person for the misdirection of this thread. Not the case! In my "opinion". This thread seems to have been appropriately listed under Modified Z Cars. Now that being said: POINT OF ORDER! JLP
-
Thanks for the education on the V8 conversions. I was not aware of the development of the cars beyond the conversion itself. :stupid: I guess it just makes since that folks interested in this type of transformation would take it to the next level over the years and not being a fan I have not followed this development. You have just "expanded my horizons" and I will look at them in a new light. As we developed the 00029 car the engine was moved back about 6" the battery ended up in the right rear and the alternator behind the drivers seat, all in the pursuit of balance. JLP
-
Actually from what I understand (correct me if I'm wrong) the V8 Z cars become straight line cars for the most part due to weight distributions issues etc.. I guess that’s one of the reasons they don’t appeal to me having enjoyed autocrossing my 72 and roadracing my 70 Z car. I like the feel of a well balanced car, responsive and nimble. But to each his own. This thread is under modified Z cars! :surprised
-
I tried to interject a little humor to lighten up this thread earlier but I have to now take a stand. I have owned Z cars since 1972. I still have what was my first new car, my 110 red with white interior 1972. I also still have my 1970 I purchased in 1976 it is and has been a road race car. I recently found this site and have greatly enjoyed following the threads and starting some of my own. I took a look at the big block Z in this thread and having built and raced Z’s marveled at the engineering and craftsmanship although it is not my cup of tea. I am 52 years of age and don’t want to be considered a senior member, recent member or judgmental member. I just enjoy being a member. Would I ever consider putting a V8 in a Z no but so what!!! I’m sure a lot of Z owners would cringe at what I have done to the 00029 car. Now for you young and old members alike share your ideas and thoughts and maybe we can all expand our horizons. Where is fantasyland anyway?
-
You all are harsh! Just enjoy the ride!!!
-
You start with the cam sprocket in the #1 hole location. Number 2 and 3 are used if the timing chain is stretched beyond certain limits. You can figure this out by setting the engine with #1 piston at TDC on the compression stroke. Check and see whether the camshaft locaton hole on the camshaft sprocket comes off the of left end of the oblong groove on the camshaft locaton plate. If it is off the left end of the groove, the chain is stretched beyond the limit. You can repete this proceedure for hole #2 it should be at the right end of the oblong groove. When the #2 hole is used, the amount of the modification is 4 degrees by the rotation of the crankshaft and if it is necessary to use hole #3 the amount of modification by rotation of the crankshaft is 8 degrees. :squareeye Hope this helps. JLP
-
Just a little "P" car story. Back in 1976 while atttending my first SCCA drivers school my instructer was Logan Blackburn. On Sunday as we were setting in our cars waiting to go out for the race Logan came over to my window and said "Don't even come back to the pits if you let the "P" cars beat you!". I'm proud to say that I was able to come back to the pits...
-
I have a 1973 parts car, I will check out the booster this weekend. I won't be able to test it unless someone knows how to test one off the car but if it looks ok I'll remove it and you can have it. You pay shipping. If your interested let me know. JLP
-
Thanks Mike, your right. The stainless trim needs to be installed after the seal has been put back on windshield and prior to truning the window face down to prep for installation. I forgot that step. :stupid: JLP
-
I've replace the windshields with the rubber gaskets many times and it is a very simple process. Take your rearview mirror out and start by putting a tool, (plastic or wood) most automotive supply stores carry them, under the top corners of the inside of the windshield seal. Loosen the rubber moving across the center and then down the sides. Once you get the rubber loosened put slight pressure on the inside top center of the windshield (make sure the pressure is spread out like two open hands) and use your tool again to start at the center top of the windshield and move to one side an then the other while applying pressure. The winshield will start moving out as it does move down the sides and then back to the center top. Once it pops out at the top and sides get someone on each side (exterior) and lift it off of the bottom lip. To install the windshield put the rubber seal on the glass turn it upside down and and spray silicone all around and on the inside lip of the rubber seal. Now take a stran of automotive electrical wire and put it down into the channel of the seal crossing it at the center bottom. Put the windshield in place on the bottom metal lip. Have someone push in and down on the windshield from the outside open flat hands and start pulling the wire to both sides evenly. Once you have the bottom of the inside seal over the bottom lip and bottom corners go outside and push down and in on both sides to seat the bottom of the seal inplace. Now from the inside start up both sides with pulling the wire out when you get to the top go outside and once again push, even pressure on both sides to seat the lower sides of the seal. Now go back inside and pull the resest of the wire out and the window will seal in place. Go around the inside of the seal with your tool to make sure the seal is in place. This is harder to put into words than to do. Out and in will take no more than a half hour or so. Once you've done it a few times you can do it by yourself but I would suggest help the first time. Rember no metal tools and even spread out pressure! Hope this helps. JLP
-
Another method, if you don't have help and don't have the time use the gravity method you can: Open the bleeder (in the previously described order) and place a hose (tight fit) on the bleeder and place the hose in a bottle of brake fluid. Pump the brakes slowly, the bubbles will go to the top of the fluid in the bottle and fluid will be sucked back into the system as the pedal returns to the up position. Do this a few pumps and then go to the next wheel. Good Luck!
-
I had been looking for a quality shop to chrome my rear bumper. I have received estimates, from all parts of the country, ranging from $280 -$650 :surprised for all five parts. I decided to give a local shop the job. They come very highly recommeded by our local hot rod club. They gave me a price of $370. ($150 for the center section, $85 each for the ends, $25 each for the over-riders) I took the best of my two rear bumpers but the owner of the shop said that the price would be, for the most part, the same for any decent rear 240Z bumper, including removal of a few dents. He estimated $10. per hole if one were to want the rubber strip holes welded up prior to the chrome plating. I will post the results including photos when the shop get the job done. (4 to 5 weeks) JLP