kenz240z
Free Member
-
Joined
-
Last visited
Everything posted by kenz240z
-
 Put that meter to use and verify that there is voltage at the headlight connectors. If you can't find your meter, how 'bout a continuity tester? Pull the connector from the back of the headlight, turn the lights on, and check for voltage. I'm not sure which pin in the connector is the low beam, but if none of them have any voltage, you'll have to track backwards through the wiring harness & switch to find the problem.
 -
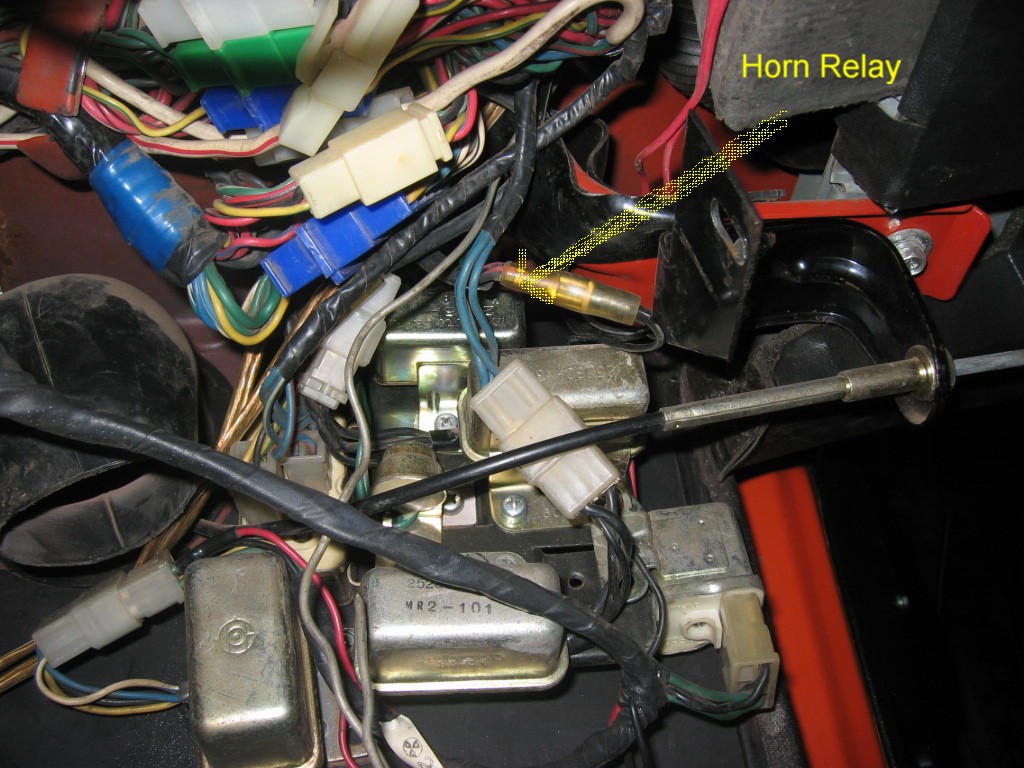
Hi, ZSaint, The horn relay on my '73 is mounted up high on the passenger side kick panel, amid several other relays (see attached pix, pardon my crude label!). One pic shows the horn relay surrounded by the other relays, the second pic is a closeup of the horn relay. It has 3 wires: green/black - from horn button on steering wheel, the connector is labeled "S"; green/red - battery, the connector is labeled "B"; and solid green - to horns, the connector is labeled "H". I think the horn relay is mounted on the driver's side kick panel on early 240's. On the steering column the green/black wire connects to a wiper that rubs against the backside of the steering wheel. When the horn button is pressed, it creates a path to ground through the steering column for this part of the circuit. If the wiper isn't rubbing against the back of the steering wheel the horns won't sound, a common problem. A DVM set to resistance can be used to verify the wiring, disconnect both ends and connect a lead from the meter to each end. Should be 0 Ohms. Another simple test is to use a jumper to ground the horn button. If you remove the horn pad you will see a black wire screwed to the horn button. Use the jumper to ground the wire to a good frame ground. Normally this is through the steering column. If everything is connected properly and the relay is good this should sound the horns. When I was troubleshooting my horn problem I measured a couple hundred Ohms with one lead of the DVM touching the center of the steering column and the other lead touching the frame. When I chased the threads for the steering column mounting bolts, the resistance dropped to less than 1 Ohm, and the horns worked. Hope this helps!

-
From your description, it sounds like this relay isn't doing anything. I'd guess that one side of the toggle switch is hot. When the switch is flipped, it would trigger the relay, which would then connect the battery lead to whatever was connected to the dead-end lead. So it would seem that the relay was there to provide power to something. If it was my car, I'd take that relay out, and remove all questionable wiring associated with it. Wiggling the wires attached to the relay could have tugged on another connector somewhere, which might be causing your cold starting problem.
-
You might also want to check the ball joints. Are the lug nuts on all 4 wheels tightened to spec? What about the motor/tranny mounts? Suspension bushings? Differential mount? Steering rack bushings?
-
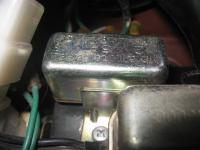
On a similar note, my horns wouldn't work after I re-painted the engine bay in my Z :disappoin . After verifying that all the wiring was indeed good, I figured it must be the relay. So, I pulled the relay out to test it. It is tucked up on the passenger side kick panel with several other relays and the connectors are hard to get to with it in place . Anyway, after I got the relay out I was able to test it and sure enough, it worked just fine. After a bit of noodle scratching (something I do too much of, as evidenced by the growing bald spot on the back of my head ) I put the relay back. The relay has 3 connectors: one hot lead, one lead to the horns, and one lead to the horn button on the steering wheel. When the horn button is pressed, it creates a path to ground that triggers the relay, which then connects the hot lead to the horn lead, therby making the horns sound. The path to ground for the horn button is through the steering column. In my case, it turned out that I hadn't chased the threads where the steering column mounts to the firewall. Once I cut through the paint (primer/base coat/clear coat), the mounting bolts made a good path to ground and my horns worked just fine :knockedou . If only I had begun the trouble shooting process by chasing those threads... :stupid:
-
I would guess that the wire on your car isn't original. Every car I've worked on has had a wiring harness that ran inside the car from the front to the rear that provided the connections to the tail lamps, back up lamps, rear license plate light, fuel tank sending unit, etc... This harness is tied into the under dash wiring (main harness) by way of a large, multi-pin connector. I would remove the mystery wire, especially if it is not connected to anything on either end. If the electric fuel pump isn't hooked up then bypass it. If you keep it in line (working, or not) then be sure to open it up and check the fuel filter inside. Mine was clogged up with sediment from the tank. The previous owner had parked the car and left it sitting for 7 years before I bought it. Caused a bit of a fuel starvation problem in my Z, but I finally figured it out!
-
Those projections on the wheel side of the outer fender should have pads on them before the fender is put back on, so should the one in front of the inspection lid opening. I cut a couple of pieces of closed foam rubber strips and stuck them on. I bought the closed foam rubber at the local Ace hardware. I also ran a strip of the foam along the outer edge of the filler panel between the inner & outer fender. It's the one right behind the tire, can't remember what it's called...
-
My employer has asked for volunteers to go to New Orleans to help restore communications (I'm an RF Engineer for a wireless provider). I have offered to go, and at least two of my co-workers have offered, too. I should know tomorrow if they will still need us. I figure it would be a good way for me to help out directly, there are so many people who don't know if their family or friends are ok simply because cell phones & landlines are out of service.
-
I chose to do a complete suspension rebuild on my 240Z. That way I only had to tear the suspension apart once. I removed all of the front & rear suspension parts from the car, including the differential & halfshafts, the steering rack, & the front cross member. The engine, transmission & driveshaft were already out of the car, so it seemed like a good time to do the suspension work. I cleaned all the parts then primered them and painted them. I installed new Tokico blue struts, Tokico springs, new urethane bushings, new ball joints, and new rear brake pads & hardware (the fronts were in good shape). It took me a few months of cleaning, painting & reassembling, but now the suspension looks great. I have several pics in my gallery taken at various stages of the suspension rebuild. I have a big, 3 1/2 ton floor jack I bought at NAPA. It was very helpful when lowering the strut assemblies from the car, also great for raising them up when it was time to re-install them. Made it much easier to do the work by myself.
-
I have a '91 Cadillac Allante that blew warm air when the AC was on. I took it to the dealer to inspect & recharge the system. Turns out somewhere along the line before I bought it the system had been charged with propane. From what I learned propane is suitable as a coolant, but can be disatrous in an automobile, especially when a mechanic goes to work on a car with a leak in the A/C and does something to create a spark...
-
I have a cousin who recently bought a house in New Orleans. He evacuated a couple of days ahead of Katrina to Jackson, MS. Mom told me he's doing ok. The poor guy, a few years ago he had a boat that he fixed up and lived on. While in the harbor at New Orleans, his boat was struck by a tanker. At least he escaped from that incident unhurt, just homeless... now he's homeless again. He'll be back on his feet in no time, though. He has always been a very resourceful fellow with a grand sense of adventure and an indomitable spirit. Furthermore, he does underwater welding & repair on oil rigs. I imagine he'll be busy for the next several years. His family has had a few close calls this year. My aunt, uncle & two cousins (his siblings) were in Thailand on the coast the day before the tsunami struck there. If they had been there a day later...
-
Not sure, there were two colors. Orange and light blue. Mine has the blue air cleaner. I'm kinda glad, it's a nice contrast to the orange paint on the car :classic:
-
My chair started out in the Motor Pool for the 67th Infantry Brigade. Then I ended up sitting in the percussion section of the Fightin' 43rd Army Band. I spent 6 years in the Nebraska Army National Guard.
-
I'm an old & crusty 38 :beard: ... but if you ask my wife, she might say I sometimes act like a 3 year old
-
Until I rebuilt the suspension on my '73, it handled about as well as the old M60 tanks I learned to work on at Ft. Knox...
-
When I was 15 I had saved up a couple grand for a car. I found a '75 Olds Cutlass, red with fat white stripes & white interior. I wanted to buy it, but Dad steered me towards a '64 Chevy Impala SS. He said it was a "classic." I started taking auto shop and began the transformation into a gear head. It wasn't long before I swapped out the 283 for a 327 with a Carter AFB and found a posi to put in the rear end. I drove it up until college. I never could really afford to do anything major with that car, I learned to find cheap parts at the salvage yards, and from other car nuts. I bought a '66 Mustang right after high school, but never had the money to fix the rusty rear quarters & floor boards. It had an inline 6 with a little single barrel carb. Any time it rained, the distributor cap would suck up a little moisture and the car wouldn't start. I sold it a couple of years later. I bought a '62 Buick Special with an aluminum 215 and Rochester 4-jet carb for $75 the summer before I started college. I rebuilt the front end and replaced all the brakes. The engine ran strong and was pretty fast. It was a fun little car. I sold it about 5 years ago when I moved from Lincoln, NE to Longmont, CO. Right now I have a '95 Ford F150 pickup, a '91 Cadillac Allante convertible, a '75 Chevy Caprice Classic convertible, a '73 240Z and a '64 Chevy Impala. My wife drives a '91 Nissan Altima, my daughter has an '88 Toyota Celica, and my son has a '00 Jeep Cherokee. I've got my eye on a few other 240Z's in the area, but I don't have any room for another car. Dad ribs me about the "used car lot out in front of the house" everytime he and Mom visit!
-
Enrique, good intro to metal working. For anyone hesitant to try it, I'd just like to say don't be afraid to learn how to use a hammer & dolly to remove dents and smooth panels :nervous: . I taught myself how to remove dents by hand after reading the Paint & Body Handbook by Don Taylor & Larry Hofer. I bought the book at the local Borders bookstore. Another tool I like is the metal body file. It helps make low spots & high spots stand out when you have a dent almost worked out. Use it judiciously, though, because too much filing in the same area can make thin spots, or even a hole :eek: , in the sheet metal! The sheet metal used in the Z car's body panels is pretty thin, at least compared to the older Detroit vehicles I've worked on. I think that the more you can hone your auto repair skills (engine/drivetrain/mechanical, electrical, body work, interior, etc...) the better equipped you are in assessing the condition of a prospective project vehicle. If you find a vehicle that has damage that is beyond your ability to repair, then you have to ask yourself how much it's worth to pay someone else to do the work. Then there are those vehicles that, sadly, are too far gone to realistically be saved . FWIW, I think I've saved myself from spending thousands of dollars on bodywork over the years by learning this useful skill. :rambo:
-
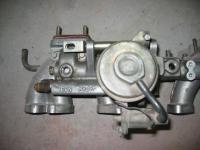
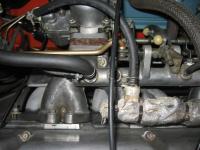
My '73 originally had an N33 intake/balance tube with an EGR valve. I have since replaced the intake/balance tube with an E46 from a '71. It does not have the EGR valve. The first attached photo is of the N33. The second shows the E46. Hope this helps!
-
Try www.victoriabritish.com or www.zcarparts.com. They carry replacement heater hoses.
-
I didn't know the '73 had longer lines that any of the other Z cars from 70-78...
-
I got bit by the car bug as a teenager. My first car was a '64 Chevy Impala SS, and I was still in high school when I became a member of the Nebraska chapter of the Late Great Chevy Club. I met some great people through that club, and got to know a fellow real well who did complete frame off restorations of '62 Impalas (he did a couple of 409 bubble tops for Kenny Rogers once). I was fortunate to find a good mentor, but then that is one of the gratifying parts of being an old car nut - you pass it on to the younger generation. That's what is so great about this site, it allows the folks with the knowledge & experience to share it & pass it on, thereby keeping the hobby alive. And that's something that we should all be concerned with, as some areas of the country are making it more and more difficult to keep older cars on the road. There is no trick to restoring a vehicle. It's really an exercise in project management, and requires a good deal of planning and forethought (plus the usuals: time & money!) in order to avoid posting an ad like Enrique described. There are scores of books that have been written on the subject of auto restoration. Some focus on the nuts & bolts of a specific make & model, others take a more generic approach. As for me, I've always been a hands on kind of guy, and I've learned by doing. My thoughts on the subject are simple: do the best work you possibly can, pay attention to detail, do it once and do it right. Its a rather rewarding feeling when someone looks at your Z and says, "Nice car!", especially when you've done the work yourself.
-
Hi J P D, it looks like you have a great car to start with for your project Z. Glad to hear you have tackled a few car projects before. As Enrique pointed out, it's easy for a person to get in over his/her head by tearing a car apart without a plan. FWIW, I submit the following: I'd say the first step would be to determine what work you will do, and what work you will send to a shop. Try to schedule the shop work so that you will have the items that have been sent out back when you'll need them. This could include rebuilding the engine and transmission, body work, chrome work, interior, etc... Then make a list of all the new parts you will need. Purchase as many of the parts as you can up front, so that you don't have to wait for parts to arrive in order to complete any given step of the project. Another option is to purchase the parts in batches. Each batch should contain all the parts needed for the current task. Buy a good digital camera, if you don't already have one. Take lots of pictures along the way. Get a notebook, too, and make notes as you go. Documenting details as parts are removed and wires are disconnected will save plenty of time & headaches when it's time to put things back together. Never trust anything to memory (I've lost a few brain cells to beer, myself :stupid: ). Buy a box of Ziploc baggies for storing small parts. I like the ones with labels you can write on. Round up a few sturdy boxes or buy a few large plastic totes for storing the filled baggies & other parts. Anyway, I would suggest repairing the mechanical items first. Pull the engine and transmission and send them out for rebuild/repair, unless you will do this yourself. Tag & label all electrical connectors that you take off. Start by rebuilding the suspension. Replace the struts, springs, bushings, brakes & brake hardware, drive shaft & half-shaft u-joints. Clean all of the suspension parts, then refinish them with a good black semi-gloss paint. Reassemble the suspension on the car. With the engine & transmission out of the car you will never have a better time to refinish the engine compartment. Remove everything on the firewall, inner fenders, radiator support, etc... Bag & tag the items you remove. Once the engine compartment is bare, clean it thoroughly. Make any rust repairs that are necessary. Once everything is up to snuff, repaint the engine compartment. Clean and detail any of the underhood items that you will re-use. Then put everything back on the firewall, inner fenders, etc... If you sent the engine and transmission to a shop, hopefully they will be done about the same time you are done with the engine compartment. If you are doing the engine & transmission work, do it now. Reinstall the engine and transmission, along with new motor & transmission mounts. Next, move on to the body. Begin by repairing any rust damaged areas. Weld in new sheet metal or patch panels where needed. If you are good with a hammer & dolly, you should be able to remove most of the dents. Use a good quality filler where needed. Once all surfaces are dent free & smooth, prepare the body for paint. This will involve lots (and I mean LOTS) of sanding. A good set of air powered sanders (DA, jitterbug, inline, etc) will save a bit of time, but I like to finish up with wet sanding by hand. Prime & paint the car. If you are not doing the body work, then drive or trailer the car to the bodyshop you've scheduled with to do the work. Once the body work is done and the car is repainted, it's time to do the interior. If the dash is cracked, repair it, replace it or cover it with a dash cap. Reupholster the seats. Put in a new carpet set. Repair or replace any of the vinyl that is damaged. Repair or replace any of the interior plastic panels that are damaged, including the center console, heater control panel, etc... Deliver the car to the interior shop for these tasks, if you are not planning to do the interior work yourself. That's it, in a nutshell. Following these general steps should result in a nice looking, nice driving Z car when you are done. Of course, any of the steps could be done in a different order depending on time & money :classic: . Thanks for bearing with such a long winded reply, and remember, this is just one old buzzard's thought's on the matter. Oh, and keep in mind the five P's: Prior Planning Prevents Poor Performance!
-
When I bought my '73 the outer rear wheel arches were rusted through. I purchased a pair of replacement arches from Tabco and had a local body shop weld them in and spray them with primer. They did fantastic work, check out my gallery for a few photos.
-
Hello, Pennyman, I recently rebuilt the front & rear suspension on my '73. I bought a strut/spring package on e-bay that included the Tokico HP blue struts and Tokico springs. I also replaced all the bushings with Energy Suspension urethane bushings. I got the bushing set on e-bay, too. This combination has yielded a firm, yet comfortable ride. But, anything would have been an improvement over the old suspension... the struts were shot and the bump stops were missing. A couple of the original bushings were pretty well deteriorated. My teeth darn near rattled out of my jaw when I hit a bump before. Now it's a lot smoother! And no missing teeth!
-
Have you checked the point gap yet? Could be the points are either staying closed, or staying open. Have they been replaced, too?