panchovisa
Community Member
-
Joined
-
Last visited
Everything posted by panchovisa
-
Pusher, Thanks for letting everybody who has invested time on this thread know what you have found. Many times I see people throw a problem out to the group to help solve and then they never let people know the result. I think that is kind of rude and doesn't help other people that may (or will) have similar questions. Try backing out the big bolts in each end of inner a-arm, that will relax the bushing (and spread the shoulders) until you get the bolts back into cross members.
-
 Very trick Ron! Stay awake much at night ????
 -
Is the new diffy the same length from input flange to back aluminum cover? Are you putting front cross member back on with cut out for exhaust on the correct side? My guess is that the answer is yes to both, but just thought I'd ask. I would loosen the two nuts that hold moustash bar (rear diffy bracket) to the car. This will allow m-bar to move backwards slightly. I would also back out big bolts in front of a-arms. This will allow a-arm bushings to "relax" and lengthen out. I would attach the front cross member loosely, reposition the metal/rubber front diffy mount as far back as possible, install the diffy, tighten m-bar nuts, tighten crossmember bolts to car, attach prop shaft, and finally tighten big bolts thru bushings. If you want, grind hole thru front cross member elongated toward the front. I think the main problem is the m-bar is pre-loaded by old bushings to move forward and it is just to hard to get any leverage when your on your back with a diffy on your chest to push it backwards. Crack open a Fosters and give it a thought! Or two! (Fosters, that is)
-
Pusher, looks like the previous owner put bushings in wrong place. The bushing at the back inner pivot is about 3/8" shorter than the front inner pivot. Looks like he got them reversed. The big bolt compresses the bushing until it is stopped by the steel inner sleeve. This swells the bushing (stock rubber) and brings bushing shoulders tighter against the pivot brackets. I would guess that now you've found most if not all the cause of toe-in problem. Might as well check out the other bushings also, he may have 3 long/ 1 short bushings instead of 2 long/ 2short.
-
 Yeh, this and a Cheetah will do me fine.
 -
Leave the ball joint attached to steering arm (holds crap in position so you don't need 3 hands). Slide steering rack bellows back towards steering rack until you see two wrench flats. Break jam nut loose at tie rod end. Turn "ball jointed" threaded extension from the steering rack (the part with the two wrench flats) the proper direction. One side of car is right hand threads, and the other side is left hand threads. Look for an "L" on jam nut/rod end, or better yet just examine direction of threads (compare to a standard bolt if your not sure). Use plenty of WD-40 and give the ball joint a couple of sharp raps to break rust loose. Wear your knuckle buster glooves and have at it.
-
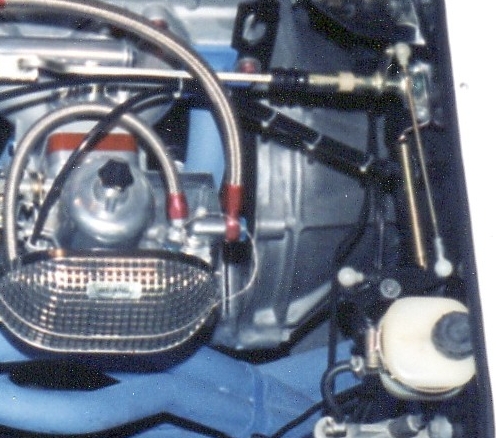
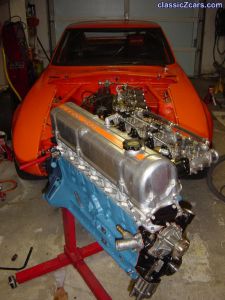
moyest, Add another return spring from the top portion of the"bell crank" mounted on firewall to a home made tab mounted behind the mounting point of linkage (close to firewall at end of shaft heading toward carbies). I'll try to attach a file that (if you blow it up bigger) shows what I'm talking about. The added spring is gold collored. My throttle is very firm and responsive, and the carbies shut down immediately. Also check that long throttle shaft moves freely. Drop the three links to carbs and the link to bell crank. Long shaft should not bind.

-
I think your talking about the GTO class car run by Cunningham Racing. Not sure exactly what they used for trany, but I do recall that the twin turbo V-8 IMSA GTX Z run by Bob Sharp racing used a Hewland transaxle mounted at the rear, driven by a drive shaft (at engine RPM!). Most race car developement usually goes ever onward, so I'm guessing that if the rules allowed it they probably also used a Hewland transaxel (very expensive at about $9K, and requires constant rebuilds).
-
If it was actually a problem with the haed gasket it will be quite apparent. Next to one (or multiple) water passages you wil see that the gasket is not tightly compressed/ erroded/ flakey. If the gasket has broken towards the combustion chamber you should have seen white exhaust at start up and will probably have some errosion of the aluminum head caused by combustion heat/ gasses mixing with H2O/ anti-freeze to create an acid that eats aluminum. Talk to a local engine rebuilder to determine if head needs skim cut/ weld/ or "plastic" metal repair. A leak between water and oil passages will result in "milky coolant" and contaminated oil (possibly excess "oil" level). Should be no problem with head if it didn't overheat. A leak between water passge and edge of gasket only results in low water level and mess on outside of engine. Aleak between oil passage and combustion chamber should have given a blue exhaust at all times. Only concern would be that leak was large enough to starve top end of cylinderhead (cam/ rockers) of lubrication. If that was the case you would hear more "clatter" noise from engine especially at idle (when oil pressure is lowest). Note that it is possible to have combinations of the four main types of leaks.
-
Well who will be the first to get an english wheel, shear, press brake, tig welder, hammer forms, shot bags and build the first all aluminum Z car????? Oh come on, should only take 2 or 3 years if you quit your other job! Just think that if Datsun had made the Z car out of aluminum we would have been forced to learn some of the metal forming trade. People always talk about having enough money not to have to work. If I were stinkin rich I would love to tackle a project that requires similar hard work just for the satisfaction of creating a thing of beauty. I wouldn't be the "idle rich" thats for sure!
-
Wow, what craftsmanship!! Unbelieveably huge project to attempt. Can't imagine how much money it cost, or how many millions it will be worth when finished.
-
 Cris, Spare race engine, or one of things your selling? Either way I'm jealous.
 -
A sprung wheel is just the wheel. A bent stub axel is something else. Most spare tires on used cars are in the trunk (and not on the car)for a reason. Swap the front and rear right side tires. Go for a ride, if wheel was sprung you feel it in the steering. A friend could follow to see if wobble/bounce/whatever is gone from rear wheel. To check for bent stub axel flange face (don't believe you could bend the round part of axel withount damage to axel housing/bearings) you would need a magnetic base indicator holder, a lever style indicator (+/- .015"), and would need to run nuts down wheel studs to hold brake drum tight to stub axel. I would imagine that total indicator movement greater than .008" at 6" diameter would be questionable.
-
With the wheel mounted on the car you can rotate the wheel (up on jack stands) and see if the rim (out at the bead seat) moves inward and outward. Use a pencil taped to a chair leg for reference point. The pencil lead will wear away from the "high" spot and you can use a feeler gage to measure the gap at "low" spot. Excessive (depending on quality of wheel, the total lateral runout should be less than 1/32") lateral runout would indicate the wheel rim (bead seat) has been "sprung" in relation to the wheel hub mounting face. This would make the wheel look like it "shimmies" while you drive. Would also make wheel appear to have (toe in, less toe in, no toe, toe out, etc) as the tire is rotated. Check a couple of your wheels to get a reference on the lateral run out of a good wheel. Fixing a sprung wheel is a job for experts. By "took a shot from the left" I didn't mean collision, I mean't suspension took a hit from curb, pothole, etc. There may bee no visible dmage to see. Maybe tire scuffed or wheel ding at most. Ya, the rear control arm bushing would be the non-adjustable type. If you wanted adjustable maybe someone else knows where to find them.
-
I looked at all the pictures and can't see anything obvious. It is possible that the stub sticking forward from the a-arm at the inner pivot could be bent. You could support the front of diffy and drop the front cross member and the two rear clam shells. Both a-rms will be free at inner pivot. Then slide off bushings and check that "stubs" are in line with rest of a-arm tube. You could replace the bushings at that point also. Also appears that drop piece from frame to rear cross member is slightly crooked. Could just be optical illusion or sign that rear end took a shot from the left rear and has been moved to the right. In that case I'd fall back to my previos suggestion. Have you spun the wheel to rule out that it has been sprung?
-
 It was at Gooseberry Falls state park. About 40 miles north of Duluth. Had to jump about 8 feet from main cliff to stand on part of cliff that was seperating (will eventually collape into lake about 40 feet below). Beautiful inland ocean! Holds about 10% of the worlds fresh water. 1800 ft deep in places, and has storms that sink oceangoing freighters.
 -
On a cliff over Lake Superior with my better half.
-
I agree with the concensus. The right a-arm should show a buckle at some point. It is also possible that the pivot pin thru the bottom of the strut is bent (more likely if a-arm has stock rubber bushings). The Z cars did have a small degree of toe in built into the rear. It is possible that the side you think is straight is actually toe'd out. In that case you can loosen the bolts (four from body to drop pieces) and (four from drop pieces to lower rear cross piece forming inner a-arm pivots) and genty reposition the lower rear pivot points towards the left rear. The front pivots are fixed (and could only be moved on a frame rack) ,but the rear pivot points are kind of "loosely" located by the assembly of sheet metal stampings,over sized holes, and under sized bolts (talk about tolerance stacking!). Most things can be moved with a big enough hammer (part joke, mostly serious).
-
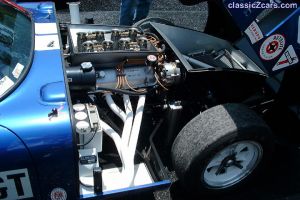
 Notice the hood prop'ed open to eliminate front end lift. Just like the old Can-Am cars and their fenders vented to the back side. Not against the rules, and I wonder if anyone back then realized it wasn't "bad body work".
 -
Sorry guys, I hit my browser "back" button and it posted again. Tried the edit/ delete post and don't have privleges to delete the copy or origional.
-
GaryZ240, I'd have to agree with jmortensen about that head having been faced. If you look at your "c" jpeg it appears that the #3 and 4 chambers are much larger than the others. Just lay a straight sheet of paper on your monitor with the c.jpeg and try to line up the edges of the chambers towards the in/ex face. I would guess that both ends of head have had more material removed than the center. If this is true you will have various compression ratios on the different cylinders. The head may need cc-ing to operate properly. I also would not use the cam or rockers if what appears to be rust actually is, and not some sort of reddish assembly lube. Also, if the head was milled to correct a bow'ed condition then the straightness of the cam towers is also a question area. When the head is in your hands you will be able to access it's condition more accurately, and get estimates to correct any problems. I hope I'm wrong (wouldn't be the 1st time).
-
 I like the stance and ultra smooth flairs and body. Not a fan of hood vents (would like them better painted to match body). Just needs to finish black out on side windows. The wheels look great with the deep offset and the style compliments the rest of car. If it were for sale I'd buy it!
 -
If your confident it's not the rings, then the valve stem seals are probably the problem. It's not a tough fix, and not expensive. Also make sure you have washers on your plugs.
-
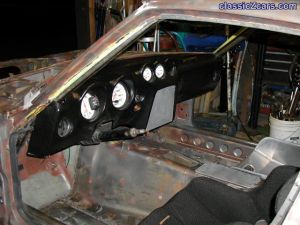 Reminds me of when I built my 1st Z racer. The bare metal, spots of primer, weld burns, etc. The pay off is when the 1st coat of paint goes on, it just comes alive! Are you going to weld in any kind of clutch scatter sheild? Wish I hadn't thrown away the box full of templates of every plate/ tab/ mount/ duct/ bracket/ etc that a Z racer could use. I would have sent them to you. In the old days the SCCA wanted 1/8 in thick scatter sheilds. I had one that went from dummy pedal to the left side of tunnel top, and from the vertical section of firewall back to the area about 2" in front of the shifter cutout. The left front down leg of the cage mounted (welded) to it as well as a drop leg from the dash cross tube. I believe it really stiffened up the frame, including the left front frame rail, and the diagonal tubes from dash center to the front strut towers. Plus it made more confident that I would still have two good legs if I were T-boned by a heavy Vette. Keep the pictures coming.