


panchovisa
Community Member
-
Joined
-
Last visited
Everything posted by panchovisa
-
New pilot bearing for back of crankshaft (pack the old one with grease and use a pin "slightly" smaller than pilot on trany input shaft to "drive" out with hydrolic pressure). You will want a new throwout bearing. I believe you will want a 240 clutch which will need the OLD 240 throw out bearing collar and fork with the adjustable slave cylinder rod. Someone correct me if that is wrong, I just recall some have had problems mixing 280 with 240 pieces during this swap.
-
John, the comment about 300# springs leads me to question if that is the wheel rate (including sway bar rate) or just the spring rate alone. If it is just the spring alone then what rate are people using for a sway bar? Remember that every 1" front sway bar doesn't give the same rate (the length of "arm", material, rod end or polyurethean bushed drop links, flat ends on arm vs cross holes vs clamps, etc.). The spring rate alone will affect brake dive, squat, and two wheel bumps. The wheel rate will affect cornering, turn in, and trail braking. Pancho (didn't get package sent until last Friday, sorry)
-
I'm no expert, but looks like a fair amount of carbon build up. After the rebuild I'd suggest getting some NGK sparkplugs in a sligthly hotter heat range than what was previously used (unless engine was previosly driven by little old lady. Then just stick with recommended heat range). Good luck on your project.
-
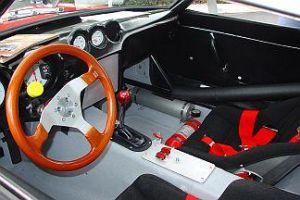
The purpose of that coupling was only to provide a softer feel to steering inputs. It is meant to be flexable in rotation, not to align the steering shafts. The u-joints in the assembly take care of shaft alignment. Performance users would want less lag between steering input and the result. Like Carl said there are polyurethane upgrades available. I made mine out of solid aluminum. You could get one made for $20/$30, our do it yourself for $2 worth of aluminum.
-
Wouldn't you think a purist would have posted this under General Chit-Chat rather than Tecnical Articals? And his Gallery is gone, how will we know how it should be done?
-
2ManyZs, sorry I took so long to post (working in the garage). The part number (ARP's) is 100-7703. Didn't measure the knurl, but it needs a 15.5mm hole (.610") so of your two knurl diameters I would assume it's the .680" knurl. With any knurl the hole size is most inportant. With mine I measured the minor dia of knurl at .580 with a tool scope. Tried a 15mm (.590") hole and couldn't budge the stud. With 15.5mm (.610")it was hard to press in, but with 4 foot extension on arbor press and good grease on stud it seated fully. I think a .625" hole would be to big.
-
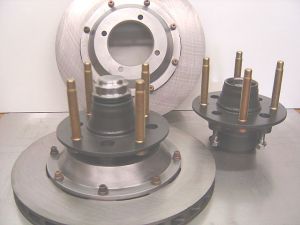
I just put in the 3 1/2" ARP studs from Summit Racing. They are listed as Chrysler studs with a 1/2-20 fine thread. It did require the hubs to be drilled out to 15.5mm. The stud has a very coarse knurl (don't think you could ever spin them). The threaded portion from hub face is 2 5/8" and 3" to end of starter pilot. The problem is not finding studs, but to find the correct style nuts to fit wheels & studs. My set up requires "open ended" mag style nuts (glad I already had).
-
Boy scouts was a blast until I got kicked out. Seems the scout master didn't appreciate it when my buddy and I put our name tags on the "in water" side at the lake and snuck back to camp to smoke. When we got back to the lake we saw all the others holding hands and walking out into the lake. Of course we walked up behind the leader and asked "What kind of game are we playing?". Well that, and three years as a tenderfoot (didn't want to be too competitive).
-
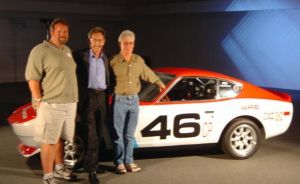 Build a Z in two days huh? They could have saved some money by just filming you and your guys doing the same thing before you showed car at Motosport Auto Nationals.
 -
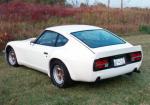
 Looks great, just wish the photo was bigger!
 -
David, glad it worked out. I used to be a ski bum in Jackson, Wyoming is some beautiful country. I'm just guessing that the first time you assembled the axel you tried to "pull" the inner bearing into it's seat with the axel and nut. Correct? I'm also gyessing that the second time you assembled you "Seated" inner bearing then pulled the axel through seated inner. Correct? I just assumed that inner bearing got slightly "cocked" which caused inner bearing to bind while trying to turn off axis.
-
Well as long as you have decided to rip it all apart "I would back off the torque on axel nut until start turning torque is in spec, then measure end play and verify axel nut torque is in range." Or not.
-
If it only drips with more than a half a tank then I think you probably have rust pin hole in tank (maybe sat for a long time with half a tank and rusted at that level).
-
Of course you dont have the halfshafts on or the brake drum on when adjusting start turning setting!!!!!!!!!!
-
I have scanned an old S30 chassis and body manual and will try to attach. The spacer and the housing are BOTH marked. The housing appears to be marked on the top near where the flex brake line clips to hard line. The distance piece only relates to the distance between the "lands" in housing. The stub axel has no effect on spacer length (the inner bearing presses onto axel until it stops against "land"). Spacer "C" is the shortest (2.063"/2.065") Spacer "B" is middle length (2.067"/2.069") Spacer "A" is the longest (2.071"/2.073")(manual has a typo here, I corrected) Spacer "A" for housings 2.072"/2.076" between "lands" Spacer "B" for housings 2.068"/2.072" between "lands" Spacer "C" for housings 2.064"/2.068" between "lands" Notice the spacers can be from -.005"/+.001" from length of hub. The rear axel end play is 0.0"/.0057" This can be the reason that the axel nut torque can range from 181/239 ft-lbs. to keep the axel shaft turning start torque is 28.7 oz or less pulling at a wheel stud. I would back off the torque on axel nut until start turning torque is in spec, then measure end play and verify axel nut torque is in range. Yes Regis, this is my final answer! PS can't seem to get scans attached.
-
The "distance pieces are marked "A", "B", and "C". They should go into rear hub castings with the matching mark. I have mine apart now, but I'll be damned if I can find the letter mark anywhere on my hub castings (but of course I ground them down smooth before I knew they had and important mark on them! Dooh!!)
-
Datsun/Nissan joints are aftermarket (they don't make their own, why should they?). Who makes them is unknown, but my guess is a quality aftermarket company (Moog?). All you get from Nissan is a 200% mark-up.
-
The comittee for the creation of the wheel is deadlocked over what color it should be (or something like that). Not knocking anybodys job (Ark #1 thru #3), just amazed at how people change fields of work and also some of the more unusual jobs. I've been a patternmaker (20 years), product designer (7 years) and Swiss CNC machinest/programer (4 years). Eventually want to move to Cancun and be a real estate speculator/taxi medalion leassor.
-
After reading all these responses why am I reminded of "The Hitchikers Guide to the Galaxy" and the Ark #2??
-
I do as little as possible, but I'm a complete failure at it.
-
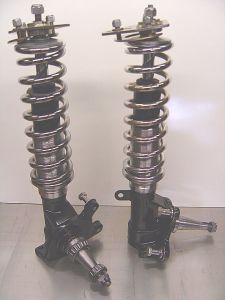 Steve, they are nickle plated I believe. Chrome plating can cause hydrogen embrittlement if they aren't treated properly after chroming (NOT GOOD FOR A SPRING!!!). They are from Carrera Shocks, as are the collars, camber plates, and of course the shocks.
 -
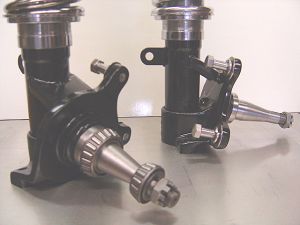 Steve, the front spindle is forged. The heat zone from welding only extented about 1/2' from weld, so wouldn't think it changed any metal properties of the spindle or brake "ears". The rear strut braces were a little more trouble. The strut tube is silver soldered (factory) to a ductile iron hub casting. The steel brace had to be welded to strut tube and brazed to ductile casting without screwing up silver solder joint. I'm still working on some other special mods to rears so don't want to post pictures yet (but believe me you have never seen anything like them). And yes I do want to drive it full tilt, soon I hope!
 -
 Funny you should ask. They are ARP studs from Summit Racing. I ordered 16 and got 16 packs of 5 each!!!!! The holes have to be opened up to 15.5 mm to press studs in. PM me if you want some studs.
 -
Now it's a toad with a G-nose. Still ugly.
-
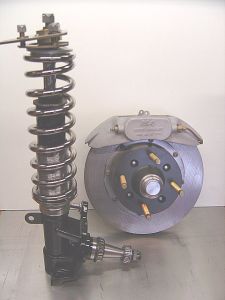 Hurst-Airheart 4 piston front calipers and vented disks from old Datsun Competition catalog racers buffet. Rebuilt stock hubs (wanted aluminum hubs but am spending to much already), 3 1/2" long wheel studs (for the vintage race look), also stayed with four studs for vintage look. Getting custom made wheels so four studs are no problem.
