


siteunseen
Free Member
-
Joined
-
Last visited
Everything posted by siteunseen
-
 Most chain parts stores have a section of small stuff sometimes they call it a "HELP ME" section. I always go to Advance Auto or O'reilly's. They have them for sure but you might call around before going. If you're gonna use the bushings in your shifter, you need to take it with you and check the size because I'm not sure of the part number that I ended up using. Here you go!! Thanks again Blue! http://atlanticz.ca/zclub/techtips/shifterbushing/index.html
 -
Yes, welcome to the time machine. I'm a middler I guess, half my stuff is backwards, the other half is forward technology. Getting fuel is when it happens to me the most.
-
The lid, from what I read. I haven't done it myself yet, but the next time I will for sure. Seems like someone would've made a better gasket by now, these cork ones are pretty much once or twice then replace. I'll try the RTV like Rossi says. If I remember right Permatex makes one for fuel. Yes they do;
-
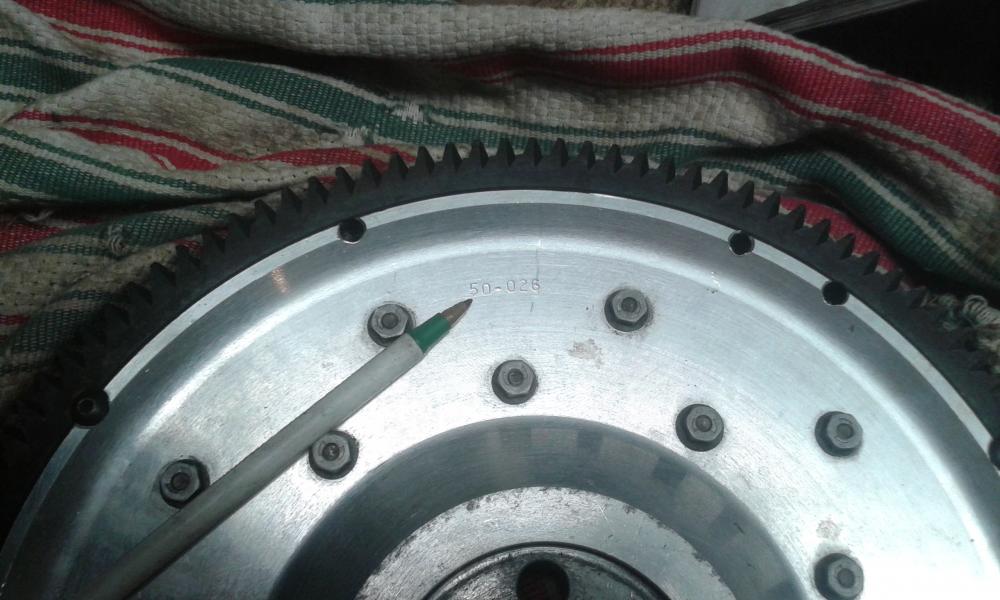
Awe what the hell. I was wrong anyway. Markings a "TE". Tilton engineering? "50-026" opposite end. Ga'night Jean P!

-
I have a Tilton. It has a slight "TL" looking engraving on the front. Just had it resurfaced and my machinist said he could go down to the screw heads holding the disc on. He removed the dowls and resurfaced it with the disc in place. I can put up a picture in the morning but it's my bedtime now, sorry.
-
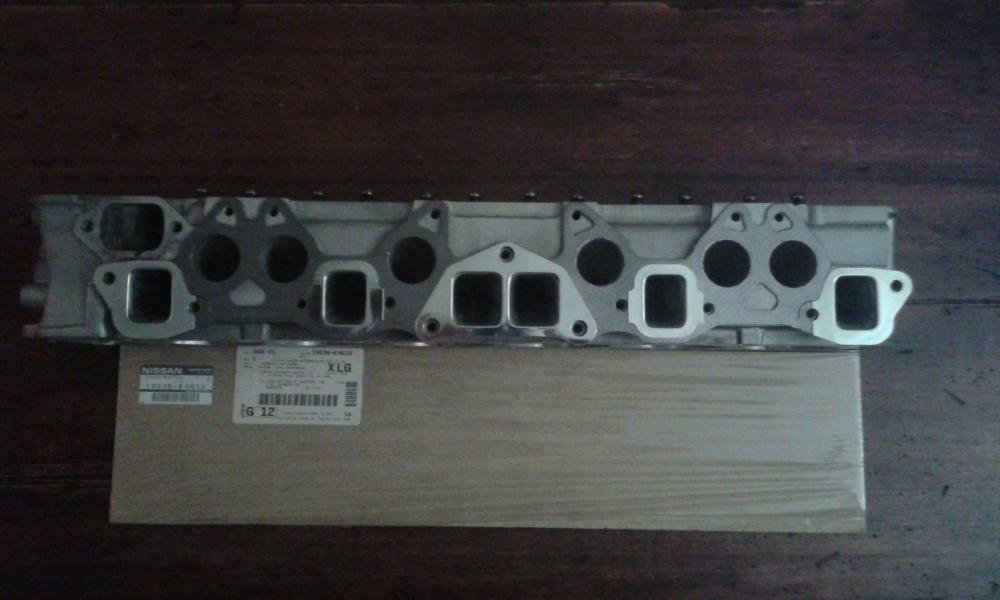
I highly reccomend nissan # 14035-E4610 manifold gasket. $15 from my local dealership. Took a couple of days though but fit and finish is fantastic. Here's mine on ported E-31. Felpro is fine but don't stop short now. 8^)
-
I got a bad valve from Ztherapy once, they source them from someone else I'm sure. The pin was too short to bottom out and seal off. Bruce overnighted me another one, no questions asked. They're top shelf folks in my book!
-
You can remove the valve and push the pin down and shouldn't be able to blow through it. Does that make sense? Pin up you can blow through. Pin down no blow.
-
You can take those float valves apart. Remove that small clip ring at the top and pull the pin out. There's a little cone shaped at the end. Mine are grey in color. There's also a spring in there you can stretch out for a stronger closing pressure. Clean the pin and it's seat inside the body of the valve with a can of carb cleaner. Stretch the spring and it should be like new. Or buy new ones.
-
You can use those Dorman pin bushings for your gear shifter too. I've got them on mine instead of the plastic OE ones. Work great and no more slop. And of course I read it on here first.
-
Go to a restaurant with "free refills" to get a small straw, an all you can eat Chinese buffet.
-
Those seals should have a couple of straw like condoms in the bag. put the curled end on the vale tips. Oil them up like SB says. Push the valves through. Reuse the condoms on half then go with a new one for the other six. DO NOT FORGET TO PUT THE SPRING SEATS ON FIRST I learned that that hard way.
-
It's taken me some time to get used to the "extra" but I completely understand Mike's reasoning. I see at as a way to help a whole other generation of members. And they need help for damn sure. I enjoy trying to help out when I can. I've made it through the guy from Panama! That was/is an exercise in building patience. Something I've never had so it's helped me as much as him just in a different way.
-
Try unplugging the cold start vale. It could be fouled up somehow and continues adding fuel after the motor warms up. Too much fuel would cause backfire through the tailpipe. Some people don't have them at all, they go bad and the car will run without it so they just unhook them.
-
I should have used A B Normal with this avatar. That's my reality.
-
We have gained a lot of new and younger members since Mike gave the site a face lift. It took me a minute to get used to it but it works like a magnet. Way to go Mike!
-
I bet that sounded like a train on loose tracks! Clackity, clackity clack. Maybe the locking nuts were loose for a loooong time?
-
Blazing Saddles!!! "The sheriff is BONG What did he say? The sheriff is near No dad blame it...the sheriff is BONG"
-
Take a look at the rubber on the pedals. They'll give you an idea of milage. Welcome aboard and a hardy handshake to you.
-
That's what I'm trying to say without making anybody mad or sounding like a know-it-all. If he cut the cones off and maybe tapped the suction chamber with a rubber hammer until everything was smooth then tightened the screws? We'll see soon enough, can't have too many Z parts.
-
Maybe the body screw holes are cross threaded? Maybe the screws are wrong? Seems like there would be scratches if something needed replacing?
-
I had my spares down today and was going to post some pics! I'll do it in the a.m. Mine are 3 screws with the nubbies on the front 2 screws. The rear screw has nothing. The way the nubbies are positioned, one side is above the screw hole and the other side it's below. The suction chamber can only go on one way. If you slightly tighten the screws, get the piston dropping smoothly then tighten them down it's super simple. The nozzles have to have their angled "leg" pointing to the float chamber and that's it. I won't disagree with you but the nubbies are no big deal on the 3 screws I have. They're all crumbly anyway. I'm too comfortable to go downstairs at the moment but will in the morning for pictures. I can't understand why his are fine without screws but bind with screws? I'm too frugal to buy new parts but everybody's not like me and you. Goodnight Sir.
-
Welcome to classiczcars.com! The archives are great. Stay in school as long as you can stand it. 8^)
-
-
It confuses me still but somehow it works out? Here's some stuff off Blue's Tech Tips that may help. There's electrical and mechanical. I do the mechanical line up first then put a light on the pulley and adjust to at least 10 degrees, mine runs better between 12 and 15. Something that'll really help is to mark all the notches with white-out or some kind of paint. Another thing, those remanufactured distributors are bare bones, no cap or button and the ZX's are bigger plus you should regap the plugs to ZX specs, can't remember off the top of my head, .46???? Mechanical, initial set up, http://atlanticz.ca/zclub/techtips/timing/mechtime.html When you get all that done, crank it up and turn the distributor until the pulley mark lines up with the 10 when the light flashes. If you have the 240 pulley, the one to the far left looking from the front is 0, next is 5, third one is 10 etc. Those are the ones that need paint. It's confusing! I'm not a good explainer either, sorry. My Dad never uses a light, he turns the distributor until the valve train is the smoothest sounding then backs up a tad. But he's a Chevy man.


