Everything posted by siteunseen
-
Seafoam spray through carbs ?
That's where I get the air filter remark. Every single time my commercial mower starts running bad it's ALWAYS the air filter, cleaning them a few times is okay but I buy a new one every spring. Another thing is the summer gas blend the do in California. Could that have an effect on you Z?
-
Seafoam spray through carbs ?
When is the last time you replaced the air filter? I've got the Nissan P/N if you want to try one, they're much better quality than chain parts stores.
-
Deja Vu: 1971 Restoration
You wish that car could talk! It be a lot better off.
-
The GREAT 2017 ZCON picture thread
The force is strong! Listened to SRV yesterday while painting my house, loud too. Good work music.
-
Cooling issue from hell
I'm leaning to the timing adjustment just for shits and giggles. Also I can dial my potentiometer while driving and watch the temps go up and down. So maybe cleaning those connections might have an effect?
-
The GREAT 2017 ZCON picture thread
See if you and Zed Head can get together and make the flight/train ride/car ride. I don't know if he'd leave the "help desk" long enough to play with us? Sure would like to put a face with both you guys, maybe even cram a drink in those faces?
-
The GREAT 2017 ZCON picture thread
Yes! I'd share a room with mr maras, with 9 fingers we might get a discount! Less hand soap?
-
Cooling issue from hell
I say that's the fan clutch but without a little more info I'm just guessing. The way I've always thought/learned when the car is cold you should only be able to get one or two at the most rotations of the fan by spinning with your hand. I've also read where they somehow lock up and spin continuously sounding like an airplane all the time.
-
Cooling issue from hell
Don't get mad, you've built a nice engine bay so this stupid but Nissan thermostats make a big difference and the spring goes down.
-
35 mm film developing find
Need to get rid of this stuff! possibly free to a good home that pays shipping charges. No resellers please, I'm trying to do something nice here and don't want anybody taking advantage of it for profit.
- 1976 280Z Restoration Project
-
Cooling issue from hell
That's the fan clutch coming in and out.
-
Cooling issue from hell
I think I've read some head gaskets block one of the coolant passages on certain head swaps? If it's an N42 block and N47 head should be good to go but an F54 with an N47 maybe not? Maybe this is what I read and it has the '83 turbo head, P90A http://www.zcar.com/forum/10-70-83-tech-discussion-forum/120833-head-gasket-holes-don-t-match.html
-
Cooling issue from hell
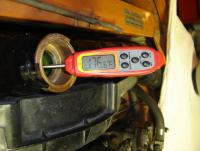
Have you put an actual thermometer in the radiator and let it idle until the thermostat opens? My 240 needle sets on the right leg of the M in TEMP on the gauge. I thought it was running hot too so i put a digital meat thermometer in and it runs at 173F sitting in my garage with no air flowing. So long story short, my gauge is flaky and my temp is fine. EDIT 176F with no airflow
-
The Classic Z Motley Crew
I'm gonna ask Nick can I stay at his lake house? I heard he needed some extra money and was using AinB.
-
2017 Z Nationals, who's going?
Yes they'll be "A" brew or 13! If our car's aren't ready we can walk or at least Uber. I'm gonna drive the dog's 280 so he can hangout a few days then come back and get my 240. The old saying "arse gas or grass" does not apply to that car and my Buddy can't provide any of those (that I know of), he may be a drug sniffer gone to the dark side/crossed over. But he loves riding in the hatch of the 280. I think he likes the buzz from the exhaust fumes? Takes after me!
-
fuel mixture or jet adjustment nut settings
-
2017 Z Nationals, who's going?
Yes!, no excuse with this head start, not even for me.
-
Somethings wrong...
When he sits still long enough I'll post a picture. Maybe I can catch him while he's sleeping? He is still a big ole puppy though and there ain't much chance of sneaking up on him! He'd been a good dog for Clint Eastwood. Remember that movie when the old Indian tells him he's noticed when people sneak up on him they get shot. I can't sneeze without him "come a runnin'". He's super protective of the one that feeds him.
-
2017 Z Nationals, who's going?
Read her post on "something's wrong". She got a new cute friend and co-pilot. 8^)
-
fuel mixture or jet adjustment nut settings
Surprisingly there's people that don't understand left and right looking from the top. Hence my analogy, driver's side and passenger's side.
-
2017 Z Nationals, who's going?
Will you be driving a red Z? Maybe newer than what we're used to?
-
fuel mixture or jet adjustment nut settings
When I've explained it in the past, trying to be as simple as possible, turning them towards the passenger's side=leaner. Driver's side=richer.
-
fuel mixture or jet adjustment nut settings
Mark make sure he understands the mixture knob. I turn mine CLOCKWISE until they are snug, then COUNTER CLOCKWISE to 2.5. I'm sure it's a typo but who knows?
-
Somethings wrong...
Well now, what a sweet looking little girl you've got there! Congratulations, everything else is secondary from here on. She's smiling too!


