Everything posted by Zed Head
-
Starting a new project...Subaru STI Differential swap into my Z
So how long did it take you to do the work? And did you get the parts from the guy on Hybridz? What would you estimate you spent, all told, by the time you got it installed? Just to fill in the blanks for a good comparison to a diff and half-shaft swap.
-
Starting a new project...Subaru STI Differential swap into my Z
With the OBX you'll have to get deep in to the guts of the differential, and the odds are high that there will be clunking or howling or the Belleville washers will fail if you don't replace them. With the STI you could not even remove the cover and probably end up okay. Kind of comes down to how much risk you want to take and how much wrench work you want to do. The OBX seems simple in concept but the details are difficult. On the 5 speed - don't forget that the early ones have a 3.321 1st gear and .864 5th, while the later ones have a 3.062 1st, and .745 5th. The later ones, 80-83 ZX, typically came with the 3.9 rear gear, so you'll want an 80-83 ZX 5 speed.
-
Greasing the Rack and Pinion on a 76
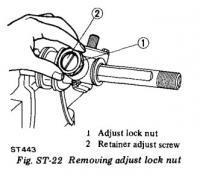
It's not difficult. You just have to work blind or with a mirror, but there's room from underneath. Finding a tool big enough for the locking nut takes some work though, I think that I used padded vise grip jaws on mine. And, as I think back, I also had to fabricate a big "screwdriver" from a flat piece of steel to turn the adjusting screw. The old grease inside was dry and chunky though, and I did get 10-15 degrees of extra tightening on the nut, if I remember right.
-
Greasing the Rack and Pinion on a 76
Why don't you lube from the inside? Remove #2 and the parts underneath, pack it full of grease, then do the adjustment procedure to tighten things up. You'll probably find that there's been some small wear and there is room to tighten.
-
google is getting even dumber
The Future.
-
Need assistance from the Zed Collective Conscience!
I had a very, very similar thing happen to me when I was checking a spare ECU that I had (coincidentally from a 1978 parts car that I had picked up). I installed the ECU, the engine started right up, I hit the road for a little test drive and it hiccuped once after a Stop sign, then died before I could turn around to get home. Within about a mile. It started again and made it about 1/4 mile before dying again, then another 1/2 mile, then wouldn't restart. The guy who helped me push it in to a parking lot said it smelled like it was flooded. I ran home and got the old ECU, replaced it and drove home. I reasoned that the transistors that drive the injectors had crapped out and replaced them, and it seems to work right now, although I don't trust it and only keep it around as a curiosity.. Flooding from a bad ECU has been documented a few times. I can't remember the guy's screen name but one member re-flowed the solder joints at the ECU connector to fix a similar problem. Summary - it might be your ECU.
-
Help Me Identify These Parts (Photos Included)
The popular option is in the link, called the RT Mount. There are a couple of places to get them. Many people on this forum use it to get rid of the clunk. But others say that a new rubber mount and strap will accomplish the same. http://www.classiczcars.com/forums/engine-drivetrain-s30/35995-ron-tyler-differential-mount.html TechnoVersions - Home of MeterMatch, TachMatch, Diff Mount and MotorMatch
-
Help Me Identify These Parts (Photos Included)
The parts look good individually, but the combination might not be the best. The solid front with the flexible back concentrates much stress on the front cross-member mounting point. Here's a thread from Hybridz that mentions it along with some other facts and options. What is the deal with solid diff mounts? - Drivetrain - HybridZ
-
Heater blowing cold air.
jmort brings up another good possibility. On my 76 I also found that the cable that actuates the heater control valve (the one that determines how much heat, cold to hot), was bent and not actually doing anything when I moved the lever, just moving the bend in the cable. I had to take the control panel off and dink around with it, and even after fixing it the valve is more off/on than gradual.
-
Not charging at idle
Glad it worked, you're welcome. You may have completed the fastest voltmeter removal and replacement I've heard of. And to be honest, I don't even know how to replace the charge light bulb, but I know it needs to work. Did you actually remove and replace the bulb behind the charge lamp? What kind of bulb is it?
-
Heater blowing cold air.
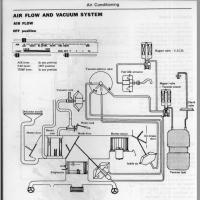
Yes, it is. It's pretty big too, over on the passenger side, hard to miss. The diagram is from the AC chapter - Index of /FSM
-
Heater blowing cold air.
-
Heater blowing cold air.
Check the vacuum lines to the white bottle under the hood. The valves for the heater flaps are vacuum operated. Pretty common for old tiny vacuum hoses to crack and break off. The vacuum is controlled by solenoids (Nissan calls them magnet valves). It's all described in the Air Conditioning chapter (Nissan calls heating AC also).
-
Not charging at idle
The charge light comes on when you turn the key to On because there is current running through it and the alternator windings. When the alternator starts charging diodes prevent the current from flowing back through the light so the light goes out (that's a super simplistic explanation but I'm no expert). The 14.5 volts that you measured after revving show that the alternator is working correctly. The fact that the charge light does not illuminate shows that no current is flowing through it to the alternator windings. It could be as simple as a bad charge lamp bulb in the voltmeter, or a bad connection before or after the charge lamp. I would trace the wiring for the charge lamp and find out why it doesn't work. That wire is key to your problem. It doesn't matter how many alternators you try, if there's no current through the L wire they won't work right. The wiring diagram shows that the yellow wire from the T plug passes through the brake check relay. So, whatever you did to fix the brake check light must have disabled the L wire. It's possible that somebody rigged your other alternator up as a "one-wire" alternator. I think that you can do that by just connecting the L to constant power. I'll bet when your other alternator died you had to figure out why your battery kept dying and the lights were dim, or why did my radio die, etc. If it was wired right, the light would have come on. Good luck. I would trace the L wire first, it might just need a new wire run to the T plug.
-
Not charging at idle
For what you're looking at 76 would be the same as 77. The problem you're describing now is not the same as what it looked like you were describing in Post #1. The "L" wire, which is one of the two wires at the T plug in the back of the alternator, is probably not getting power. The L wire runs through the charge lamp in the voltmeter and provides current through the alternator windings to make the magnets that allow electricity to be produced. Does the charge lamp turn on when you first turn the key on, before you start the engine? If not, it should. It could be that your first alternator had enough residual magnetism in the winding cores to start charging at low RPM. Your new one doesn't and needs the L wire current. You can check voltage at the L wire in the T plug with the key on. Your mechanic really should have checked that when you told him what the problem was.
-
Help Me Identify These Parts (Photos Included)
It's hard to tell when the diff mount is bad. The rubber will look okay but if you stick a long screwdriver or pry bar between the top and bottom plates and pry you'll probably find that it is weak and separates easily. When you accelerate the nose of the diff will stretch the rubber and when you let off the gas it will drop down and the top and bottom plates will hit, or the front of the top plates will hit the cross-member. Check the distance between the top and bottom metal at the front of the mount. There is a actually a spec. for the distance between the two plates. Everything that you're asking about is described and illustrated in the Rear Axle chapter of the FSM. The diff mount is called an insulator and the "half-shaft" is called the drive shaft. What we call the drive shaft is known as the propeller shaft. Index of /FSM
-
Not charging at idle
If you got the replacement from an auto parts store like O'Reilly or Autozone, take it back and tell them you want a replacement. That's why they have lifetime warranties, because the quality of the rebuild is not very good. Sounds like you just got a bad one. I had a rebuilt O'Reilly (actually Schucks) alternator, bought it directly from the store, that put out less at idle than a ten year old, corroded Nissan alternator. The rebuilds really are just poor quality. Good luck, be emphatic that you got a bad alternator, even though it will test as "OK" on their machine. Or get a refund, buy a junkyard alternator and have it rebuilt at a specialty shop to higher output, using better parts. Someone here will probably know of a good shop.
-
Not charging at idle
Does it charge when you increase engine RPM?
-
AAR hose re-routing
The Megasquirt site is informative - Idle Control Looks like many ways to use a modern valve.
-
Rough Idle until I pinch valve cover hose
The big hose opens to the air intake tract. Either through he AAR or directly through the AFM hose or both. Are you checking with the engine warmed up or is it still cold? Did you plug the power back in to the AAR? If you didn't, it might not be closing quickly, and you're actually cutting off air through the AAR when you pinch the hose. 1977 had several hose routing possibilities, currently under discussion in other threads.
-
Inside an FPR - the valve
Glad you got some value from it. I have an adjustable Aeromotive regulator that leaks down in seconds. It uses a big ~3/8" diameter steel ball in the diaphragm seated on a hole in the aluminum body of the bottom half. Terrible design for sealing. I even tried to fix it by lapping in a better seat in the aluminum but it's impossible. I'll probably sell it to somebody for use with carbs (it has a low rate spring for carb usage). That's what got me interested though. On your leak-down problem - I have cracked the fuel lines on 280Z's and ZX's in the wrecking yards that I'm sure had sat for months. They were still holding pressure. You might consider buying used Nissan wrecking yard parts. Easy to test the leak-down of the pump check-valve and the FPR with a pair of side-cutters, aka "dikes". Just make sure the cut is pointed the right way, and cover your eyes. Having a system that holds pressure for days, weeks or months is really nice. That's why I never went back to that Aeromotive FPR even though I'd like to have it to do some fine tuning. Too aggravating.
-
Inside an FPR - the valve
Messing around with things and I cut an FPR open, mainly for the mounting bracket, but also to see what the valve looks like. It's a steel tube mated against a steel disc, both highly polished and very flat. You can see how a little bit of crud or even just a hair could cause it to leak.
-
Window NOT lining up
They don't seem to be called out as separate pieces here - Datsun 240Z Door Lock, Window Regulator & Door Handle (To Jul.-'73) My window would hang outside the rail at times after I got my car. I messed with several things at once but if I remember right the thing that made a big difference was putting the "door glass bumper" (page 2 in the PDF file) back on to the door skin. It hangs/clips on to the door skin near the front of the window opening and pushes the window in as it's rolled up. They seem to break off from flex-fatigue over time as noted in the PDF file. I found the pieces to mine in the bottom of the door. Got a replacement at the wrecking yard. Part #26 here, but hard to see - Datsun 240Z Door Moulding, Finish & Arm Rest (To Jul.-'73) BUT, maybe, if you're lucky, new ones might still be available - STOPPER-RU :: Nissan Parts, NISMO and Nissan Accessories - Courtesyparts.com Check with your local dealer first, using the part number. Note that they are left and right, I don't know which number is which. Your broken rollers might also be leaving their channels and binding. But it looks like you'll have to build your own or replace the whole assembly.
-
77 280 z 2+2 won't drive
The key concept of the EFI system is fuel pressure. The gauge seems expensive but the $40 will probably save you hundreds in parts and whatever your time is worth. If you don't want to buy one, see if a shop will measure it for a small fee, or if you can borrow one. There's no need to "cut in" a fitting for a gauge. The gauges come with a T fitting with the gauge port, a piece of hose and some hose clamps. All you have to do is pull the hose between the fuel rail and the filter and insert the T fitting. If you replaced the filter, you've already had the hose off once. Avoiding the fuel pressure measurement might be the most common (non)action of people new to working on EFI. Fuel squirts from the hose, gas flows, the pump makes noise - none of these tell that fuel pressure is right. If it's not right, the EFI can not work as intended.
-
Alternative Throttle Bodies
They moved the BCDD to the bottom of the intake manifold in mid-80 or 81. You could look through the various FSM's, EFEC chapters, to see what's out there. My 95 Pathfinder has an IACV mounted on the throttle body. But it also has throttle control by cable. And don't forget that the TPS is mounted on the throttle body. They went to sensors instead of switches eventually so you might have to rig something up there. And, the AAR heating block needs consideration. Overall, looks kind of complicated to convert. Might be easier just to move it and hide it.


