Zed Head
Free Member
-
Joined
-
Last visited
Everything posted by Zed Head
-
 The part spins so whatever makes you think that it will stay on at high RPM.
 -
That's the right car but Rockauto has the wrong part for it. 1981 was unique. Their compatibility table shows that it's for the later distributor style sensor. You have a big problem. You can convert to the distributor mounted sensor easily but those are hard to find also. borini63 has always been good for old ZX parts. @borini63
-
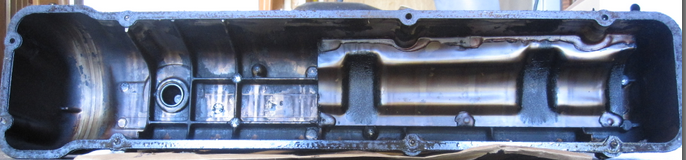
I did leave the thought a bit unfinished. When I look at that stamped piece of steel, that only covers half of the length of the cover I think that some engineer somewhere (probably at Nissan Motor Corp.) must have put some time and effort in to it. Can we really just throw it all away? Save some of it. Is there a purpose to those bends and that shape?
-
http://www.thezstore.com/page/TZS/PROD/12-4020

-
I pressed out my front control arm bushings with a vise and some well-chosen sockets. Heat made the difference. No heat, no movement. They even stopped moving as the metal cooled after I removed the torch. Pretty sure that people have bent tier arms also, so more force might not be a good option, if it comes to mind. Unless a brace is used in between. Heat.
-
It wouldn't be as clean and neat on the inside but a person could run a tube to the area of the exit port under (above) the baffle then run the tube to wherever they wanted the new exit to be, inside the cover. You'd have the same design that was originally engineered, except for the volume that the tube occupies. If the multiple bends in the baffle have a function it would be maintained.
-
That was my point on the other forum, but based on adhesion to the metal base. Wasn't aware that "nano clay" was used in the PU material. Where did you get that information? An aside, and no offense intended, but "nano" is one of the most over-hyped, and incorrectly used terms in the materials world, in my opinion. Anything can be described in "nano" terms. It's just a unit of measurement. A personal peeve. I think that it got its popularity from Mork and Mindy.
-
Don't overlook that there are two switches involved n the headlight circuit - the power supply (the main switch on top of the column) and the power ground (the dimmer). For whatever reason, the dimmer switch doesn't seem to foul, or heat up and fall apart, like the main switch does. Although it does seem to get gummed up and need contact cleaner. The main switch does have two circuits side-by-side though, the running lights and the headlights. So, more total heat. My point was going to be that you can do one at a time. I bypassed the power sixths with a relay at the fuse box, but left the dimmer switch alone.
-
There was a thread on a different forum about using two part urethane to pour your own engine mounts. I commented that sufficient adhesion might be difficult to achieve, considering the shearing forces at the interface of "rubber" and steel, but this application seems about right for it. If the material fails everything is captured so that no parts come loose, unlike the motor mounts. Remove the rubber from the bar end, build a mold, and pour. The inside of a mustache bar end will give the dimensions needed to find a replacement from another car. I have one with the old sleeve still inside. There are really two dimensions that you could consider, old sleeve in, or bare bar.
-
Doesn't the evap line have a check valve in it?
-
Does anything pass through at all? You might use a high pressure EFI pump or even just a low pressure pump and set up a loop, with a small tank of carb cleaner or similar. An EFI pump will have pressure and volume. Let it run and purge it. Run it backward also.
-
I thought that you had a picture of your mustache bar end bushings somewhere, but I can't find it (edit - found it, #10 here http://www.classiczcars.com/topic/58053-worn-transmission-mount-best-replacement-video-inside/ ) They looked kind of loose. They can move many different ways. (Had a different description here but the forum ate it). Buy you can't swap n the urethane without destroying the rubber. So that's a big decision. I tested mine by getting some big washers at the hardware store and inserting them between the rubber stopper and the bar, to clamp the bar ends down. It stops the up and down but the sideways motion is still possible. But it did reduce the thump. U-joints are really hard to diagnose. You need to stick a large screwdriver in to the joint and reef it around. Moving a wheel by hand or twisting the propeller shaft and looking for movement at the u-joint doesn't really cut it. The joints are under very high loads in-use so you're not going to break them with a screwdriver. Look for gaps at the seal, red rust dust, or just wiggliness.
-
Here's an 81. It looks just like a 78 that I also have. carpartsmanual shows a change in the L24 engines but doesn't give a year. Sorry to get the thread all oily. It's just a spare engine.

-
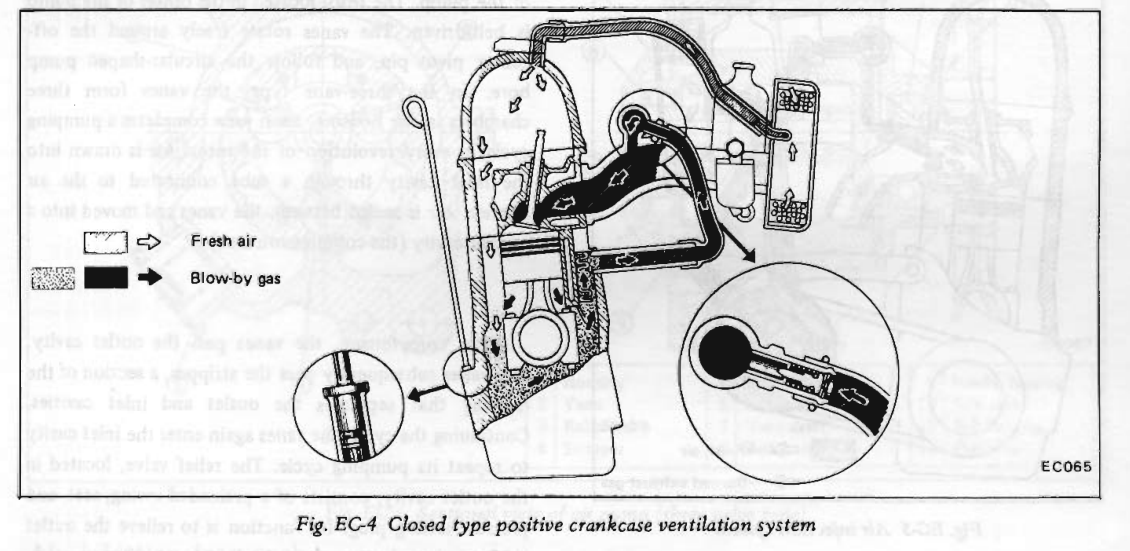
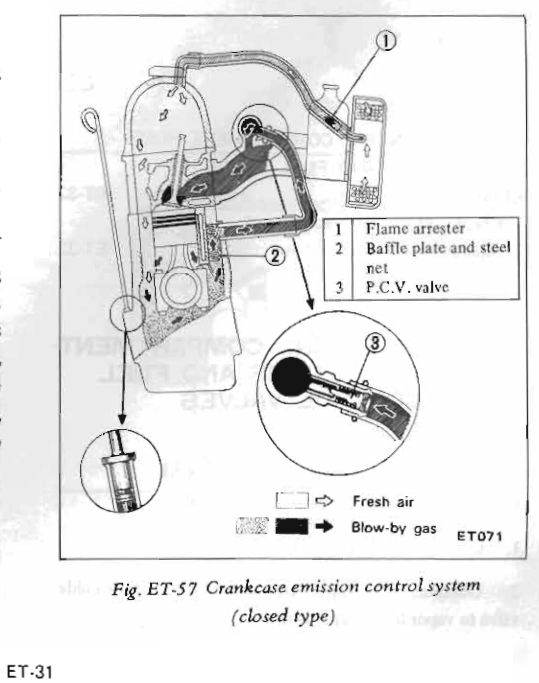
One improvement I could see from reversing flow would be the ability to clean the "steel net", that you would be adding if you matched the system design, in reverse. I think I've mentioned this in other threads but we used to build mufflers for our vacuum pumps in chemistry lab so that the exhaust vents wouldn't blow oil vapor. We packed a piece of pipe with steel wool, just like you show in your post, and attached it to the vent. Without it, there would be a steady oil mist whenever we pumped a vessel down. But in order to match what Nissan has you'd need a very large filter/separation chamber on the valve cover side. More than just a flame arrestor sized piece. Might be bale to build one inside the valve cover. To take the geekiness in another direction, it would be nice if the steel net in the block had easy access so that it could be removed and cleaned. I imagine that as it gets gunked up over the years, it loses surface area and becomes less effective, letting oil vapor pass through. Could be why some old engines end up with a lot of oil in the intake manifold. My old 76 engine was wet with oil in the intake. You'd have to cut a whole in the side of the block though, or add a filter box to the end of the pipe that goes to the PCV valve.
-
The reverse flow is described in the text, but that would have been a really big image (like your steel wool image). It's also illustrated in later FSM's with arrows. Funny how Nissan seems to expect a lot of blowby, sooner or later. I'll take a picture of the inside of the ZX cover and post it, just for fun. They were fine-tuning things in the ZX cars, like using a slightly smaller throttle body. Counter-intuitive, why bother kind of things.
-
Didn't you just finish all of the work to put that in your car? What happened? Did you ever get to try it out? Just curious.
-
Also notice that 1972 doesn't show the flame arrestor. Maybe it's an EFI thing only. Edit - it's added in 1973. Maybe they had a few problems in 72... Oddly, they moved the PCV description to Engine Tuneup. Sorry for the distraction. Seems to fit the geek factor though. No offense.

-
Might be interesting to compare a 240Z baffle to a 280ZX baffle. See if Nissan did any tinkering over the years. I have an 81 ZX engine in the garage.
-
There's a measurement shown n the Rear Axle chapter. 9 mm and 2 mm. The instructions are kind of odd. I think that they're trying to describe a range. Once you get past the diff mount and the u-joints then every other rubber part is suspect, along with bearings and nuts and bolts. Somebody recently described how their sway bar bushings were causing a clunk. Loose strut inserts are fairly common. Maybe your diff is worn out, they're durable but it happens. Someone described the small bushing in the hub casting being completely disintegrated, causing a clunk. Many possibilities.
-
-
No offense intended. Better to hear it early than late. Looking forward to watching the build. Carry on.
-
Now I feel bad. Until I think back to all of the unsafe things I did at 16. Besides that, the bling factor is strong for that tank. Seems way early in the game to be buying and installing a fuel cell. The path of bling is fraught with peril and expense. You'll need Triple A, for instance. Or friends with a Z car bolt pattern, close by.
-
Ouch. We do sound kind of harsh. But, he says he's planning to be an engineer, and this is the kind of stuff engineers do. The fabrication and installation aren't too bad, but the engineering is poor. Those six clamps on the strap steel will let go in a second, I'll bet you can pull them loose with your finger tips right now. Then the strap bends will open up and the cell will rise up and is flopping around on the ends of the braided hose. Engineering is a state of mind. Critical thinking. Digging in to the fine details. https://en.wikipedia.org/wiki/Bulkhead
-
Besides that, if you ever plan to race it, it won't pass inspection - 9.3.26. https://dk1xgl0d43mu1.cloudfront.net/user_files/scca/downloads/000/022/824/GCR-_Updated_July_2017.pdf?1498667032
-
You avoided the question about if it moves,and ignored the issue of lines getting pulled. I went to school with two sisters that had been in a house fire. All you could see of their faces was lips and eyes. The rest was covered with a protective mask. Seriously, your installation is terrible. Your friends and your mom might have been doing it that way for years but when the gasoline is leaking after an accident you'll wish you'd done it differently.