Zed Head
Free Member
-
Joined
-
Last visited
Everything posted by Zed Head
-
 Weird that our last two posts from yesterday have disappeared. About the condenser. I added a condenser to the negative circuit of the coil when my tach wouldn't function. It worked but I can't say exactly why. Many people have used the HEI module with no tach problems. This is essentially what I wrote yesterday. I saw it post. Good luck.
 -
I haven't actually seen one myself. I just read about it. Looks like the top. I think I see it...
-
I added another. But you want to make sure that the tach is actually connected first, of course. You didn't answer the other questions. The tach needle would probably do something if it is connected. Many people don't have any problems at all.
-
Does the needle vibrate or twitch at all? Did you disconnect the original module by the fuse box? My tach wouldn't work right until I added a condenser on the negative side of the coil. It would just sit there and twitch and jump.
-
I would adjust it then so that it opens.
-
I clicked on a few pictures, and recycled the page, and one or two changed pictures changed but then they came back with some nastier ones. Nasty and pervy.

-
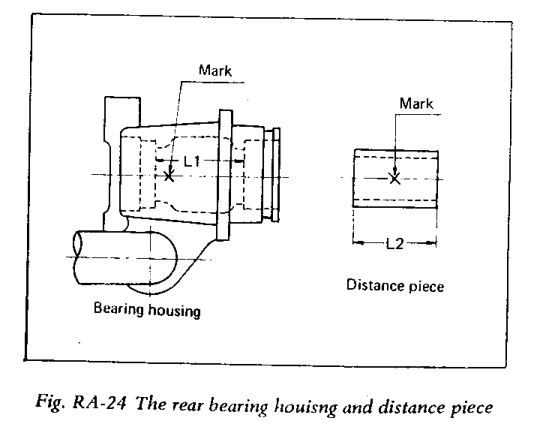
The hub casting itself should have a stamp on the outside. A, B, or C.
-
It's been a while since I complained about this kind of thing, so what the heck...for old time's sake. I like to hit the "End" button to go to the bottom of the page. And I always end up seeing the same old end. This girl pointing her coochie at me, and showing some boob. Is there any way to get Google Adsense to switch things up a little? She must be getting tired anyway...

-
Looks like you need an "A" distance piece. Can't remember if you found a mark on the hub or not. .007" is much better than .020".

-
You should "follow up" in the original thread. It's not clear what the first problem was.
-
If you didn't use the same springs then you can't really say it's the shocks. If you like the ride height of the car is it is now, with the old shocks, then the odds are in your favor if you take those same springs and put them on the KYB's. You might get an extra 1/4 to 1/2" inch. I'm sure that they're the same internal pressure as the KYB's we use on the 280Z's. We get a little pop from the gas struts too. Not 2" though.
-
Why are the springs mounted? They should be on the old set of shocks that you reinstalled. It's looking like you just got some higher rate springs on your new KYB's. It's not the shocks it's the springs.
-
It's pretty easy. You can do it temporarily in the engine bay as a test, before putting the time in to make it permanent. Or just get ahead of the eventual failure and make it permanent from the beginning. The performance is as good as the stock Nissan modules.
-
Those are the tarp grommet fix. The hardest part is grinding or drilling the back of the post to remove it then welding or fastening it back on. It's simple in concept but takes some effort to get it done.
-
I don't think so. I meant to collect all of the tricks we've described in these threads, to replace the backing guide piece that broke on yours and others, and the roller itself, that broke on mine.
-
What does your tachometer do when you try to start it? The weird timing numbers and wet plugs suggest an ignition module problem. Too many ignition pulses (sparks). The 280Z ignition modules seem to die at a fairly constant rate. They're old.
-
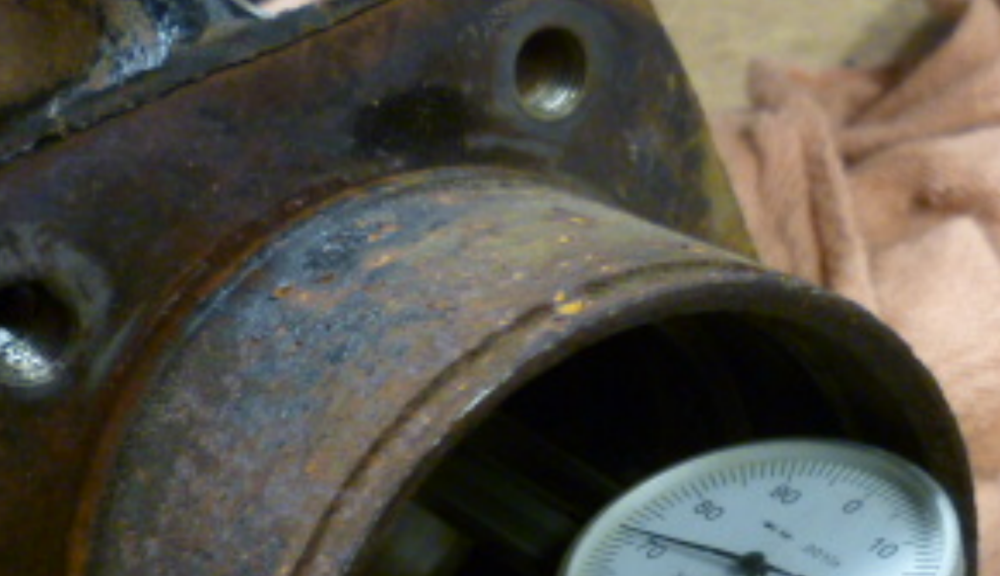
Did you examine the two parts, side-by-side? Check the spring perch, push the rod in to the shock body, all the way down? You can do it by hand or by putting your body weight on it. It's actually good exercise. You have the KYB's right there, right? Give it a stroke. Measure the distance to the spring perch.
-
Just trying to help. Sorry, didn't really have a good picture of the ZX rear suspension. I guess it is a strut, by strict definition. Rockauto says that's the correct part. I could ask a bunch more questions but I don't have a ZX anyway. Who installed them, did you mess with the springs, did it ride correctly before, do the new ones look like the old ones, etc. The basics would be to check that the shocks aren't bottomed out. The springs hold the car up, the shocks might only add 1/4" from the internal gas pressure. Good luck.
-
I still like my idea for a quick check. You can feel .020" with your finger. 1/2 mm. Use a washer. Sometimes we get too caught up in having a number. The tables show the parts are supposed to be about the same dimension. The tables are actually kind of nonsensical when you really look at them. The ranges overlap. p.s. funny also that they have a huge error that they even converted to inches.
-
What are the part numbers and what is the car? The 280ZX does not have struts in the back. It has what's called a trailing arm suspension design.
-
You should inspect that roller closely while it's out. Maybe do the whole rebuild on the assembly.
-
That's a good one right? Your problem is a broken or missing one? That part is really just a "location" or spacing device. There are probably many ways to make something to do the job. Something like a split collar clamping device. In my case, the roller itself broke apart. So I had to remove the shaft and figure something out. It's the shaft removal and replacement that is difficult. I don't have a welder. Here are some examples of split collars. Metal would probably be "scrapy" in action. Plastic would be best. https://www.amazon.com/s/ref=nb_sb_noss_2?url=node%3D16411921&field-keywords=split https://www.grainger.com/category/shaft-collars/shaft-couplings-collars-and-universal-joints/power-transmission/ecatalog/N-1d90?refineSearchString=split&searchString=Shaft%2BCollars&ts_optout=true#nav=%2Fcategory%2Fshaft-collars%2Fshaft-couplings-collars-and-universal-joints%2Fpower-transmission%2Fecatalog%2FN-1d90Z1yyta09%2FNtt-split%3Fsst%3DAll%26ts_optout%3Dtrue http://shaft-collars-couplings.staffordmfg.com/viewitems/standard-round-bore-shaft-collars/two-piece-split-clamp-type-shaft-collars
-
Just had a thought about replacing that part - SteelStik epoxy. You can shape it in to the desired form and it will harden in place. It's like putty and won't run. If you don't want to grind the pin out then replace it. Do a test run to get a feel for how fast it sets up. Wear gloves. https://www.jbweld.com/products/steelstik-epoxy-putty-stick
-
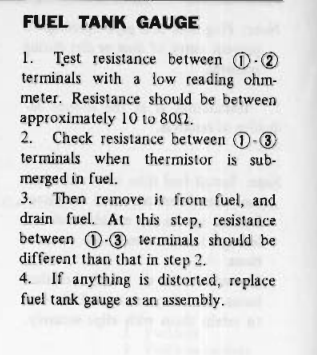
There's nothing that will jump, but it could be that your damper slipped. That would move the timing mark. Easy to check with the valve cover off. Vacuum to the distributor will increase timing advance, not decrease it. Not sure what's going on there. The quickest way to check the complete temperature sensor circuit is to measure resistance at the ECU connector. Pin 13 to ground. Then compare the value to the chart. The best drawings are in the EFI Guide, 1980 version. Shows the connector itself with numbered positions.
-
This is the closest I've found so far. But they just say "different". FE-6.