


Zed Head
Free Member
-
Joined
-
Last visited
Everything posted by Zed Head
-
 There should be a bolt with a hanger on it there. Looks like your bolt broke off or something worse. You could use a transmission bolt. Same area, about the same balance.
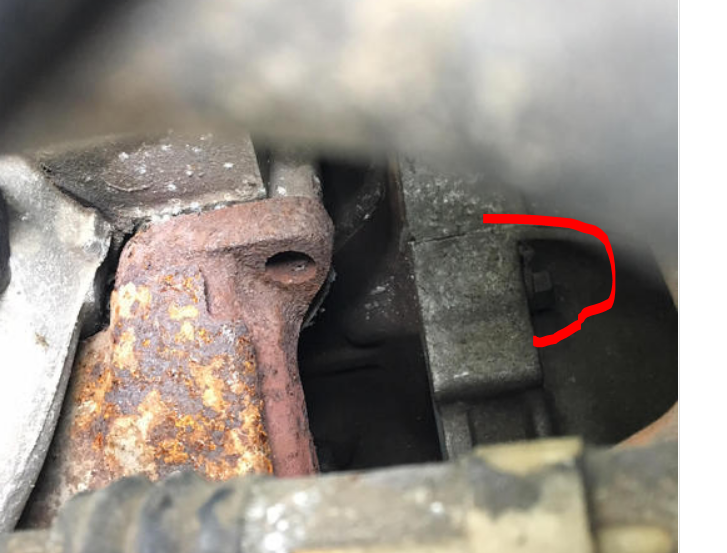
-
I've read that the shaft has rotational play that can cause the "trigger" to bounce forward and backward, causing small timing changes. That spring might be a drag on the shaft right before the trigger passes the sensor. John Coffey wrote about shimming the notch and tang at the bottom of the shaft to remove some of that play. I know it does give the distributor a nice mechanical buzz when you spin it. Makes it sound like it's doing something, and set up right.
-
Seems like solving a problem that doesn't exist. Tank sealants are designed to seal holes, and they come with their own risks, like clogged ports, failed drying/curing, etc. You have a nice clean tank apparently. On the other hand, if you're just looking for another project, why not? I'd hang some silica gel inside and seal it. https://www.homedepot.com/p/Dry-Packs-40-g-Silica-Gel-Dehumidifier-DP40CAN/303044548?cm_mmc=|THD|&mid=sxTI6Qz12|dc_mtid_890389n25185_pcrid_247839744665_pkw__pmt__product_303044548_slid_&gclid=EAIaIQobChMI3aDvwKvy3QIVGNRkCh1EgAYVEAQYASABEgKdo_D_BwE&gclsrc=aw.ds&dclid=CJT578Wr8t0CFdILrQYd54gIlg
-
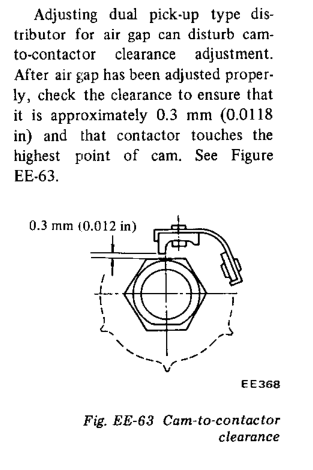
It only needs to touch. I think it's there to make sure that the gap that was just set stays the same while in operation. It's opposite the air gap. It's an interesting thing.
-
Kinser86 seems a bit like a fresh engineer itching to use new knowledge to solve problems as fast as possible. Very detailed work but he has skipped the basics of calibration and verification. No offense kinser. Everybody jumps ahead to what "must be" occasionally only to find that what must be, wasn't. Some people spend much time and money doing that.
-
Actually, the pressure readings are the same before and after the pump change. 42 psi. Hence the thought that there's a bad gauge somewhere. It's been the same gauge reading fuel pressure from the beginning. The parts stores will loan a fuel pressure gauge, among other things. I don't know why I don't take more advantage, they have quite a selection. https://www.oreillyauto.com/rental-tools
-
You should post the complete table of improvement price increases. If getting the engine running adds $2000, I'd imagine it will be a $20 - 30,000 car by the time you're done. Good luck! Forgot to say, it appears to be a 2+2. For those considering taking a look.
-
I use something like this in my spare engine. Seems like it might work in a tank. https://www.walmart.com/ip/STA-BIL-22001-Fogging-Oil-for-Engine-Storage-Protection-Against-Rust-and-Corrosion-12-fl-oz/32926613?wmlspartner=wlpa&selectedSellerId=0&wl13=1784&adid=22222222227000000000&wl0=&wl1=g&wl2=c&wl3=42423897272&wl4=pla-51320962143&wl5=9032982&wl6=&wl7=&wl8=&wl9=pla&wl10=8175035&wl11=local&wl12=32926613&wl13=1784&veh=sem&gclid=EAIaIQobChMImd21p5ru3QIVhdlkCh0rPwgsEAQYASABEgLkWPD_BwE

-
Might be a hurricane car. Still, one of the first 800 Z's is probably worth taking a shot on. Even at $10,000. Looks like it still has the monkey-motion transmission. Unmodded. Survivor!

-
I have a nice one from a 78, I think. Shoot me an offer by PM and it might be worth me digging it out. If it's still there. Might have sold it already.
-
Texas plates and kind of looks like it's been under water. Apparently it runs though. The hub caps alone are worth thousands, right? "1970 Early series 1 January build date. car number 795 has a little rust but runs and drives white with the blue 4 speed matching numbers has hub caps in trunk if you would lime more pics or ? Call show contact info Nick"
-
It looks like the electrical part is right, doesn't it? The switch is doing its job, there seems to be a pressure differential. The brakes might need bleeding. Some people say that the 240Z switches need to be reset after the valve moves. I could get my 280Z light to go off, when I had a problem, by pumping the brakes to remove the differential. That was a clue, for me.
-
Actually this is not quite the same. You need to compare pressure inside the rail to "pressure" inside the manifold. The big confuser for the fuel pressure regulator operation is that they/we use vacuum for the measurement on one side and pressure for the other side. Convert vacuum to pressure and do some math and you can see what's happening. That's what I did in post #103. But I have to go search around for proper values every time this topic comes up. CO's cool tool is a direct reading of what's happening. But a calculator and two gauges will get you there too. Kinser you almost seem more interested in the measurement and diagnosis than actually driving the car. You will do well here...
-
You can swap carbs on to the EFI engines easily. Bolt on. Pick the car that has the least of what you hate doing.
-
The problem with the switch is well-documented for all of the Z's. They pit, then get hotter, then the solder joint fails. Wasn't talking about your newer switch. If you want to drive your car in the city and you can't use high beams because of other cars then Big Phil's fix will work. If you decide to use the high beams you run the risk of damage. But low beams will be just like normal, except grounding at a different point. Good luck with whatever you do. The simplest fix, of course, is to find the original problem before deciding on a "fix". Even Big Phil knew that his real problem was somewhere in his wiring harness.
-
Big Phil shorted the low beam so that it always has ground whenever there is power. You have to watch the video. The low beam will always be on by Big Phil's video "fix". It's shown in the wiring diagram.
-
Looks like a decent quick-fix. I think you end up with both filaments on, high and low, when the high beams are on though. So more current than normal passing through the HL fusible link. Might be more for the switch on top of the column also, if I recall right. That switch already gets hot with just one beam circuit running through it. Might melt if you run high beams for long. Unless you put a relay at the fuse box. Good old Big Phil...
-
In real life usage the backs of the valves tend to get coated with crud. From the PCV system and back-flow of exhaust gases and fuel vapor. The fuel additive industry makes a fortune claiming to be able to clean them. Not to be a downer, it's cool for that first dyno run or individual races or drag strip runs but long-term might not stay effective. There's a neat thread over on Hybridz about weight reduction and balancing of rocker arms. Lots of grinding of non-critical areas.
-
Did you bypass the switch to see if it's causing excess resistance?
-
My burned EFI-Pump relay has a diode and a resistor in the circuitry. A few more pictures of Dreamzz's burned relay might show something. Maybe I'll pull mine out and take a look, to be sure it's not slow-cooking.
-
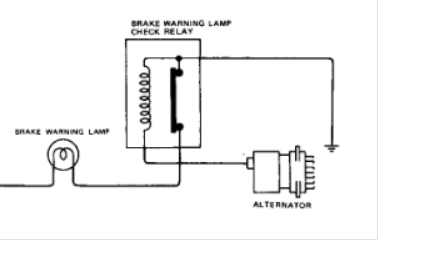
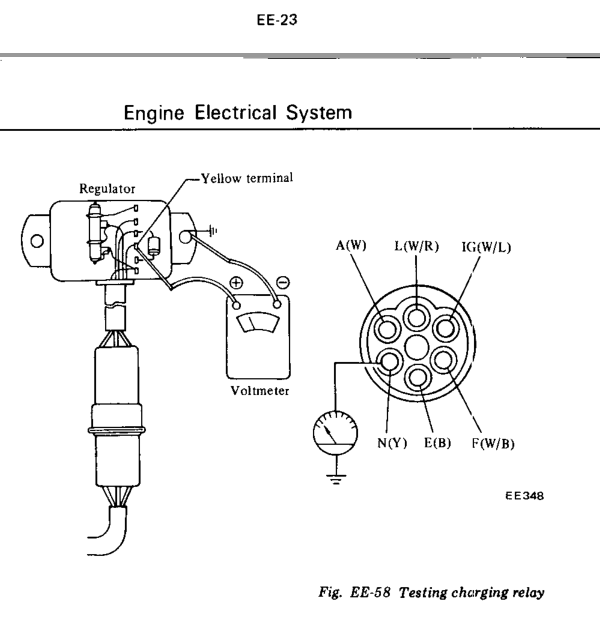
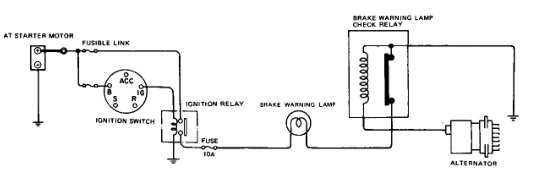
Actually it "unlights" the brake warning lamp. So the relay isn't as simple as I said previously. It's a normally closed relay. One of those 5 pin Bosch units, I think, would work. Hundreds in the wrecking yards and eBay for cheap. I remember some basic AC to DC conversion stuff, with rectifiers and wave forms getting their bottoms flipped over and all that, but learned it long ago and only 101 level and it's all corroded now, so I can't even make a guess on what N is doing here. The relay in question sees 12 volts through the switch contacts, where the power comes through the lamp on its way to the relay, where it is grounded, and it sees N voltage through the relay coil which opens the circuit causing the lamp to go off. The relay coils are what has crisped here. Maybe my relay is living on borrowed time. Is there any way to tell what voltage a relay coil is rated to? Marks, codes, etc. The coils look just like the EFI and fuel pump relay coils. Which get crispy also, over time. The brake warning relay also tends to get wet since water pools in that area when there's a leak. There are no drain holes.
-
N has a branch off to the relay. It must get wired to battery voltage in the swap diagram. Can't speak to what it's rated for, voltage-wise, or even what comes out on N. Not my forte, and mine works. Being lucky, I guess. Anyway, many possibilities.
-
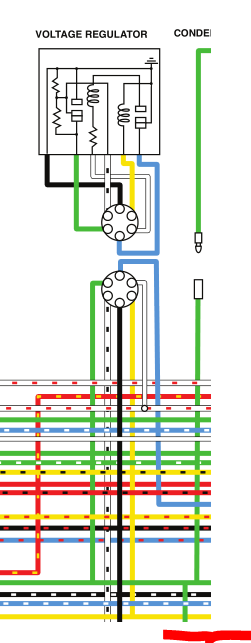
Could be. N enters the VR and probably serves multiple functions. See attached, below. CO knows more. @Captain Obvious Dang, looks like he's here... posting anyway!!! Output is in amps. At 12 volts or higher. Amps do the damage. My relay has been fine on the 14+ volts my alternator puts out on the fuel pump circuit. Good luck. The key is to have power to the control function of the relay only when the engine is running.
-
12 volts should not have fried it. That's what it's designed for. Are you sure it's dead? I had the same problem with the battery draining. The atlanticz wiring diagram doesn't take the relay in to account. The relay is supposed to get power when the engine runs, but the ZX swap scheme gives it power all the time. I ran a wire over to the fuel pump power plug by the passenger seat to use the same power circuit as the pump, which only gets power during starting and engine running. It's about as basic as relays get, if you did fry yours. Any old relay should work. The line from the alternator is the power wire that gets misdirected after the swap. It actually comes through the VR. Weird that the diagrams don't show it though. This is the 1976 drawing.
-
Suddenly all of those old worthless automatic transmissions have value. I'll bet most have been scrapped. Could be a problem.