Zed Head
Free Member
-
Joined
-
Last visited
Everything posted by Zed Head
-
 Looks like SteelStik. https://www.jbweld.com/product/steelstik-epoxy-putty-stick
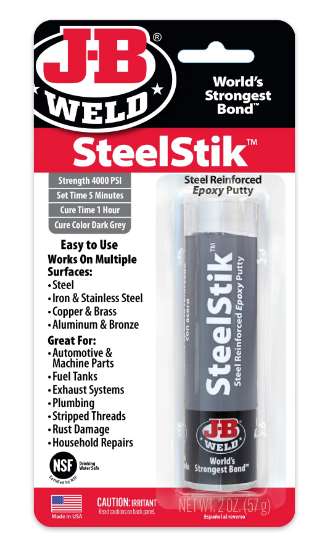
-
I don't think that they are heat-treated to be "springy". I remember straightening the bends out of the ones that I had. They definitely make a difference. I tried the various treatments and greases but only reinstallng the straightened/flattened shims solved the problem.
-
Don't nix up starting and running. If it runs well, with no weak cylinders, that's a sign that the injectors are fine. The cold start valve and the ECU are involved in starting, along with residual fuel pressure in the fuel rail. Leaking FPR's are a common cause of hard starting. Today's aftermarket FPR's are of poor quality and tend to bleed off pressure pretty quickly. Have you watched the pressure bleed down after shut-down? Generally, the rail should maintain about 15 psi for hours. If pressure leaks down to zero within an hour you'll have hard starting, since the rail will be empty of fuel when you restart.
-
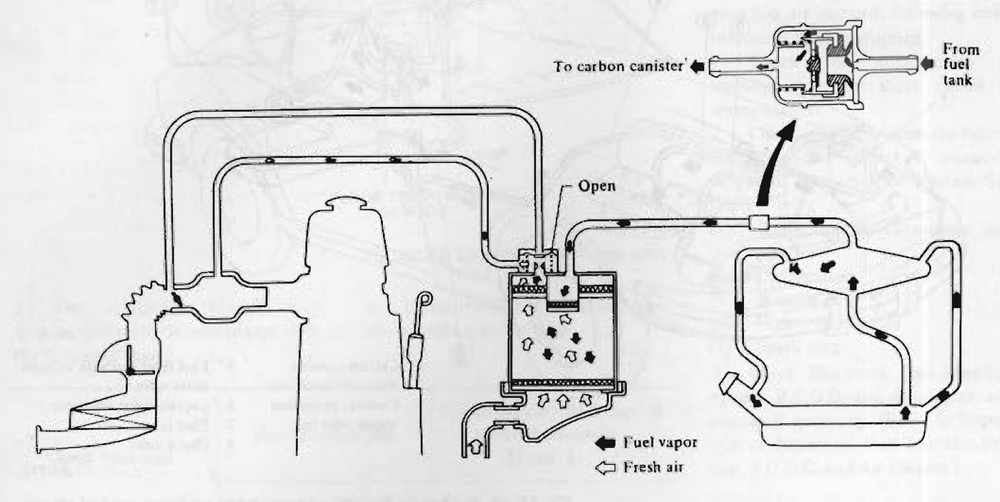
The FSM has a drawing, below. It's not clear how you're using this vapor detector device. I think that the most common source of gasoline smell, that's hidden, is the bottom of the charcoal canister. The carbon/charcoal gets clogged over time and does not absorb all fo the vapor. The bottom of the canister is open to the atmosphere. That's where I'd be looking, after I tightened all fo the clamps.
-
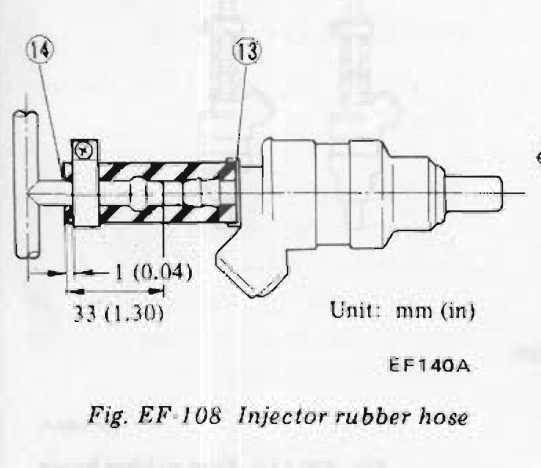
What type of hose are you using? I had found that the Gates hose I got at O'Reilly's loosened up and need the clamps retightened. Surprising since the hose is advertised for it's vapor control. I think that the material "creeps" under pressure. Probably needs a constant tension clamp to work best. https://www.gates.com/us/en/fluid-power/engine-hose/fuel-line-hose.p.4219-000000-000003.html
-
I was referring to c. cats original concern, with his 1978 valve cover. The thread has expanded in to the past..
-
ZCD has them. Cheap. No idea of quality. https://zcardepot.com/products/oil-cap-gasket-seal-240z-260z-280z-280zx?_pos=7&_sid=5b8d04292&_ss=r
-
This is good avice. You don't even need to put the clip on the pin. You can check it before the transmission is installed. It will be obvious. But, loose bushings will make it worse.
-
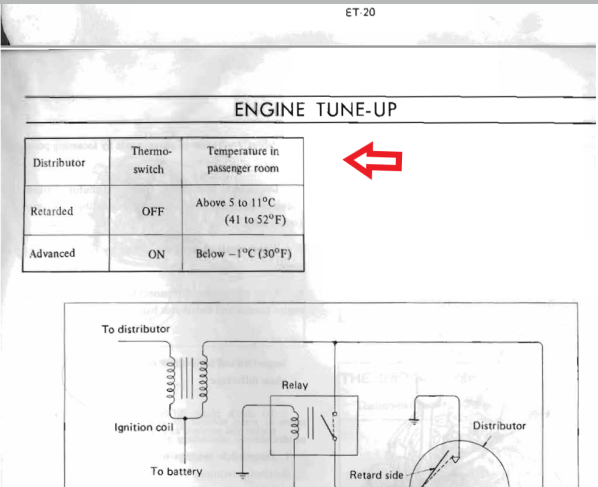
This is why the pictures would have helped. I doubt that they used "passenger room" when they were thinking of the coolant in the engine cooling system. It was a fun puzzle though.
-
Could be. Let's see some evidence. Don't forget, it's automatic transmission only. The manual 240Z's didn't get the dual points. According to the FSM.
-
It's in the Engine Tuneup chapter also. Still can't paste an image. Page ET-21.
-
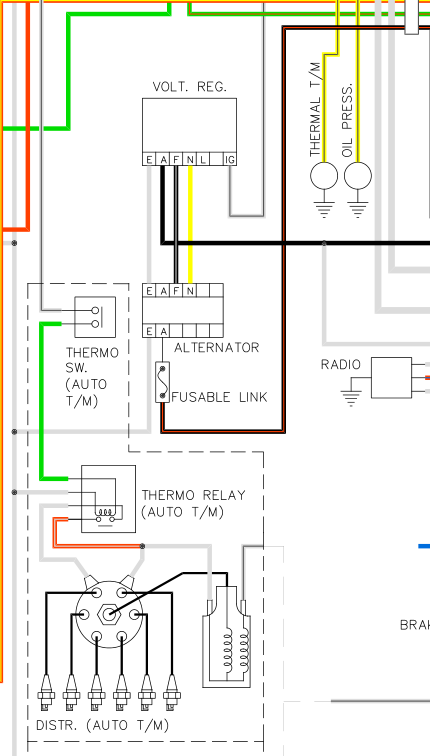
Looks like it is the first attempt to control the second set of points in the distributor. Maybe it is close to the coolant hoses? Another oddity. From the 1973 wiring diagram. Unable to post images again. Something about the shape or size. Who knows. It's over by the distributor on the left side of the diagram. Controls the relay that switches the points to give more advance. Emissions.
-
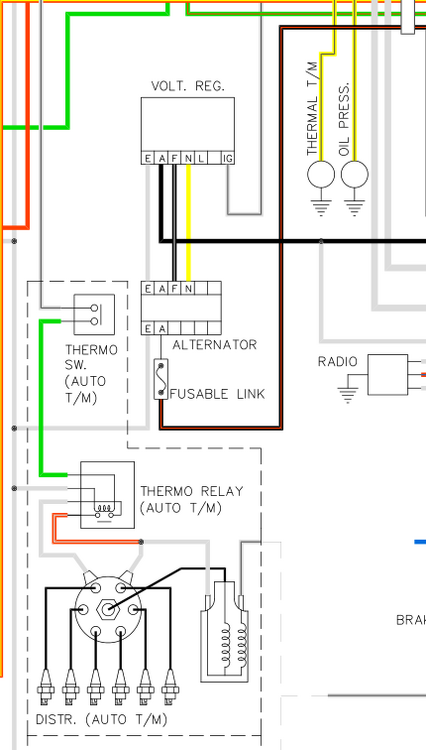
So it is a temperature switch. Wonder what it's protecting? Is there a high temperature warning light on the automatic 240Z's? It is odd though that the drawing seems to show it in the cabin on the passenger side. A "thermo switch" used, apparently, only on the automatic cars. p.s. as far as the thread being complete, the question was "what is it" not do I need it. The puzzle is still open! https://www.carpartsmanual.com/datsun/Z-1969-1978/electrical/electric-unit-switch/section-1/240z-260z
-
The inhibitor switch also has two green wires. Edit - but it's a four wire switch. The seat belt switch has two greens also. Is it magnetic? What would be the actuating mechanism of the switch, if it's a switch. That was one of my thoughts in sugesting a low temperature switch, like AC or heat. You could put in the freezer, and run hot air over it, and see if it closes in either case.
-
If they have a bad o-ring.
-
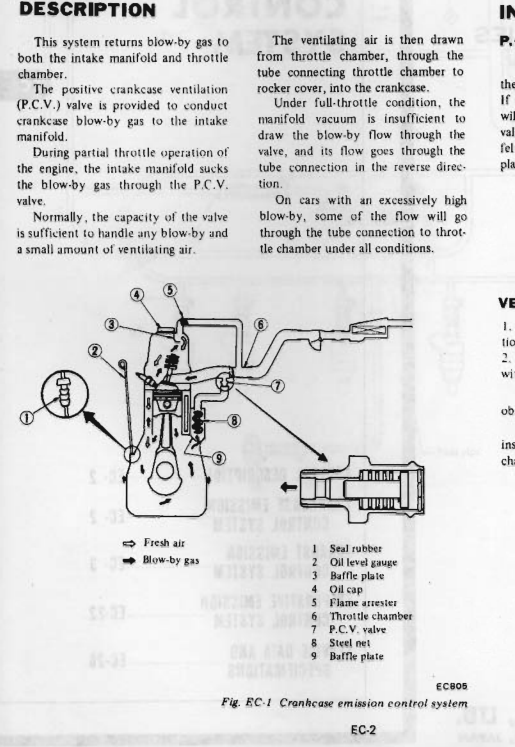
Blowby from combustion can create pressure. But there is also just general leakage and surface coverage from the oil vapor and oil splashed on to the bottom of the cap and cover. Oil tends to spread and cover whatever surface it contacts.
-
Is there measurable resistance or is it open or closed circuit? Looks like both wires are the same color scheme and have the same connector, meaning no polarity. How about a switch in the AC system? Air temperature.
-
I was kind of kidding. Didn't know that it was a thing. An odd name for a product, must be from way back. https://www.iqsdirectory.com/articles/wire-rope/aircraft-cable.html https://www.homedepot.com/p/KingChain-1-8-in-x-50-ft-Galvanized-Aircraft-Cable-Kit-with-Clips-and-Thimbles-7x19-Construction-504711/304086908
-
Can this be found at Home Depot?
-
Odd. Where did you get the switch? I wonder if it was a bad connection that got fixed while you did the work. The extra stuff. You can use your meter to check continuity through the switch from the power supply wire to the outlets. Doesn't really matter, just curious. I finally understand the inhibitor switch circuitry on these automatics now. Never had a reason to dig in to it before. Thanks for the puzzle.
-
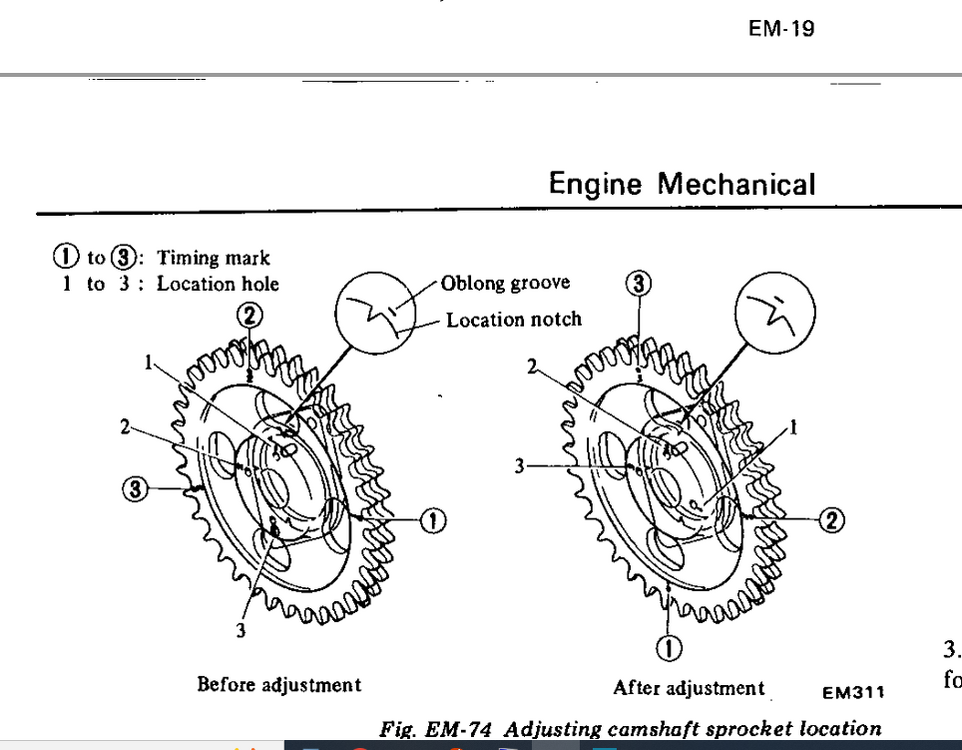
Since you now know that the head has been off and your hopes for an original engine are gone I would change direction and take time to verify that whoever swapped heads did a good job. Check valve lash and timing chain wear. 1975 has the engine serial number on the ID tag in the engine bay. Compare numbers to see if you got just a head swap or a complete engine swap. The tag is over by the brake master cylinder. Original Nissan parts have a notch on the timing chain sprocket that will indicate wear. Rotate the engine to the zero on the damper pulley timing mark and make sure the driver's side of the chain is tight.
-
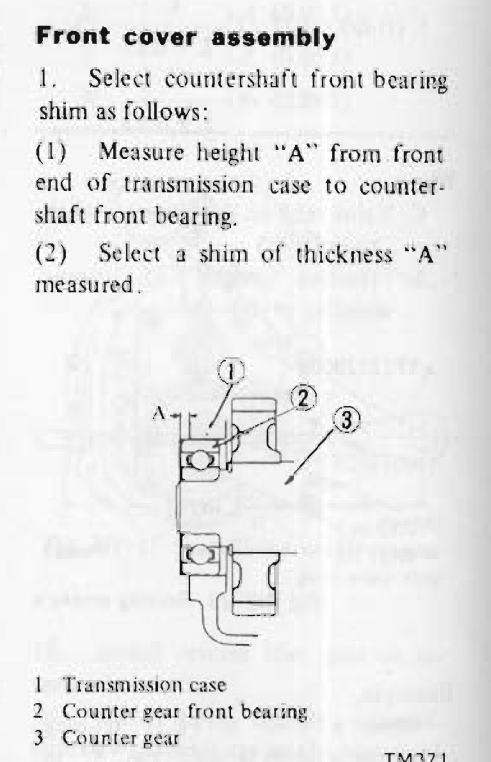
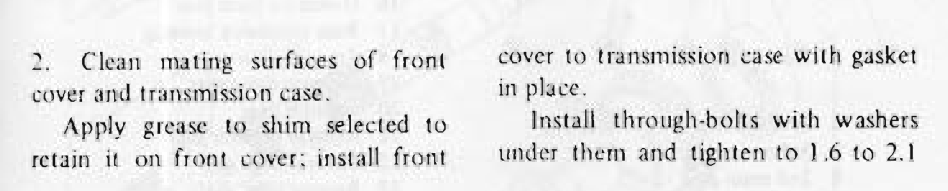
You'll still want to use the paper gasket it with it. I think it might be part of the countershaft bearing shim calculation. Not 100% sure though. And don't lose the shim, it might stick in the cover and you don't realize it's there. The bread trick is to just stuff some bread in to the pilot bearing hole, then pound a rod in on top of it. It generates hydraulic pressure through the bread and will force the bearing out. Don't forget to check the fit of the new bushing on the inpout shaft too. Yum...

-
Looks like the 4 speed is still in there. You might be ready with a way to stop the engine from tilting backward when you remove it. Some people insert a 4x4 between the valve cover and firewall, others put a jack under the back of the oil pan. Don't forget to replace your pilot bearing. Try the bread trick. Hylomar Blue is popular for things like that front cover gasket. Doesn't harden but seals well. https://hylomar.com/product/universal-blue/
-
People call it the "M"N47 because it comes from a Maxima. But there's no M in the casting number.
-
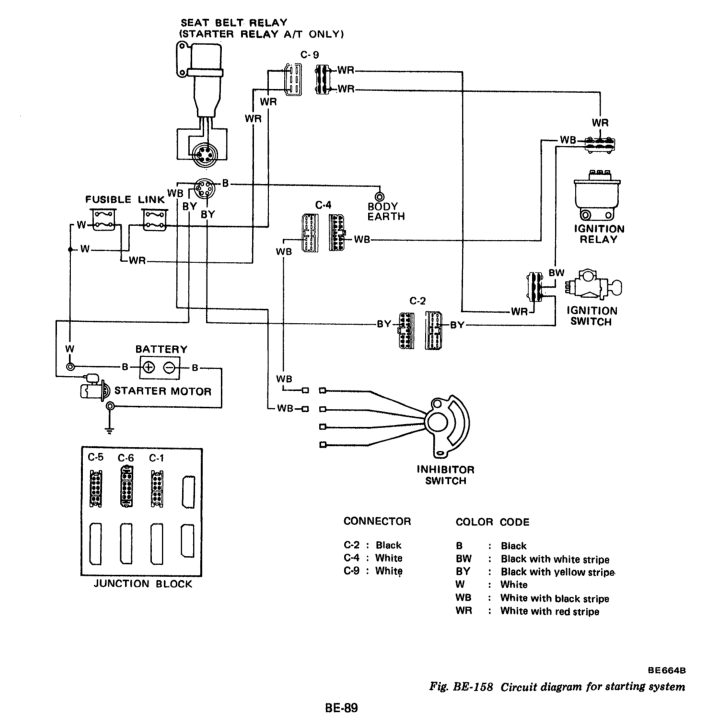
I've probably added a lot of confusion here by looking at things that are indirectly associated with starting. If you want to check if power is making it through the ignition switch I would check for voltage at the black wire with yellow stripe (BY) at the seat belt relay when the key is turned to Start. That is a straight shot, through just one connector, from the switch to the relay. One of the two wires at the plug should have power at Start. The relay just stops it from passing through to the starter solenoid. The thing about the relays clicking is that when you turn the key to Start the Accessory relay opens to cut power to accessories during starting. So the click you hear might not be directly related to your problem. Actually, this diagram frm the FSM clears up a lot, I think. The inhibitor switch controls the starter relay, the starter relay controls power to the solenoid. After checking for power, if you have it, verify that the other BY goes to the solenoid. Then just jump them together as CO suggested. The engine should spin just like jumping it at the solenoid.