AZ-240z
Supporting Member
-
Joined
-
Last visited
Everything posted by AZ-240z
-
Way to go BD280Z, After seeing the car, I think you got good value for your bid. Are your plans, if a title is forthcoming, to restore this car to original? I'm in Phoenix, and would love to see the progress. Keep us updated. Dan
-
Well, I just went out to look at this car, and will give my impressions for anyone interested in bidding. The car is a numbers matching car, engine # L24-007913 and vin# hls30-04880. The head is an E-88. The passenger side floor is rusted through. It looks like the A/C evaporator, with a lot of water staining, caused the floor rust. The driver side floor looked to be pretty solid. The frame rails in the engine compartment looked to be solid. Unable to look under car as it is sitting on the frame. There is minor rust bubbling in a spot on the lower front corner of the passengers door, and on the rocker panel just in front of this door. The exhaust system appears to be original. The car looked to have been sitting in the desert for quite a long time with everything covered by pack rat nests and droppings. The interior has turned to dust althought it appeared to be totally original except for an upgraded radio. Glass is all original except for the windshield. bumpers look good but have dents and bends not visible in pictures. The tail lights are the early plastic castings but are somewhat milking from sun exposure. My overall impression is that this car is pretty original with no signs of modification anywhere except the radio. The location is a real challenge to get to with about 6 miles of rutted dirt roads. Hope this gives somewhat of a picture in a nut shell.
-
Well, I guess the bottom has fallen out on any interest in reproduction decals. I am going to forge ahead, though, and try to complete the master vac decal and will post a picture when it is completed.
-
We have discussed reproducing decals on other threads. I just wanted to post an update on my project. I have been reproducing decals for my own car and wanted to share what has been done with others interested. My only commercial interest is to help reduce my costs with these projects by offering them to other club members interested. Pictures of the three decals that I have done, so far, are posted in my gallery. Let me know what you think of the accuracy, authenticity, or use of these, and any other questions you may have. I am, currently, doing the master vac decal and may need your help and advice in duplicating the correct embossed, or stamped, numbers, but only if these decals turn out to be perfect. Thanks, in advance, for your feedback.
-
Thanks for all of the replies and interest in this decal project. I will go ahead and see what it would cost to do these master vac decals. I am estimating that I would need to sell these for about $10.00 to $15.00 each to cover my costs, but will know more about pricing once I talk to the company that will do these. If you have seen the other decals pictured in my gallery, you can see that I will not do a decal if it can't be done perfectly for my car. The master vac decal also includes some numbering which must be done with a stamped die set as seen in the original in my gallery. This shouldn't be too difficult to do. This decal, from my research, is for the 1969-71 z cars. The decal format, as seen above in Victor's picture, may have changed for later cars. I am still reseaching to see if there was any change for later cars, or if all years had the same decal format for US imported cars. I will post any new info as soon as I know the particulars. If anyone is interested in any of the other three decals shown in my gallery, please PM me with any questions, and use this thread for inquiries. Without your interest and support in projects like this, it would be impossible for me to do these decals for my car. Thanks, Dan
-
Hello Tomohawk, This is just speculation on my part, but the fuel gage sending unit is no more than a float suspended in the fuel tank. I would take a look at this first, to see if it moves freely, is not binding, or possible leaking fuel into the float, itself. The float is mounted on the end of a long wire rod, or arm and could possibly be calibrated by bending the arm slightly to adjust the signal in the sender, itself. I haven't done this, myself, but this might be a possible fix. The tank would have to be drained, then refilled with a known quantity of gas not to exceed the height of the port where the sending unit is mounted, say, a quarter of a tank. Then, remove the sending unit and make incremental adjustments to the arm until the gage reads 1/4. Again, as a disclaimer, I have not done this, and am just offering an idea which may, or may not, have any merit. Dan
-
As I am having some difficulty in attaching an image of the master vac decal that I would like to have reproduced, I have added the image to my gallery. Other pictures I just put in my gallery are those of reproduced emissions, hazzard switch, and spare tire cover decals. Dan
-
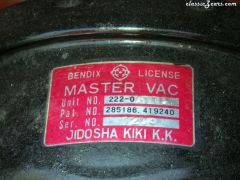 Photo of original decal from a series 1 240z
 -
I appologize for my lack of computer skills, but could someone direct me as to how to add thumbnail pics to my posts? I just uploaded some pics to my personal gallery, and the pics ended up on the home page. Hopefully they will make it to my gallery. Thanks, in advance. Dan:stupid:
-
-
-
-
-
-
-
 Spare tire cover decal
 -
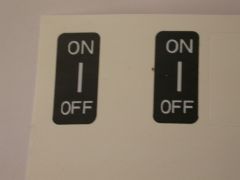 Hazzard switch decal for series 1 240z
 -
I have reproduced several decals for my Series 1 car, and am considering another. It is the red on bright silver decal found on the master vac. I can do this if there is enough interest from other members which would allow me to cover my costs. The other decals that I have done are: 1. Emissions decal done in a chrome gold finish to duplicate the finish found on many original 240Z emissions decals I have seen. 2. The hazzard switch decal found on series 1 cars. 3. The decals found on the spare tire cover, these are a black on chrome triangular decal, used to align the cover over the spare tire well. All of these decals have come out extremely well. This is probably a bad time to poll the membership here, with the Motorsport show taking place this weekend. Let me know if you are interested or your opinions on the general interest in this sort of item. Dan
-
Well, Carl got me by a year on date of purchase. Bought mine off the showroom floor in March of 1971, the last of the series 1 cars. But I got him on longevity: still own the car today, and has been a restoration project since 1999. It won't be finished until it looks like the day I bought it. Dan
-
Alan, Your the greatest. I have been totally frustrated trying to find this information. Many thanks. Dan
-
Thanks 26th-Z. That is exactly what I needed. Any thoughts on my question concerning the "ICA" columns on these parts CD pages? Dan
-
I have been using the CD to locate parts for my restoration, but one page is missing on my copy of the z-car CD. In the Electrical sub-section, page 55-4 is obliterated and I am assuming all the other CDs came out the same way. Does anyone have a good copy of this page that they would be willing to post for me to copy? Thanks for any help. There is one other question I have tried to get an answer for about this CD but, in the past, got no response. Maybe someone could help. In one of the last columns of this CD the heading is "ICA" and beneath this are two sub- columns labeled "N & F". Down in the parts list these columns will either have a "Y" or "N" and sometimes a "C" for a specific part. I am assuming this reflects the interchangeability of parts, but I don't know what the "N", or "F" stands for, or the "Y" or "N" or "C". Can anyone help me out on this definition? Thanks, again. Dan
-
Kats, 26th-Z, Just to add a little more perspective to the early round, chrome coat hangar, my car, one of the last series 1 with production date of 1/71, came from the factory with the round, chrome coat hangars. I was fortunate enough to meet Mr. Matsuo at the 2004 National Convention. This meeting was a large influencing factor in my resolve to return the car to as much originality as time and depleting finances would allow. The dialogue you both provide concerning issues of originality is totally where I am at. Dan
-
Hey Chris, Glad you jumped into the discussion, here. That is a very interesting association you make with the quarter window trim screw and clear washer fastener and the use of same on the door trims. My car has the welded-on tabs on the quarter window frames, and I found a couple of NOS screws and washers on ebay. Guess I should have bought more, as they show up very rarely on ebay. I noticed on the center picture you posted, above, the remanents of that small rubber upper quarter window frame post seal that was particular to only series 1 cars. Do you have a line on any supply for those? Mike, at Banzai, was going to have these reproduced, but may have found it too expensive to do. I'll let you know if I have any success in a quest for seat cushion guards. Are you going for a Concours restoration on either of your car, Chris?
-
Hello Kats, Thanks for your research on the seat cushion guards. They look terrific on your car, and I would like to install a pair on my seat, if I can find them. What I am getting from all of the above inputs to my original questions is that these guards were, probably, used only on very early production cars, the same as your unusual hood bumpers. I very much doubt that they were on my car originally, but as a stock item on series 1 cars, I think that I would use them. Are the machine screws and washers used to mount your guards a stock item? It is doubtful that we will every find a part number for these guards, but it has been an education for me, anyway. Although I have owned this car for 35 years, I have never had so much fun putting this car back to its original condition. Dan