AZ-240z
Free Member
-
Joined
-
Last visited
Everything posted by AZ-240z
-
 Ziggy, after some soul searching, and inputs from Mike B, could you change my tag order for a total of 6, and make the date code 12 - 1970? Thanks, and let me know if that works for you. Dan
 -
Mike, that is exactly my reasoning for asking the date code question, so thanks for your thoughts. I seem to remember earlier date code discussions used the same reasoning, and even two month before car production dates would not be considered unreasonable for parts codes. Dan
-
Thanks for doing this, Ziggy, but I have a question that you, or someone here may help me with. I believe my car had 6 tags in total, one on each lap belt, and a third on each shoulder harness. Mike Bs' picture above also shows a shoulder harness tag. Your offer is for a "set" of 4 tags, but didn't all 240zs come with 6? That being said, could you do 6 tags for me and I will gladly pay the pricing that you have established? I am also torn between using a date code of "12-1970" for my 1/71 production car instead of "1-1971" as it was said to have been made in the first half of January. Since I don't have the original tags on my car to confirm the actual date, any thoughts, anyone? Dan
-
Ziggy, here is a photo of a 1971 tag, but the month stamp is no longer visible. But, this would confirm that a 1/1971 tag would be the same format as the ones you are making.
.thumb.JPG.d7bfef4724be5213bc81136602f85059.JPG)
-
Ziggy, looks like you really nailed it, from the correct font to accurate sizing and fabric texture. Any chance that you could do a set of 4 for me with a date of 1 - 1971? I am currently working on reproducing the early master vac decal, so I can definitely attest to the work involved in doing these right. Dan
-
Thanks Mike B. I would welcome a distraction right now. The shop I use is 100 miles away in Tucson, so, emails and phone calls would take care of everything in the reproduction process except the final choice of decal material. That's a match I would do personally at the shop. There are always corrections that must be addresses but that is challenge of an authentic reproduction. I'm sure zingy can do a fine job, but, should he not be able to get these done for whatever reason, I would be happy to give it a try. Dan
-
7TooZ, Captain Obvious, Zup, Jfa.series1, Your concern and best wishes for my recovery is very much appreciated. It is heartening to occasionally be reminded that this is not only a society of Z enthusiasts, but, also, of just real good people. Dan
-
Mike, I could give this a try, but would need a few things. 1. A high resolution picture taken as directly head on as possible to reduce distortion. 2. The best discription possible of the silver color and gloss level as this is the most difficult part of reproducing these decals for greatest authenticity. Even mailing samples back and forth may be worth the effort. let me know. Dan
-
Thanks! Took a header down my favorite hiking trail by catching my toe on a boulder and landing hard, and 2 feet down, on my right knee. That jammed right femur into pelvis causing multiple fractures. " Ouch" doesn't begin to describe the pain.
-
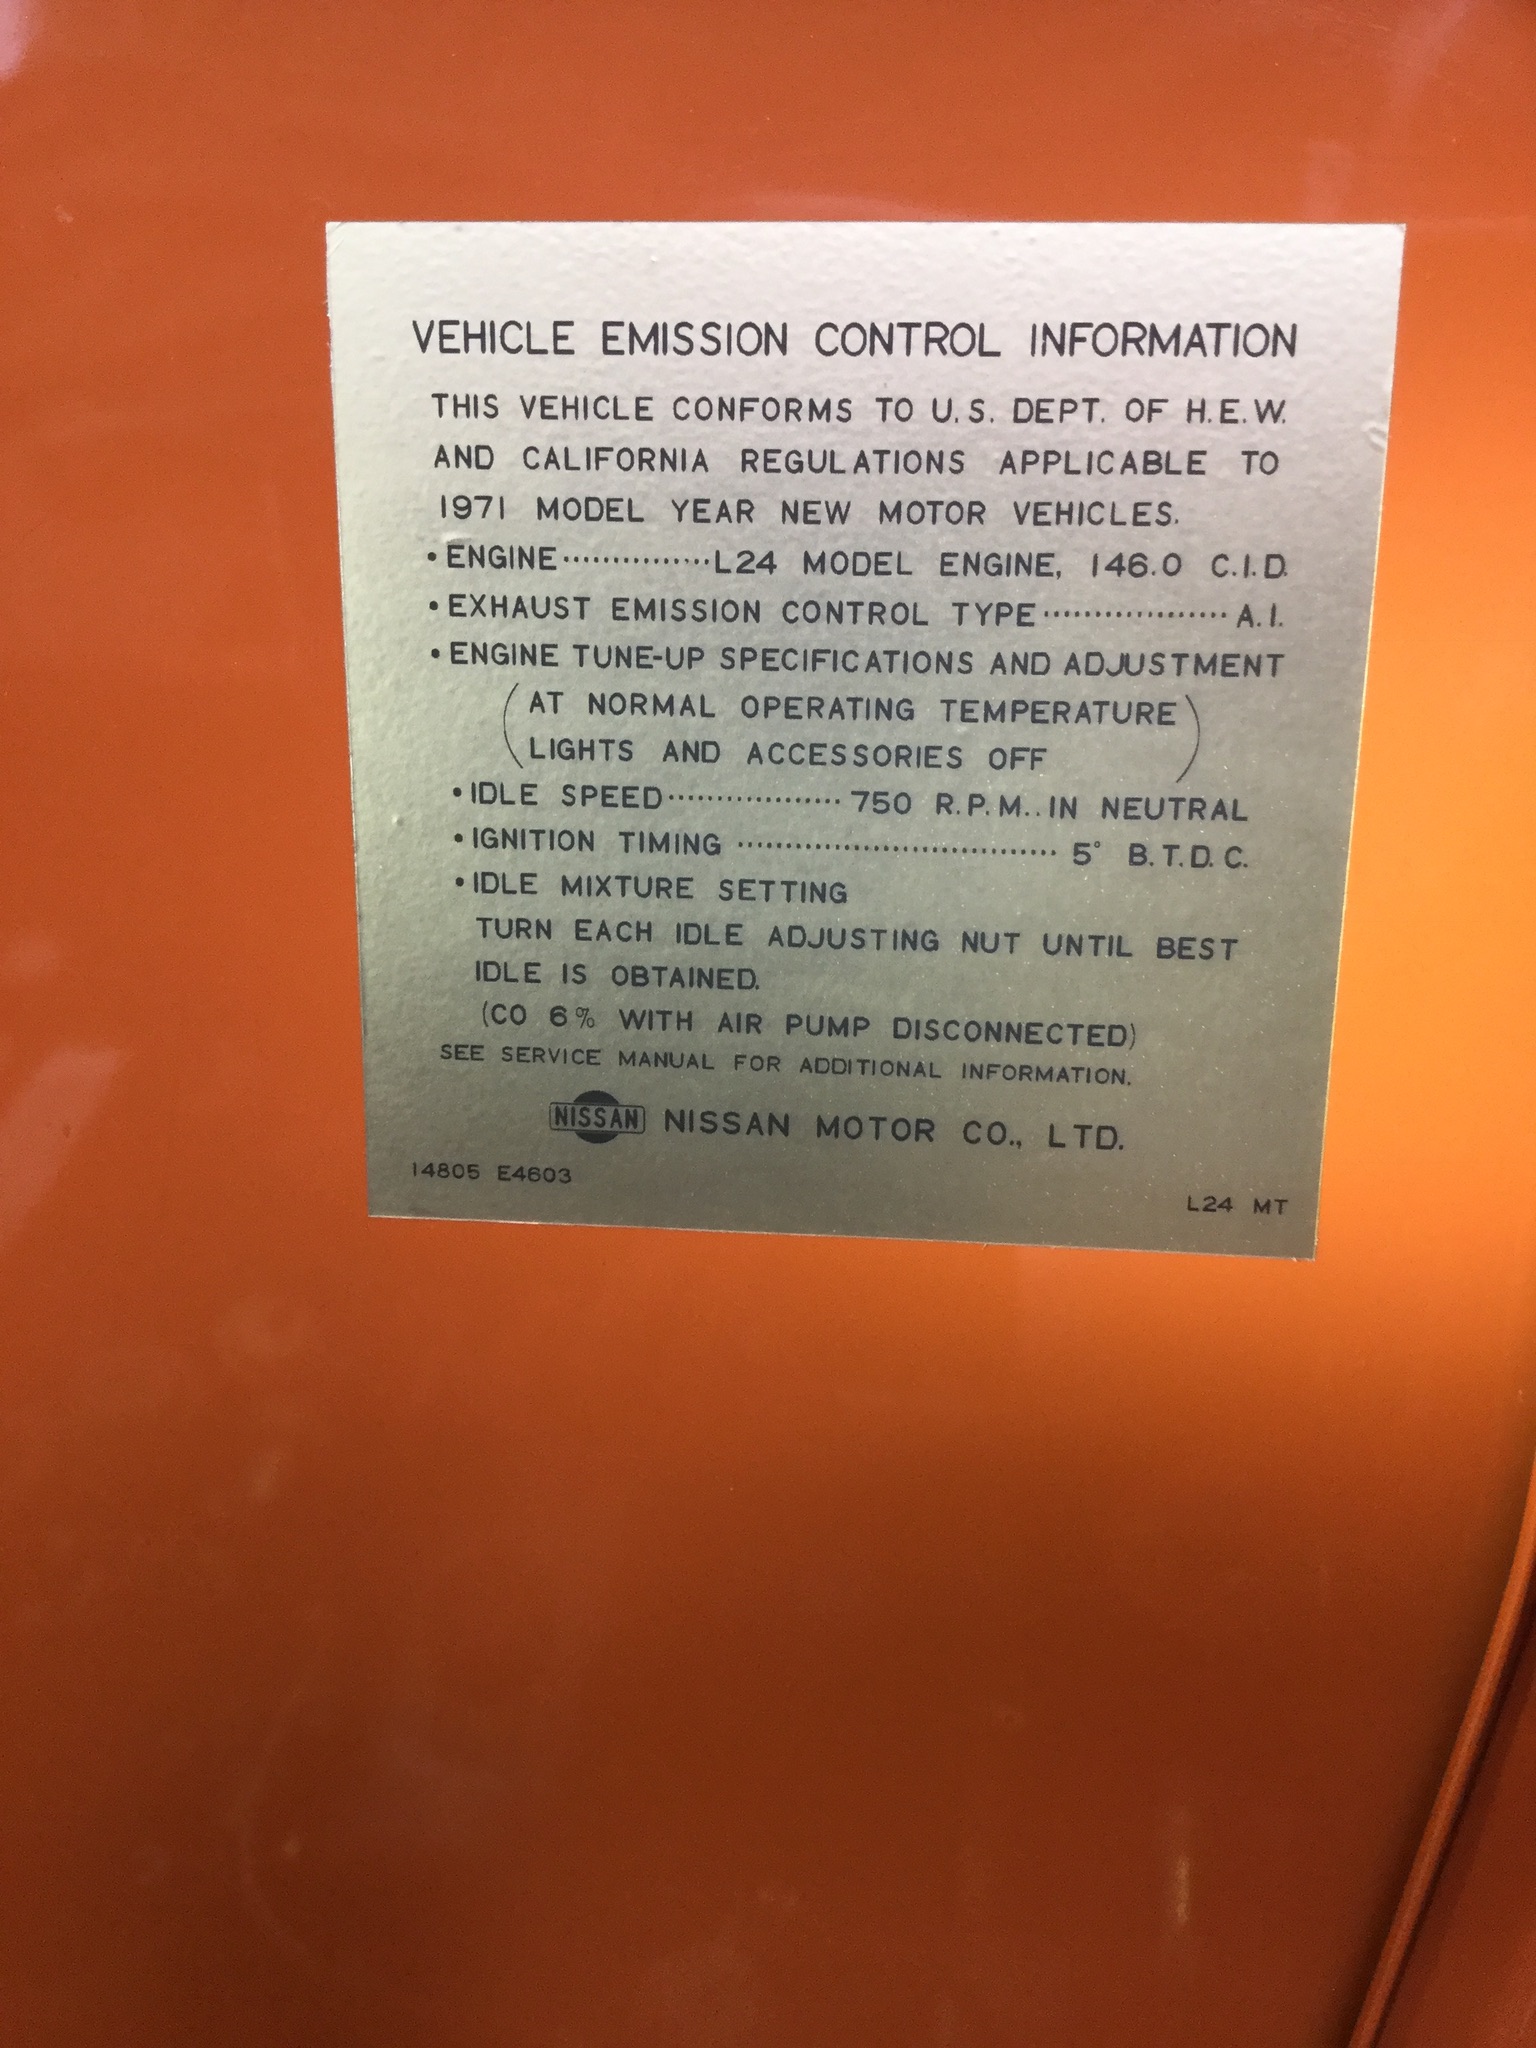
I just finished reproducing a '71 emissions decal for my car. It has the part number on the lower left corner and was done on gold vinyl decal material. I would be willing to see if I could have this decal reproduced, but won't be able to do any thing for a few week as I just fractured my pelvis in three places. Here is a picture of this decal on my car.

-
Thanks, Jim D. Sharing our all-too-infrequent successes is what this society of originalists is all about for me. As far as actually driving my car, I'm afraid a severe case of paranoia and OCD controls my Z driving habits these days. I do take it out on weekends though for a 60 mile tour of Phoenix freeways when they are pretty quiet to renew the spirits and keeps things in good operating condition. Dan
-
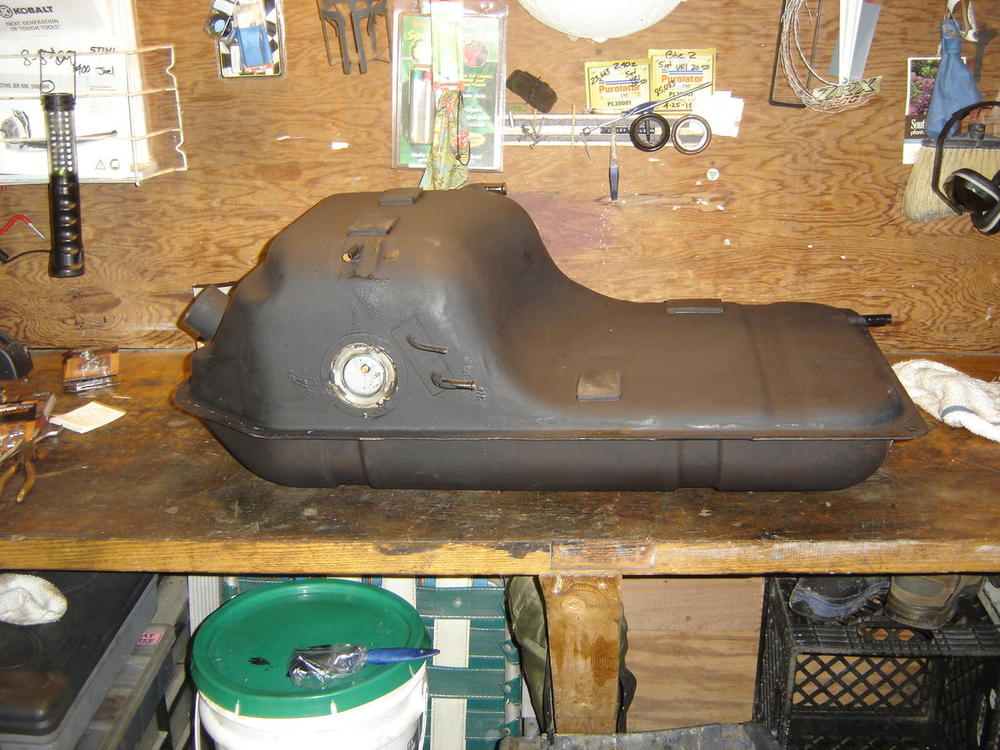
Well, it's been a while, but I want to revisited this subject with another possible solution to inaccurate fuel gauge readings. My gauge would read about three needle widths below the full mark after filling the tank (like forever), and would still have a lot of gas remaining when reading well below empty. I drained my tank of the 2.5 gals remaining and removed the sending unit. Outside the tank, I hooked up the sender to the wiring harness, grounded the earth wire to the chassis, and turned the ignition key to on. I then manually moved the sender arm through its full range of movement causing the pickup contact to slide on the resistance windings full scale from empty to full. The gauge readings remained unchanged as when installed in the tank. the reasons I narrowed my focus to the sender as the culprit are: 1. I removed my fuel gage and hooked up another spare gauge. There was no change in fuel readings. 2. The fuel sender sub-harness is new and properly grounded to the chassis. 3. The sender is NOS, and replaced a NOS sender installed a few years ago with the same issues. 4. The fuel tank has been restored to as-new condition with all of the correct fittings. I had previously spoken about possibly "bending" the float arm on the sender to change the gage reading. Well, after taking a closer look at the sender, I noticed a set screw on the pivot arm of the sender float arm. I also noticed that the contact on the sender was not near the top of the resistance winding scale when the arm was moved to full tank position. With nothing to loose, I loosened this set screw and rotated the pickup contact up to the top of the windings while holding the float arm against the full stop position. this set screw was then retightened and finger were crossed. Someone else may have already tried this, but, none the less, I'm feeling pretty excited about my discovery and anxious to try it out. Again, outside the tank the sender was wired up and grounded and, with the ignition switch on, the sender was manually moved to full stop causing the gauge to move to The full mark for the first time in years. Looking very promising, I reinstalled the sender and dumped the 2.5 gallons of gas back into the tank. I have always thought that, at the empty mark, there was probably 2 to 2.5 gallons of reserve fuel remaining, or maybe I read that somewhere. Anyway, almost afraid to try it out, I cranked up the engine to see if anything changed. The fuel gauge worked its way up to the empty mark and stabilized there with 2.5 gallons of fuel. Success, at least for now. I couldn't get to the gas station fast enough to try a full tank on my gauge. When the station pump clicked off automatically signaling a full tank, I switched the ignition on and the gauge indicator needle slowly moved to and stabilized EXACTLY on the full mark. I am definitely a happy camper right now. Since I don't drive my car frequently, something that I have to keep in mind is, the gage will move toward the half full mark more rapidly due to the shape of our gas tanks. The sender is mounted in the deeper (fatter) end of the tank. When the float on the sender arm reaches the halfway point, there is much more than half a tank of gas left, if that makes sense. Thereafter, the gauge needle will move more slowly to be consistent with the actual amount of fuel remaining in the tank. Also, something I failed to mention. With the sender out of the car, I used a Q-tip with some wax and grease remover to clean the resistance windings of any gas varnish buildup, and a piece of 220 sandpaper to burnish the pickup contact for a more positive contact. Not sure if this contributed to my success or not. I hope this may help those with similar issues. Dan Also, I plagurized a photo of a gas tank from one of siteunseen's posts to help with the above explanations.
-
All of the fender bolts were painted body color from the factory. They were hex head indented bolts with a "4" (torque value) cast onto the head. There were only a very few fasteners un-painted, such as the 4 round counter sunk Philip flat head screws that fastened the rear hatch to its hinges, and the door window frame fasteners, 5 per door, located in the door jambs that I can think of right now. Dan
-
Jerry, I am digging for my source information, but here is my understanding of thinner-headed fender bolts. Early cars that had the FRP (fiber reinforced plastic), or fiberglass, headlight housings used, at the discretion of the assembly worker, thinner headed bolts, along with lock and flat washers to secure these housings to the inner fender. The reasoning for using these was because the FRP housings had a thicker profile than stamped metal housings which could reduce the hood clearance to the FRP headlight housing bolts and possibly damage the hood. Two bolts on each headlight housing would be required. The other six, three per fender, fender bolts had standard size heads. Some of the flat washers for these six bolts also could have used flat washers with one side trimmed flat. This was to avoid damage to the flared contour of the fender inner lip. Hope this helps. Dan
-
I concur with all of Carl's & Chris' comments. My experience has been quite similar. My car was restored by Pierre-z who, along with Les, were shops designated by Nissan to do the original Vintage Restorations. This car, I am confident, was done to a very high standard throughout with as-new reliability. I would say that, as a current condition #3 car, it's value is at least $35,000. What takes it to a condition #1 or #2 concours car are all the little thing thus far mentioned, plus much more. Also noticed, the door weatherstrips are tubular generic, on-off hazard decal is on wrong side of switch, no vinyl boot on dash harness on right side of console. I would, also, guess that many fasteners used to build this car are new, aftermarket without the proper torque codes or finish in order to keep this car reliably together and avoid liability issues that restored used fasteners might incur. If one was to renew this car to factory correct, it would probably take another $15,000 parts and labor, and I would estimate it's value, when completed with all of the correct, almost impossible to find, NOS parts at, in the neighborhoods of $60,000. Just my thoughts! Dan
-
Jerry, are you saying that the NOS tank you sent is not the tank that was installed by the restoration shop?
-
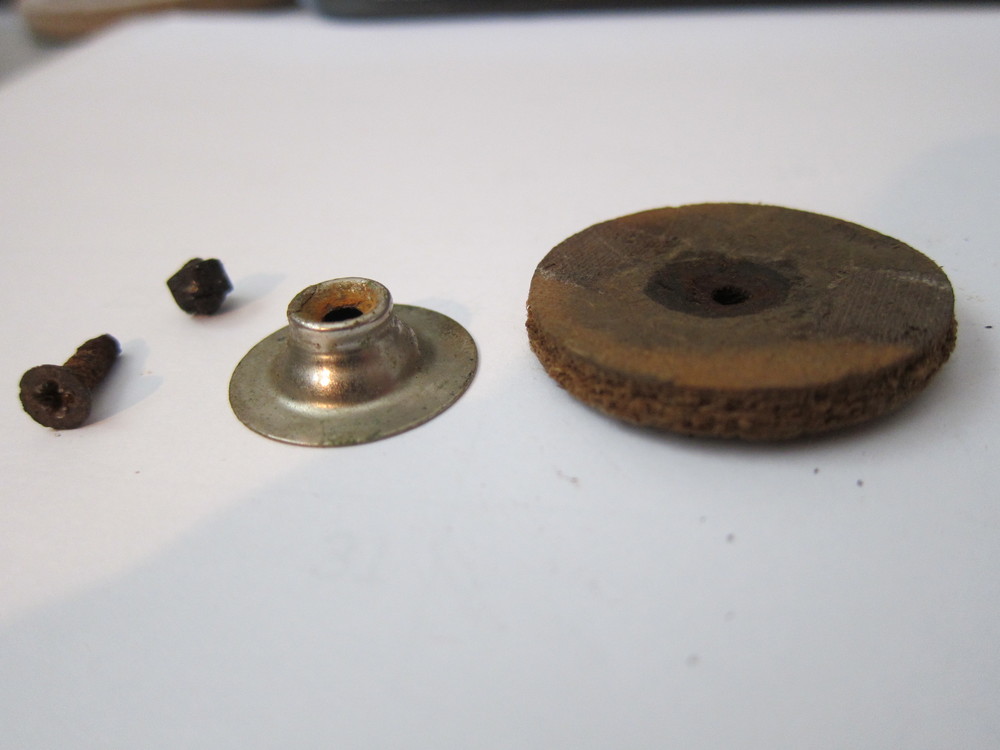
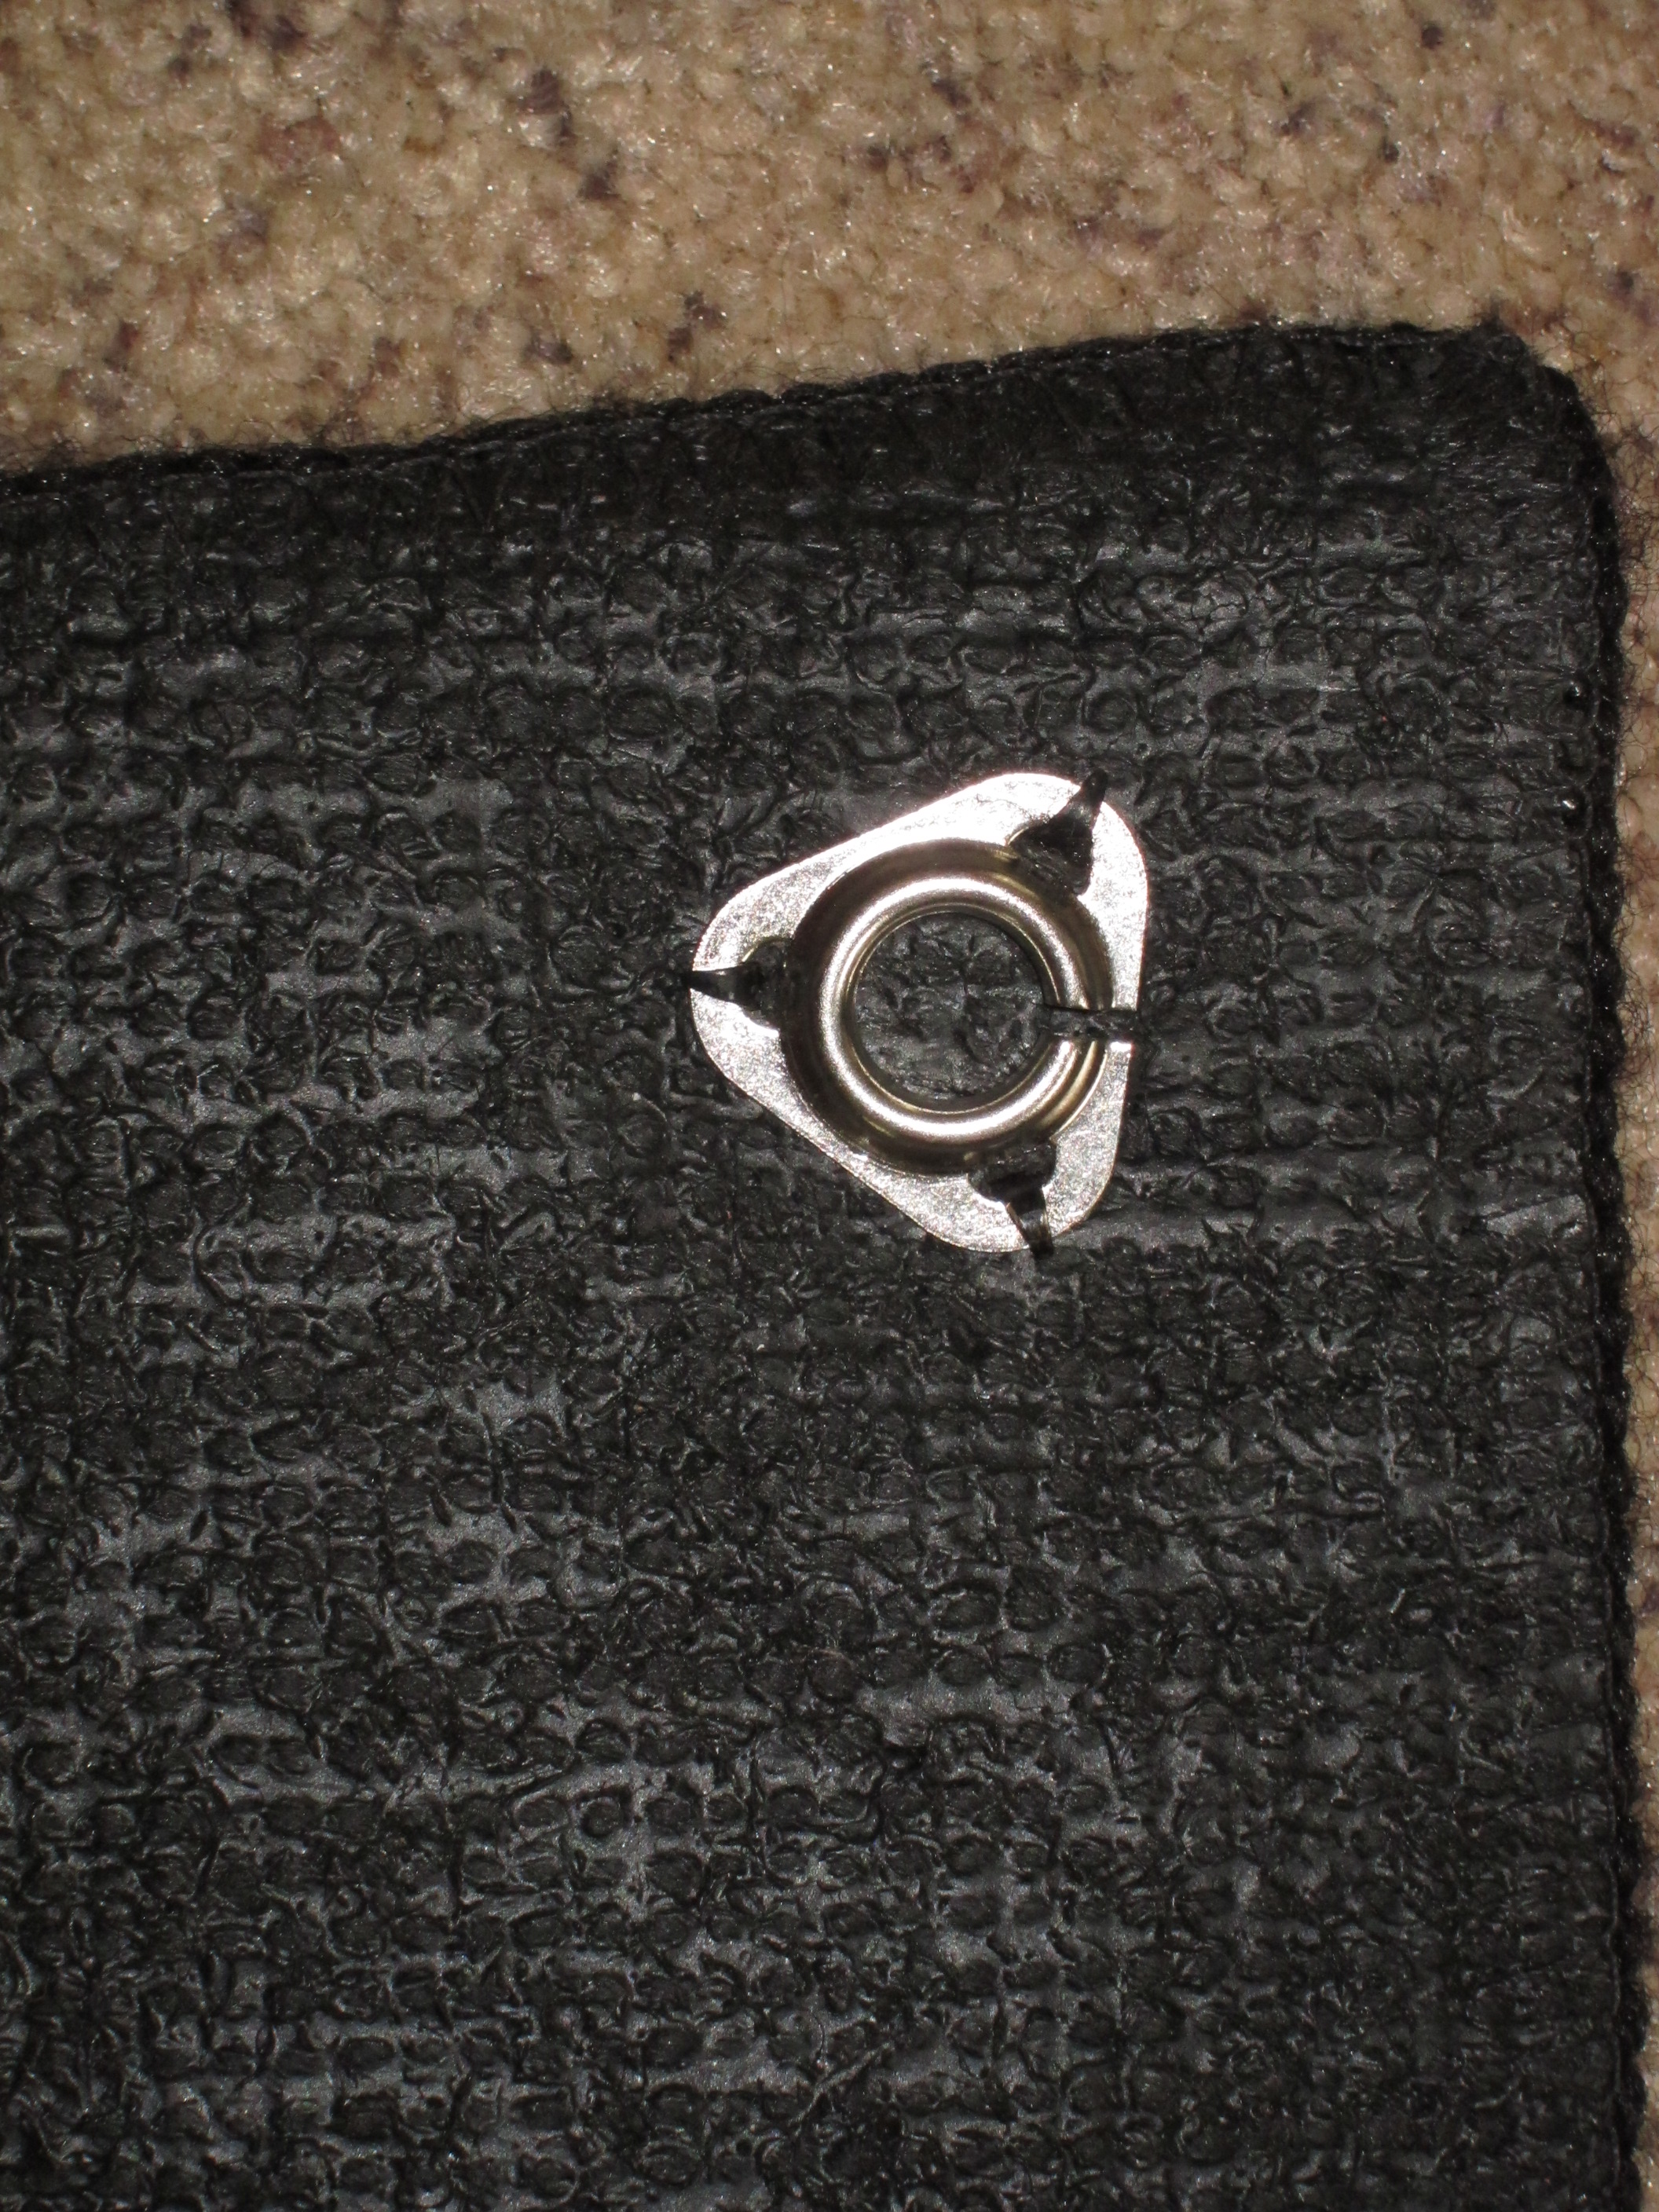
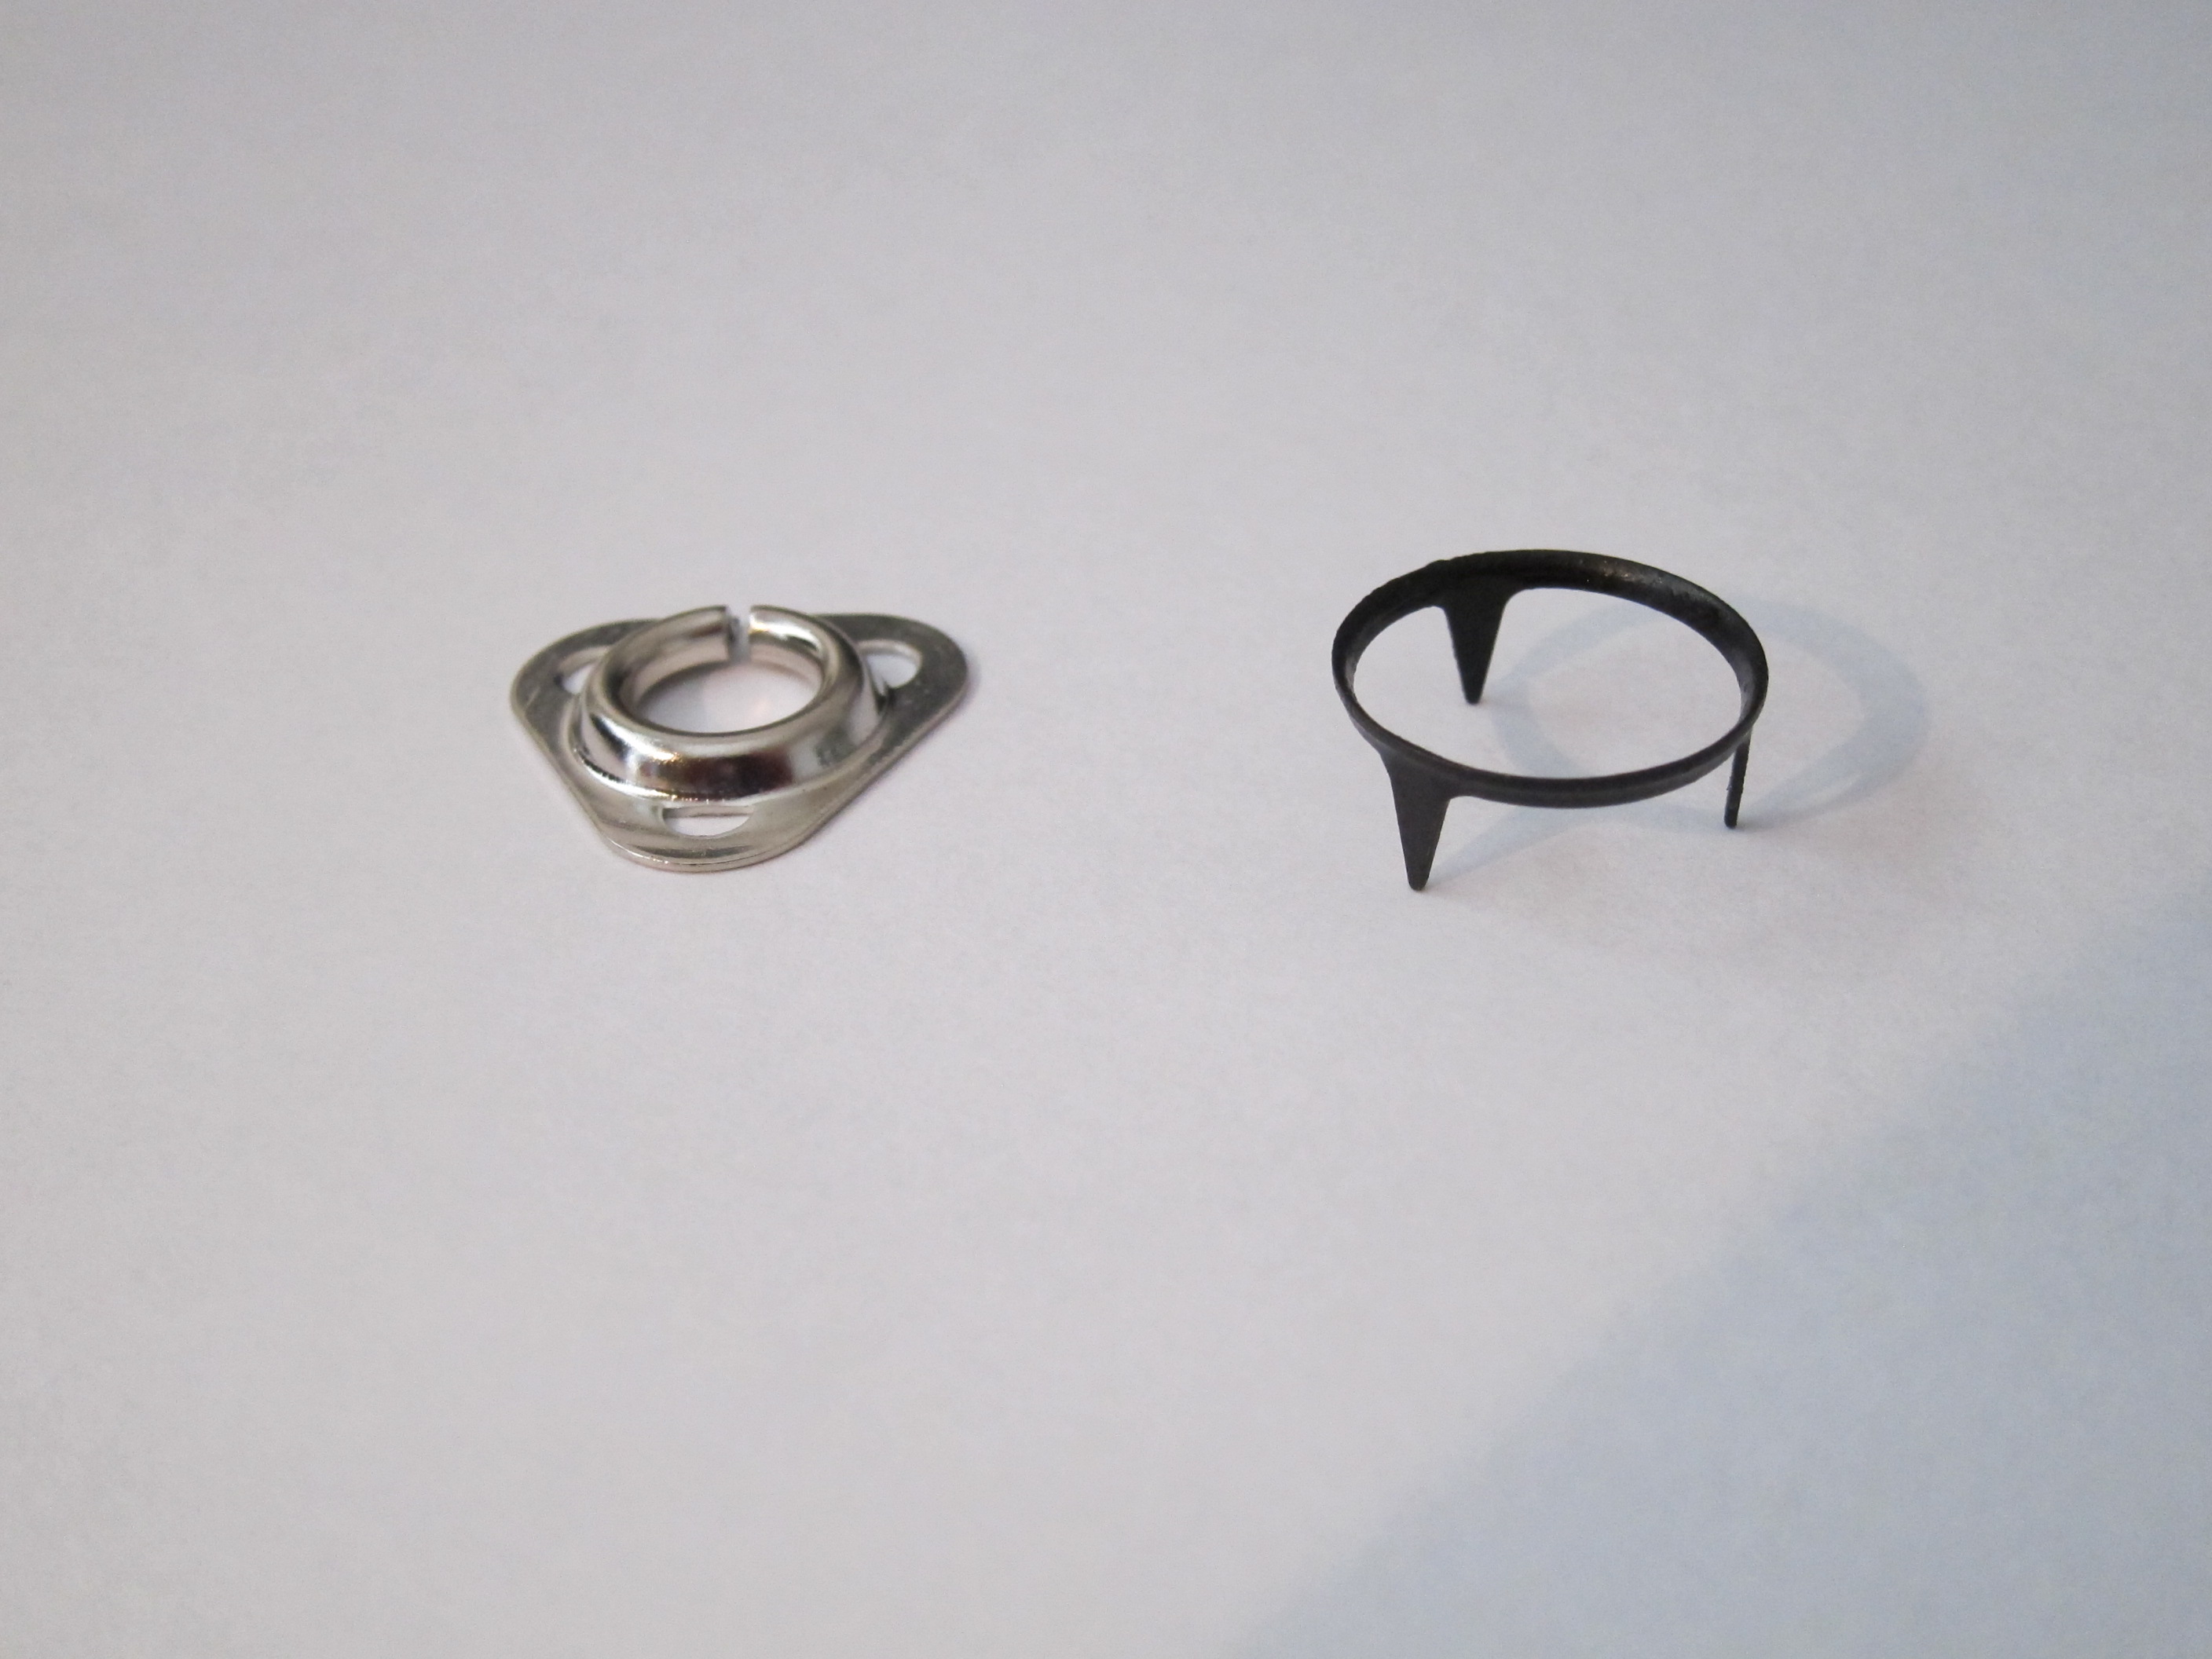
Careless, I included a picture of one of the male fasteners I have left over from my project. Sounds like this is what you already have. The Masonite is 1 5/8" in dia. and 3/16" thick, although it may have swollen over time with moisture exposure. The Phillips screw is 3/4" long and size is undeterminable, due to rust. Jim at C&H was very helpful to me in making my carpets. Although I made my own patterns and cut all of my carpet pieces, he was able to surge all of the carpet pieces on his equipment and they turned out great. I got all of my carpet, jute, and female snap fasteners at Newport Upholstery. The male fasteners were retrieved from my original footwell carpet pieces. Newport, now, will only deal with the trade and not public, but Jim at C&H could possibly order directly from them, but that would be up to Jim. Here is Newports website address: http://www.newportupholstery.com/auto_trade_suppl.htm And here are some pictures of the original male snap fasteners that I used. Dan

-
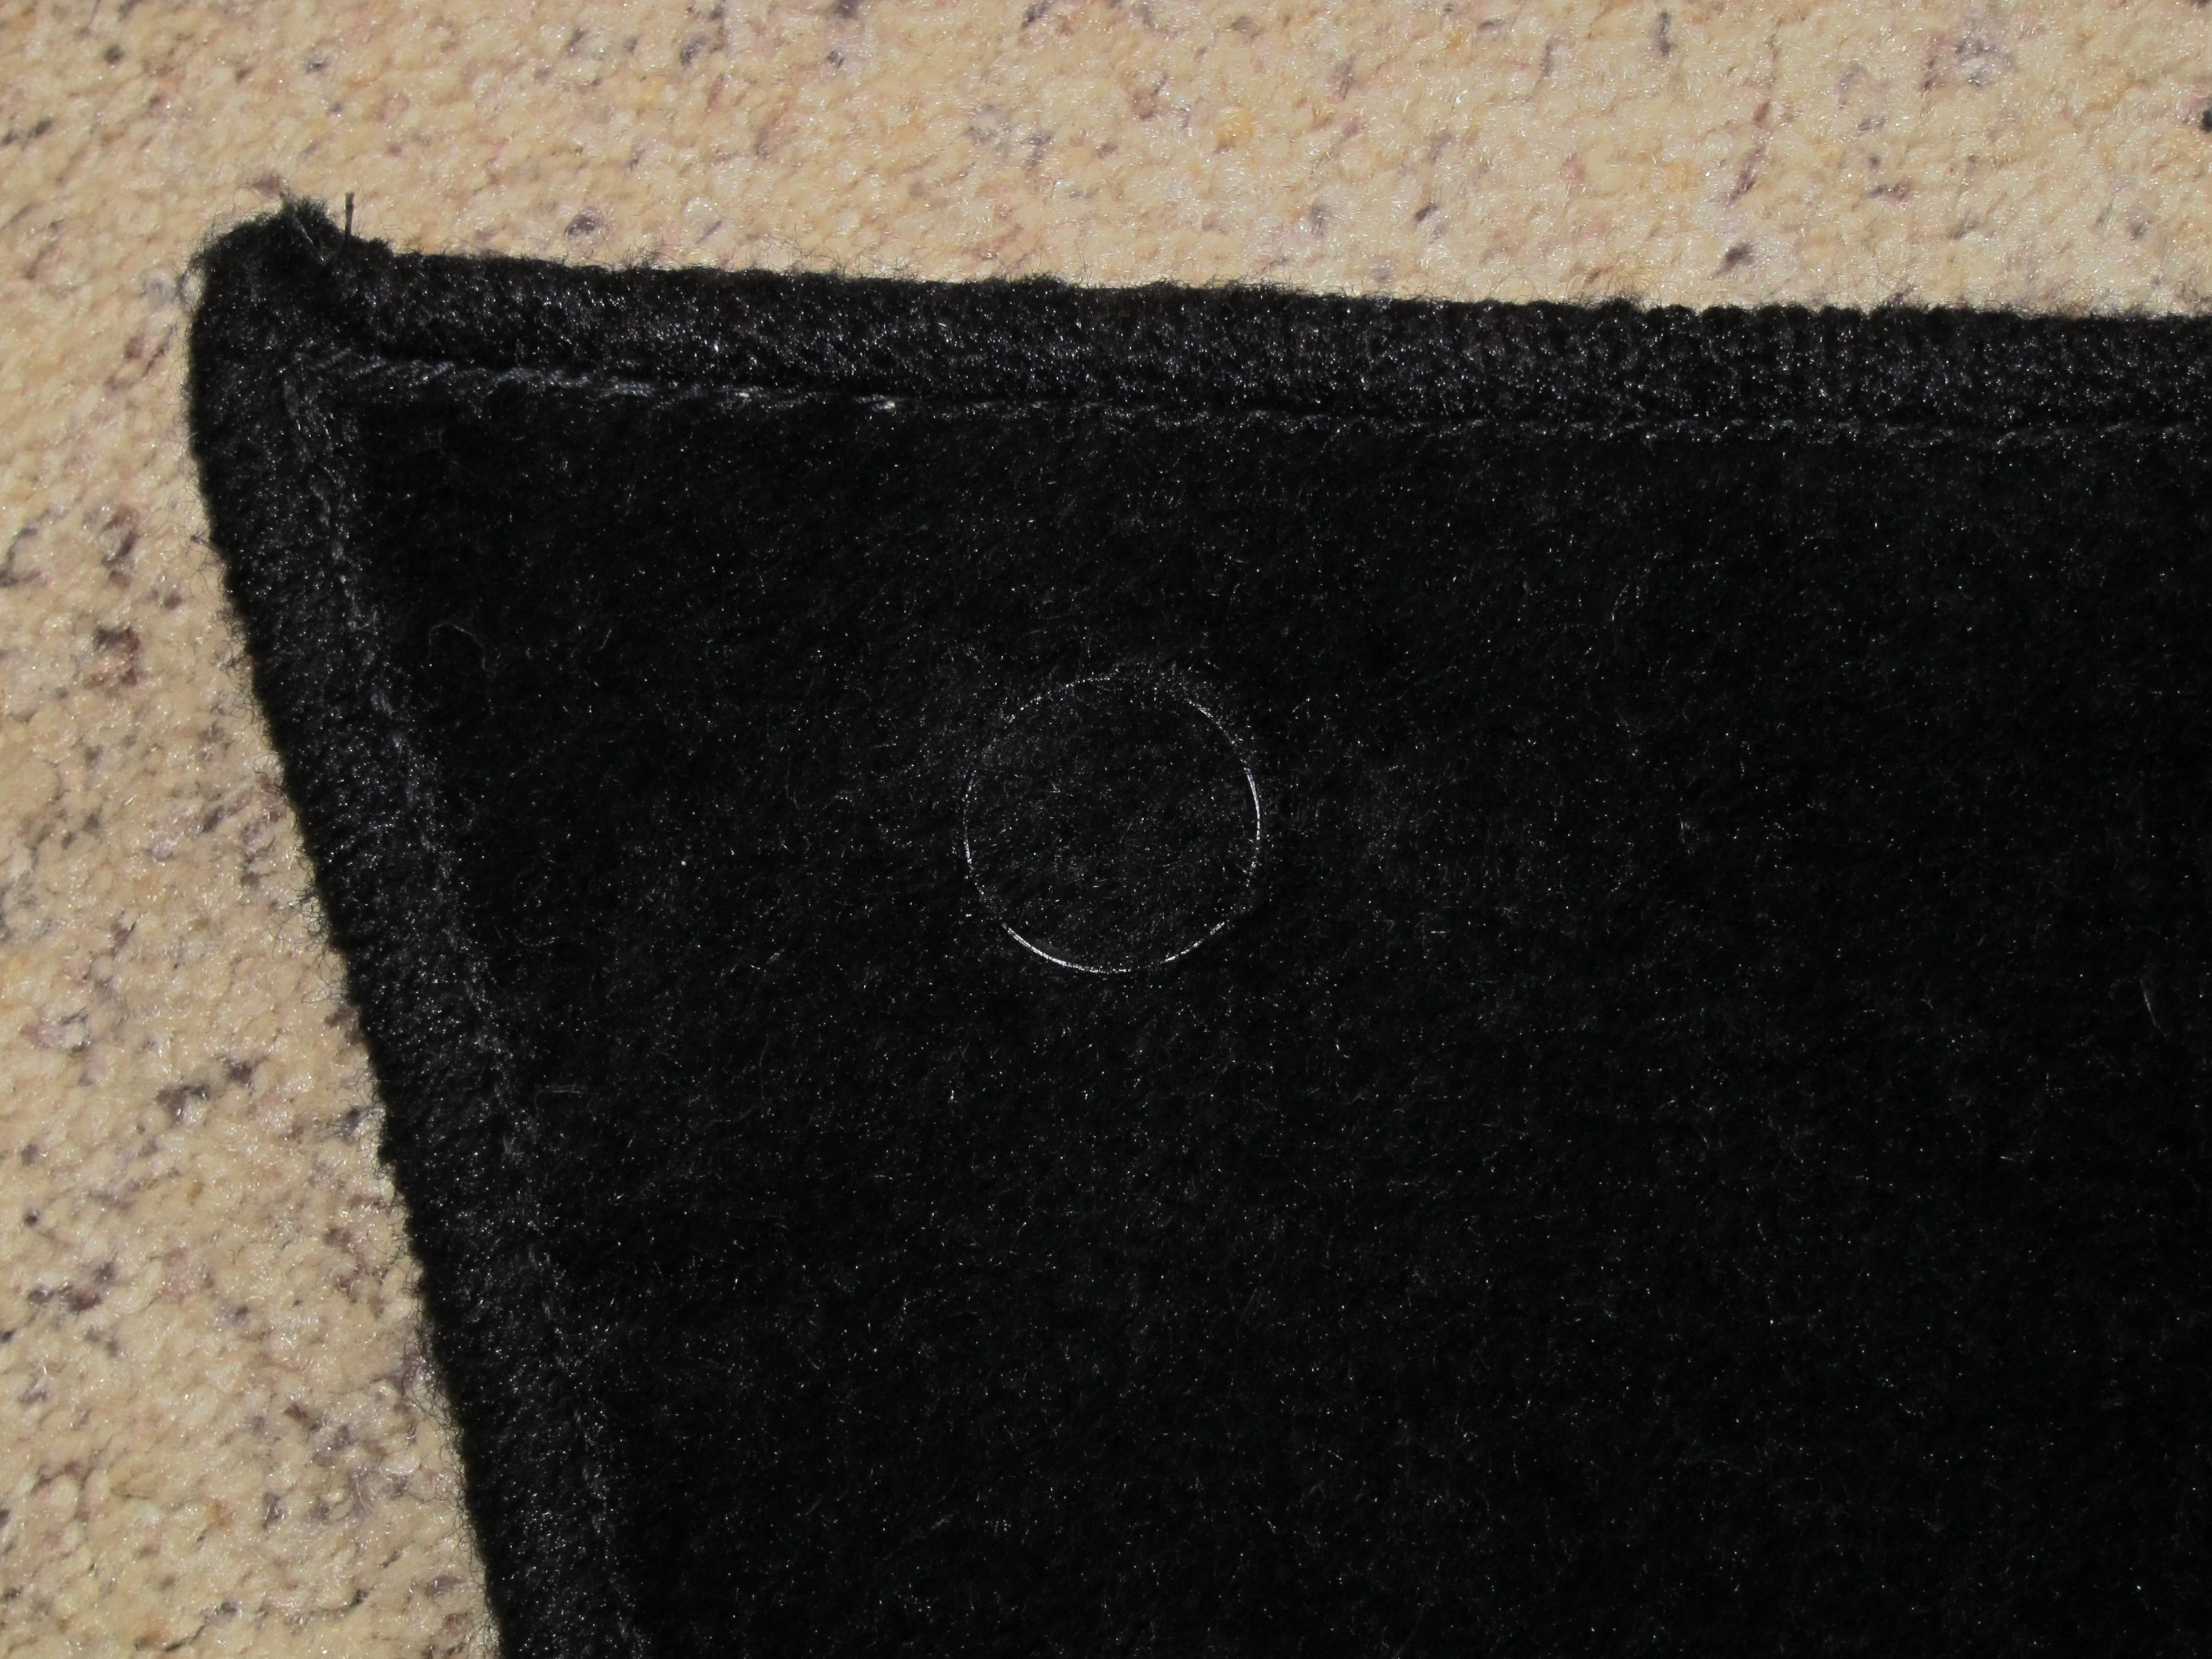
Careless, I have done what you are now proposing to do to replicate the firewall insulators and correct carpet snap fasteners. The male snaps with the Masonite backer board attached to the firewall insulators, as seen in the attached images. The first image shows the original and new insulator that I reproduced. The triangular shaped fastener you describe is not generic, but actually is the female half of the fastener that attaches to the backside of the carpet. Let me know if I can be of any further help. Dan
.JPG.dcc6f95f46c923310fd024eae5e49307.JPG)
.JPG.1b011040b2269af4e556b76818724c40.JPG)
.JPG.d3ea0a3396be5f6da3294378bbd28bcb.JPG)


-
240260280, thanks for your pics. Location and application both very useful to catalogue.
-
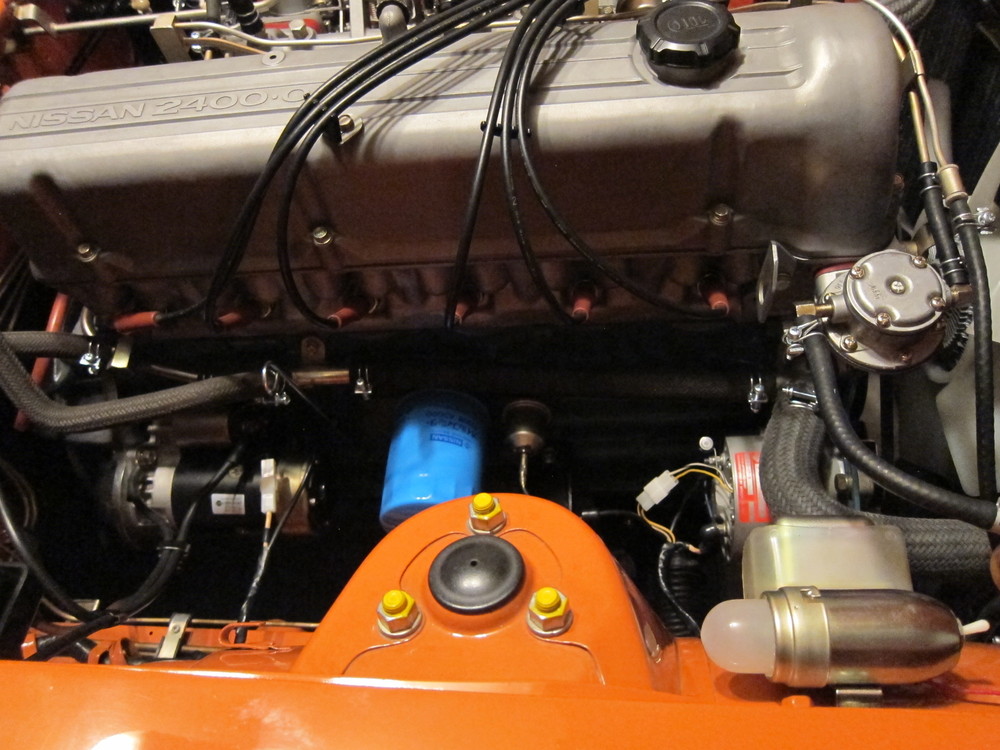
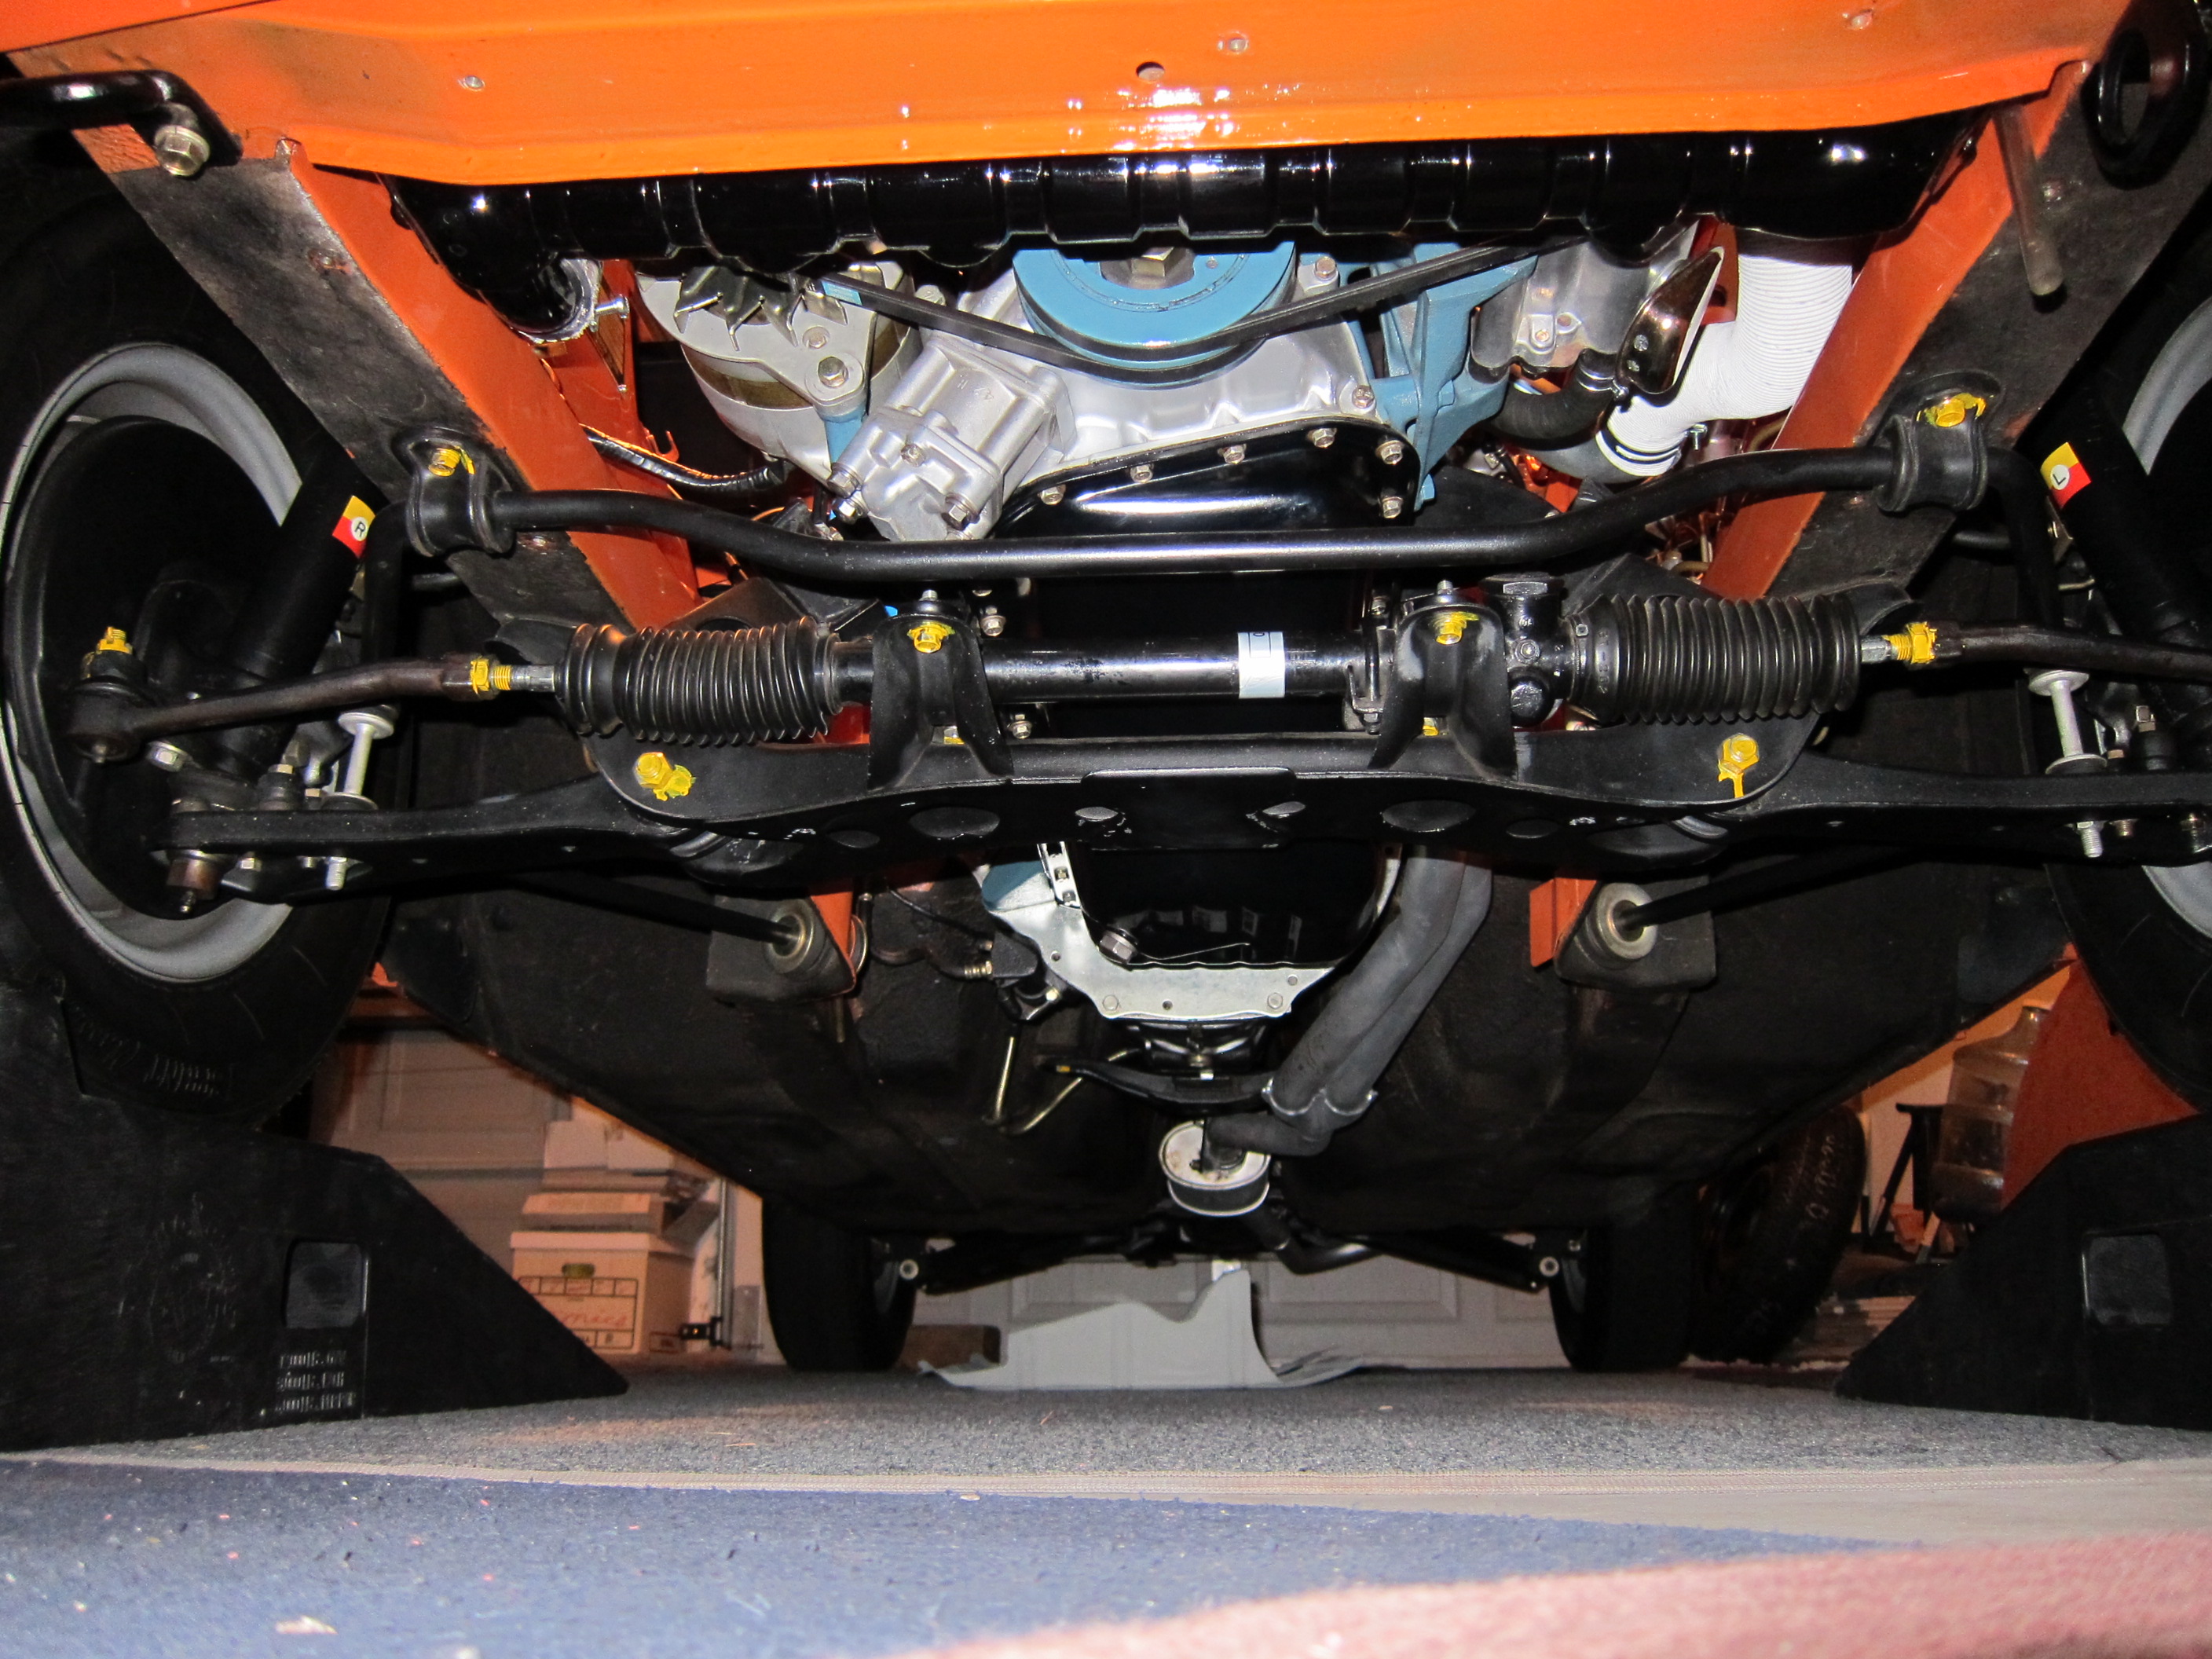
Thanks for the positive critique Chris. Am I sensing an interest in my early oil pan? It has been media blasted and painted with gloss black catalyzed paint. Would be great to have a color code or sample match for the red.
-
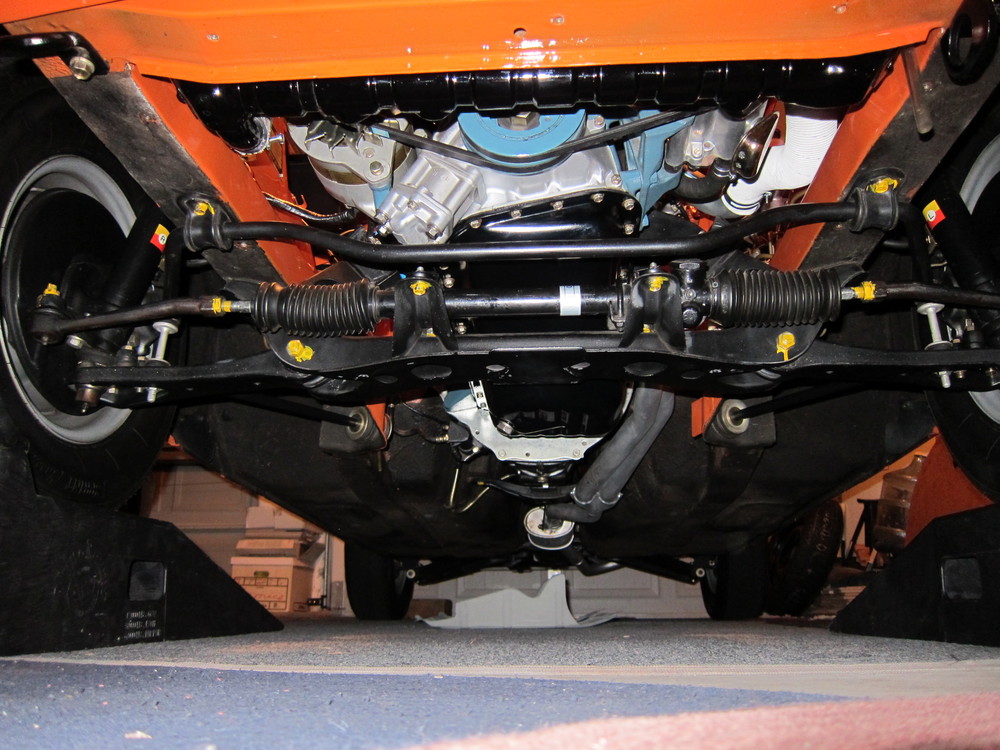
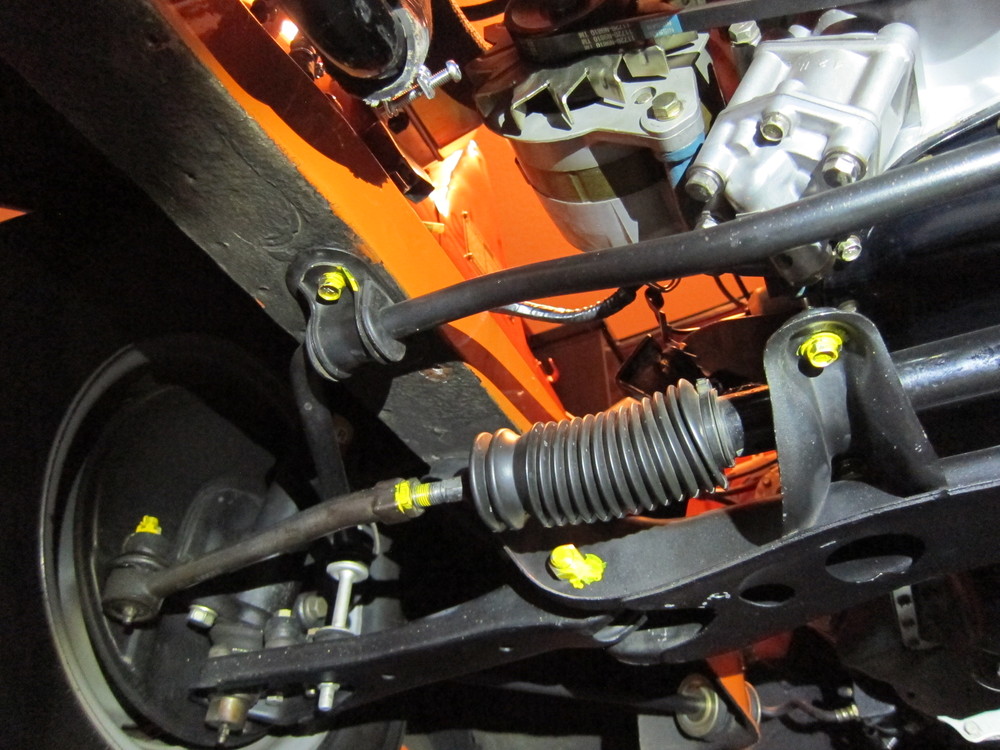
Hi Rich, thanks for those. I'm not seeing anything on the steering rack other than the colored tape. I'll definitely do the yellow mark on the engine. you have the earliest of oil pans, so may need to do some more research on the preserved white V marking. I've got one of those early pans in the attic which will go on eBay unless someone here wants to offer on it. Dan
-
If all 4 wheels are 4-71, in my humble opinion, that adds a lot of value for someone doing a stock, original restoration. And, I believe these wheels would be considered original for any car with a build date from 4-71 to 6-71 without stretching the point. Good luck to you! also, you really should post pictures of all the wheels, front and back.
-
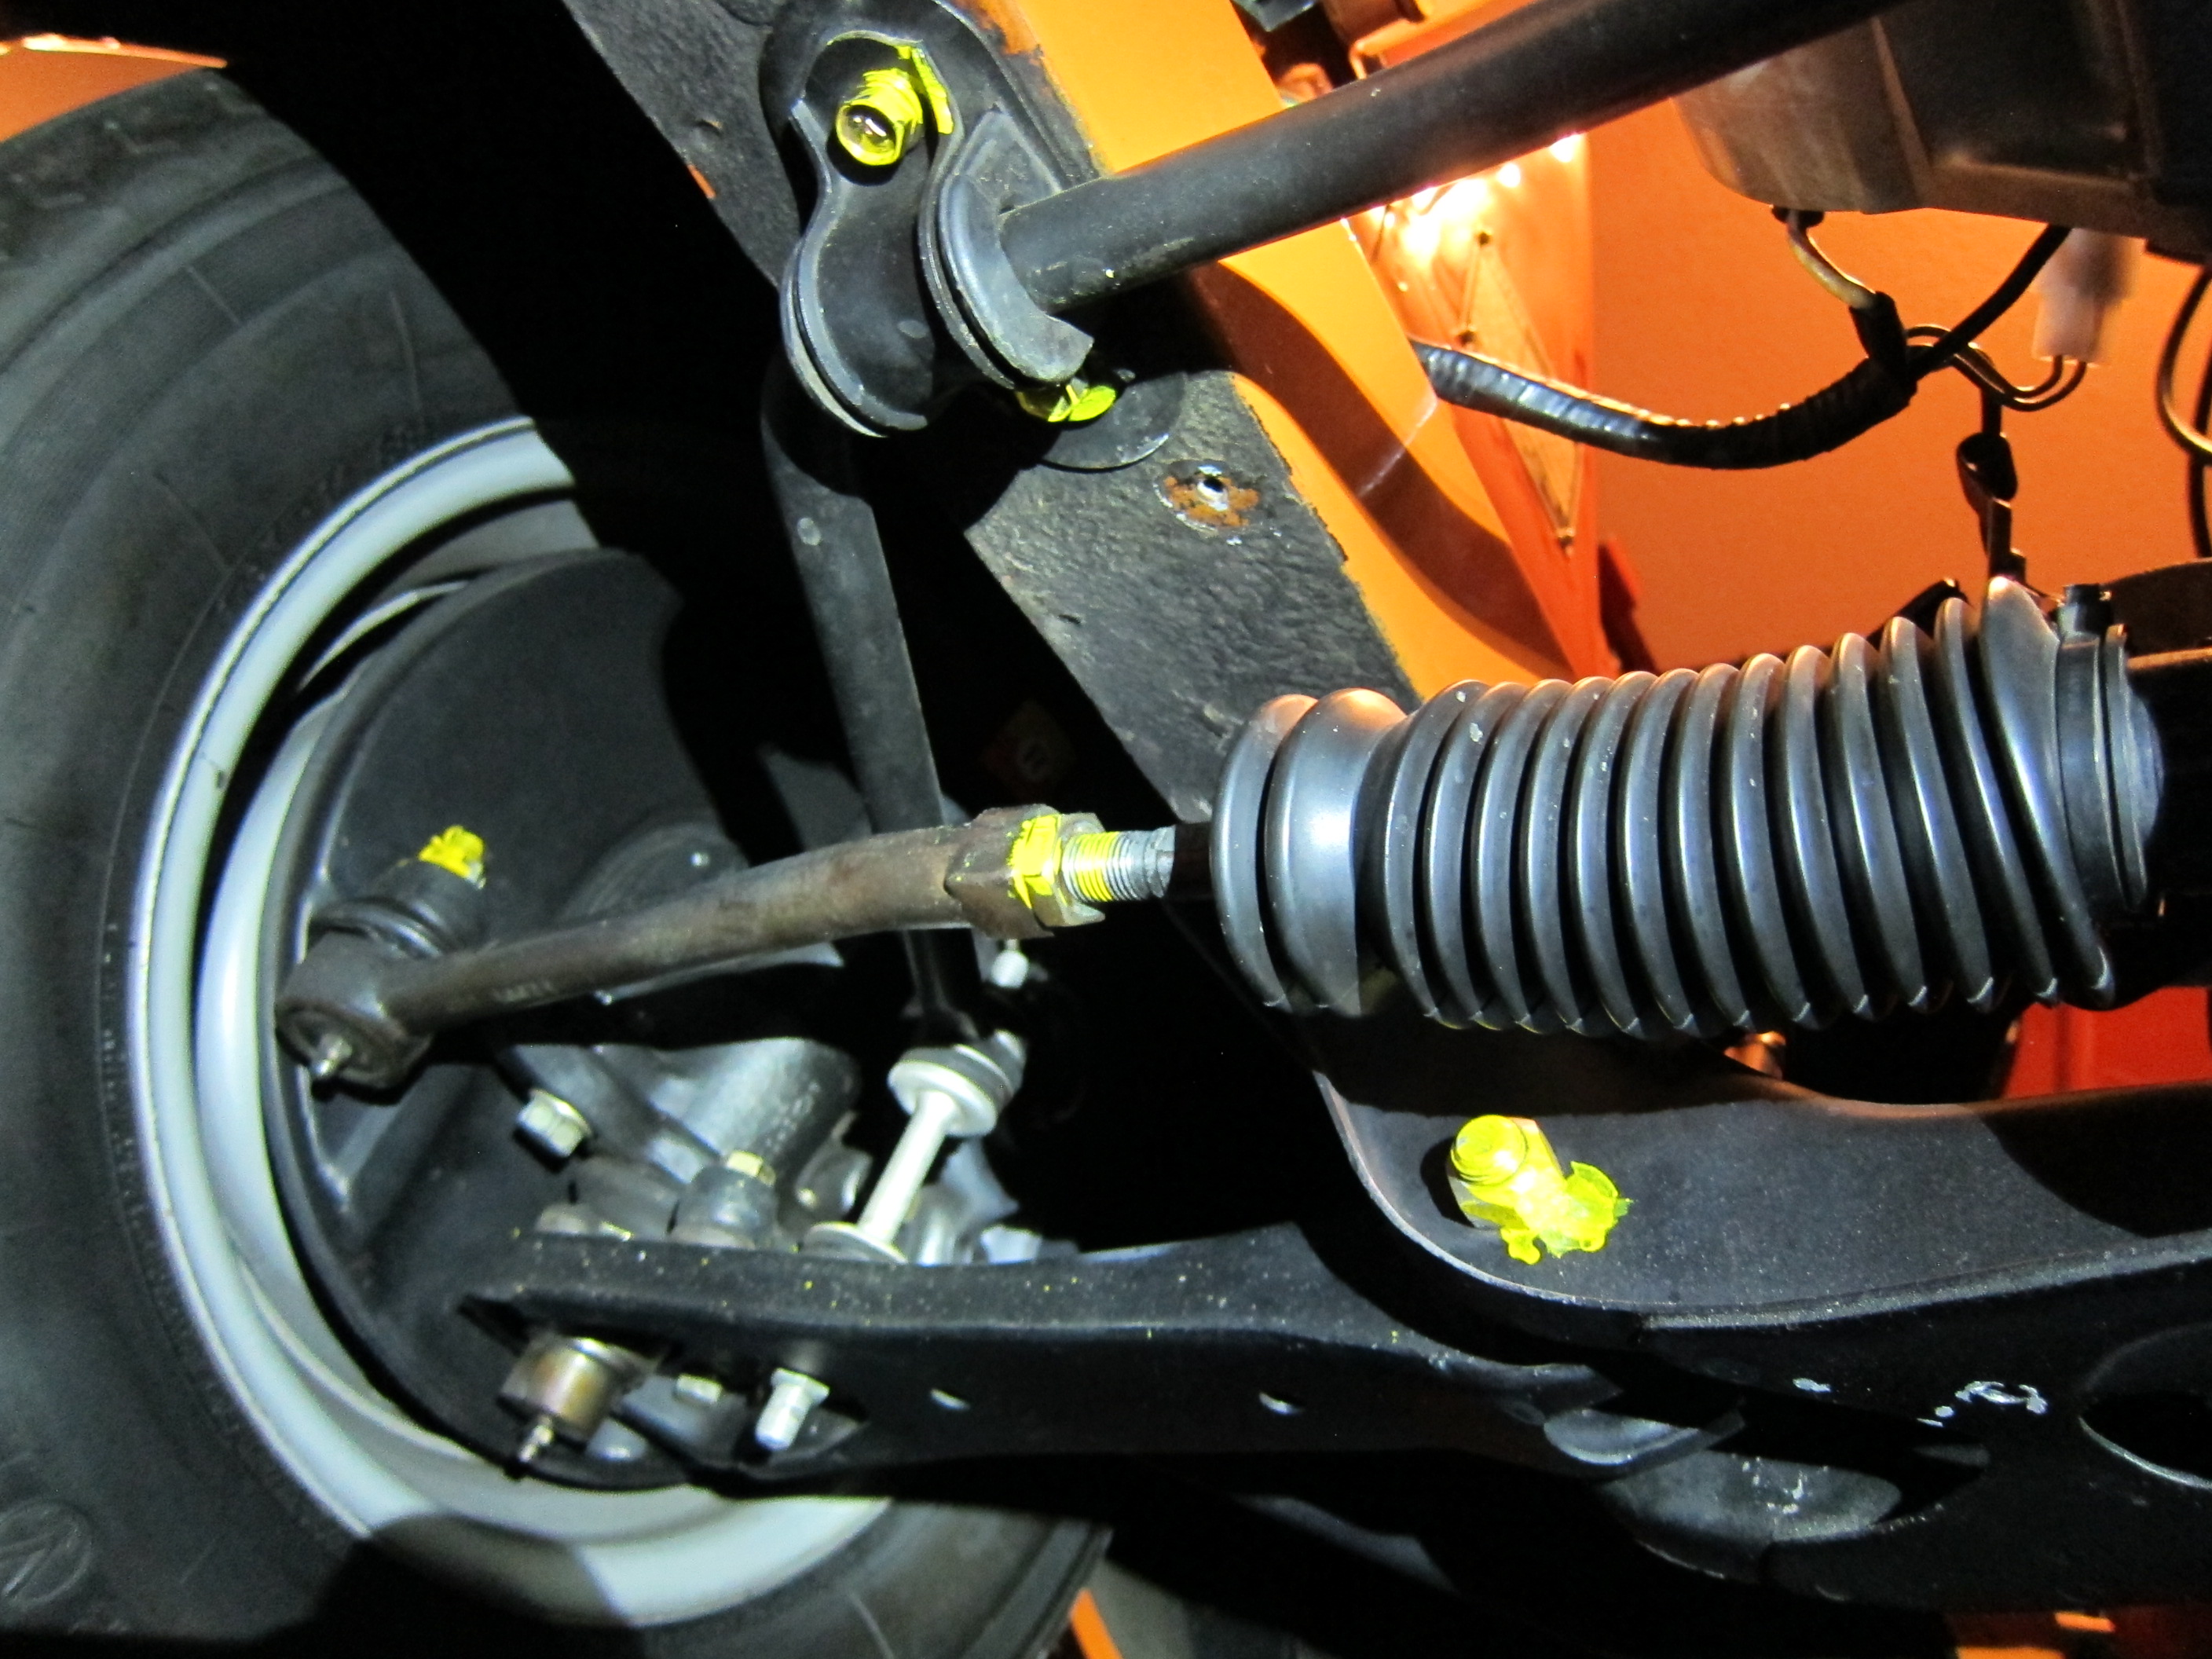
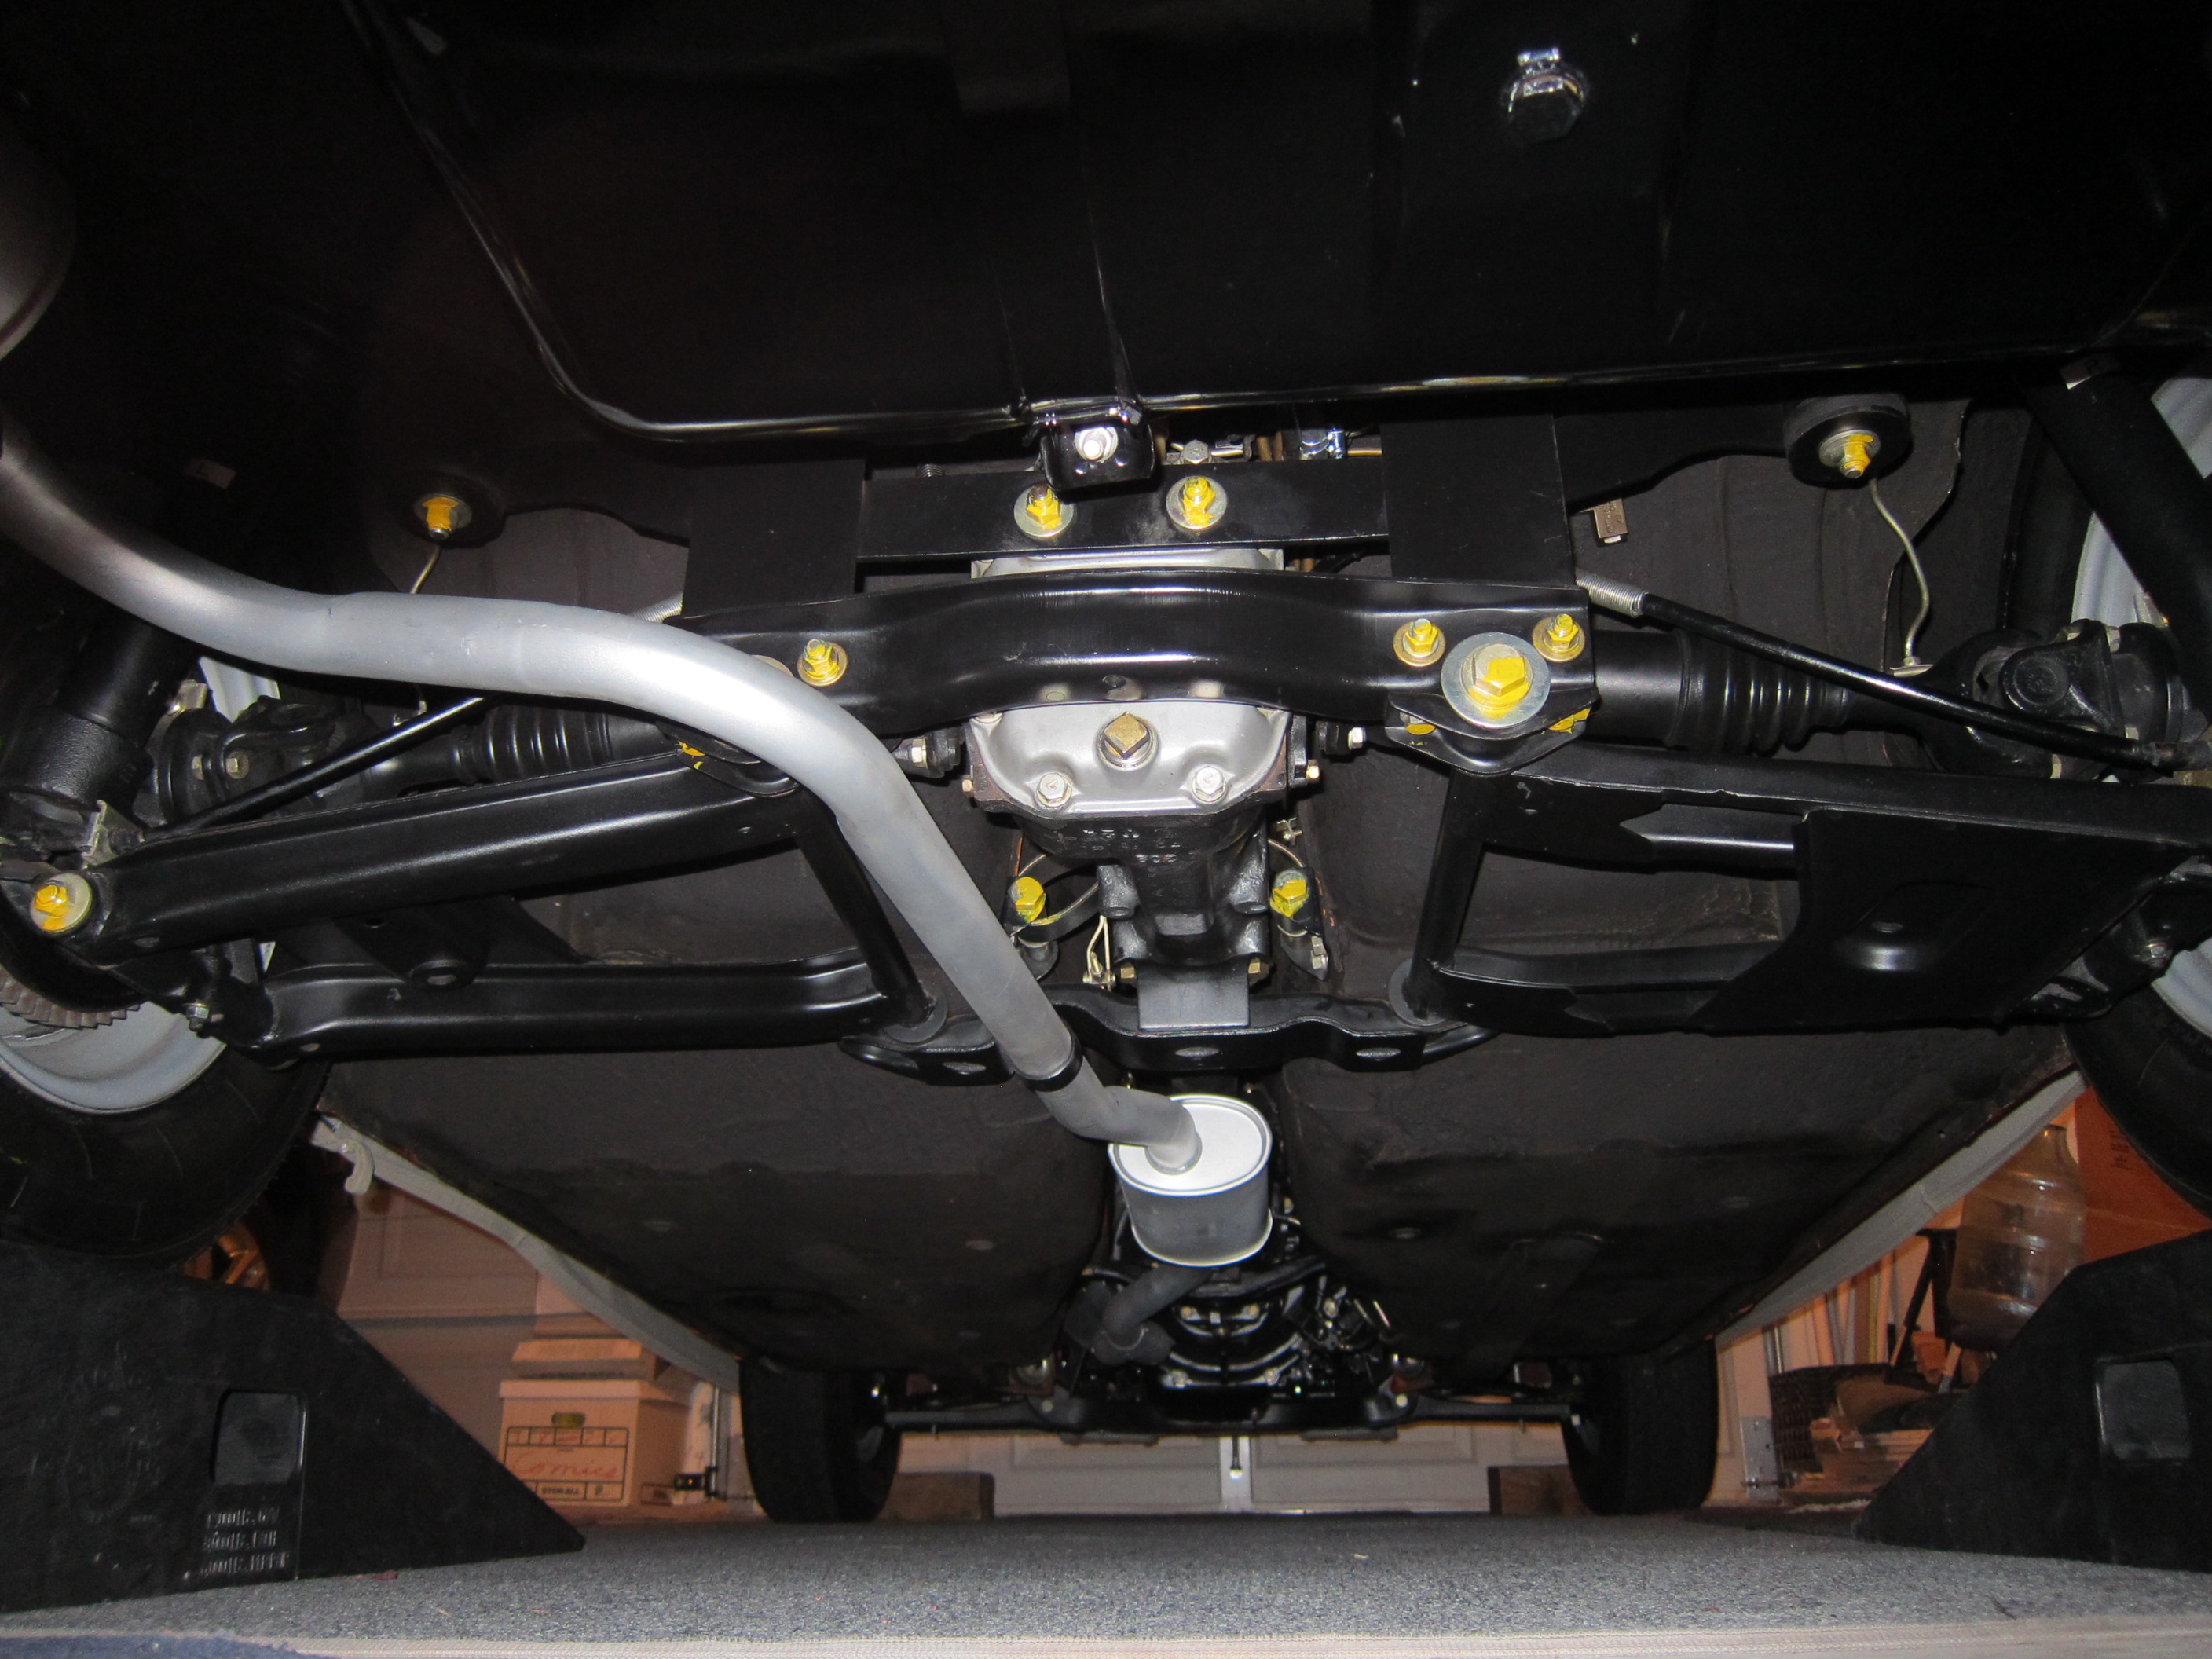
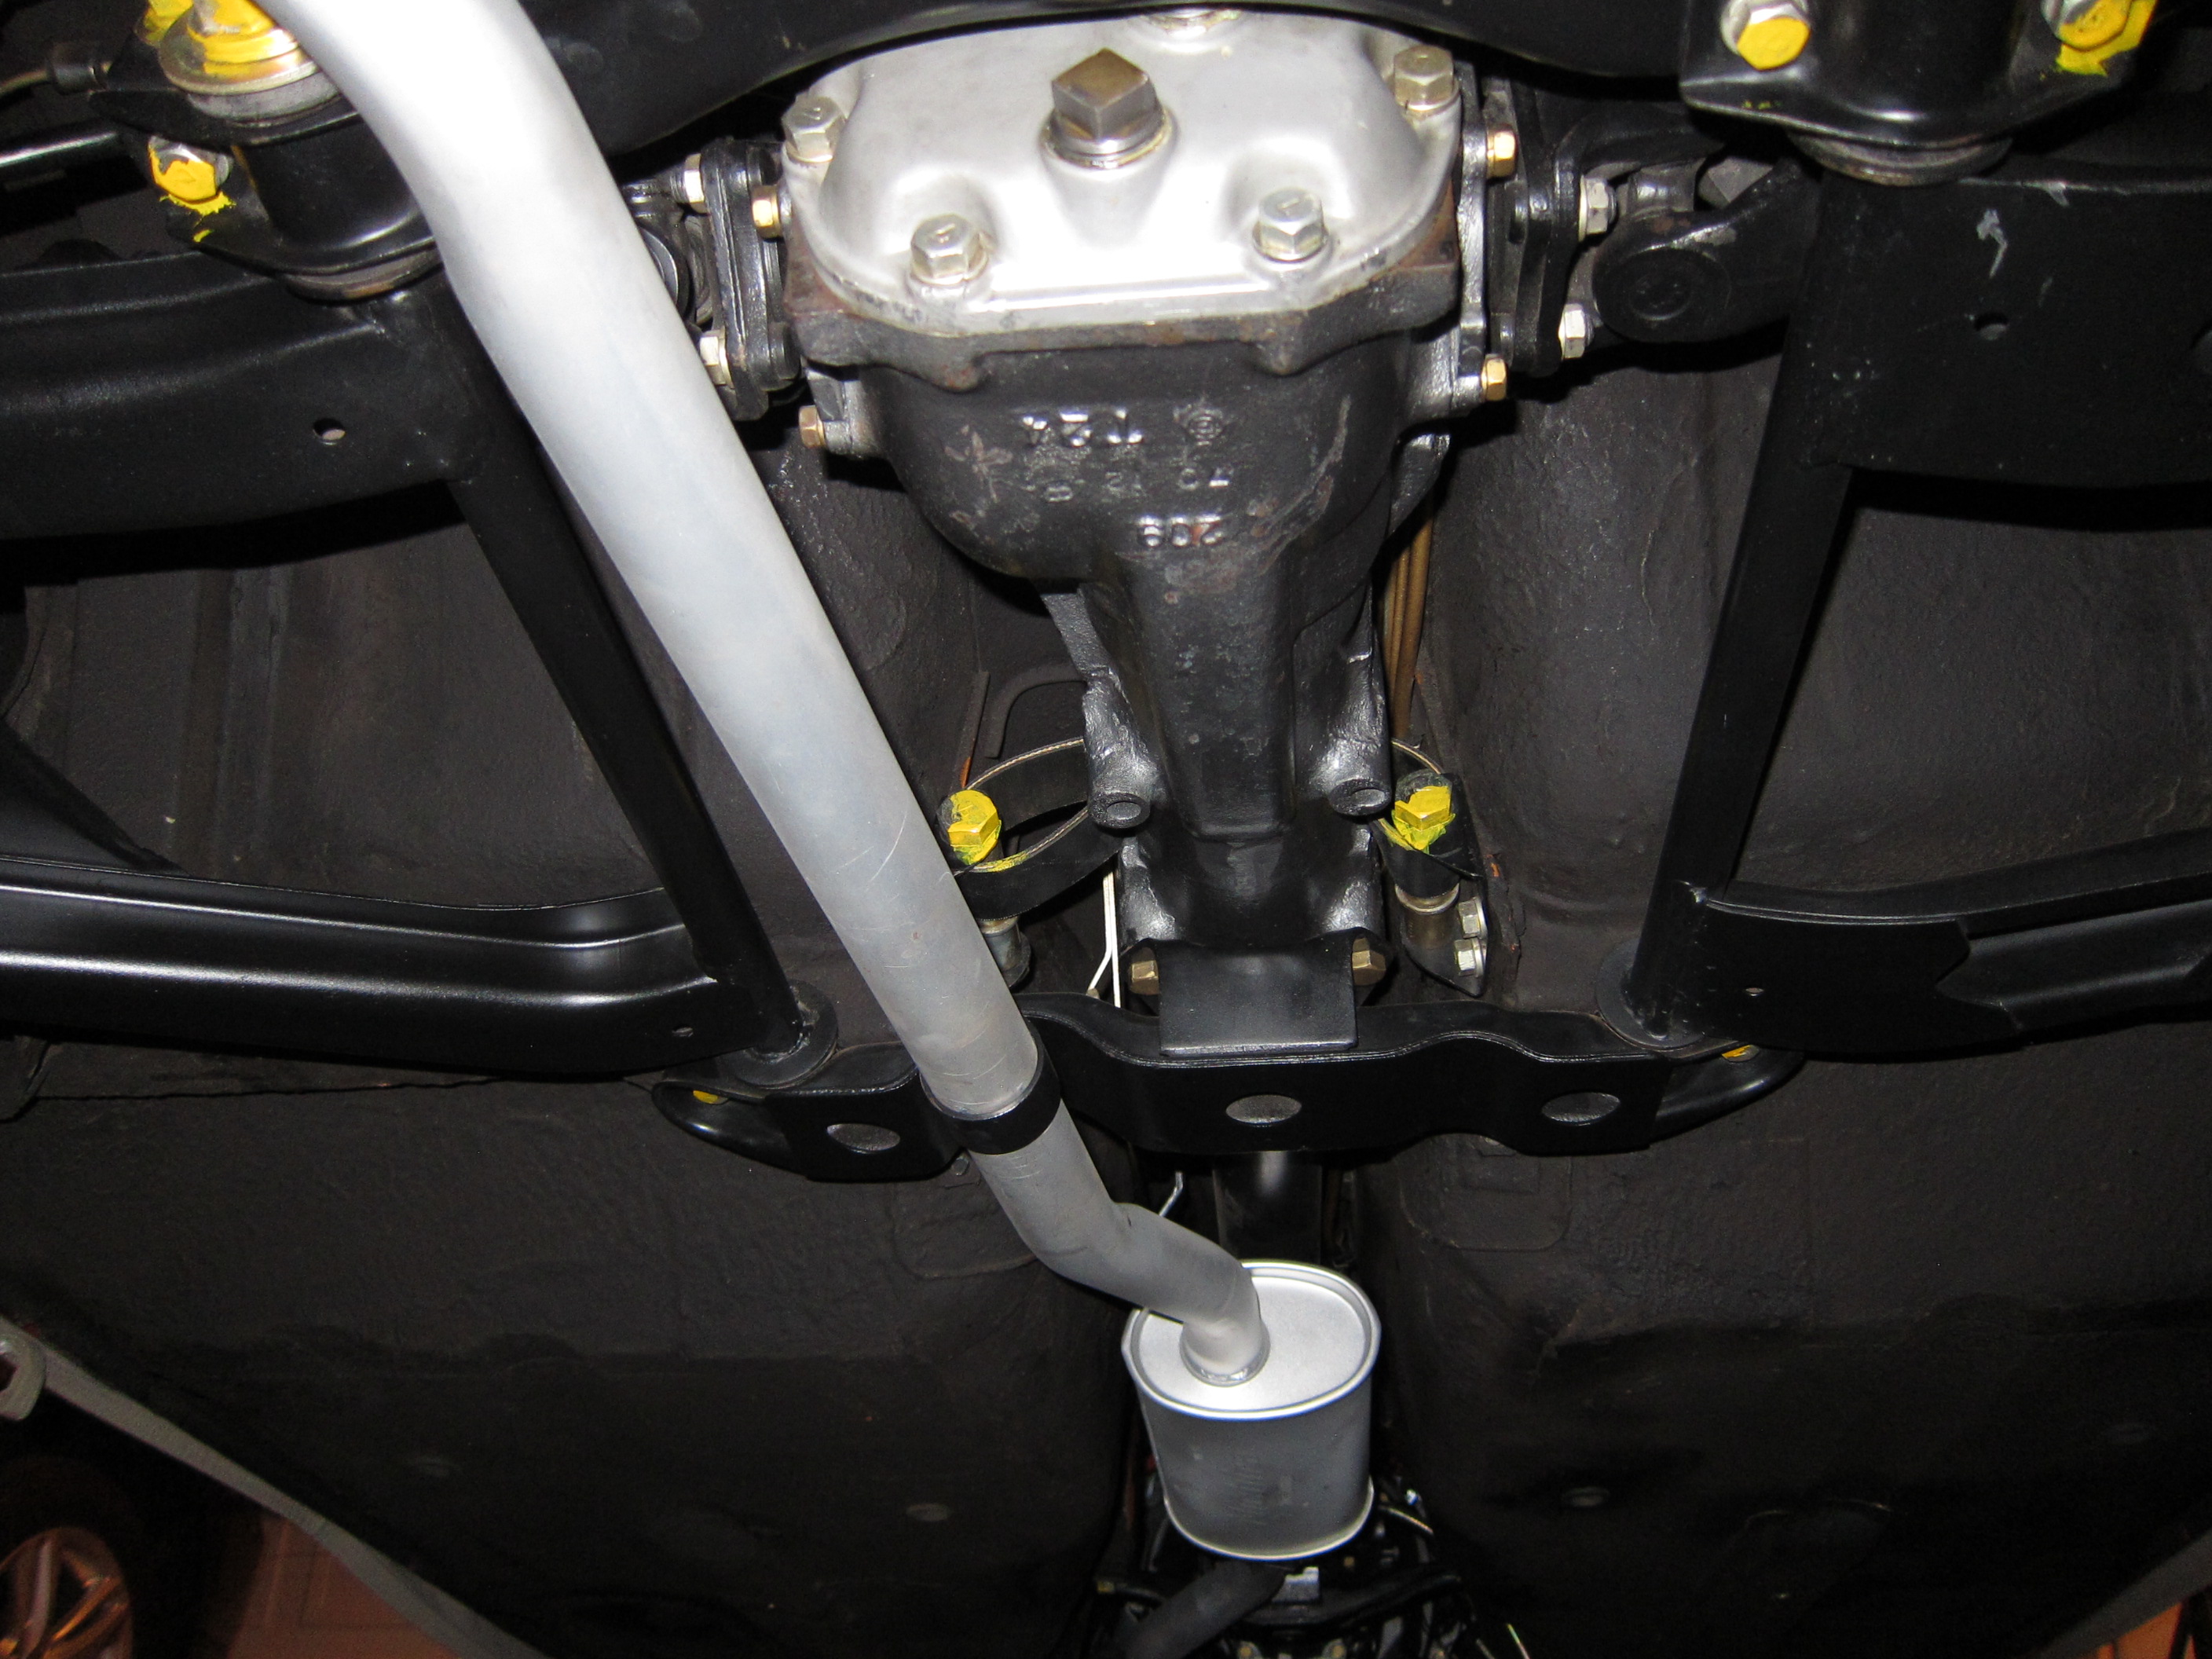
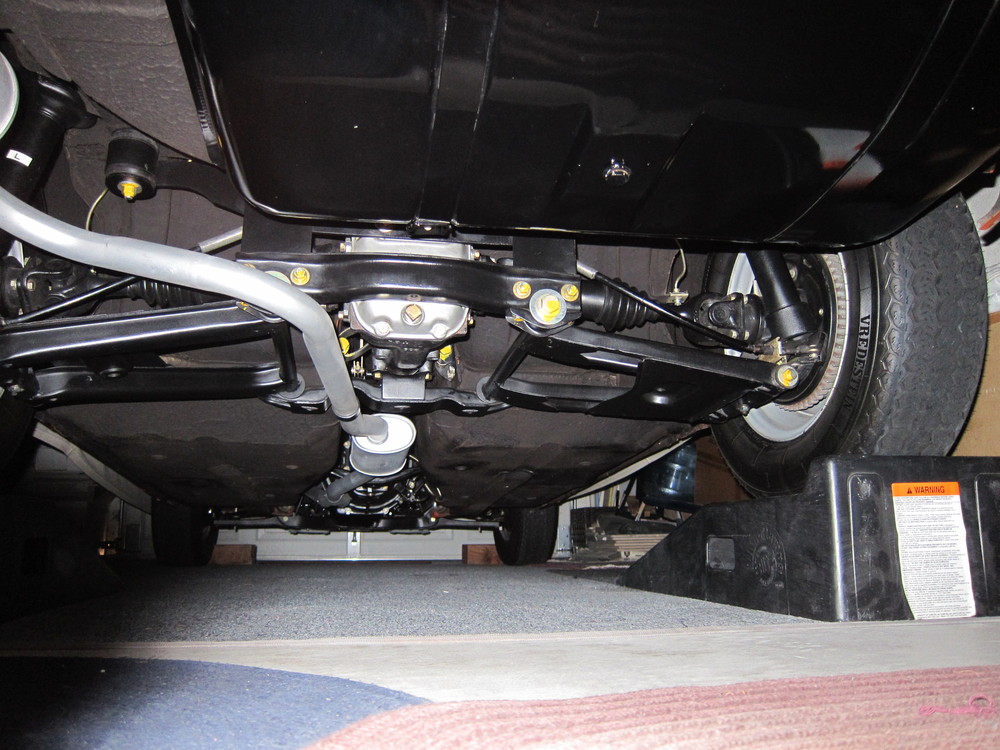
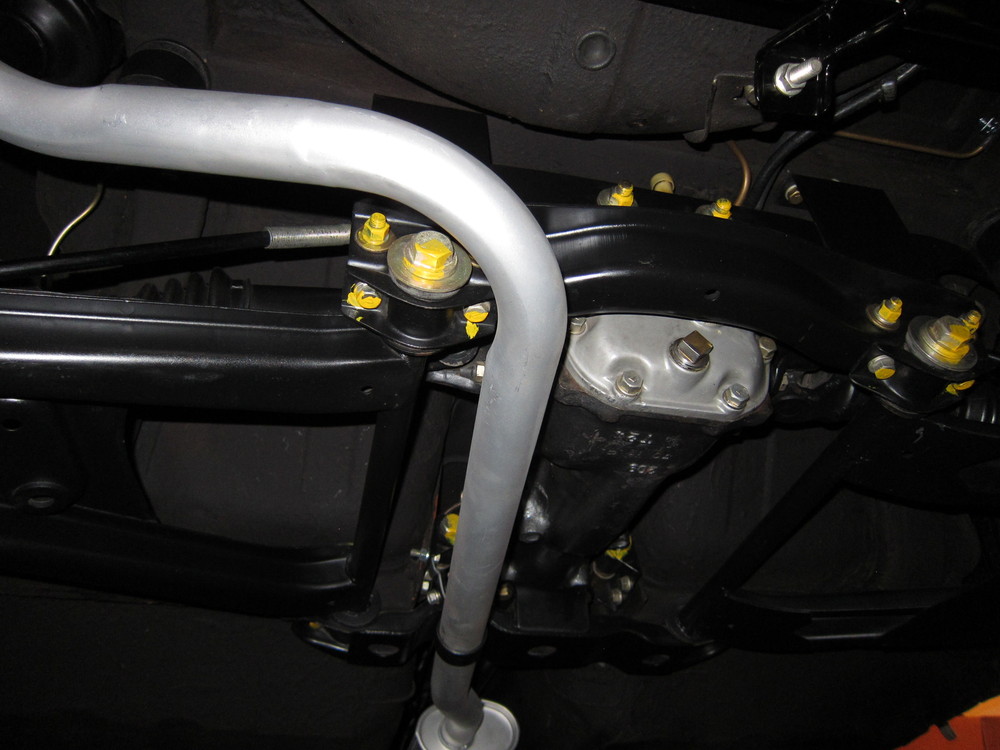
Thought I would update my pictures after re-doing a lot of the manufacture inspection marks on my car. Not quite as neat and sterile as before. I still need to research the correct red for the front suspension compression rods that 26th-z mentioned and for the tranny bell housing splotches also shown in previous posts. I still need more evidence that those red inspection marks would be correct for my car.

.thumb.JPG.31b7226502695445ad62cf0d5113158f.JPG)


-
See my previous post which I amended. If you look at the outer rim surface the date code/wheel size information will be engraved in the rim toward the outer circumference.
-
A couple of things that might help you. Pictures sell almost anything, and, could you list the date codes of all 4? The date code and wheel size information are found on the outer rim and start with TOPY. If the dates all match, that would be of great help. They are probably 41/2" wheels as opposed to the later 5" wheels.

.JPG.bc91e39a436b5de6426b1e0230990dd3.JPG)


.JPG.40cddc5871d86b9ad98635a0a9fbb5c9.JPG)