AZ-240z
Free Member
-
Joined
-
Last visited
Everything posted by AZ-240z
-
 Ron, From what you describe, and the attached picture, it looks like the chrome ring and plug that is glued inside the wood knob is one molded piece. So, if I used a heat gun from the shift pattern end, after removing the shift pattern button, to soften the glue, I may destroy the plastic ring/plug part. All great information, but maybe some adhesive clean/remover may soften the glue if allow to soak from the button side. Thanks, Ron, and I'll post any successes once I decide a good approach. Dan
 -
Arne, Although my shift pattern emblem is free of cracks, I had, also, thought how to approach this kind of repair. In the past, I have had good success repairing scratches and chips in the plastic tail light lens using clear paint as used in two stage finishes. It adheres to plastic well and can be buffed to a high gloss. My thinking is that, if the cracks could be enlarged with a fine exacto knife or similar tool, it would allow the clear paint to penetrate the crack which it may, or may not otherwise do. Then, successive coats could build up, and then be smoothed to an even finish. Just a thought Dan
-
Has anyone had any experience in restoring an early series 1 shift knob? Specifically, the knob is in excellent condition except for the chrome mounting ring at it's base where some chrome has pealed off. I would like to remove this chrome ring and have it re-chromed without damaging the wood part. It appears that the chrome ring is glued to the wood mounting hole with some sort of epoxy. I hate to just go in and try to drill out the epoxy without knowing exactly how it interfaces with the wood. Thanks for any thoughts. Dan
-
Chris, Not quite sure what you meant, but, when I purchased my 01/71 in March 1971, I had the AMCO front bumper guard installed as a dealer option. It was an AMCO aftermarket option, but was offer and installed by the dealer when the car was new. Dan
-
I looked up the Z Car Home Registry, and car hls3018124 was manufactured in 12/70, so I would guess that is the manuf. date of your car. This is Carl Beck's web site www.zhome.com. Look under zcar registers. Dan
-
Gary, ditto what duffman said. Glad to hear that you and the cars are doing well, but my car misses you terribly. Maybe you can hook us desert rats up with someone here who can help us keep our Zs going. Take care. Dan
-
I don't know where to start. Apparently Arne owns my car as his name is next to my vin, it is now red and not orange, and it was produced six month out of sequence. Dan
-
Take a look at www.vintageconnections.com Dan
-
For what it is worth, when Pierre did my car, he outsourced the paint work where they also used Dupont 918 Orange. This is, of course, no verification that same was used on the VZ program cars. Dan
-
spitz17' Could you share some information concerning the original grapefruit alternator shown in one of your attachments? On the housing, there should be a part number engraved and, would love to know this to confirm what the correct early 40 amp alternator is. From the information I have, the numbers should be: LT140-53 23100 A4800 I am also a little confused about correlating the early production date with what appears to be a series 2 appointed car. Thanks, and congrats on the nice find. Dan
-
John, Just my take on everything I have read, so far, in this thread. I would forget about the razor blade, (too much of a chance of gouging the paint) and just use fine paper on a very small hard rubber block. I would, initially, mast off the drip and sand the bulk of the run, then remove the masking tape and try to cut it down to match the rest of the painted surface. Then use something like a 3M polishing compound. I think you can achieve perfection without the trouble and headaches of trying to blend in touchup paint. I have done this many times and, when done, cannot find the runs I worked on. Dan
-
Kats, Flying must really be keeping you busy. I would never have imagined that you would ever sell your Zs. Your cars approach perfection and has been a large part of my motivation as I continue to restore my car. Are you thinking of doing other cars? Dan
-
Could have meant forum-ites?
-
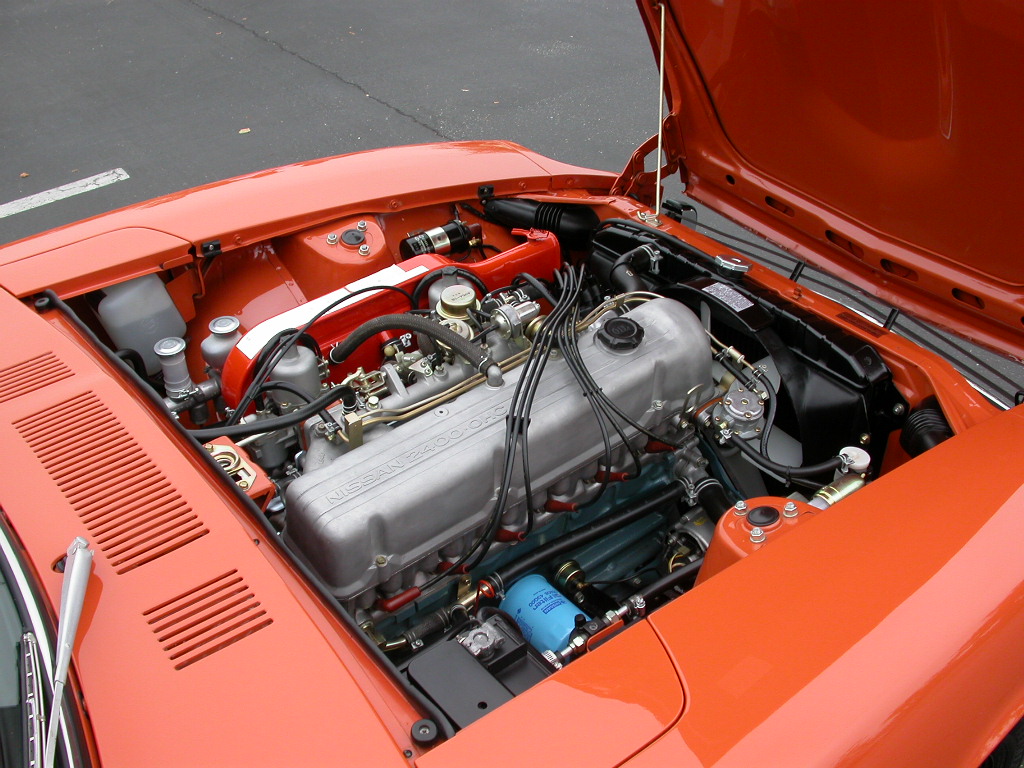
Not the best picture, but here is my series 1 engine after restoration.

-
Goose, sounds like that's what I would probably do with a nice, original part from my car. Please pardon my little tongue-in-cheek inquiry as I, also, have a few little treasures which I drag out occasionally anticipating the time when they finally find a home in my car. Dan
-
Goose, The 4-speed knob you have is, also, an early shift knob. If you would like to rid yourself of this, let me know. Been looking for one of these for quite a while. Dan
-
Thanks, Ron. You nailed it exactly. That raised upside down U bracket in the middle of your attached pic is what I am referring to. My fenders are on so I intend to just find some very dense closed cell rubber foam to glue and wedge in from beneath. As you mentioned, my car does not have those other supporting foam cushions shown in other attached pics in this thread. And Rich and everyone, thanks for all the info and searches for this info which I couldn't find. This is indeed a very special place and gathering of terrific people. I wish us all the very best in the year to come. Dan
-
Thanks, Keith, but it's not the inspection lid bumpers that I am after. The cushions I am looking for are mounted on top of brackets attached to the top of the inner fenders just in front of the inspection lids. The fenders, themselves rest on top of these cushions and can not be seen. The cowl cushions are also mounted on top of brackets at either end of the inner cowl structure to which the cowl is mounted and is also hiden beneath the cowl. This could be a real tuffy to define, but thanks for giving it a shot. Dan
-
I am looking for the rubber cushion blocks that are mounted on top of the inner fenders just in front of the inspection lids that the fenders and ends of the cowl rest on. Anyone ever tried to re-creat these rubber cushion blocks or happen to have a supply of NOS pieces? Can't find a part number on the parts CD. The correct demensions would be of vital importance to fabricate as well as the correct material type and density. There would be four cushion rubber blocks, one under each fender, and one under each end of the cowl. My explanation may be pretty vague, but any help appreciated. Dan
-
I would like to second John's comments, just an absolutely stunning build of which you should be very proud. My car is a frame up resto which I had done by Pierre-Z, for the most part, as my skills would not do it justice. I am contenting myself with doing all the little things to make it absolutely as original as the day I took delivery from the show room so I know how rewarding our projects are personally. Congratulations Dan
-
If, through communication with the seller, it seems to be a car that you would buy, I would take your son, fly out to purchase it, and drive it back to Atlanta. It would be a trip that neither of you would forget for a lifetime. The difference in cost between that and shipping it couldn't be compared to the experience for the both of you. I know, easy for me to say! Just a thought. Dan
-
Hi Gary, I used a preval sprayer to do touchup on the inner lips of the headlight housing after a fiberglass repair and the inner fender ledges after replacing the machine screws with the correct screws. I am just a hobbiest have no paint experience except for small touchups from rock chips. I was extremely pleased with the spray pattern. It was a nice fine spray that covered nicely with several applications to get the desired coverage. Mine was a two stage. I put the color on with the preval, and Dupont Clear with a rattle can. I had a paint store color match my paint, 918 Orange, and it is impossible to see the touchup. Hope this helps. Dan As far as equipment, I just used a good masking paper and tape, sand paper, and paint prep cleaner. Take your time with the prep and the results will be good.
-
If you look at the fourth picture of this post, this shows the aft door opening bead edge. If the do the same black across the bottom of the threshold open and then up the front door opening edge to the pillar post, and, also, extend this threshold door opening painted edge both forward to the fire wall and aft to the wheel housing, along the top edge of the inner rocker panel, this will hide any body color which may show below the rear dog leg panel or the front kick panel and the rocker panel vinyl trim piece. Wish I could find pictures but hope this helps.
-
seriously????????????????
-
Frank, If the car was new on 15 April 1970 when you purchased it, I personally think that transaction makes you the original, or first, owner of the car, whether or not it has changed hands numerous times since that event. You may be the second, third, etc., legal owner of the car, but that doesn't change the fact that you originally purchased the car new. This may be a question for Carl Beck, but thought I would give you my opinion. Dan