zKars
 Subscriber
-
Joined
-
Last visited
Everything posted by zKars
-
 You have a leaking cold start valve that doesn't care if the connector is on it or if power is supplied. Maybe it leaks worse with power on. Remove the fuel supply hose to it and test again to confirm. Nice job of trouble shooting so far. Keep up the details. Jim
 -
That is so nice! Excellent! I desparately wanted to do the same thing when I did my VA install. I used the black faced slider controls at least to retain as much of the stock appearance as possible. I'm assuming you're going to use the stock fan switch in place of the 3 position VA fan switch too? As long as you keep their hi-speed relay and if the internal contacts are clean, it should perform fine. How are you handling the separate hot and cold controls that the VA panel has? The stock panel only has one slider that does the cold to hot transition. A linkage that swaps from one to the other would be incredible cool (or hot!!) And as I read the other two posts it all becomes clear! Fantastic work! Great work. Nice to see
-
Most likely the oil pump relief valve. If your oil pressure gauge is working like a tach, that's it for sure. Could also be a plug in the oil system. Definitely must be sorted out before continuing. Change the oil pump first, easy to do or just diassemble the relief valve in it to clean and re-try.
-
I believe there is one aspect of this topic that has not been covered. I have had a ceramic coated header for a number of years, but its not the heat that's been bothering me. Its the noise!! In my quest to quiet the car (more specifically the engine bay) but not the performance, I finally decided to try header wrap. Well wouldn't you know, it helps considerably, a reduction of at least 50% was instantly apparent. Not as good as a cast iron manifold, but getting close. Now the glorius noise of the triples is no longer drowned out. The properly restrained yet loud and clear notes of joy are mostly heard by those following me in my dust and I get just the backdrop of glorious stroker induced rumble seeping into my overall experience in the cabin. Clearly having a properly coated or painted header is highly recommended before the wrap to reduce on-going corrosion issues. About the only problems I've had after about 18 months with it is with making the mistake of wrapping too far under the car. When I rub high spots or bump strips etc the wrap gets ripped. I've even abandoned the classic and outdated 3 bolt header flange for a band clamp style connection that does not remove ground clearance and eases the system removal. Just my experience, yours may vary. Happy Motoring!
-
There is a great thread on hybridz.org about wiring and the L28ET swap, its even specific to the 81 which is slightly unique to the 82/3. Search and yee will find. Good luck!
-
I'm not aware of any differences in the 240 and early 260 (North Am. market) turn signals. The urethane air dams that I have seen that are meant to accept the 240 signal lenses usually don't come drilled for the mounting bolts, meaning that the owner had to do that, which leads to inconsistency. Perhaps this is what you are seeing?? Love to see a picture and some measurements of the turn signal housing themselves to see if there really are differences. You never know.
-
I'm thinking you're getting a vacumm leak when the AC is on. This is the only system "shared" by the AC and the engine that would cause such a dramatic effect. As to where to look, well, everywhere vacuum lines are used by the HVAC system. Study the FSM for clues. Watch stumbling verses boost. If the issue goes away when on boost, and comes back when you're on vacumm, then that really points to a leak. Good luck, be methodical. Jim
-
Isn't the trick then to use two right side inners and two right side outers? Are there differences in the outers left to right other than the internal threads? I know the inners have the same right hand thread to attach to the rack, but the threads that attach to the outer are different. I always wondered if they did that so the alignment guy wouldn't get confused about which way to swing the wrench .... I have a few spare racks that I may be coerced into scavenging some inner's TRE's from for the right incentive.... jim
-
Bryan you sly dog. Excellent idea! Put me on the list for brown padded leather wheel. I'll put a "core" in the mail today! Jim
-
That's not the stock location of the plug. It usually on the bottom near the back of the tank. For whatever reason, someone put in a new plug in this corner. You're on your own as to the threads. Take it out and go shopping. Yes it should have a sealing washer of some kind.
-
The Grand is a steal if the work was done right. I'de ask to see receipts for the machine work, especially the balance. If you don't detect any hanky panky while talking with him and your visual inspection of the block looks good (like verifiying the crank is V07) then do it! Jim
-
One thing to add about the process of changing the angle between the two arms on the throttle pivot. All threads so far discuss cutting the top arm off then re-welding it at the new angle. That's messy For the early gen pivot arm type such as Arne's, there is a far simpler technique. Cut right through the tube part about half way up. Place a drill bit that just fits in the hole to re-assemble the two halves to align them, rotate the top and bottom halves to the new angle (~45 deg verses the original 90ish). Weld and grind until the tube is back to being a seamless tube. The drill bit will keep them aligned so it will slip over the pivot pin on the firewall again. No one will even know you touched it if you do a pretty grinding job. Try telling the story to someone at a car show that Nissan recognized the problem and issued this very rare part with the smaller angle between the arms and you just happen to have that very rare part. See who you can convince its true! Jim
-
-
Aha! There IS a difference in the "fresh air bellows connector" (good one E) 73 and prior! When I try to fit a 72 on the 73 or the opposite, they don't fit! More careful inspection shows there is a difference, slight though it is. See if you can spot it in the picture. Well, I made it easy. The one on the left is the 73. That inner lip is SHORTER to clear the lit panel top on the HCP. Other than that they are identical. So a 72 duct adapter could be made to fit a 73 HCP by just trimming that lip. Other way around, you'de have to add some material to the lip (duct tape?). Jim

-
Dave: Good day indeed! I'de really like to see pictures of your parts. I see no difference at all in the 73 and pre-73 outside panel dimensions as it fits in the dash pad and how the vent outlet ducting is sized. But I also know there is always something new to learn. Please send me a note to z240@shaw.ca and we'll take the transaction part offline. Jim
-
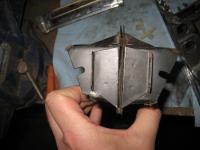
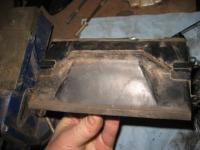
Dave: I can let you have mine for $55 + shipping. I'll throw in the metal vent duct mating piece too. I took the duct piece from a 73 and 72 HCP and held them together. I don't see the difference. Pics attached. They mount the same way, have the same chrome duct, same exact shape that I can tell. Jim
-
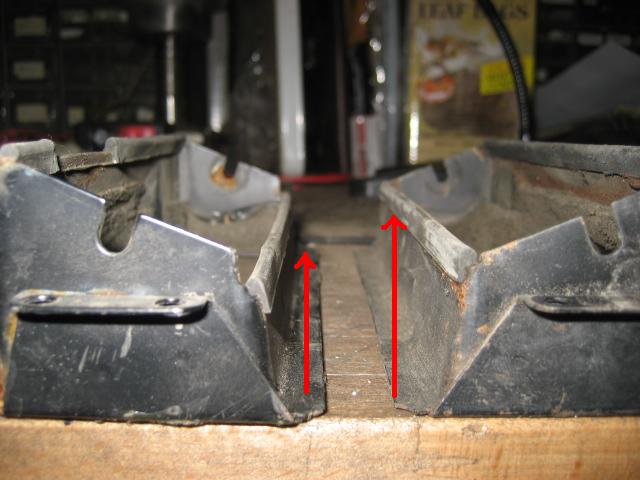
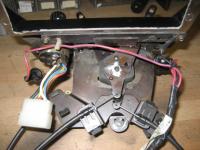
Dave: Here are the pictures of the control assembly I have for the 73.


-
Yes, the end inside the car, at the tip of the gas pedal, has the end that unscrews, but just pop that end off the tip of the gas pedal and take it off the car, then worry about getting the rod apart to replace the boot. The plastic ball on the ends of the rod fits through the hole in the firewall. Jim
-
My comment was based on the assumption that the rod and old boot was in his hand already. Now why would you not just pop the ball off of both the pedal and the throttle linkage and take that rod out entirely before you try to undo the nut to separate the rod to put the new boot on? Bad enough having to be under the dash, let alone try to get that 7mm nut undone! That way when you put it all back together, you can make sure you get it back to the same length as it started too. I'm just saying!
-
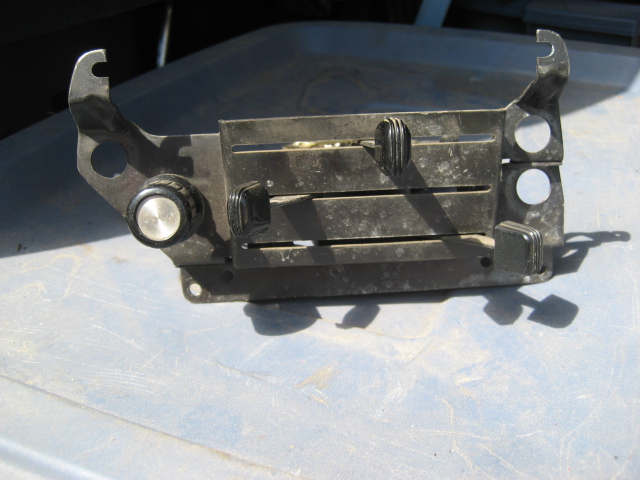
Here is the one picture I have from the AC install that kinda shows the 73 controls on the back of the faceplace and how it mounts. Hope it helps. The dash opening is identical. Nothing to modify there. I can take more pics of the parts when I get home. Drop me a note to z240@shaw.ca Jim
-
Look closely at the rod again. You will soon see how it comes apart. Threads, a little 7mm nut, no rocket science here. give it a good scrubbing, maybe the threads are hiding..
-
Surprise! Fits the console opening, does not fit the 72 control levers plate. I have my old control levers from my 73 after going Vintage air and replacing all that nonsense. Let me know if you want them. I think the four cables it actuates are all the same. Jim
-
Nothing special inside. Only thing makes it a turbo pan is the turbo oil return line fitting. Get that AZ pan on the car quick.
-
Well well another Series I uniqueness. Could be a race part, significant weight savings there. Of far more interest is the what appears to be a strip of door welting on the lip of the rear control arm link. Was that a Series I only item as well? I'm having trouble imagining the purpose. Was it something you installed Gnose?
-
The good news is they are nearly exactly 1/8" (0.125) diameter. Hobby stores are your friend. Won't find the color you're after, but if black, then a black sharpie is also your friend. I swear I lost 500 of those things in my car before I finally put 8-32 nut- serts in every hole and used machine screws. Jim