Leaderboard
-

Mike
Administrator2Points23,065Posts -
jmortensen
Free Member2Points2,385Posts -
nix240z
Free Member1Points468Posts -
Ptero
Free Member1Points137Posts


Popular Content
Showing content with the highest reputation on 03/09/2015 in Posts
-
1 pointI'll give that a shot and see if there is any change. The intake is barely even attached so I'm pretty sure it has sufficient air but I'll double check. The block is also N42. Haha, yeah I'll probably take it apart but opinions and suggestions are always welcome from people who have done this all before. Thanks for the extra info about the other parts! I would have never known.1 point
-
Pros: 1. It will give more overlap. 2. less tools for adjusting () Cons: Since the exhaust valve will heat faster than the intake, it will elongate faster and lose lash faster. This effect will be more significant on a cold motor at start up. The aluminium head will elongate more than the steel valves (at the same temperature) but the coolant inside the head limit it compared to the exhaust valve that is not cooled. When the engine comes up to temperature, the head and the valves will have elongated to their equilibrium states thus a valve lash adjustment on a hot head is somewhat more "real world". By having a greater lash, like stock, the exhaust valve will experience more "slamming shut force" so this will help to deal with carbon build-up than a valve with a tighter lash.1 point
-
1 point
-
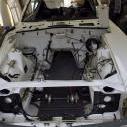
Have wanted to visit my Fairlady and Yves at the Bodyshop for a while, but sadly i never really found time. That until last thursday. Just wanted to talk about the "Master plan" regarding the chassis and see the work he did so far. As usual great work from what i can say. But i'll let the pictures talk: So Far the front-right Corner almost is done... - Battery-tray area fixed (battery tray will be sandblasted, primered and welded back in soon) - New Rocker panels created from sheetmetal and replaced old ones. - Inner side sills repaired - Frame rail rebuilt and partially replaced with the NOS one i brought him. - Complete front inner wheel well repaired - Front air channel repaired and rebuilt from sheet metal - Firewall below Battery tray replaced (Work in progress) Next steps will be replacing the floorpanels with replacement panels i brought him, as well as completing the firewall on the passenger side. Then the work will move to the passenger-backend of the car.1 point
-
1 pointAgreed from above! I look forward to your progress. bvolken your Z looks awesome too! I filled up "Kiddy's Classic - Automotive Restoration Cost Calculator" to the way i would want my project Z to be stock original show quality and it came to $79,525 and it's not even Concours! Man I need to win a lottery1 point
-
1 pointNo lube on the rubber. That's exactly how the rubber bushings are supposed to work. The suspension movement is derived by torqueing the rubber part of the bushings. Here's some pics I whipped up a while ago to try to show how the rubber bushings operate. This is what makes them different in application than poly: http://www.classiczcars.com/topic/49405-front-end-alignment/#entry449585 Lube won't do anything good for you. At worst, it'll do bad things to the rubber. I would grease or anti-seize the bolt going through the center of the bushing just to help prevent it from rusting into place in the future, but for the rubber portion? No. On edit: Here's one of the pics from that other thread just so one resides here as well:1 point
-
1 pointPretty good video for anyone interested, takes it a little farther than I did with the belt sander:1 point
-
1 pointThe source of the problem is that the bushing is wider than the sleeve that goes through it. It might not be when you look at it on your workbench, but when installed in the control arm, the sleeve will be 1/16" or 1/8" shorter than the unloaded bushing. When you tighten down the bolt it squeezes the poly bushing between the control arm and the xmember and its that pressure applied to the bushing that creates the huge amount of friction between the bushing and the sleeve, leaving it unable to rotate easily. John's nylock solution undoubtedly works to reduce the friction and make the suspension work better, but it may also let the sleeve rotate, so essentially the suspension is now pivoting on the control arm bolt itself instead of the bushing moving on the sleeve and the bolt locking the sleeve down securely. I'd fix it a different way: sand the ends of the bushing down - belt sander is great for this - until it is just about the same length as the sleeve that goes through it (when installed in the control arm). Now you can tighten the bolt to spec and the bushing works as intended. Also a good idea to drill a hole and install a zerk in the control arm so that you can grease the bushing later on. One way or the other, it's worth dealing with it. If the control arm is that hard to move, then they won't be reacting as quickly or accurately to smaller bumps on the pavement, nor will they allow the suspension to extend into dips.1 point
-
1 pointOne issue with the urethane front lower control arm bushings is: torquing them to the factory specs induces a lot of bind. I've had cars come in where I can do a pull-up on the end of the LCA once the strut is removed. What I do is replace the 14mm nut for the LCA bolt with a Nylock and tighten the nut and bolt until there is some drag on the LCAs rotation but no serious bind.1 point
-
1 pointdon't beat yourself up w/having reversed the springs - i did it when i went to a set of eibach progressives and found that this is a fairly common mistake. it sure would be nice if they were labeled for those of us who don't know... also, i found that when i re-did my suspension it took a little bit of driving for it to settle in to the correct ride heights - probably because the bushings/sway bar/etc. were tightened when the car was up on stands and things needed to find their center under load. you may find the same applies in your case. just out of curiosity - did you grease up all your bushings prior to assembly?1 point