


240260280z
Free Member
-
Joined
-
Last visited
Everything posted by 240260280z
-
 Thanks. I'll take a photo today. The harness is now in the car and difficult to trace.
 -
"Go ahead, make my bed"
-
3 levels of democracy: A. The Three Party System: Canada (PC, NDP, Liberal) B. The Two Party System: USA (Democrat, Republican) C. The One Party System: China (Chinese Communist Party) Me
-
"I hate them cuz they made me hate" me
-
Yup that is it Thanks! What about the solo red wire? I thought it was a PO addition but I dug into the harness and it was dressed in at the factory.
-
I re-checked. One is red with blue stripe and the other is black.
-
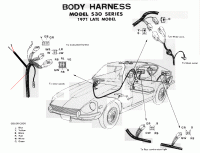
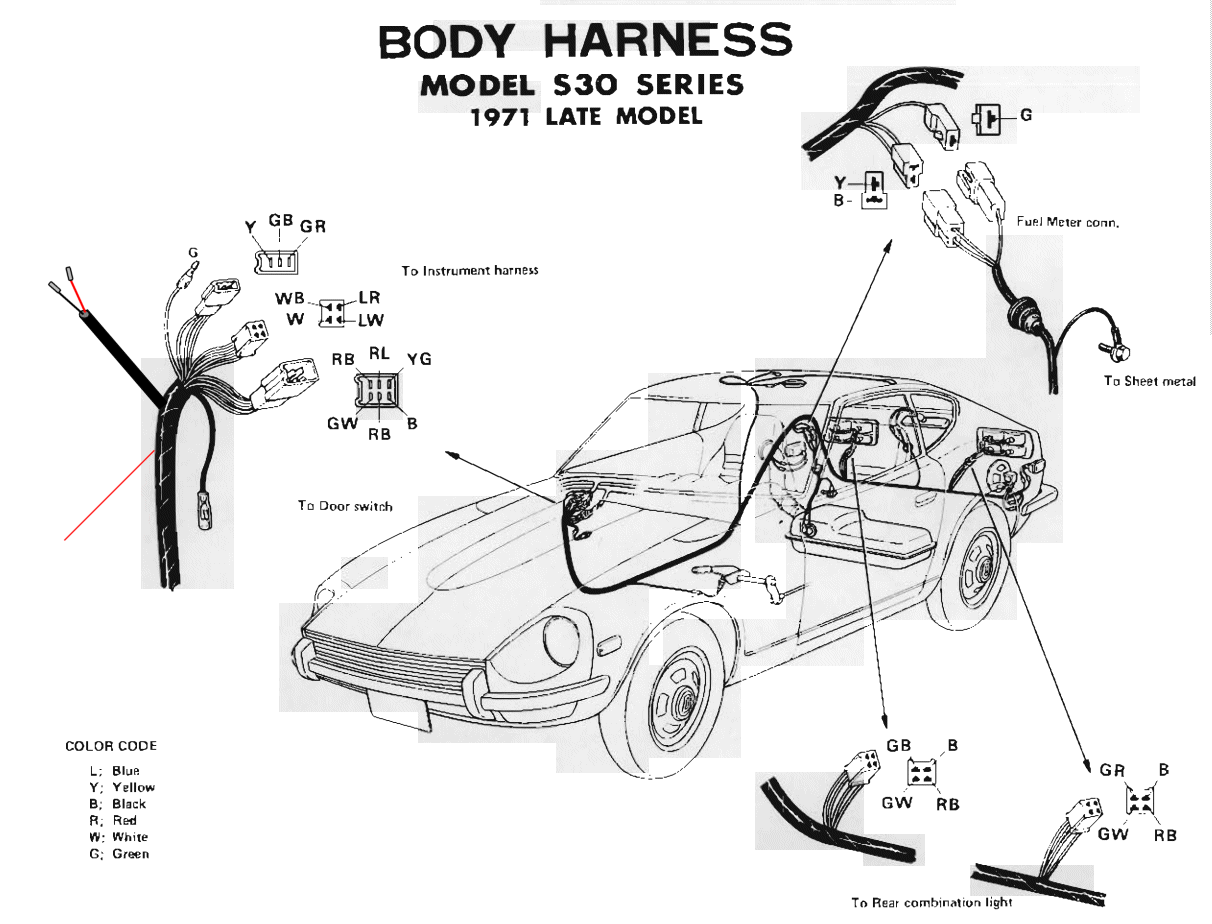
Thanks Steve, It is a 71 240z. They are at the head of the harness that goes to the back of the car. This location is in the passenger kick panel area near the top door hinge. Here is all the FSM shows (I added the red and the black and red paired):
-
Looks mean... in a good way.
-
I seem to have all connections made to the body harness and all electrics seem to work in the back: - passenger door switch - room lamp - all tail lights/turn/rev/4way flashers (except brake light which I will chase down today) - license lamp - marker lights - speaker - power antenna - defrost - fuel sender So I am wondering what the 3 unused wires in the body harness do? One is red and seems to be a loner with a long-ago broken off connector The other two (which seem to be paired) have the bullet connectors (one is black and the other is red or red with a black stripe..I forget exactly). The only two single wire connectors that I connected to the body harness were a green (bullet) and also the one from the pass. door switch (blade).
-
Hi Jerry, Some useful info here: http://www.gordon-glasgow.org/lsd1.asp
got it http://www.classiczcars.com/topic/18257-what-was-originally-in-the-1970-240z-toolbins/#entry148779
Yeah it is a series 1 . There are fittings in the floor behind the passenger seat for the wire assembly and I think for the belt-thingy and maybe even the jack and chocks. I just would like to see how it is supposed to be tied down to these fittings correctly. This shows where the wire A frame part goes... but what about the belt and bag?
Jan 71 240z I am ready to put the tools back. Does anyone have a description or photo of what goes where and how? Here is a stock photo of the parts borrowed from this web site. It seems to be missing a bag and chock.... and what does the rubber belt device hold down. I ensured all of the welded fittings behind the passenger seat remained exposed.
Thanks again! Now that I am moving forward and throw the dash in.
Thanks...that will work. I am guessing the 30A fused sheathed blue is the blower and the 20A fused non-sheathed is the defrost. Now to throw that dash in. Philip
Down to the wire (pun). So far I have figured out where all wires go from the wiring diagrams, colour coding, fsm drawings and support from this forum (thanks). I am down to 3 that I am not 100% positive about. The dash harness to the fuse box has 2 blue wires with in-line fuses and one black wire. All are heavier gauge: 1) One of the fuse holders is toasted looking. It also exits lower in the harness and it also has a black protective sheath around it. Am I correct to assume that it goes to the blower motor harness or defrost? 2) The other blue wire comes out ~ 3" higher in the harness (near the taped back fuel pump connector) but I am not sure what it does? 3) Finally, where does the hefty black wire (with protective sheath) go?
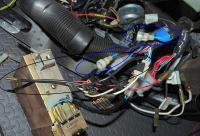 Just reading this thread now as I am seeking help with the connections in the area. I believe the orphan connector in the blower harness is for factory AC. My supposition is based on the drawing on page 26 of the 71 FSM document: "S30 Supplement Manual" . On page 27 it mentions that item 54 (L) is power for AC coming from the same harness so I assume that the 3 pin connector is also some sort of control leads for the AC unit or related louvers,etc.
this manual has excellent section on dash removal http://www.xenons30.com/files/1971%20FSM%20Supplement.pdf
Pallnet is first class and saves the headache and risk of errors when learning on your first rail. Plan to drill and cut two. If you want to improve on the design, source extruded aluminum with two internal passages for send and return and integrate an fpr in one end. You can also use the stock rail, cut it and bubble flare the ends or braze barbs on the ends: It will look like this:
Jan 71 240z with e31 and same problem... the piston is also peppered with holes and much lighter. New head and pistons....
I was inspired by Arne's photos so I lubed the mechanical clock. When trying to access the bushing on the back of the motor, I removed the wrong screw under the white loctite stuff and disconnected the two whisker contacts and the insulator that holds them. Long story short, I completely removed the motor, removed the pos and neg contacts, removed the insulator, carefully placed the insulator in place, placed the whiskers back into their sockets (the trick is to keep the whiskers out toward the outer perimeter of the casing as much as possible while inserting until you seat the screw that holds it. This screw and connection fit carefully into the plastic insulator so align carefully). It took me 3 tries to get it right.
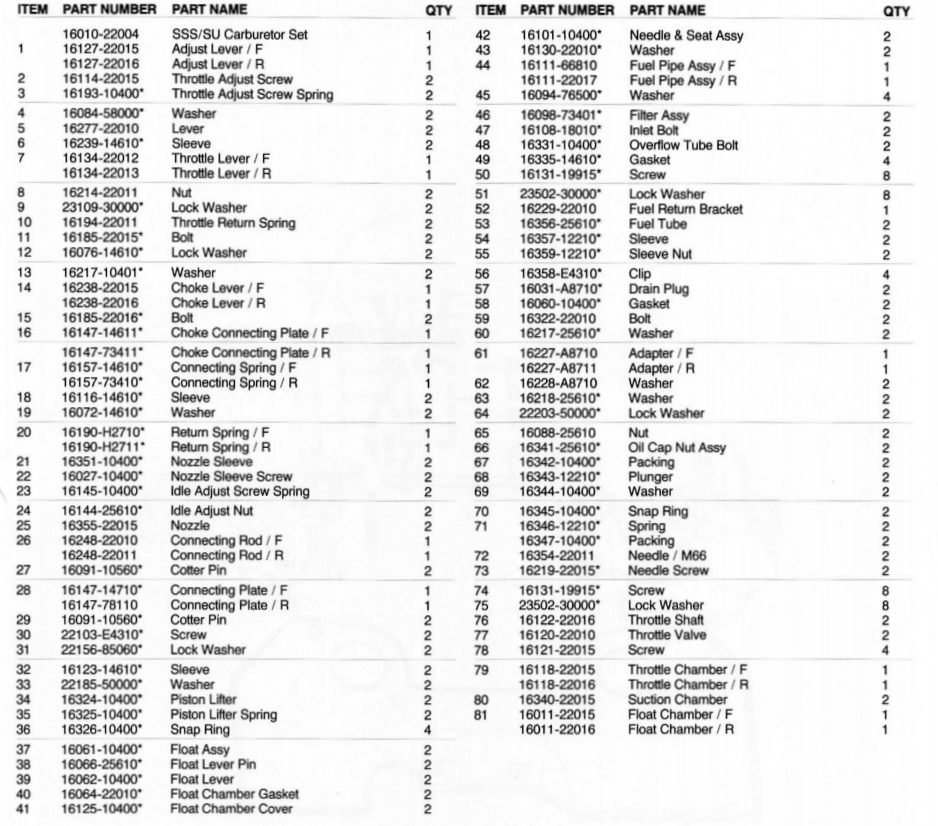
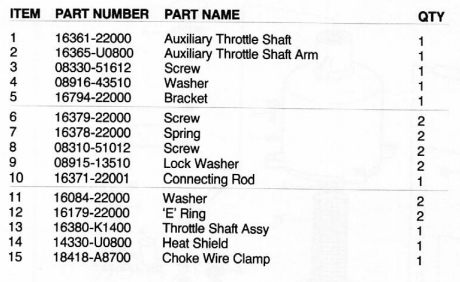
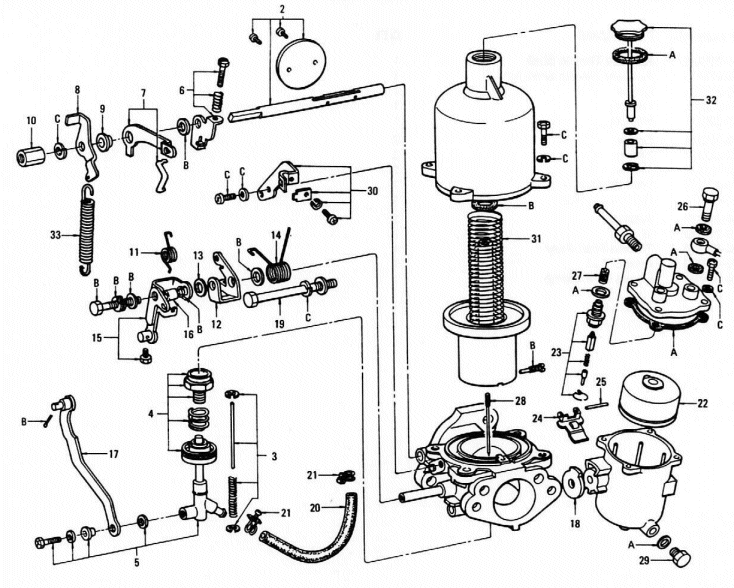
This vid shows you how it works...and he hits a limit and inbalance: Here is my fav: http://www.classiczcars.com/forums/showthread.php?41940-Quick-and-dirty-SU-Tuning
The rods to the door locks rattle when the door closes. I think I will run some plastic washer hose over the rods to absorb the banging. Any other suggestions?
Just reading this thread now as I am seeking help with the connections in the area. I believe the orphan connector in the blower harness is for factory AC. My supposition is based on the drawing on page 26 of the 71 FSM document: "S30 Supplement Manual" . On page 27 it mentions that item 54 (L) is power for AC coming from the same harness so I assume that the 3 pin connector is also some sort of control leads for the AC unit or related louvers,etc.
this manual has excellent section on dash removal http://www.xenons30.com/files/1971%20FSM%20Supplement.pdf
Pallnet is first class and saves the headache and risk of errors when learning on your first rail. Plan to drill and cut two. If you want to improve on the design, source extruded aluminum with two internal passages for send and return and integrate an fpr in one end. You can also use the stock rail, cut it and bubble flare the ends or braze barbs on the ends: It will look like this:
Jan 71 240z with e31 and same problem... the piston is also peppered with holes and much lighter. New head and pistons....
I was inspired by Arne's photos so I lubed the mechanical clock. When trying to access the bushing on the back of the motor, I removed the wrong screw under the white loctite stuff and disconnected the two whisker contacts and the insulator that holds them. Long story short, I completely removed the motor, removed the pos and neg contacts, removed the insulator, carefully placed the insulator in place, placed the whiskers back into their sockets (the trick is to keep the whiskers out toward the outer perimeter of the casing as much as possible while inserting until you seat the screw that holds it. This screw and connection fit carefully into the plastic insulator so align carefully). It took me 3 tries to get it right.
This vid shows you how it works...and he hits a limit and inbalance: Here is my fav: http://www.classiczcars.com/forums/showthread.php?41940-Quick-and-dirty-SU-Tuning
The rods to the door locks rattle when the door closes. I think I will run some plastic washer hose over the rods to absorb the banging. Any other suggestions?


Important Information
By using this site, you agree to our Privacy Policy and Guidelines. We have placed cookies on your device to help make this website better. You can adjust your cookie settings, otherwise we'll assume you're okay to continue.