kenz240z
Free Member
-
Joined
-
Last visited
Everything posted by kenz240z
-
 Hi Arnie, you can simply run a length of fuel line from the input side of the fuel filter into a small gas can. I've also filled an empty vegetable can with gas and used that as an external "gas tank". Be careful, though, you don't want to spill any gas and create a fire hazard. Keep a fire extinguisher at hand, preferably a CO2 type. Have you inspected the inside of the gas tank? If it appears to be rust free, you might be able to clean it out by pouring in a small amount of gas, then removing the drain plug at the bottom of the tank to drain out any debris. Disconnect the hard line at both ends and blow compressed air through it to blow out any debris in the line. You might want to tie wrap a rag over the other end to keep any junk from splattering all over. Hope this helps!
 -
Hi Miles, the headliner can be replaced without removing the windshield or other vinyl pieces. I would recommend removing the plastic trim piece that goes along the back side. Use a small punch or a hex key to push in the pins in the plastic rivets that hold the trim piece in place. First, make sure the inside surface of the roof is clean. Use a scraper to remove any large pieces of old adhesive and any remnants of the old foam. Then use a rag with a bit of laquer thinner to remove the last bits of adhesive. Dry the the inside surface of the roof with a clean rag. Use masking tape and masking paper (plastic or newspaper could also be used) to cover the vinyl trim pieces. Cover the dash and seats to keep them from getting any adhesive on them. Before spraying any adhesive, hold the new headliner in place as best you can to get it centered. Use masking tape to help hold it up. Use a piece of masking tape to hold the front of the headliner in place in the vicinity of the rear view mirror. Then use a piece of tape to hold the back of the headliner in place in the vicinity of the dome light. Use a few pieces of tape to hold one side up above a door opening (left or right, it doesn't matter) Then let the other side hang down. Spray the adhesive on the exposed half of the roof surface and the backside of the headliner. Leave the last inch or two around the outside edge of the headliner bare. In other words, do not spray any adhesive on the edge of the headliner that overlaps the vinyl trim. Working from the center line (from the rear view mirror to the dome light area) push up on the headliner to stick it in place. Take your time to avoid wrinkles. Don't worry about the edge of the headliner at this point. It should be over lapping the vinyl trim at the front and the side. A fiew pieces of tape will help hold it in place. Now untape the other side and let it hang down. Spray adhesive on the exposed roof surface and the back of the headliner, then stick it in place like you did the other half. Now all that remains is to push the edge of the headliner up into the space between the vinyl trim pieces and the roof. A paint stick works well, sand the edges first to prevent damaging the new headliner. Go slow and use a soft touch. Once it is all tucked in, re-install remove the masking paper from the vinyl trim, uncover the dash & seats, re-install the plastic trim piece along the back edge of the headliner and admire your work!
-
I've had urethane TC bushings in my '73 for about 5 years now and have not had any problems with them. The car doesn't get driven a lot, but when I do drive it, it tends to be spirited driving on twisty mountain roads.
-
Hi, Ken. Great minds think alike! The spare parts are getting harder to find. The Z cars are not showing up in the salvage yards here in northern Colorado like they used to. In fact, one yard crushed out a half dozen or so cars last year :>( I'm starting to consider stockpiling parts in the rafters of my shop. I'd consider buying another Z car or two, but just don't have the space...gotta finish up a few of the others works in progress: 64 Impala, 65 Buick convertible & 73 V8 Z.
-
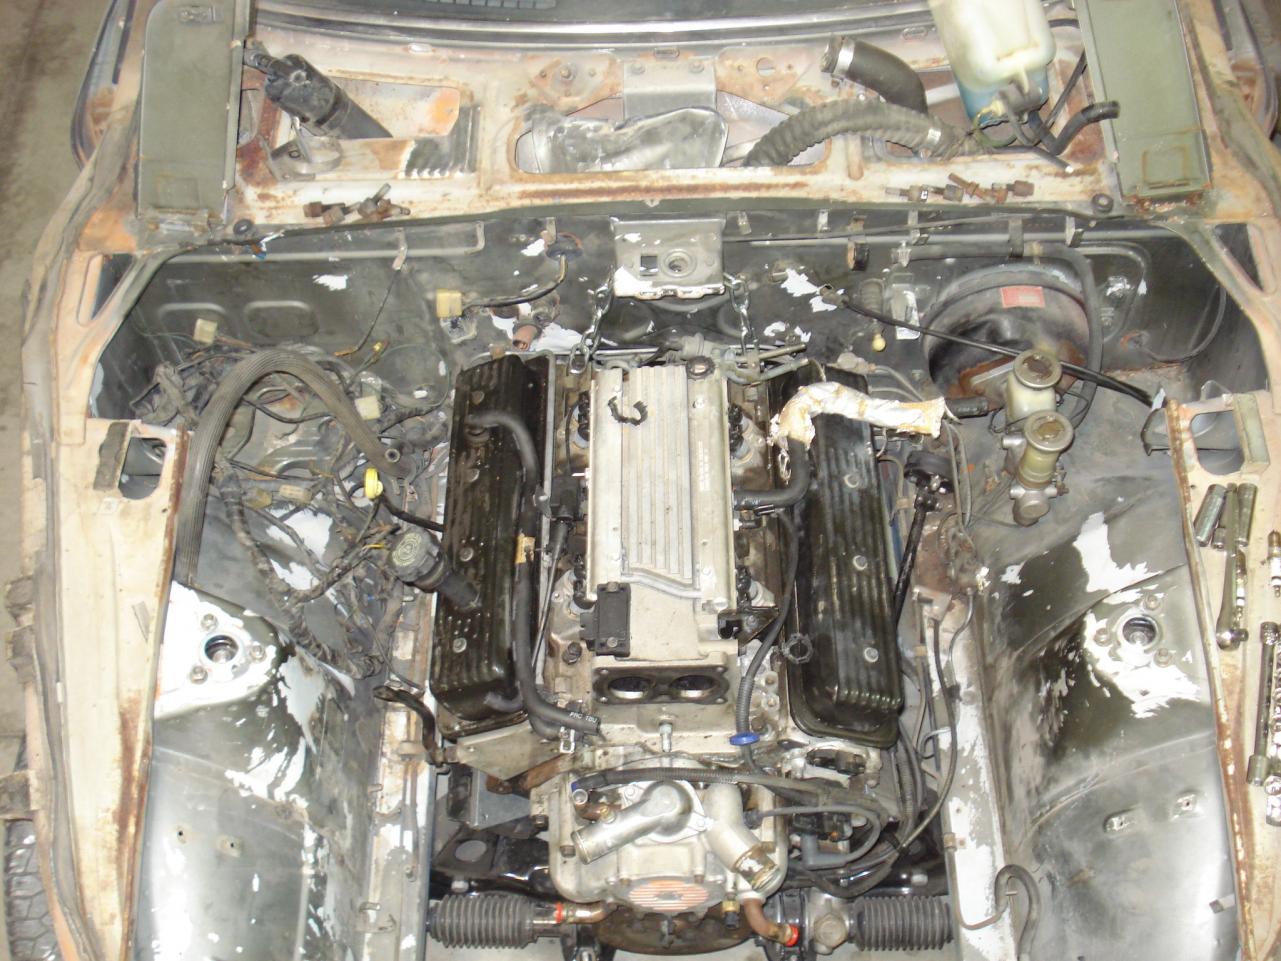
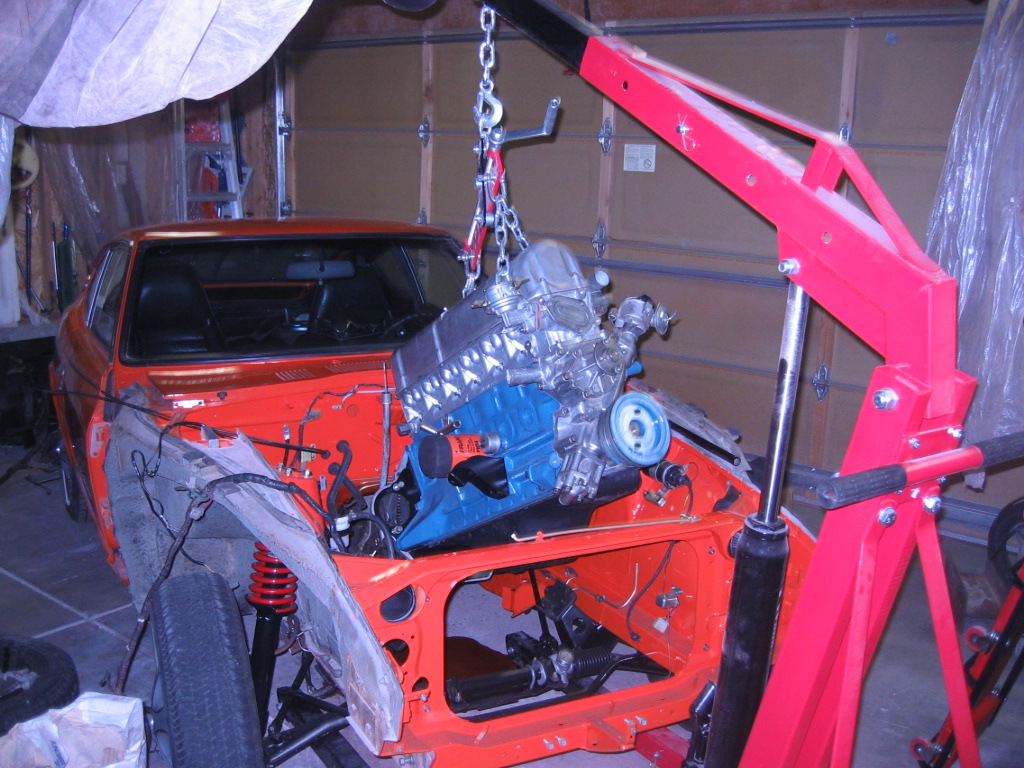
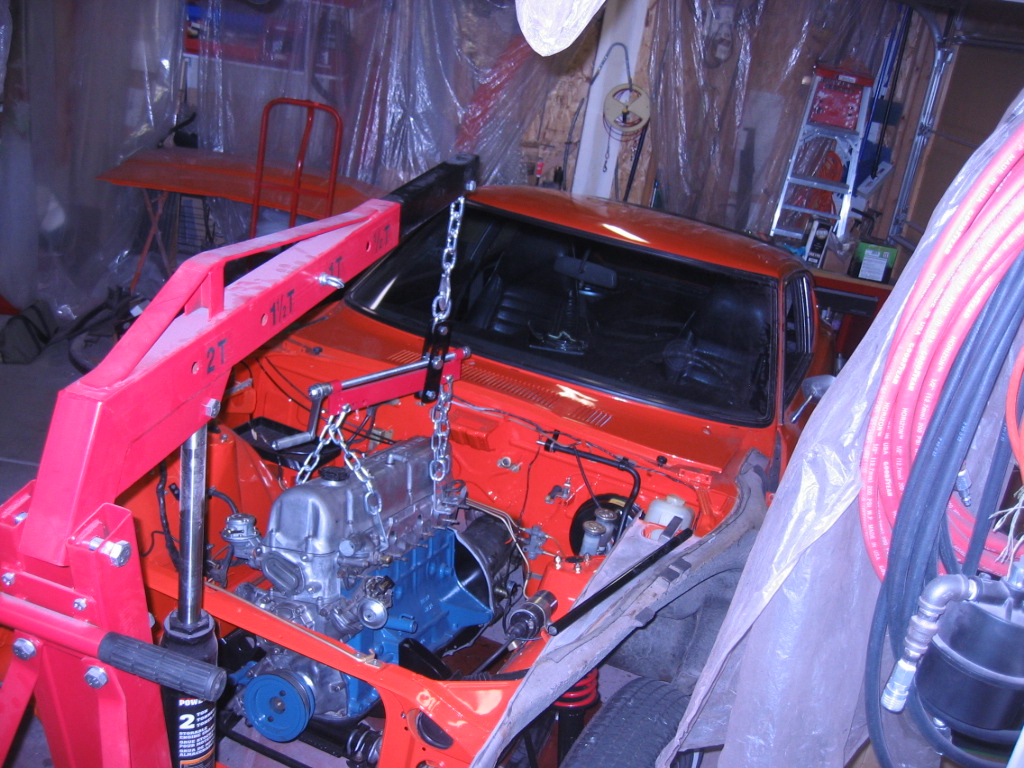
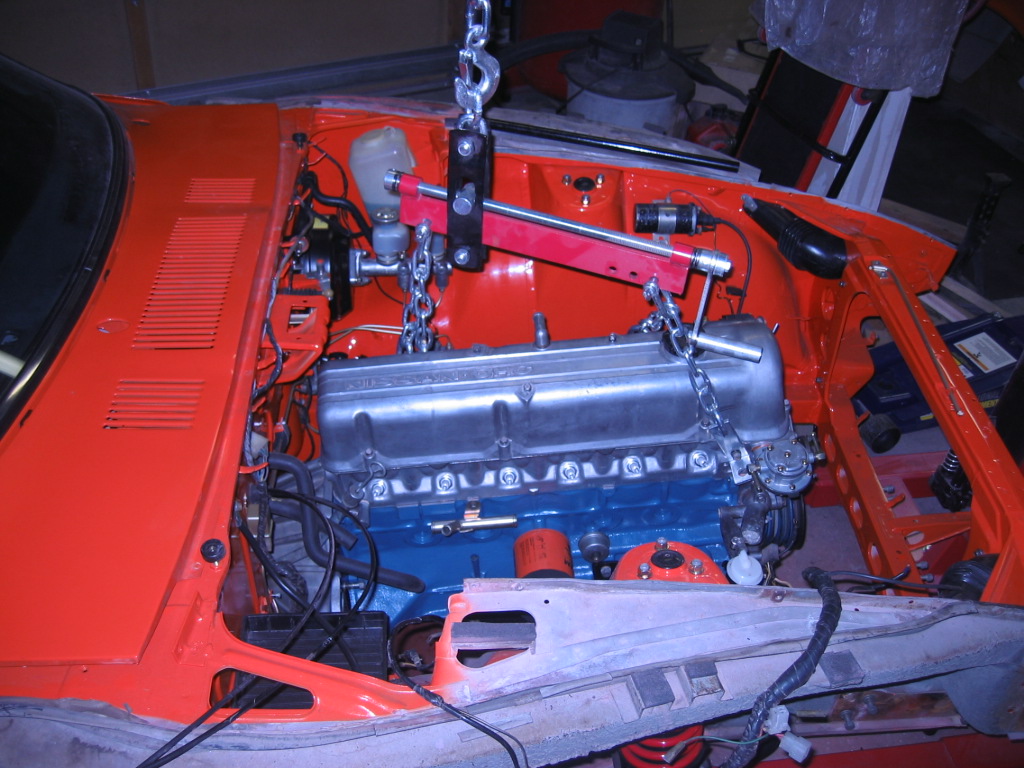
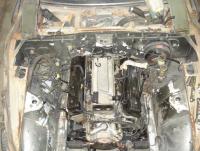
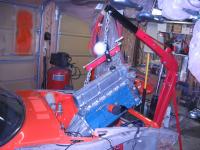
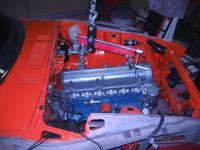
I'll be finishing my LT1 V8/T56 6-speed '73 240Z. I already rebuilt the suspension with KYB struts, Eibach springs and urethane bushings. Replaced the R180 with a 3.9 R200. New brakes all around. A set of 17" Rotas waiting for new shoes. The LT1 is still at the machine shop nearing completion. Most of the body work is done, just need to tackle the left rear quarter, plus a few holes in the floor. Stuck another LT1 in there so I can start on the underhood details, accelerator cable, clutch, wiring, fuel lines, etc... while I wait for the rebuilt engine.
-
-
Great color, your Z is going to look fabulous when you get it put back together!
-
I haven't had any direct experience with soda blasting yet, but it appears to be a good way to go to strip paint from a panel without having to worry about damaging chrome or other trim. I haven't converted my sand blaster to a soda blaster or purchased a dedicated soda blaster because I find it easy enough to use the DA with 40 grit or 80 grit discs to remove the old paint and strip a panel to bare metal. And while it is dusty and messy (definitely wear a good respirator mask when sanding) I can contain most of the dust by using an old shop vac while sanding to suck up the dust. Soda blasting and sand blasting are rather messy. If you do it yourself I'd definitely recommend doing the blasing outside, otherwise you will forever be cleaning your shop. Have you gotten the engine in either car to run? If so, you might consider driving the car a bit to get a feel for it. Please be sure to do any necessary brake/suspension/steering work first so that the car is safe to drive. With 2 cars, hopefully you can have one as a driver while you work on the other. The engine and tranny can be pulled together, just remove the radiator and fan first to gain a little extra clearance. And be sure to drain the oil from the engine and the tranny fluid from the tranny first. Draining the engine oil isn't as much of a concern as draining the tranny, it's just that otherwise the tranny will leak fluid out the drive shaft end when it is tilted for removal. Harbor Freight sells a plastic "plug" of sorts that fits into the end of a tranny to seal it up an prevent fluid spill, but I haven't used one on a Z car tranny and don't know if it fits or not. I have an end from an old drive shaft that does the job for me. If you don't have an adjustable engine sling to use with the cherry picker, be sure to get one. I will allow you to tilt the engine/tranny and make the removal and installation processes a lot easier! You can see the sling in the attached photos.


-
I can't remember if it was on this site or elsewhere, but I recall seeing someone install a simple kill switch in place of the cigarette lighter. The lighter itself could be used to push a switch mounted at the back of the assembly. It would look stock, nothing would be obvious, unless someone tried to light a smoke, or poked around in the wiring under the dash. Even so, the wiring could be taped & wrapped in such a way that it would be difficult & time consuming for a car thief to trace it out. Before analog cell phone service was phased out, a buddy of mine had an old analog cell phone in a car kit that he had wired into the car alarm. If the alarm triggered, it called him.
-
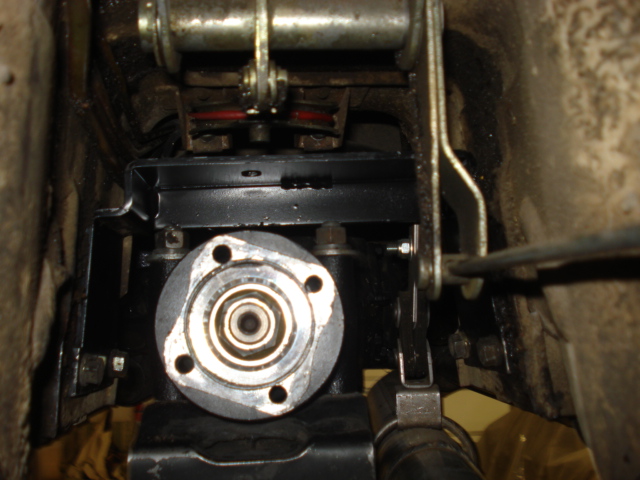
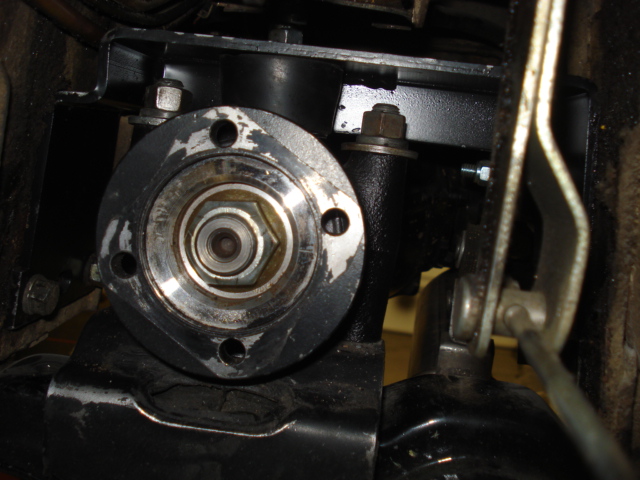
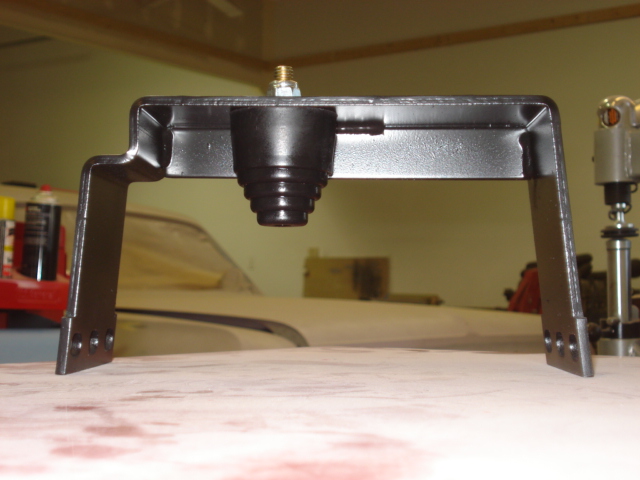
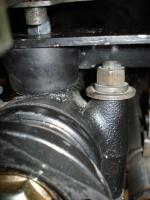
Darrel and Glen (ncolz) helped me install the mount in my '73 yesterday. I had to persuade it a little to get the bolt holes to line up, but other than that the install went smoothly. Once the mount was in we slid sockets of various sizes sideways between the top of the diffy and the bottom of the mount to measure the clearance between them. I didn't get a picture of this, but imagine a socket on its side between the top of the diffy and the bottom of the mount in the first photo attached. Then we measured the diameter of the socket with a caliper. We measured 32 mm and trimmed the bumpstop accordingly. On an unrelated note, Darrel's welding skilz are on par with mine...ugly but adequate!


-
I doubt the viscosity of the damper oil has much impact on starting. The oil provides a slight delay in raising the piston which allows for a richer air/fuel mixture when accelerating. You might want to take another look at each carby to insure the choke cable is properly adjusted and that the fuel jet is being pulled down out of the carb body about 1/4". Lowering the jet increases the area between the needle and the opening in the jet, which provides a richer mixture for cold starting. In addition to lowering the fuel jet, pulling the choke cable all the way back should also open the throttle plate slightly. Check the FSM for the specs. While my '73 is not an unmodified, unrestored, bone stock, fully original early model, it does have round top SU's. I don't have any trouble starting the engine in cold weather. I simply pull the choke lever back, depress the clutch and turn the key. Once the engine starts, I push the choke lever 1/2 way in. When the engine is fully warmed up I push the choke lever all the way forward. With over 130k miles, your yet to be rebuilt carbies may not be as trouble free as you think. The throttle shafts could be worn, causing air leaks. The fuel needle & seat in the float bowl might be worn, dirty or sticky. The float level may be off. The fuel jet could be stuck, causing hard starting in cold temps. The linkages may be bent out of adjustment. The piston may be worn in the suction chamber. Could be other problems with them, but hopefully you get the idea.
-
I have used Eastwood's tin/zinc plating kit with good results. As previously mentioned, surface prep of the part to be plated is key. I start by cleaning the parts to be plated in hot, soapy water to remove all grease & dirt. Really dirty parts may require wire brushing and cleaning with brake cleaner. I then use a produce called Evaporust to remove any surface rust on the part. I've found that a small, brass bristle brush will help shine up the parts after they have been plated.
-
A few air tools that will come in handy: die grinder with various wire brushes and grinding stones, a cutoff tool for cutting out rusted metal, a DA for removing paint & surface rust (40 & 80 grit discs work well for this), a cheap HVLP paint gun for spraying primer, a good HVLP paint gun for spraying color coat and a 2nd good HVLP paint gun for spraying clears. A good MIG welder and a good electric grinder will be useful for patching the areas where rusted metal has been cut out. Use the grinder to dress the welds down. Various body hammers & dollies if you plan to tackle dent removal on your own (Martin & Snap On). Harbor Freight makes a decent stud welder that comes with a slide hammer, this is a useful tool for pulling dents that have a brace on the back side (prevents using the hammer & dolly). If you have the room in your shop, put in a 2-post or 4-post lift! After years of working under a car on my back I decided it would be easier on me to put the car in the air!
-
I'm currently working a '73 that will be getting a Chevy LT1 V8 and T56 6-speed. I'm real interested in what you have installed in your Z for the master cylinder and proportioning valve. And where did you get the Wilwood brake parts from? Thanks!
-
One common mistake people make is diving right in and tearing a car apart without having a good plan. Lost parts and lost motivation often result...how many of us have bought a Z car from someone who gave up on the project? It is important to come up with a plan of attack to keep yourself focused and also measure the progress of the project by completing various milestones. For example, start with the mechanical. Next, work on the body & paint. Finally, finish the interior. By starting on the mechanical work, you'll soon have a car that you can safely drive on the road. The mechanical work can loosely be divided into 3 categories: drive train (engine/tranny/diffy), steering & suspension (tie rods/ball joints/struts/springs/bushings/etc...) and brakes. Make sure the car is safe to drive before you take it out on the road. Once the mechanical work is done, move on to the body & paint. Repair/replace any rusted out areas on the body, floor, inner fenders, firewall, rear hatch area, etc... Remove any dents with a hammer & dolly or a stud welder & slide hammer. Use a little body filler or lead to smooth out the small imperfections that are left. Then primer & paint! Eastwood (www.eastwood.com) and TP tools (www.tptools.com) make a lot of tools for restoration, but Harbor Freight can also be your friend, as HF will often have very similar tools at much lower prices. Finally, take on the interior work. Hopefully most of the interior will clean up nicely. A dash cap is a quick & cost effective way to repair a cracked dash, although there is a thread on the site about using foam filler & SEM products to repair a dash (do a search). If the seats are torn, get new skins to recover them, or send them out to an upholstery shop. Get a notebook to help keep track of everything. Take lots of pictures with a digital camera. Get a box of labels (the kind with string or wire ties) and label every part you remove. Baggies work great for keeping small parts together. Bins or cardboard boxes can be used to store the parts. Label the bins/boxes with the contents inside, or use clear bins so you can see what they contains (labels are still helpful). Do not trust anything to memory. Dedicate a section of the shelving in your shop to the bins/boxes/parts that are removed from the car. If you don't have shelves available, put more up! Some things you will want to send out for repair at the beginning of the project, such as sending the bumpers to a plater or taking the engine to a machine shop for a rebuild. Make arrangements for these things up front because they will take awile to get done. If you plan to have the car painted by a shop, start searching for one now. Many shops don't do restoration work these days, so start by calling the shops to narrow the list down. Then make an appointment to bring your car down to get an estimate. Trailer the car to the shop, that way the shop owner knows you are serious about getting the work done. No matter what the number you have in mind for what it will cost to paint the car, triple it right now and you'll be in the ball park. After you've visited a few shops with the car, hopefully you'll find one you are comfortable with. Of course, if you end up doing your own body & paint work you won't have to deal with this step! Wick Humble's book on how to restore a Z car is handy. There are also generic auto restoration books available that can help guide you. And there is a ton of useful information and lots of helpful folks on this site! Whew, well that's it in a nutshell I think. Keep us posted as you make progress!
-
A couple of thoughts..you might want to check the fuel filter and also check that none of the fuel hoses have cracks that could allow air to be sucked in.
-
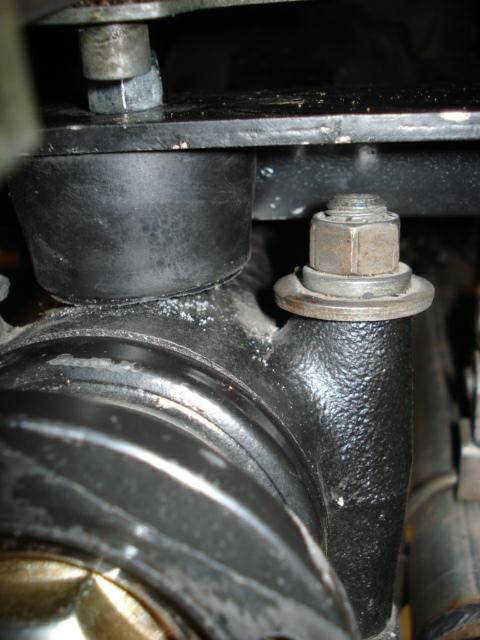
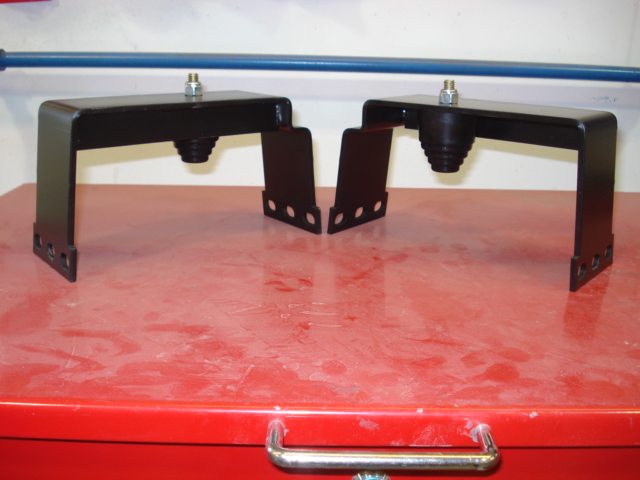
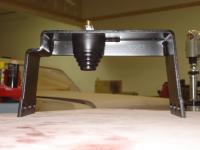
And the costs keep mounting...I offered to help Darrel with a little exhaust repair on his Altima. It may not be Z, but at least it is in the family! And to give Darrel proper credit, he helped me crack open a 5-speed and also helped install it in my '73. So, I guess he had a free lunch coming! Sorry, I'm getting off track from the RT mount discussion... Here are a couple of pics I took after attaching the Energy Suspension bump stops. I hope to get one installed tomorrow. More pics to follow!

-
I'm glad to hear it was an easy fix!
-
I checked all the auto parts stores in my area, but no one had them. I found some online from Summit Racing for under $9. Then I e-mailed Darrel, who found a set at s store near him for $11.74, if I recall. He bought them for me and we met for lunch so he could deliver them to me. The overall cost was a little more than that, though, because bought him lunch and reimbursed him for the expense of the bump stops...
-
Darrel, based on that photo I'm tempted to turn you over to PETZ (Peope for the Ethical Treatment of Z's)! As for me, the recent cold temps here in Colorado haven't slowed me down. What snow we've had has melted within a few days and my Z is ready to head out on a moment's notice if the sun is shining and the roads are clear. Then there is the other '73 I have that will be getting a LT1/T56. It is in the 40' X 60' heated shop. I finished up a little filler work and shot some primer on the hood and passenger door today. Tomorrow I hope to tackle the driver side door.
-
I have no formal training in auto mechanics or body work, other than the auto mechanic shop class I took in high school 20+ years ago. As far as body work, painting and welding, I am self taught. I jump at every bump in the night and I know when my meager skilz are not up to a challenge, but I haven't let rust holes, dents or painting a car scare me or keep me from tackling a project that at first look seems impossible. So, if I can do it, any munkee with 1/2 a brain can do it! In fact, when I brought my first '73 home a few years ago my wife thought I was nutz. She was right, of course, but that car has garnered a few plaques from the shows its been in. I say do as much of the work yourself as you can if you have, then turn the rest over to a pro. Find a body/paint guy who will work with you. If you can weld patches in the rusted out areas, cover them with a little Duraglass body filler and shoot the car with primer, the body guy can take it from there. I sincerely hope you do indeed follow through with refreshing one of these cars. One work of warning...if you do, you WILL be hooked and there will be no stopping you!
-
Looks good! Perhaps she should make some for the rest of us!
-
Please don't interpret my response as a buzzkill, I simply am playing devil's advocate. While the idea of placing the wiring in a conduit would look neat and make for a clean install, it would be a pain if the wiring inside needed to be repaired... Tape & wire loom would be a lot easier to open up if repairs are ever needed. And any additional connector is also an additional potential point of failure. Moisture, hot/cold, etc... could potentially cause a break in the path.
-
You might also consider bringing a floor jack. It may help if the trailer has a dovetail. If the car doesn't clear the tail you can place the jack under the front suspension/engine cross member to raise the car up enough to continue pulling it onto the trailer. Make sure you tie the car down at all 4 corners with an appropriate ratchet strap or chains. Don't use the generic tie down straps you get at the hardware store, be sure to either use straps that are designed & rated for securing a vehicle to a trailer, or use chains & a chain binder. Please don't take chances with safety or with the DOT! I paid 300 for the first Z I refreshed. I bought another '73 this summer for $450. From the photos you have, both cars you have look to be in better shape than mine were. I sure hope they clean up good and that one of them is a good candidate for revival. Once you assess the condition of the cars, I'd suggest making your decision to fix one (or both!) based on what you find and your comfort level with doing the work. If you are mechanically inclined and do your own body & paint work, then you might consider reviving a car that is a little rough. If not, then sell them and get a car that is solid. Personally, I like doing as much of the work as I can, old buzzard gear head that I am!
-
I'm running a 5 speed that I got out of a '82 ZX. I got the donor car for 300 bux from a salvage yard, put the engine and tranny in my '73. I did a leak down test on all the cylinders to insure the L28 was in good shape. It is running SU carbies instead of the fuel injection. With the help of another Z car nut, I opened the tranny to inspect the internals and clean it up real good. I replaced the seals on the input shaft & output shaft. You can download a service manual from carfiche.com if you decide to take the DIY approach.