


Dave WM
Free Member
-
Joined
-
Last visited
Everything posted by Dave WM
-
 makes since, one thing I have learned about mechanical work esp old stuff is not to push or rush.
 -
Oh I get it, cut from the outside so I can just lift out the glass leaving the gasket still in the frame, then with glass out pull out the gasket. I was thinking of cutting from the inside and pushing the glass/gasket out from the inside. I like your outside idea better. I assume the new gasket will be soft and work with the rope trick I have seen on youtube.
-
so the sealant worked? One of my considerations was does it make removal of the glass later a problem? I assume not since the gasket will be trashed anyway. Capt Obvious and I went for a drive around the block in the rain and I noticed a puddle of water in the center of the dash where the trim screw is located. At 1st it was WTF how did water get there, then we noticed while going around a corner water would run from the edge on top of the rubber gasket (top of gasket, part that goes on the bottom of the glass) and then drip into the center area of the dash near the windshield. You could literally pump the water under the glass by pushing on the outside bottom edge (noticeable gap) on the corner of the windshield.
while driving around yester day on a rainy day (1st time since I got the z I took out in the rain) if was able to find a leak at the rubber seal near both corners. You could see the water leak around the glass (its not a tight fit on the glass). I presume the correct fix is to remove the rubber gasket by cutting form the inside, remove the windshield, remove the stainless trim, the strip off the old rubber and replace with one of the 50$ gaskets found on line. a few questions: anyone in Orlando area know of a GOOD place to have this done. is this something that I can do (I am pretty good at working with tools and have patience) would using a sealant (buytal? based on some research done) applied to the outside joint of the rubber and glass around the perimeter stop the leak? even if temporary this would at least confirm its the gasket that is the source of the leak. The glass looks OE but if I had to replace due to breaking it, is there good quality glass available? Thanks Dave
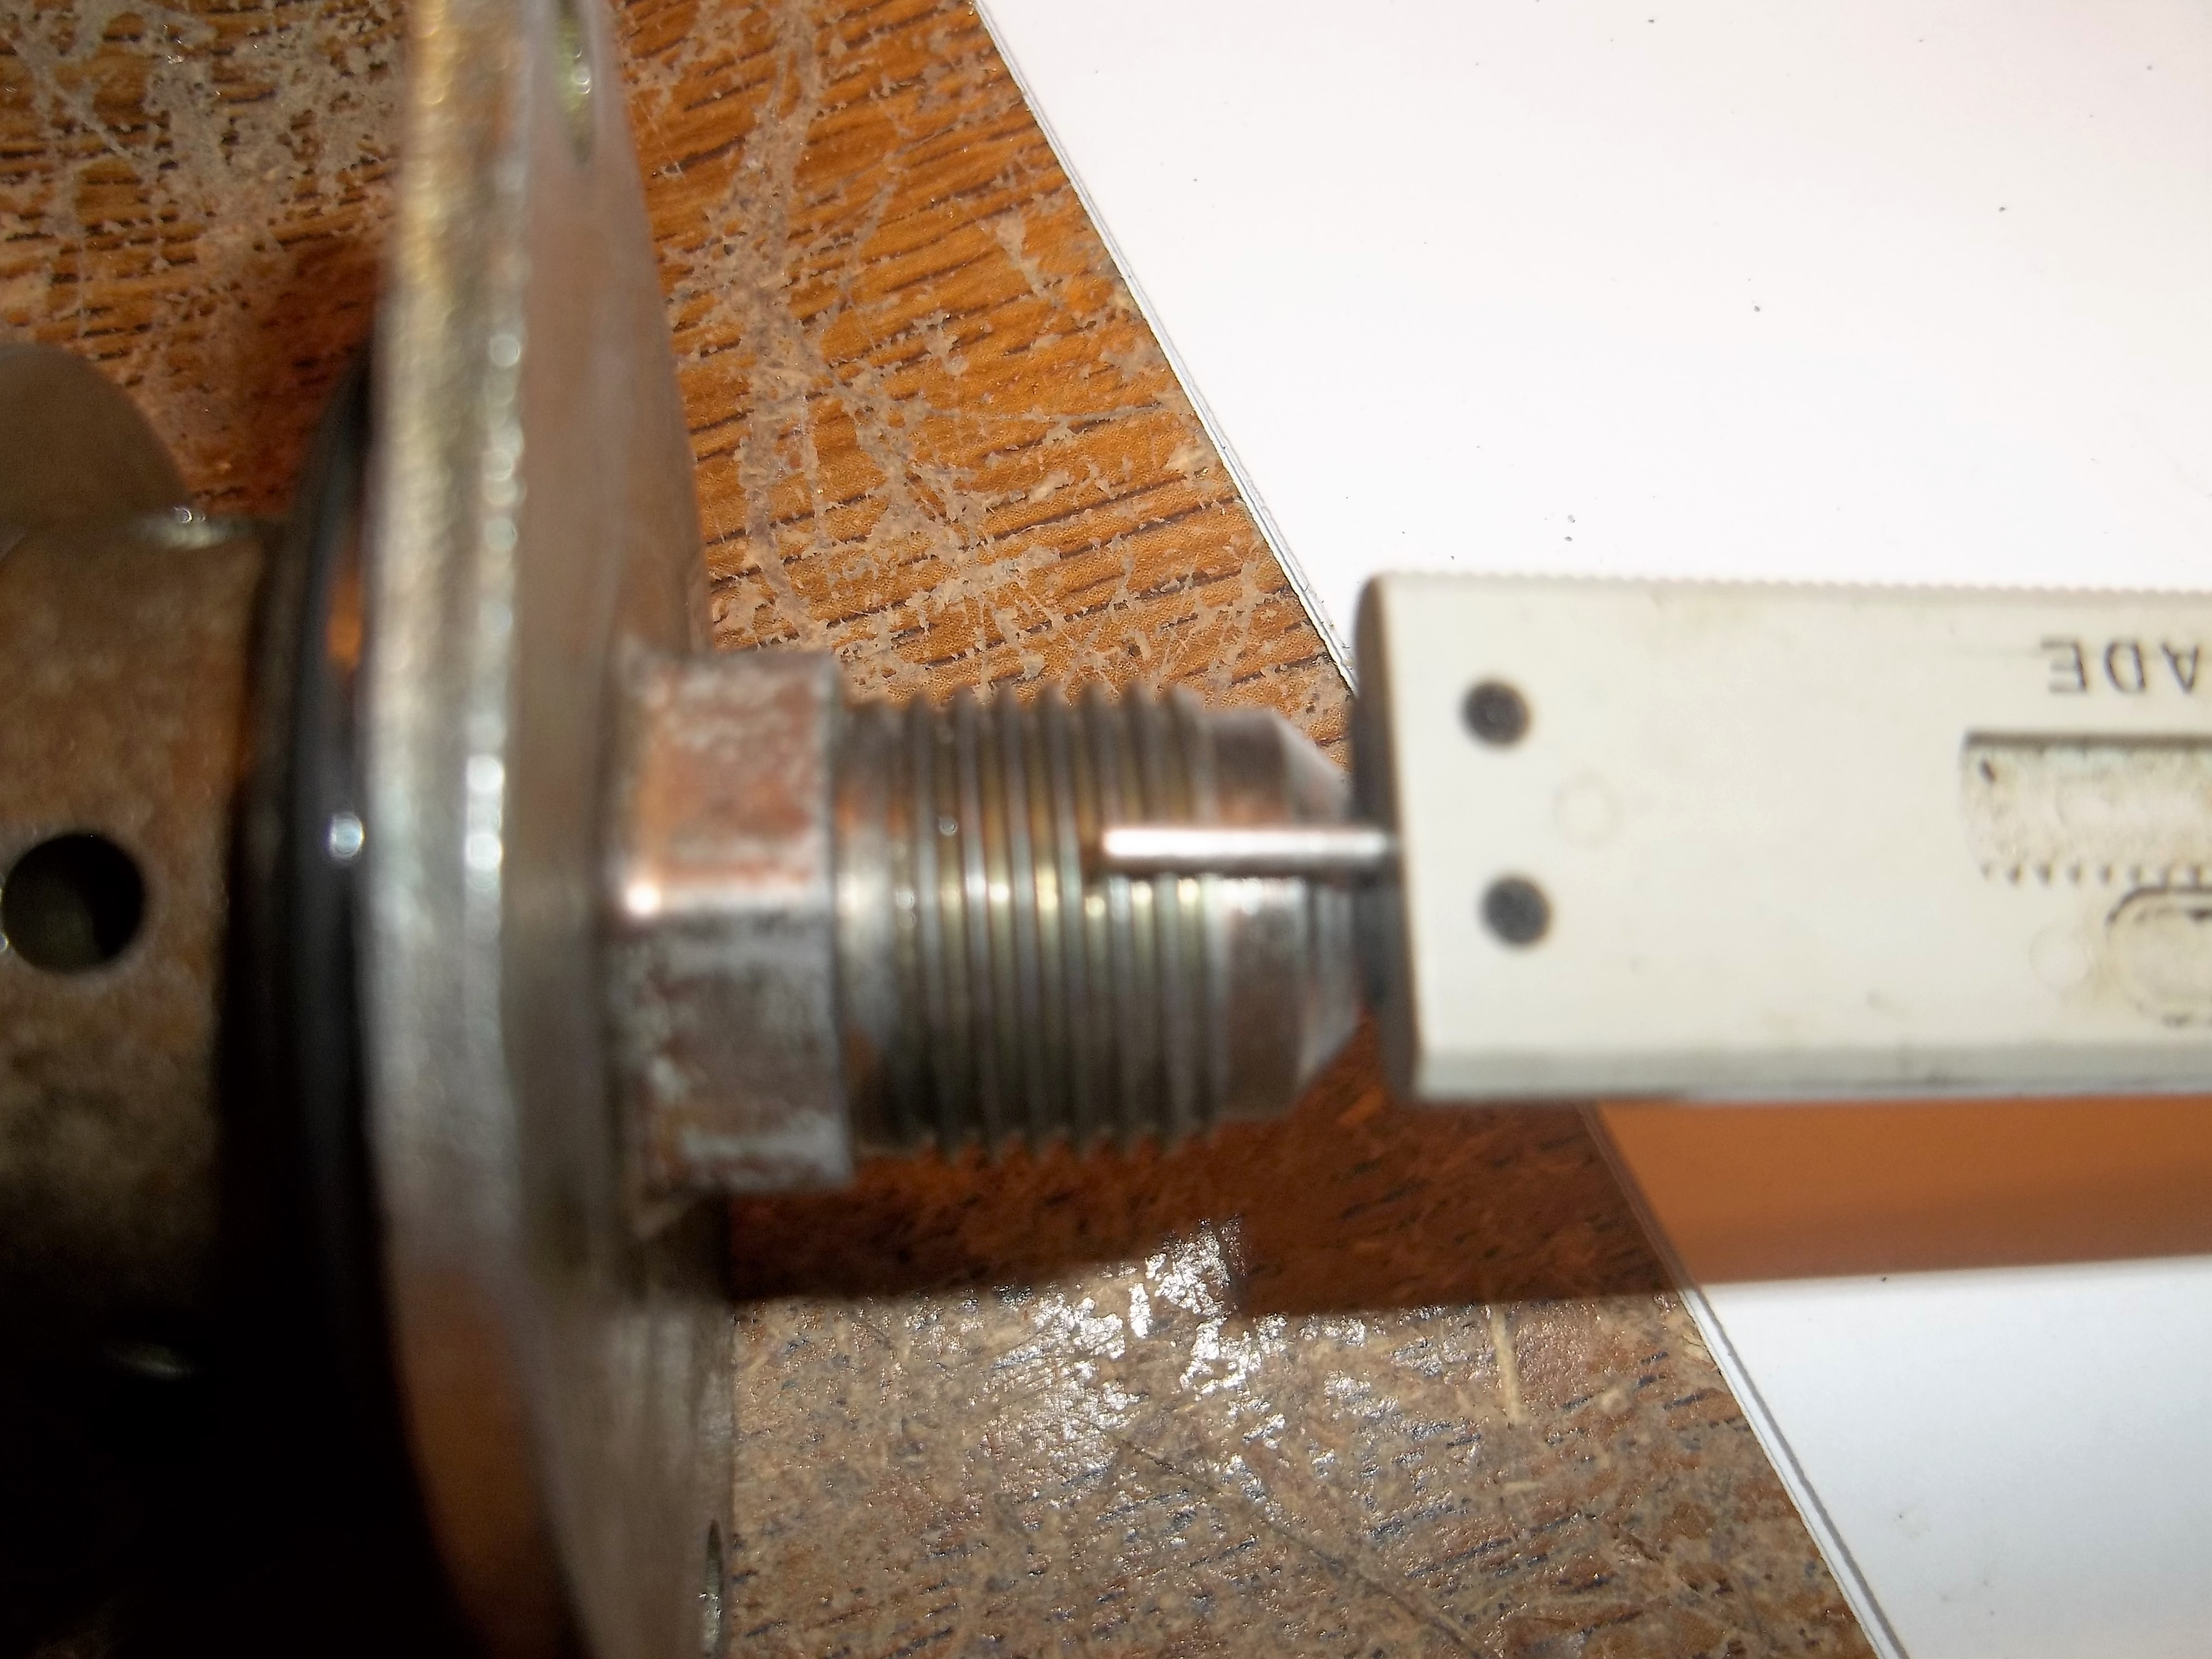
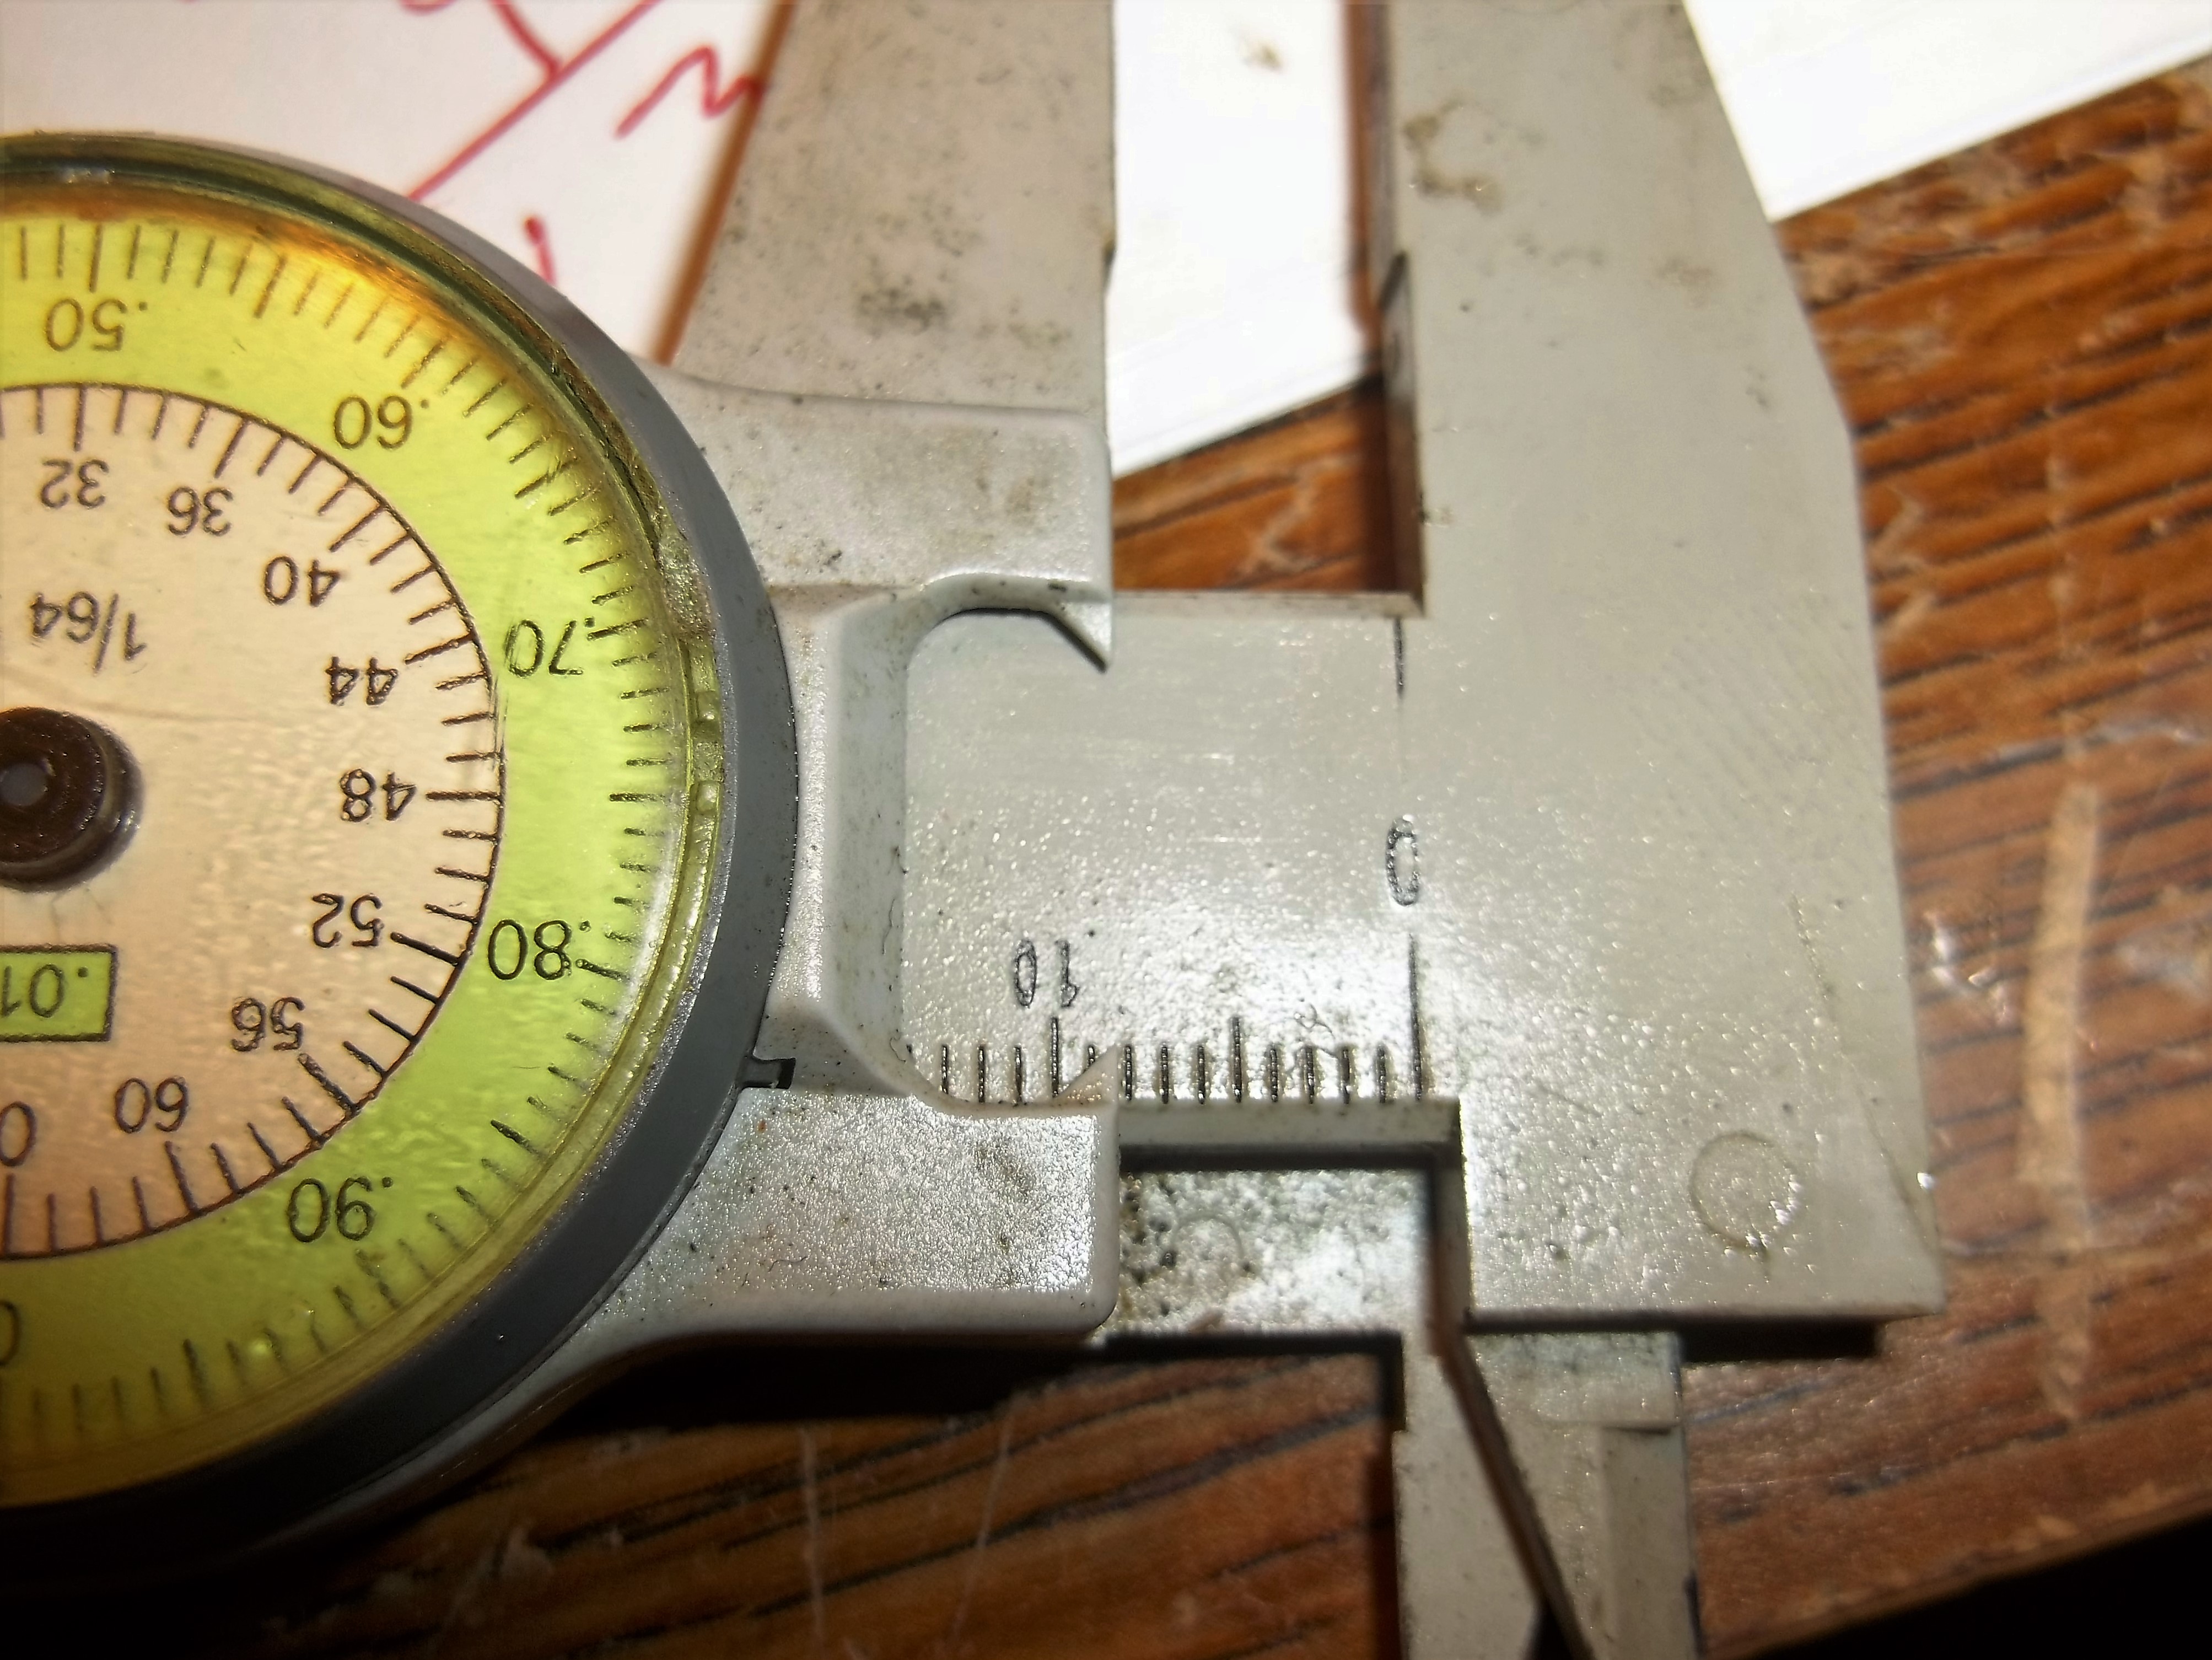
I made a rather long video that will be posted later tonight. Bottom line is I have the top of the brass spring retaining nut approx. 12.5 mm up from the base of the flare fitting connection to the plate that is bolted to the canister on the evap unit. This was done after measuring the distance on another exp valve (but later think for a ZX). It was not the same pn it has a longer inlet snout but I took that into consideration. The new ZX unit has the top of the brass retainer about 12-13 mm up from the plate, so I used that as a ref. It looks right from what I recall of how many threads were showing before I disassemble it. (thread showing above the brass retainer that is).
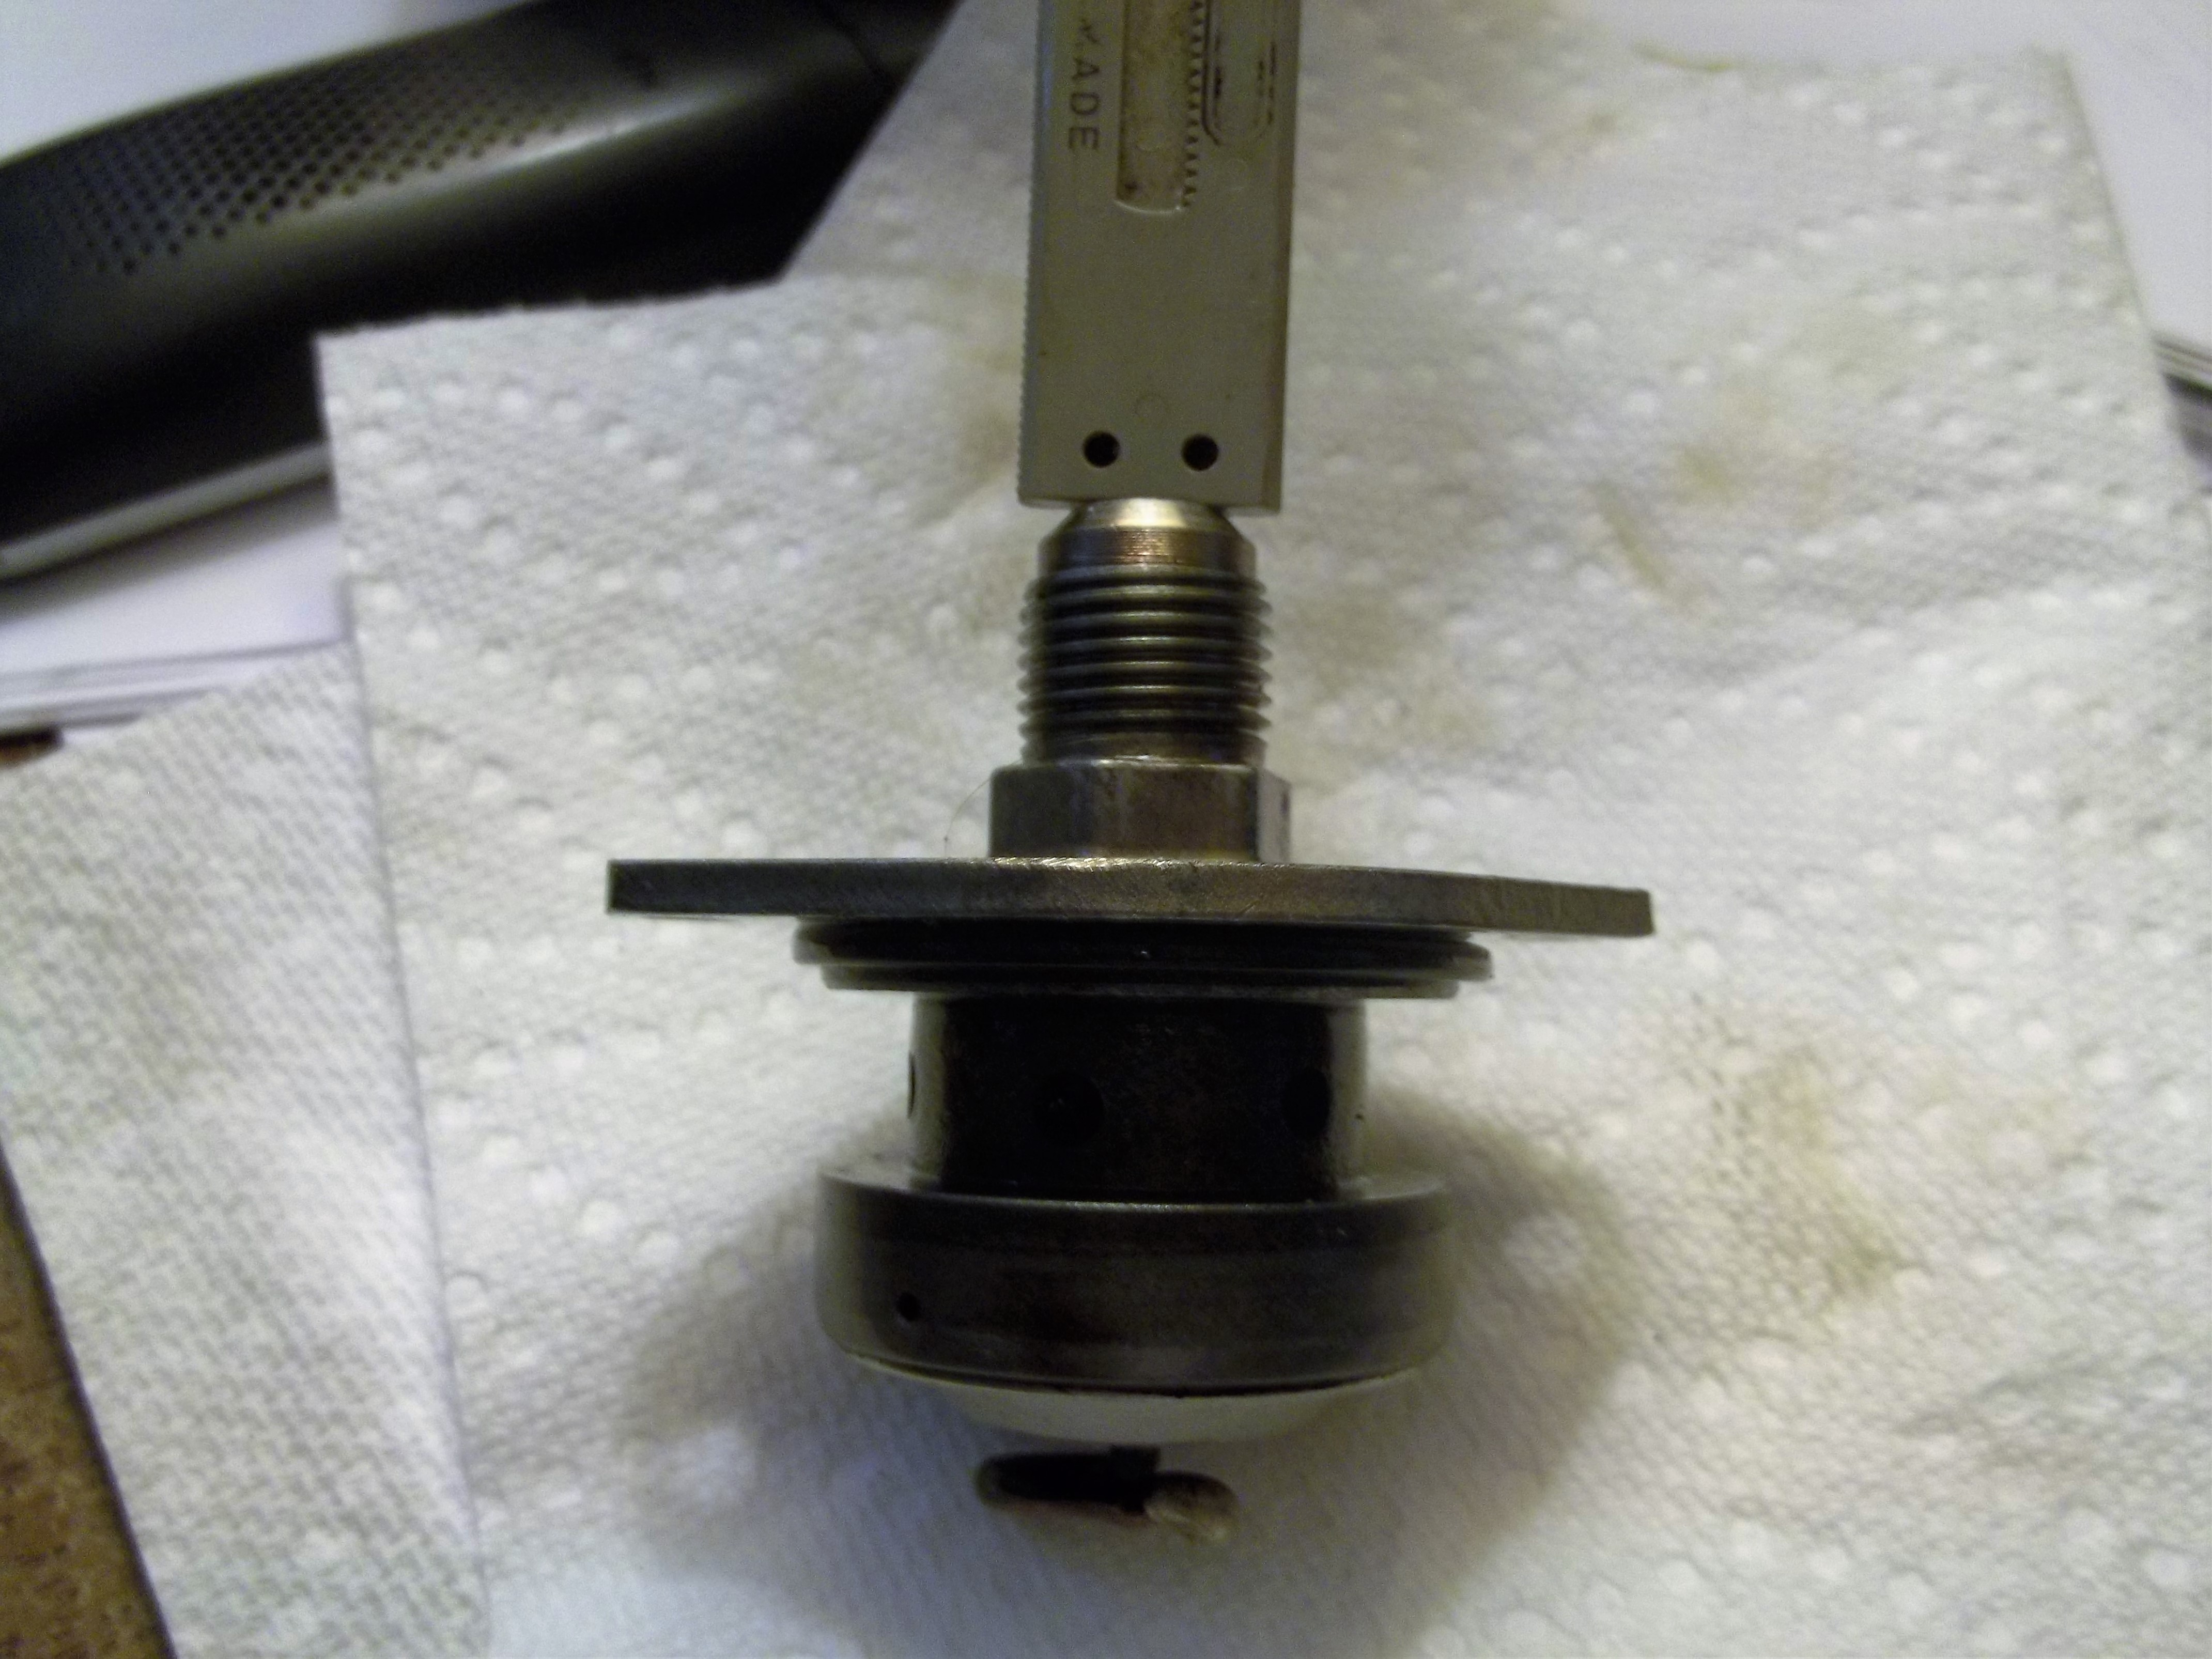
I picked a used evap/expansion chamber from a junk yard. The system had been open for a while as there was rust on the hi pressure switch, and junk in the expansion valve inlet. I removed the valve from its body, and flushed the evap with cleaner. This is the setup that has 3 separate cooling coils, all feed from the evap valve body (3 small and 3 large tubes). Anyway in my zeal to clean the rust out I removed the brass fitting inside the inlet of the valve, got the spring out (covered in rust) soaked it in evap o rust. cleaned the area around where the spring rest with some q tips. Not sure how much more it can be disassembled to get access what I presume is a needle valve arrangement. Anyway now the problem I foolishly did not measure (or count turns) before removing the brass spring retaining nut. I ended up guessing by looking how far the spring can collapse and then turning the brass retainer enough to about 1/2 that much. IF any one has one of the types of expansion valves (look in side and you will see a sloted brass disk with a hole in the center. Please give me a measurement from the top of the inlet to the brass disk. I will get some pics later to better illustrate.
A competent AC shop should be able to fab up the soft lines from the compressor to the condenser and evaporator. Some things to consider, if the system has been open for a long time, it may have rust issues. I recently got a condenser from a junk yard, it has pin leaks in it. The evaporator uses a serviceable expansion valve. That too was full of rust. The Evap while alum still had some corrosion looking white powerey looking gunk in it. I am in the process of refurbing these parts (lots of cleaning fluids). The condenser I have seen new on ebay, that is the route I would go. Look into getting a drier that is easy to find (the old orig style is not) and have your hard lines made to work with it OR maybe just run soft lines through out the engine bay. Pretty sure the orig uses a HIGH pressure cut off, I would see about sourcing a binary unit (HIGH/LOW) just because. Lastly while I understand that 134A is what is used, there are shops that can handle R12 and it works fine. I would even go out on the limb and say if a shop does R-12 they may be better at working on old cars! that's just something to consider.
My guess would be poor electrical connecters. EVERY one should be checked, also the grounds including the main ground from the ECU (goes to the battery terminal) I would start with new battery cables as a min if you don't have them already, then check all the body grounds (undo them look for corrosion). check fuse links for corrosion, and check all the sensors per the FSM. The system is very simple and works very well, good diagnostics should find the issue once you get all the connections checked out. Here is me working on the battery. jump to 1:28 talking about battery
you don't want to drive thru Parramore, high crime, drug users etc.. Don's know about Thorton Park. College park/ Winter Park has some nice old 40's era cottages. Windermere is nice just don't speed at all. Lots of dirt streets, some very high end homes to drive by but not real old. Its better to walk it, start at the library and walk down the dirt roads. Interstate 4 is a nightmare most of the time, so try to stay off of that. Also know that the schools run from 7am to 9am start and end 2pm to 4pm, during those times you have to really watch out for school zones, not all marked well if you don't slow down to 20mph thru them you will get a 200$ ticket. Just be on the lookout. I4 is real bad around 4-7 pm Try to take toll roads as much as possible. Stay away from international drive 24/7 worst traffic and driving in the state.
http://www.marcsimportautosalvage.com/ I only went out there one time, head high weed, rusted out bodies but parts are in a large old house on the property. I had to call him, he came out to meet me, so not sure if there are regular hours. He runs ads in the local craigslist all the time.
Winter Garden is a nice walk old town, somehow managed to not get bull dozed. Rent a bike and ride the west orange trail (old train tracks converted to bike paths, DO NOT drive bike on the road with cars). Canoe ride is fun used to be a place called Katies Landing, they take you up stream, so you can just drift back. Lots of wild life to see, but its HOT so beware. the Wekiva river is the run to make, very slow pace takes 4-5 hours. Sky Craft is the local surplus store, all kinds of junk to roam around in right of I-4 and Fairbanks. Florida really sucks unless you like water sports (ski/fish) esp central florida, hot and humid. Beaches ok if that is your thing but red tide and jellys can be issues. West coast beaches are nice sand and calm waters, but learn to do the sting ray shuffle. East coast is often stormy and over crowded with folks that really should cover up more than they do (not a pretty scene, if you want that go to Miami), surf can be ruff and dangerous at times. If you want to see some old cars go to Don Garletts up near Ocala, really cool stuff, but no imports. Call me when you get into town, stop by and check out my Z. I am right near Universal (don't go to the theme parks, complete waste of money and time). oh and you could visit the Z junkyard up in Sanford.
Did not even think of that, good idea. Funny thing, I too was chasing a fuel leak. Seemed to come and go, figured it was the sending unit as I noticed it with a full tank. At 1st I could not see any problem with the O ring, but closer exam showed very fine cracks. Replaced it and that stopped the full tank leak. Next it was a leak that happened all the time but this time it seemed to originate at the fuel drain plug. The fuel drain being the lowest point was where the 1st leak showed up, but this time it was dry all around except at the fuel drain. Turned out the little washer had a crack in it as well. I found an o ring that fits but that is temp until I can get down to a hardware store more a more perm fix. Will also coat the thread with some sealant next time its empty and replacing the washer.
oh I see the schematic now, yes looks like it could be the choke, will need better pics of where it was on the board. Feed thru caps can develop shorts. I see it is cap coupled. I would be tempted to at least check that 470uf cap if the audio lack bass.
sounds like an intermittent connection at the transformer. Not sure what kind of transformer it its, but has to be audio, so its prob an interstage coupling transformer or maybe even an audio out (I would have assumed it was capacitor coupled but being that old and low power it could be audio out). the typical process would be to ohm check the transformer out of circuit if it looks suspicious. Or you could signal trace it to see where the signal is dropping out when its not working. My guess is moving the wires around is simply uncovering a crack in the trace of the board OR intermittent wiring. I have an old 8 track AM/FM that I may pull out and service, it works but the tone control seems bad, could be a break in the resistance trace or just dirty. While I have it out I plan to replace the electrolytic caps as they are way past normal service life. Working on vintage electronics requires very gentle handling, as the wires and PCB are old and hardened up, making them easy to crack. One thing you don't want to do is mess with any of the tuning of the IF transformers, we call that screwdriver drift, the tuning of the IF will be ok unless its been messed with. if you are interested in transistor radio repair, check out Shango066 on you tube, he has a lot of videos, no car radio stuff but plenty of transistor radio.
You are going to need to either become a mechanic or find one that knows about older cars. The good thing is the 280z has a very easy to understand EFI system. Like Zed Head says you need to give a lot more details. For starters you need to get a fuel pressure gauge to monitor the fuel pressure. Next you need to confirm the ignition is not the issue. I too doubt the condenser has anything to do with the issue, its prob more for noise suppression than anything else since there are no points to burn up. The fuel injection guide will show you how to check things out. When it dies does it start to backfire before? does it run rich (look at the plugs)? does it start right up after die? these will give some clues. Generally speaking you need to make sure you have no air leaks, good electrical connections and grounds, good fuel pressure and flow. Replace the temp sensor for the EFI (this is one that can give trouble if its not right, you can check it with an ohm meter and know the temp) there is one for the temp gauge as well, may as well replace that one too. Check my You tube on Dave WM I have a few videos in there that relate to Z cars that may help, like how to check temp sensors and fuel pressure.
I can just imagine the screws backing out or even the spot welds coming undone on some of the rides I seen at stop lights with 1000 watt stereos. My hearing is bad enough as it is (one ZZ top concert at the Hollywood Sportatorium) did damage enough.
mines been on hold, I like to get little stuff out of the way, esp since my 4 speed is working fine. Today was pull the tank and replace the o ring. After doing all that I realized I did not need to pull the tank, but live and learn. The new O ring by the way seems to be too thin, I hope it works as I was having a leak I 'think" was there. I also go the new filler neck installed to replace the old rusty one, and picked up a nice gas cap chain at ACE hardware to replace the ragged one I had. I am still looking to make up some speaker brackets for factory located speaker on the passenger side. I am just glad to follow your progress, things you encounter will go into my thought process when I do the trans swap.
Great news!
Its ok if not great, I am really not into listening to music much while I drive, just want it to be functional, Right now I have an old 8 track am/fm which is fine, the speakers are some odd ball config with two mounted in pods to the rear tail light panel and a single speaker in a pod hanging under the dash on the passenger side. I think the two are hooked together for left, and the single hanging under the dash right. Very odd. What got me going on this is I had to pull the passenger side panel to get to the filler neck (got a nice newly plated one to replace the rusted one) and seeing as I finally figured out how to pull that panel figured it would be a good time to look into speakers.
I am looking to add a passenger side speaker as well. I think I will make up a bracket based on the drivers side. Like those speakers!
good point Zed head, another variable (worn bushing) that is in play for why some folks may have a problem. I am going to pop for a new set of bushings just to be sure (side and bottom).
just one more update, I used some thick red paint to mark the oval metal of the striker rod, installed the shifter and tried 5th and rev again. 5th looked (and sounded ) good, but rev was still leaving good witness mark from the paint on the shifter. More grinding/check/grind more/etc... until looks good and it passes the strip of paper test now. I can see how some wear marks on the striker rod head, I suspect that each trans will require zero to some work for full engagement based on the amount of wear at this point and perhaps production variances in the trans and shift rod. Anyway best to deal with this issue with the trans on the bench, I am really glad about this thread, see as I was able to work on mine before the install.

Important Information
By using this site, you agree to our Privacy Policy and Guidelines. We have placed cookies on your device to help make this website better. You can adjust your cookie settings, otherwise we'll assume you're okay to continue.