EuroDat
Free Member
-
Joined
-
Last visited
Everything posted by EuroDat
-
 I drained mine a couple of times while shaking the rear of the car and not much came out. I was surprised how much can out when I cleaned it and coated it. Something my back took a couple of days to get over. Won't be doing that again. You could still have a lot of rust and debris floating around in the tank, but the flow through the drain only takes the stuff very close to it giving you an impression its fairly clean. That was my experience.
 -
Just to add to the discussion and not blur it any. The inlet filter or strainer in Siteunseens post#12 is for the Bosch type fuel pump. The strainers in the JECS type pump are shorter and wont fit inside the bosch inlet. The Bosch strainer is loose in the JECS inlet. The new pump and the one in the car in that post are both Bosch, even though the new one is in a Nissan box. The giveaway is the black plastic around the terminals. I have only seen JECS with light blue coloured terminals. They all (Bosch and JECS) have a strainer in the inlet, although a lot have been removed over time. It is a very good idea to fit a G3 filter in the line and forget about trying to find one of these old strainers. The block easily and you can not see its blocked without removing it. Trivia: In my searching I found an article for bosch and some photo's of a JECS pump in Bosch packaging with Bosch's own part number on the box and "Made in Japan" on the box. It appears when Bosch stopped making them for a while they used JECS and Nissan was also using Bosch pumps for a while. The Nissan box must be NOS. I don't know when they started using JECS or when JECS stopped making them. I have seen a 79 280ZX with one, so it could be somewhere around then they started, if that was still an original pump.
-
Hi Steve, Welcome to the frustrations of problem solving an old j-jetronic type efi system. I have explained my pressure test method a couple of times in other threads. Jai's system is loosing prssure quickly so it should be easy to find. Its not causing her problems though fixing the pressure loss will help starting. Interesting point when it was warmed up and the pressure increased to 34-36psi. Thats approaching max for a good functioning fpr. Sounds like the vacuum dropped off completly to get this pressure. Normal idle pressure should be around 28psi, 30 seems to be a bit high, but could just be calibration issues. The potinometer would help, but I don't think it will solve the problem. When Jai got the car it was running fine and this started suddenly. The temperature tweak solves problems that take a long time to evolve. The AFM cops a lot of blame and its often adjusted with no real results. Mine was way off until I adjusted it by the method on AtlanticZ and added the temperature tweak. Test method once you have fitted a pressure gauge. 1- Build up system pressure (remove solenoid conector on starter and turn ignition key to start to run fuel pump). You may need to do this a couple of times to buid up pressure while going through tests. 2- Stop pump and clamp hose after gauge. If pressure drops its the check valve in the fuel pump leaking back to the tank. If not 3- Build up pressure again and this time clamp the return line from the fpr. It wil be next to the fuel gauge. If it now holds pressure the fpr is leaking back to tank. If not 4- Cold start valve. The hoses going to the csv are too short to clamp so I remove the two screws and gently pri it loose from the manifold. Remove the EV1 connector and build up pressure again and check if it drips. If not, the only source of leakage after this is the fuel injectors. When you pressure build up for the testing, you should be getting 36-38 psi. That the max for the fpr, like removing the vacuum hose while running or WOT no vacuum conditions. Goodluck solving it.
-
Im just wondering how you are planning on making your shopping list? Other than the usual like oils and all the filters and don't forget a Fram G3 fuel filter for between the tank and fuel pump. The obvious missing parts are easy, but things like brakes and such. Have you done any checks to see what condition its in? Until you pull things apart you don't really know what you need. For instance the rear brakes would need new wheel cylinders for sure, but are the shoes and drums still servicable. My car was sitting for more than 20 years s when I did mine and I ended up replacing everything, wheel cylinders, spring kits, shoes and hydraulic hoses, but kept the drums. When you find a radiator don't forget new hoses and a thermostat. Might be a good idea to (try) remove the old thermostat. If the bolts are corroded solid and break off you could end up buying the housing as well. Finding a good working AFM will be probably your biggest challenge. There are lots of different model numbers to choose from and I don't know what the difference is between them all except the fuel pump contacts in the pre august 1977 units. MSA sell reconditioned units on an exchange basis, but they are pricey if you don't have a servicable core. If you check the link you will see the list of variants available http://www.thezstore.com/page/TZS/PROD/classic17b17/11-3040 If you look closely at the second photo, you will also see the 7 pin connector has all 7 pins. The later version only has 5 pins the fist two blank. You will also need the rubber boots (before and after the afm) to suit your model. In your first post you mentioned you miss an a/c compressor. If I look at photo #5 in the first post I can see it under the throttle section of the intake.
-
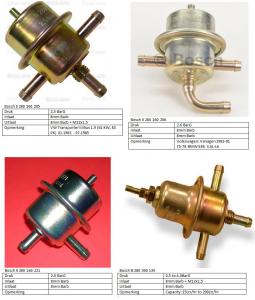
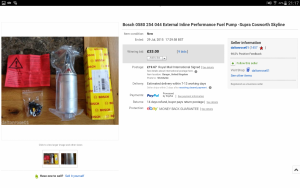
Hi Guys, I have a couple of old pretty sad original pumps. They all have problems in different areas. One is noisy and poor performance, the other is leaking around the terminal sealing mostly and a little all the way around the metal housing. As you can see the parts are not all that interchangable for a number of reasons. Somewhere in the 280Z they changed over from Bosch to the JECS copy. The Japanese did a darn good job in copying it that you only discover it when you pull them apart and start measuring the different parts. There are some parts that will interchange like the inlet pieces, the rotor and rollers with the outer ring complete, but not as seperate parts. The inlet screens will not intrchange. After MUCH research on the internet and parts books Ive found a lot od info on diferent car makers using the bosch pumps. One clear easy way to to tell them apart is the terminal blocks. Black is Bosch and Blue is the JECS A24 000 00. I have the Bosch numbers, but not with me at the moment. There are other small things like philips head screws on the JeCS linet and blade heads on the Bosch. Not all bosch pumps have the part number on the back. I have one that does and ne that doesn't. All JECS seem to though. A good, no a very good replacement is the Bosch and now I have the rare situation where I can get them for around $70 new in the box. Siteunseen, Ill gladly do you a favour a sell it to you for let say $150. Just joking of course. I just checked the prices over there in the US. WOW now thats a make up. I have seen some (rare occasions) go for €24 over here, thats like $30. If someone needs one I can help find one for a good price plus the shipping. These pumps are made in the cheq republic anywhere else is a copy. Chas
-
Or me? I don't have a photo with me at the moment, but can post a photo of both versions end next week. I have spares of both versions of AFM (Air Flow Meter). Early version: (Your car) has the full seven pins in the wiring harness connector. The last two pins are for the fuel pump relay. Basicly the pump will only run if the engine is running and sucking in air. Its a safety device to stop the pump if the engine stops in an accident etc. Later version: Uses the oil pressure sender to do this. The later sender has two prongs where yours will have one. It works the oil pressure gauge and allows the pump to run. Its located down next to the oil filter. You can use the later version, if you can't find a good servicable early unit, but then you will need the later version of the oil pressure sender and run wiring over to it. Bridging the wires in the harness is not a good idea, because you would then disable a safety feature.
-
When you get so far as to trying to start the engine, search for a thread with the tittle that goes something like "wakening the beast". Its a good "how to" thread on starting an engine thats been sitting for a loooong time.
-
When you look for an AFM make sure it has the full seven pins in the plug. You will need them all for the ECU. The later version miss two for the fuel pump switcb in the AFM. They changed somewhere around August 77.
-
Welcome to the Zed world and welcome to the forum. If you need any advice this is the place to ask. Your Zed looks like its around the same time as mine pre August, mid 1977. Your missing a little too much like the AFM to get it up and running quickly and drive it around a bit. That would be nice to feel how it was before you did any restoration work on it. I drove mine around for 4 months before I started. What are your restoration plans? I didn't have a plan all worked out, just started and went from there. Its now more or less a stock or stock looking restoration. Enjoy
-
Marios280Z, To answer your question in post 48. Yes, thats what I meant. You can test for resistance by measuring voltage drop along your power supply starting at the battery terminal. If you start with one probe in the centre of the (+) battery post and the other probe on the outside of the terminal, you will measure any resistance across the terminal when its cranking. If you see a voltage reading, clean the terminal and retest. Then follow the cable to the starter and repeat the test with one probe on the centre of the battery post and the other on the starter terminal. Any voltage reading would be a bad cable or dirty terminal at the starter. The starter solenoid is a little different because you are measuring across an open and closed contact. You will read battery voltage when you move the probe the the next terminal until cranking. You should read 0 volts when cranking. If you see some voltage then the solenoid contacts are dirty. Once you have done the positive side test the negitive the same way. One way to understand it better is to think in terms of hydraulics or your fuel system for that matter. Voltage is pressure and resistance is a restriction in the line. If a filter gets block it builds up pressure across the filter. Thats what you are looking for with voltage readings. Just like the hydraulic system, you will not see any pressure (voltage) when the system is at rest. That is why you need to crank the engine.
-
Im not sure what to think of the 4.5 volts reading at the coil. The (-) side is an open and closed circuit which will be "pulsing" while the engjne is running. Some volt meters will average this out and say if it was 9 volts half the time, it would read 4.5volts. Low cranking speeds/low cranking voltage could influence this as well. Try measuring the voltage to the coil (+) and the ground or (-) battery terminal or ground. What is your battery voltage while its cranking? Testing for resistance: A simple way to check where voltage drop (resistance) occurs in a circuit is with a volt (multi) meter. An analoge meter works best, not as jumpy as a digital. Start with things like battery posts and starter solenoid terminals. If you hold one probe on the centre of the battery post and the other on the outer terminal you will read 0 volts. If someone cranks the engine it should stay at 0 volts. A voltage reading means resistance. The starter solenoid is a little different. It will read battery voltage across the two big (M8) terminals and while cranking it will go to 0 volts. High resistance here could be a reason for the rough starting issue Zed Head mentioned. I have found bad fusable links and bad grounds this way.
-
Like Bart said. There is NO clear transition from what we all call series 1 to 2 and 3, some even say there is a series 4. Whatever, Datsun never used it, its something started in the US to "classify" different stages of development by enthusiasts Series 1 is mostly classed by the rear hatch vents and vertical demister and other stuff of course but that seems to be the big indicator. I sereously doubt the change from the E31 to E88 would have happened at the same time. A lot of people quote 10000 units for the E31, but that seems incorrect A lot of people with later vin numbers claim to have them for when the car was new. The 3 dates I hear a lot are Nov 1970, Jan 1971 and June 1971, take your pick. To the original poster. Is an E88 head original on a 17xxx 240z. Its built between Nov 70 and June 71 so it could be. You will always have doubt. If you change to an E31 you will probably have less doubt, because "most" people change to an E88 due to problems and not the other way around.
-
I think he might be thinking you have HLS30-000932. That would be considered a low vin series 1. The way you are describing it I think you have HLS30-300932. Its not a low vin, but 240Z will increase in value a lot quicker than a 280Z. What for increase depends on condition and what has been done to it, and above everthing else, what the buyer demand is. I consider resale value as a side perk if anything because I have a 280Z. I don't have any intention of selling it. I also realise restoring it is money I will never get back. That goes for a lot of hobbies.
-
It would be handy to add your cars build info to your signiture or at least year and model. I had to go back to the first post to find it again. Your car is a 78 so it should have the two prong sender unit unless someonechanged the efi system to the later type. I think they changed somewhere in August 77. I know that is different to what MSA is quoting, but and I know two around my build date have the single prong unit and we (mine and the other two) are all 2 to 4 months after the March 77 change over MSA is quoting. I believe Datsun didnt have a fixed change over method. They seem to use bins as they come. If a bin of old parts came along a month later they would be installed. I have seen a very early N47 head with a spray bar and I have heard of someone else with one. They are not modified combi spay bar internal drilled setups. They only have they spray bar and N42 cam. Back to your problem. You could also be having problems with the fuel pump relay. It could be failing when the voltage is low during stating. You could wire a test lamp to the fuel pump wires to see what is happening.
-
They look nice and $400 is a good price. Bets earching for good 40 year sets or trying to recover them. I agree, he will probably bump the price since the first set went so quick.
-
Nice, I think its the best option unless you are doing a concours restoration. The rubber servo diaphrams, hoses and fittings in the old vacuum systems are not that reliable after almost 40 years of aging.
-
jalexquijano, I think you should be checking all the bolts are tight and the diff mount for starters. If the diff mount is old it will sag and cause these kind of noises. The two big nuts on the back of the diff cover often cause this noise.
-
+1 on Zed Heads description. Sorry for not mentioning the lower pressure with manifold vacuum. My bad. The jetronic system calculates fuel mixture based on a constant 36psi across the injector tip. If the manifold has a negative pressure (vacuum) the fuel pressure regulator will adjust the pressure accordingly. Hence the vacuum hose connected the the FPR. Certainly looks like your FPR is causing your pressure loss.
-
They started using the E88 heads around November 1970 so you probably still have the original head. The 240Z in the US had 2 or 3 versions of the E88. Some people say it was 3 versions, some say 2 versions. Dates not confirmed. Might be a month off in the change overs. I. E88 Vertually the same as the E31. Nov 1970 - Aug 1971 II. E88 Port runners redesigned. Aug 1971 - Jul 1972 III. E88 Chambers altered slightly for emmisions Jul 1972 - End 240Z IV. E88 260Z. Emmision chambers and bigger exhaust valve.
-
Great news. Nice to hear you have an excellent result too. I might have gave you some bad advice in the second post. I misunderstood you post and thought you already replaced the U-joints and then had the vibration. Chas
-
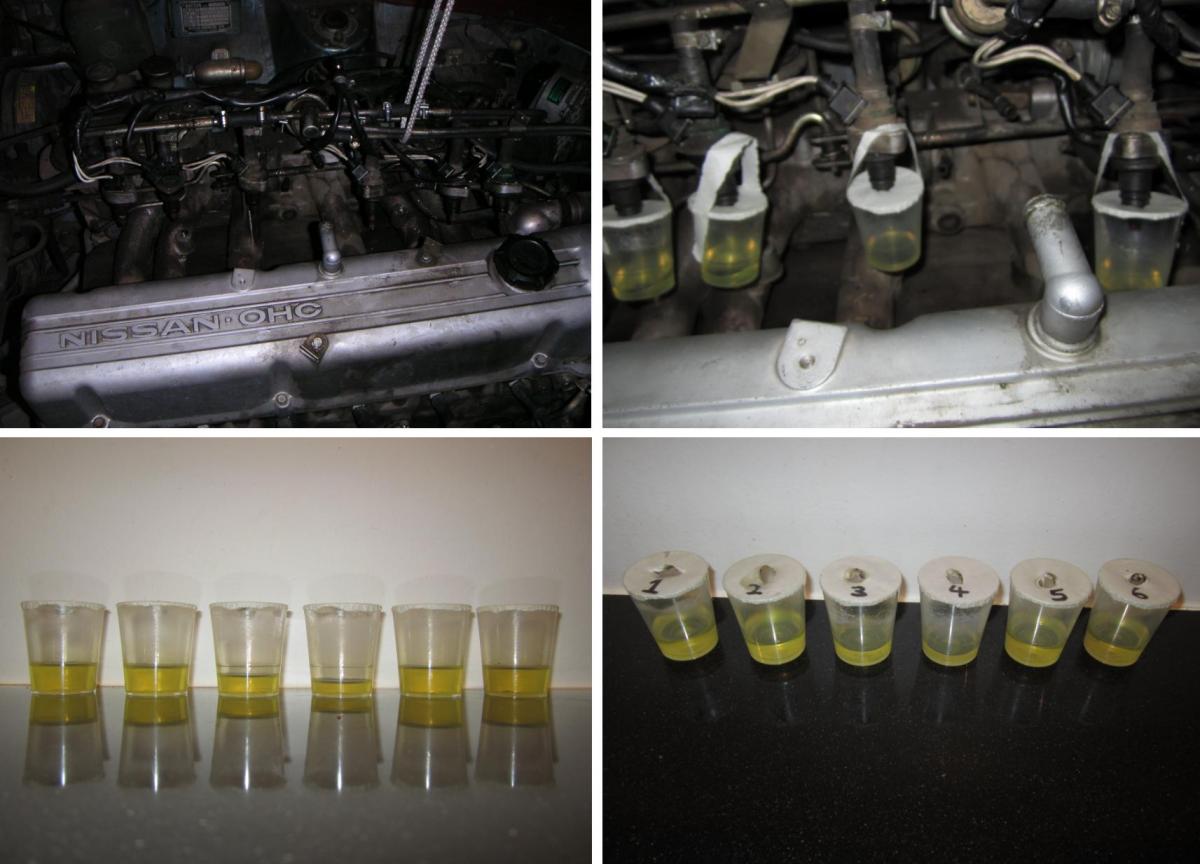
I was suspecting problems with my injectors once. Lean on 3 and 4 spark plug. To check the injectors I lifted them out of the manifold and attached small beakers to them and cranked the engine 10 seconds. With the spark plugs removed it wasn't to much stain on the starter motor. After seeing the results it was obvious the injectors were causing the lean condition. I removed then and reverse flushed them with a mixture of carb cleaner and fuel. They have been working great ever since. You mentioned changing the injectors last year. I think I would leave them to last and try to test, repair or replace the other parts first. The leakdown test with the pressure gauge will tell you were to look. You probably have more than one culprit causing the pressure loss. Like Sarah said, pressure loss is not that big a problem as long as its not getting air in the system it should built up pressure in seconds. When I first got mine it lost pressure in about 2 minutes. Mine was the check valve and a leaking fuel filter (leaking at the seam). After that it now holds pressure for 3 to 4 weeks. Just a note on starting: When it has pressure mine starts 1 second and sometimes 2 seconds. After the pressure has dropped to almost 0 psi it takes 3 to 5 seconds to start. Chas

-
Gary, Once you get yourself a gauge it will take all the guessing out og it. I would also replace the two hoses, the hose from the filter to the fuel rail and the one next to it for the return to tank. New line clamps shut a lot easier than the old hoses. The old hoses can also crack and get damaged when you pinch them shut. PS: rcb280z sent me a pmabout the original check valve.
-
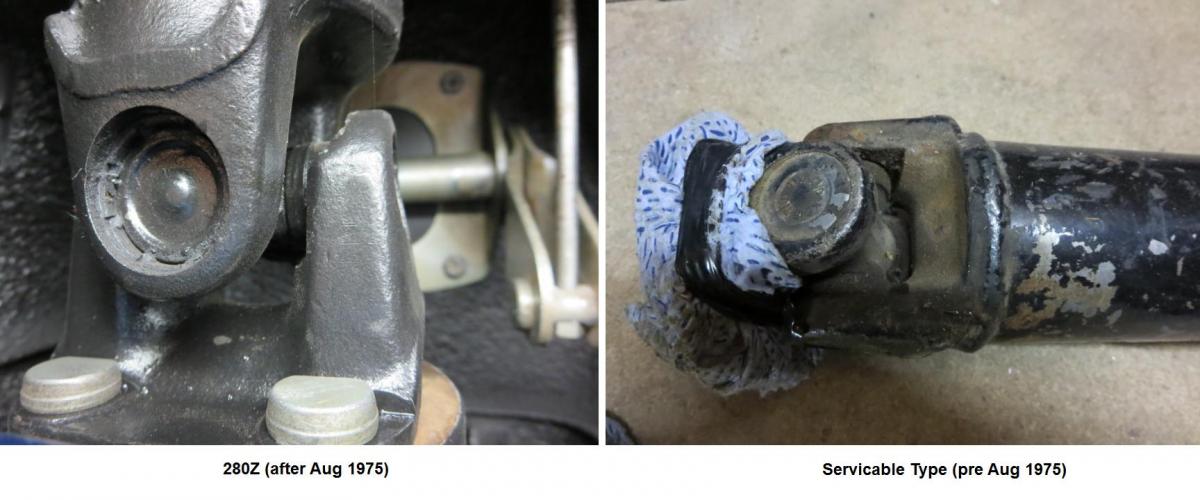
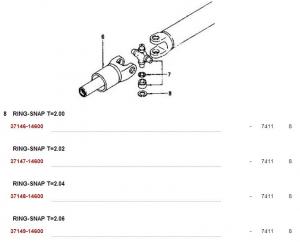
Yep, They are servicable per Aug 75 type. The snap rings are on the inside and hard to see. If it was the non-servicable type you would be able to see the spurs pushed in on the outside to hold the cups in place.

-
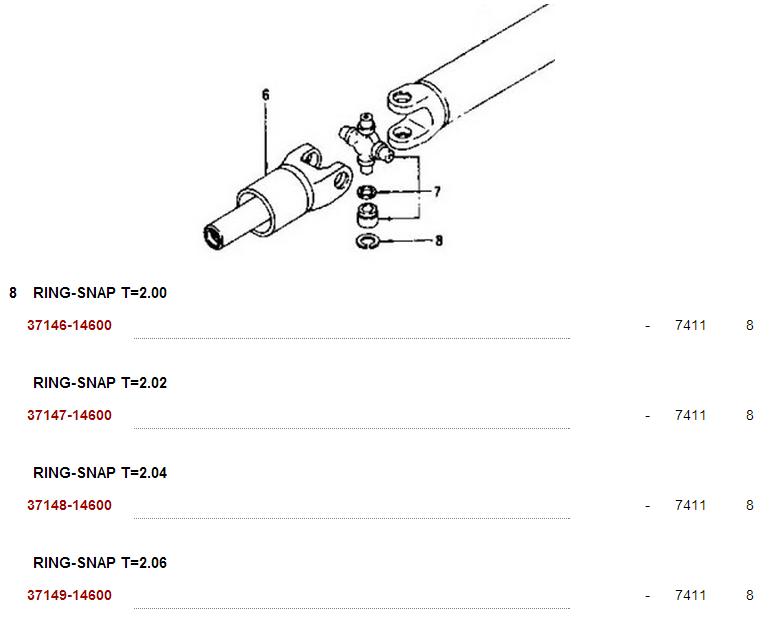
Balancing wouldn't hurt, but if the vibration wasn't there before you changed the U-joints, something is out of alignment since the change. Did you check the clearance in the U-joints? There are Snap rings available from 2.00 to 2.06mm to get the clearance within specs. If the clearance is excessive then the propeller shaft be of center and vibrate. TWhen I did the u-joints they were delivered with standard 2.00mm snap rings. After fitting them I put the yoke in the bench vice and tapped the other side with a rubber mallot to get all the cups out against the snap rings. Measured the movement with a dial indicator and divided that by two. They ended up at 2.04mm on both ends of the propeller shaft and the diff flange. The transmission yoke needed 2.06mm IIRC. It doesn't sound like much, but it could be enough to cause the vibration.
-
The check valves are still available NEW. Now should I tell my secret.......mmmm. Ill dig up the part number later if people are interested. Here are some options for the FPR.