Captain Obvious
Free Member
-
Joined
-
Last visited
Everything posted by Captain Obvious
-
 1. I shouldn't. There should be no way a bad tach should do anything at all to engine performance. Another reason that I question the coincidental nature of the events. Unless the insulation on one of the ignition wires has split under the dash and is shorting to ground or something, ignition should not be affected. But even that I don't think that should peg the tach at full scale. 2. Not really. You would have to unplug it from the harness running through the dash and pipe your own signals to it. 3. Bench testing would be a little complicated. Power and ground are easy... Generating the RPM signal for the other two wires could be a little trouble without some electronics equipment. I don't think you would be able to generate a signal fast enough just by hand. You could do it using your car with the tach sitting on the fender near the coil and some wires connecting to appropriate locations. Not the simplest thing.
 -
Yup. I won't know for sure until I try it. I may have to make another adapter out of stouter stuff. We'll see.
-
Gotcha. So no... I don't have any theories at this time other than your tach has failed internally. However, the coincidental nature of that failure occurring at the exact same time you were messing around with other stuff in the dash makes me think it's something else. Maybe SteveJ has some additional theories?
-
Yeah? Ya think? So that evap-o-rust stuff is almost totally benign, so at least it's not like you did that with Ospho or something else more troublesome. Hopefully you can get your vacuum pump all cleaned out and no harm, no foul.
-
Wait... That's your A/C evacuation pump, isn't it?
-
LOL!! OK, I got it. So why in a million years did you think that drawing the liquid in using a two-stage vacuum pump was a good idea? Why didn't you just use a funnel and pour it in through a piece of tubing like a normal human would? I suspect the answer has just been provided, but....
-
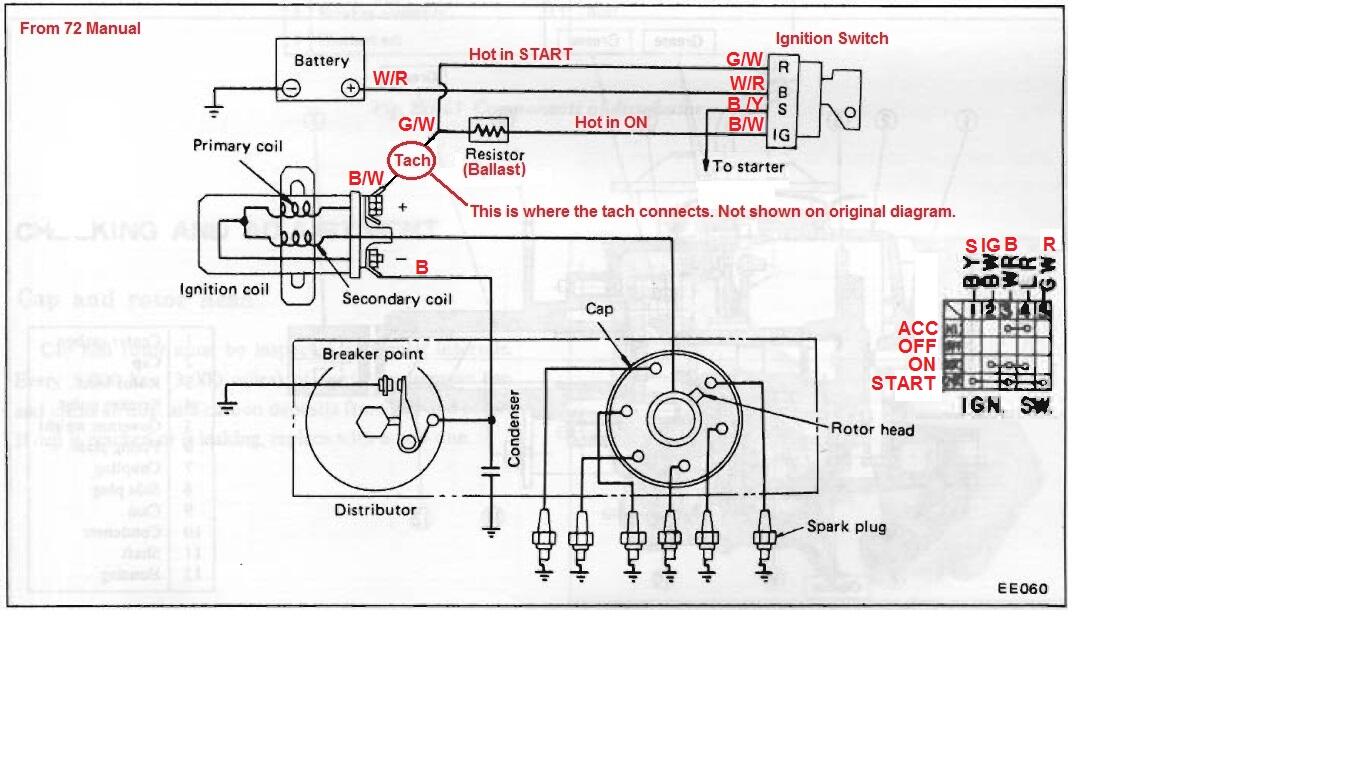
And I should have added before, I'm having a hard time coming up with an answer to "why is the tach maxxing out when the ignition is turned on". I haven't been inside the points style tach at all, so other than having a rough conceptual idea how they work, I'm at a loss. It may still have something to do with the ignition pickup even though the actual ignition current doesn't flow into the tach body. One thing I could suggest... Disconnect the B/W wire from the coil and see if the tach still pegs? Then go from there?

-
Haha! That's the best suggestion so far!
-
Haha! Well here's hoping your new installer tool works perfect. So you talked about a Vesuvius eruption, but didn't provide any detail. What happened?
-
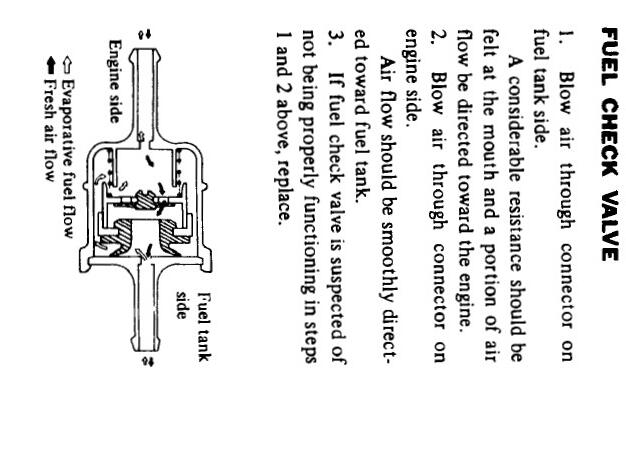
Roger that. I think 75 was the first year for the "check valve" in the vent line. So for 74, there shouldn't be pressure build-up. 74 didn't have one of these, right? No idea why that's sideways. It's not sideways in native format...
-
Actually, on the points cars, the ignition current does not actually flow "through" the tachometer. It kinda flows "in close proximity to it". Inductive pick-up, right? And if that's the case, anything steady state won't get picked up at all. So a DC current, even one that is "too high" would not be noticed by the tach at all?
-
Kinda depends on the year... If your car is new enough that it originally had a carbon canister, then yes... It may be normal for the tank to build some pressure.
-
No, it would just run richer, not faster. Unless, of course as Mark suggested, it was running really really lean and wanted the extra fuel. I really don't think that has anything to do with what's going on here. Float levels will need to be checked before this is all said and done. but that's not what's causing the idle to be at 2500 RPM with the screws backed all the way out.
-
LOL!!! Lathe shaming!! Haha!! You better step up you game! So your new version of your plug install tool is pretty much identical to what I made, right down to starting with the cheap seal installer tool. Only difference is that I made my "business end" piece out of Delrin raw material stock instead of modifying one of the pieces that came with the kit. I still haven't tried mine yet.
-
Well I hope the paint job turned out to your high standards!!
-
Well then it's time to pull that front carb off. And don't worry about how the front piston is going up farther than the rear. As 240Znomad suggested above, it's cause and effect... The effect is the piston raising. The CAUSE is something else. You fix the cause and the effect will go away. And don't worry about the damper oil right now either. What you are using is completely fine for now. In fact, at steady state idle, you don't really need any oil at all. Just doesn't matter. I'm thinking that something within the carb itself is keeping that front throttle butterfly from closing completely. Bent plate, plate installed backwards, plate misaligned badly, complicated choke linkage on side of carb not put together correctly... Something like that.
-
Something else to try... Start the engine, and while it's high idling, reach under the actuation tab on the front carb and manually pull it up gently to see what happens? In other words, "help" the return spring by adding some more force in the direction that would close the front carb. And just to be double dog sure, did you ever pop the plastic ball off the linkage to guarantee there isn't something in the linkage holding the front carb open? If you pop that ball off and pulling up on the linkage for the front carb has no effect, then I agree that it's time to pull that front carb off. It really wouldn't take much of a throttle plate opening to get you to a 2500 RPM idle with no load.
-
Woo Hoo!!! Man, I would have been puckering the entire time! And I hope you were wearing a really good mask!!
-
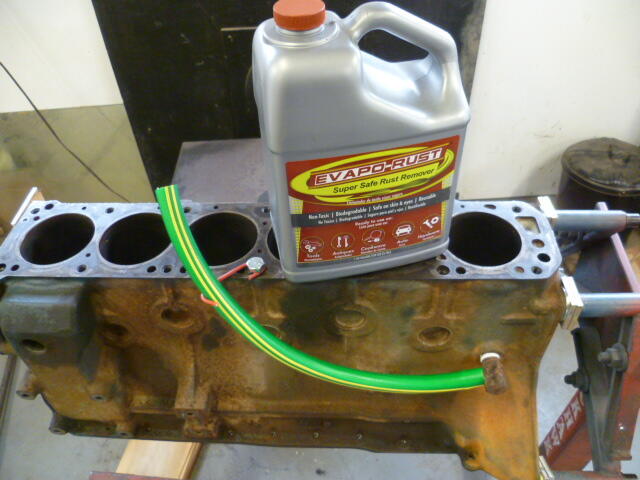
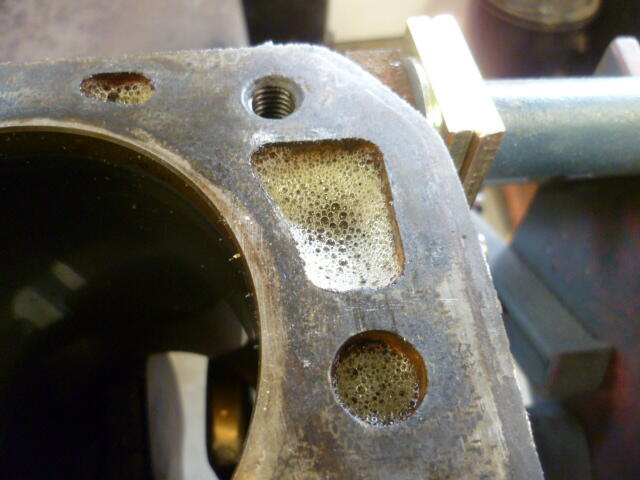
It turned out "just OK", for a number of reasons... First of all, evap-o-rust works better at warmer temperatures and I was doing this at the end of December in a wood stove heated shop. Because of that, the temperature of the block was cold. Like Pennsylvania December night cold. I had the wood stove cranking and had the air temperature in the shop up to a comfortable working temp, but that big chunk of cast iron was still pretty cold. Second, I would have liked to have left the evap-o-rust in there longer. Like overnight. But I was afraid that once the stove burned down, it would lose all effectiveness, and/or even freeze. So I had to limit the process to just a couple warm-ish hours. Third, we did two blocks and the first one we treated with phosphoric acid after the evap-o-rust and it turned out well, but boy did it stink. So I couldn't bring myself to do that a second time in a closed December shop, so the second block (mine) didn't get the phospho treatment. Bottom line.... I give mine a "5". I think if it were warmer and I left the evap-o-rust in there longer (24 hours) and then also treated it with phospho after, it would be an "8". Still not as good a hot tanking, but for a block that's not that bad to start with, I think it would suffice.
-
I am unfortunately not going to make this one either. It's just not in the cards.
-
And about your block rust: I've got the nipple on the side turned slightly downward to facilitate draining after the evap-o-rust had time to work. And you can see the piece of wire fashioned into a hook to hold the hose up until I'm ready to drain. Don't shake the shop!! Filled to the brim: I didn't take any pics of the water pump hole cover at the front, but it's bolted to the block to cover that hole that leads to the front cover. Doesn't have to be fancy. Just something to keep the liquid from leaking out that hole.
-
So I hope you actually counted the number of freeze plugs you needed and didn't simply rely on my memory. Because... Last time we were talking about those plugs in this thread: https://www.classiczcars.com/forums/topic/67591-p90a-head-f54-block-correct-head-gasket/ I had the numbers wrong... I have since found my bags of plugs and took a fresh look at the F54 block, and here are the correct numbers: The F54 block has a total of eleven freeze plugs: Nine 35 mm One 40 mm One 50 mm I bought (a quantity of two) Sealed Power part number 381-8027 sets off rockauto Jan 2020 Each set contains 1-50mm, 1-40mm & 7-35mm plugs and because of that, I had to buy two sets to get enough of the 35mm plugs.
-
Haha!! I've heard is said that it's one of my many endearing flaws.
-
Wow! How did I get to be this many years old and have never ever seen anything like that before. Ever.
-
Well then you haven't read many of the things I've written. Haha!! But regardless, it's clearly an experience issue here, not ability. You'll get it!