Namerow
Community Member
-
Joined
-
Last visited
Everything posted by Namerow
-
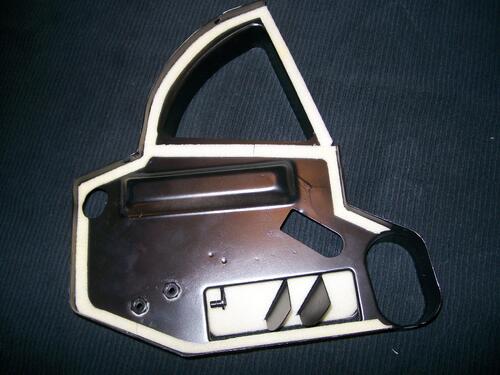
I don't recognize these two parts. What are they?
-
The coding system for the numerals makes sense. However, what is the purpose of the letter? For example, the coding for an engine block in my possession is '2329N'. The engine was removed from a Z produced in April 1972 (VIN 079701) and its number (101275) matches the number shown on the ID plate taken from the engine compartment. If I understand correctly, '2329' indicates 29-March-1972. But what does the 'N' mean?
-
Great stuff! We Canadian Z-car supporters have a special role in the car's history and it's reflected in these print materials. Can you maybe show us the full brochure? I like the slightly-modified side-view graphic of the Z. It looks slightly Cheetah-ish (terrible race car, great Cox slot car). BTW, I just noticed the dealer stamp on the brochure ('Terry Maher - Organ Datsun Limited - 2038 Dundas St. East, London, Ontario'). London is my hometown. I lived there until I finished my undergrad engineering studies at Western in 1972. I have zero recollection of a dealer called Organ Datsun. Which is not to say that they didn't exist. Instead, it points to how low-level the Datsun Canada dealer network was at the time when the Z was reaching (arguably) its pinnacle year in the international marketplace.
-
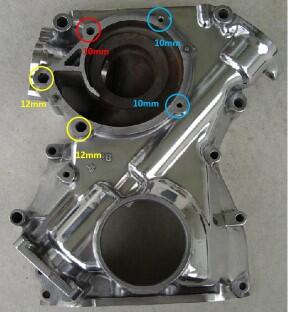
Recommend that you use an impact driver* to free up the bolts. To gain the required access, you'll need to drain the cooling system and remove the radiator. (* Do not use an electric or pneumatic impact driver. Use the good-old-fashioned, hammer-blow type. It may take a bit more time and effort, but it prevents overpowering the bolts. A high-torque power impact driver will snap those long bolts just as surely as you leaning on them too hard with a wrench.) Here's a picture of what you'll be working with. The numbers refer to the wrench size... x The pump is secured by a total of five bolts. Three of these also help to secure the Timing Cover to the front of the engine block. The small-head bolts at 1 o’clock and 4 o’clock are short and thread into the cover – M6 (10mm wrench) The large-head bolts at 7 o’clock and 9 o’clock are long and fat and thread into the block – M8 (12mm wrench) The small-head bolt at 11 o’clock is long and skinny and also threads into the block – M6 (10mm wrench) The long, skinny bolt @ 11 o'clock is usually the one that snaps off when removing or tightening. The rad, pulley, pump, and the timing cover will all have to come off to get the access needed to extract the remains. Removing and reinstalling the timing cover will open up the potential for oil leaks where it meets the oil pan. In other words, there's going to be a high price to pay if you snap off one of these water pump bolts. It doesn't need to happen... but it very well may if you try to rush the job and use too much tool and not enough caution.

-
Parts Manual shows that the PN changed as of Aug-1973. I wonder if this production date also marked the introduction of factory-installed air conditioning (as opposed to dealer-installed)? If hat was the case, the extra opening might have been added to provide a dedicated pass-through for AC-related lines and hoses.
-
Why was the fourth hole added on the left side?
-
The mainstream Canadian automotive 'industry' has always been premised on business activities restricted to 'sales, service and marketing' (SSM). Canada-based manufacturing activities, where they apply (ref. GM, Ford, Chrysler, Honda, and Toyota), are operated as separate corporations with separate management. The 'GM Canada' that we all know is actually an SSM-only operation, incorporated as 'General Motors Canada Limited'. The manufacturing operations in Oshawa (vehicle), Ingersoll (vehicle) and St. Catharines (powertrain) are controlled by a division of the General Motors Corporation parent in the US. I'm pretty sure that the same split-business model is used by Ford, Toyota and Honda for their Canada-based operations. The OEM's who don't have Canada-based manufacturing operations (e.g. Nissan) operate here strictly as SSM businesses. SSM activities include such things as determining which models, trim levels, and option packages will be offered for sale in Canada, as well as the equipment list and pricing for each of those trim levels and option packages. That pricing activity also includes setting the amount for the 'delivery' charge. SSM also: Controls dealer liaison (the dealers are independent businesspeople who hold sales/service franchises with the OEM) and set and monitor dealer performance standards (e.g. mandatory signage standards). Develops the marketing program for each of the vehicle lines on offer. That includes developing (c/o outsourcing to major communications companies like McLaren and Cossette) all of the print and electronic materials used to support the marketing, sales and distribution of the vehicles. Those materials include unique-Canada items such as TV/ online advertising, print ads, dealer showroom materials (brochures, etc), and (in most cases) the owner manuals that are provided with each vehicle. That said, the owners manuals and warranty booklets for the Z were printed in Japan up until at least the 1972 models AFAIK there are, and always have been, only two versions of these Canadian marketing/sales-support materials: the English version and the French version. However, since the advent of the internet (and certain federally-mandated requirements for the way the OEM's are permitted to display pricing), each manufacturer's Canadian website requires the user to declare their province of residence before it will display any pricing. This permits province-to-province differences for PST and delivery to be factored into the 'all-in' price. Back in the day, I think that the Canadian Datsun SSM activities were initially based in BC (New Westminster?), before transferring to Toronto. It would be interesting to know if that early 1969-70 Z brochure was made available in both English and French versions. It would also be interesting to know whether there was ever a French-language version of the Z owners manual.
-
Interesting question. I decided to turn AI loose to get an answer. Here's what I found: The Monroney sticker, also known as the window sticker, is a label required in the United States to be displayed in all new automobiles. It includes certain official information about the car, such as pricing, equipment, and fuel economy details1. But why didn’t Canada adopt a similar sticker system? Let’s explore: Historical Context: In 1955, Senator Almer Stillwell “Mike” Monroney chaired a subcommittee that investigated complaints from U.S. car dealerships about abusive treatment by manufacturers. Dealers could inflate the manufacturer’s suggested retail price, leaving buyers unaware of the actual cost and options1. To address this, Monroney sponsored the Automobile Information Disclosure Act of 1958, which mandated information disclosure for all new automobiles sold in the U.S. This act required the Monroney sticker to be displayed on new cars1. Canada’s Approach: Canada did not adopt the Monroney sticker system for several reasons: Regulatory Differences: Canada has its own regulatory framework for vehicle informationdisclosure. Instead of a single standardized sticker, Canadian provinces and territories have their own requirements for vehicle information, including pricing and safety features. Market Size: The Canadian automotive market is smaller than the U.S., which may have influenced the decision not to implement a nationwide sticker system. Industry Practices: Canadian dealerships and manufacturers may have relied on other methods to provide information to consumers, such as brochures, websites, and sales representatives. Consumer Awareness: Canadian consumers may have been more familiar with alternative sources of information, reducing the need for a standardized sticker. Canadian Vehicle Information: While Canada doesn’t have a Monroney sticker, pre-owned vehicles must have a Buyers Guide sticker as mandated by the Used Car Rule of the Federal Trade Commission. This decal informs buyers about warranties or indicates that the pre-owned car is being sold "as is". So: It looks, to me, like another example of how Canada and its bush league politicians have dropped the ball for decades as they've skirmished over inter-provincial trade issues. As Canadian citizens, we all end up as losers because of this (continuing) parochialism. It's possible that some of the provinces may have (or have had) a window-sticker rule in place -- but I doubt it. I worked for GM Canada CHQ (Canada Headquarters) from 2004 - 2010 as a product training specialist. I don't recall ever having to deal with window stickers for any of the new-stock vehicles that we used for dealer training programs carried out across the country. Prior to that, I worked for about ten years in a similar role in the USA for GM and Mercedes-Benz and the new-stock production vehicles used for training purposes always came with a Munroney sticker.
-
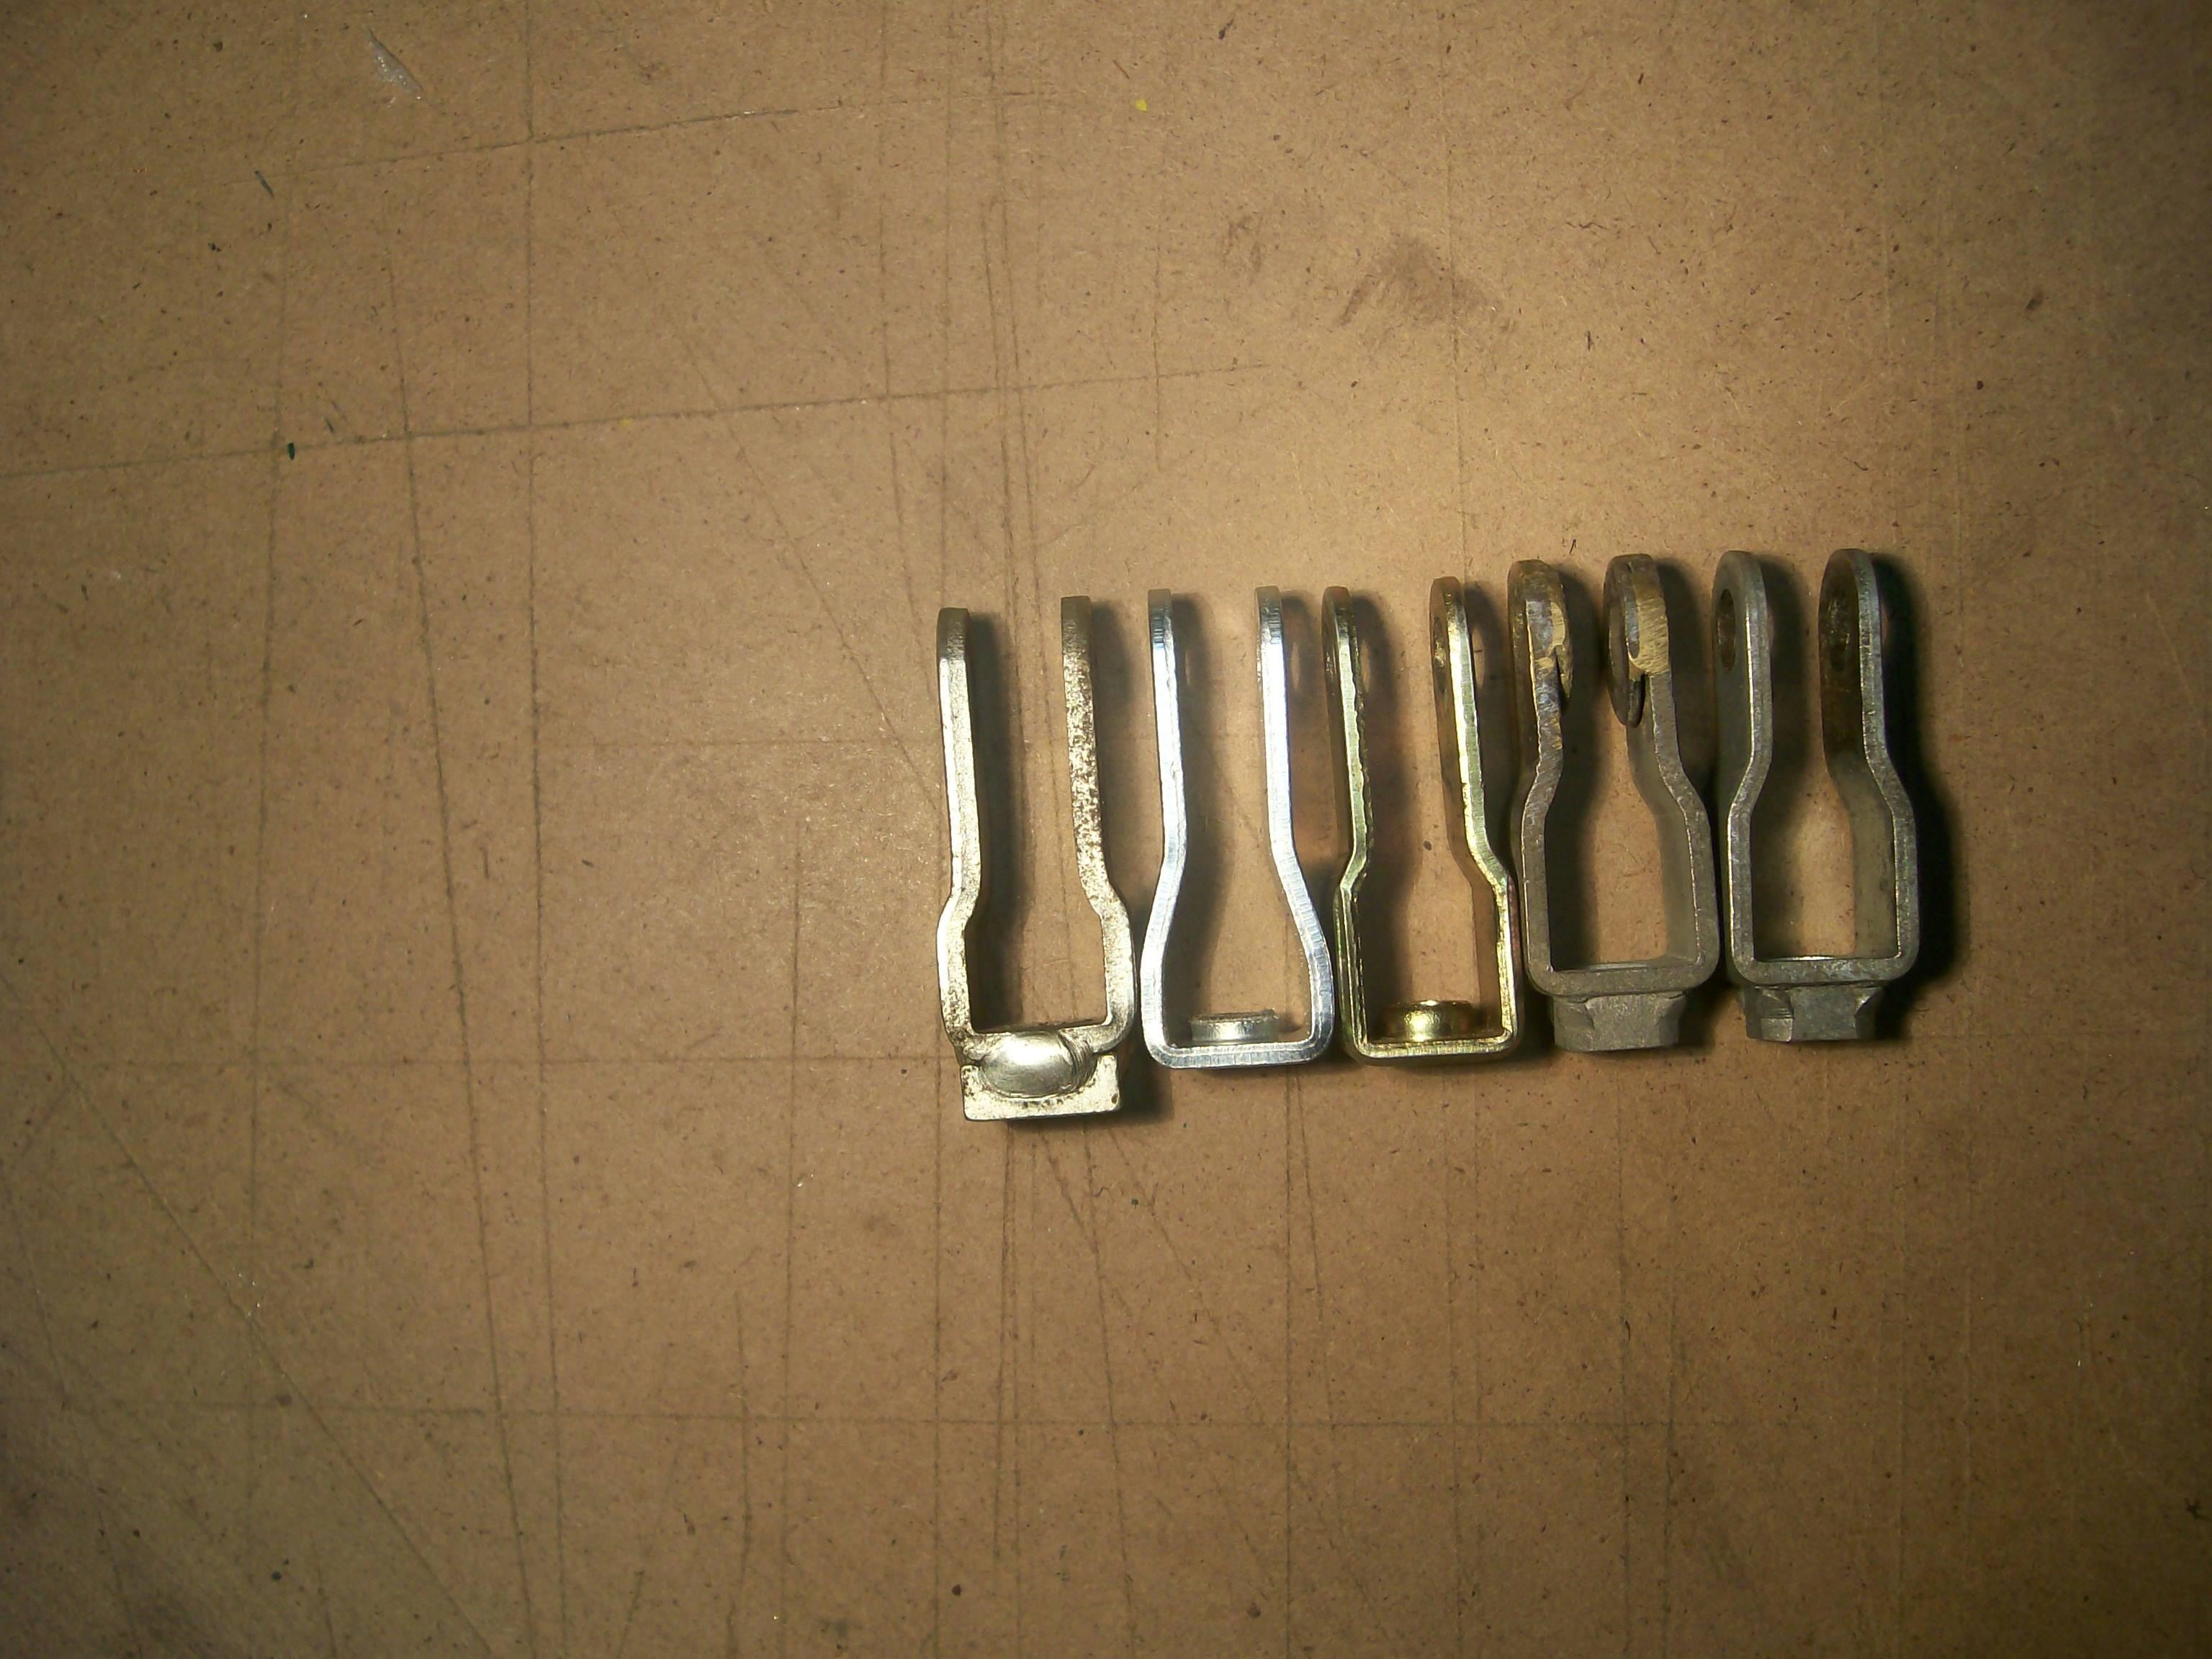
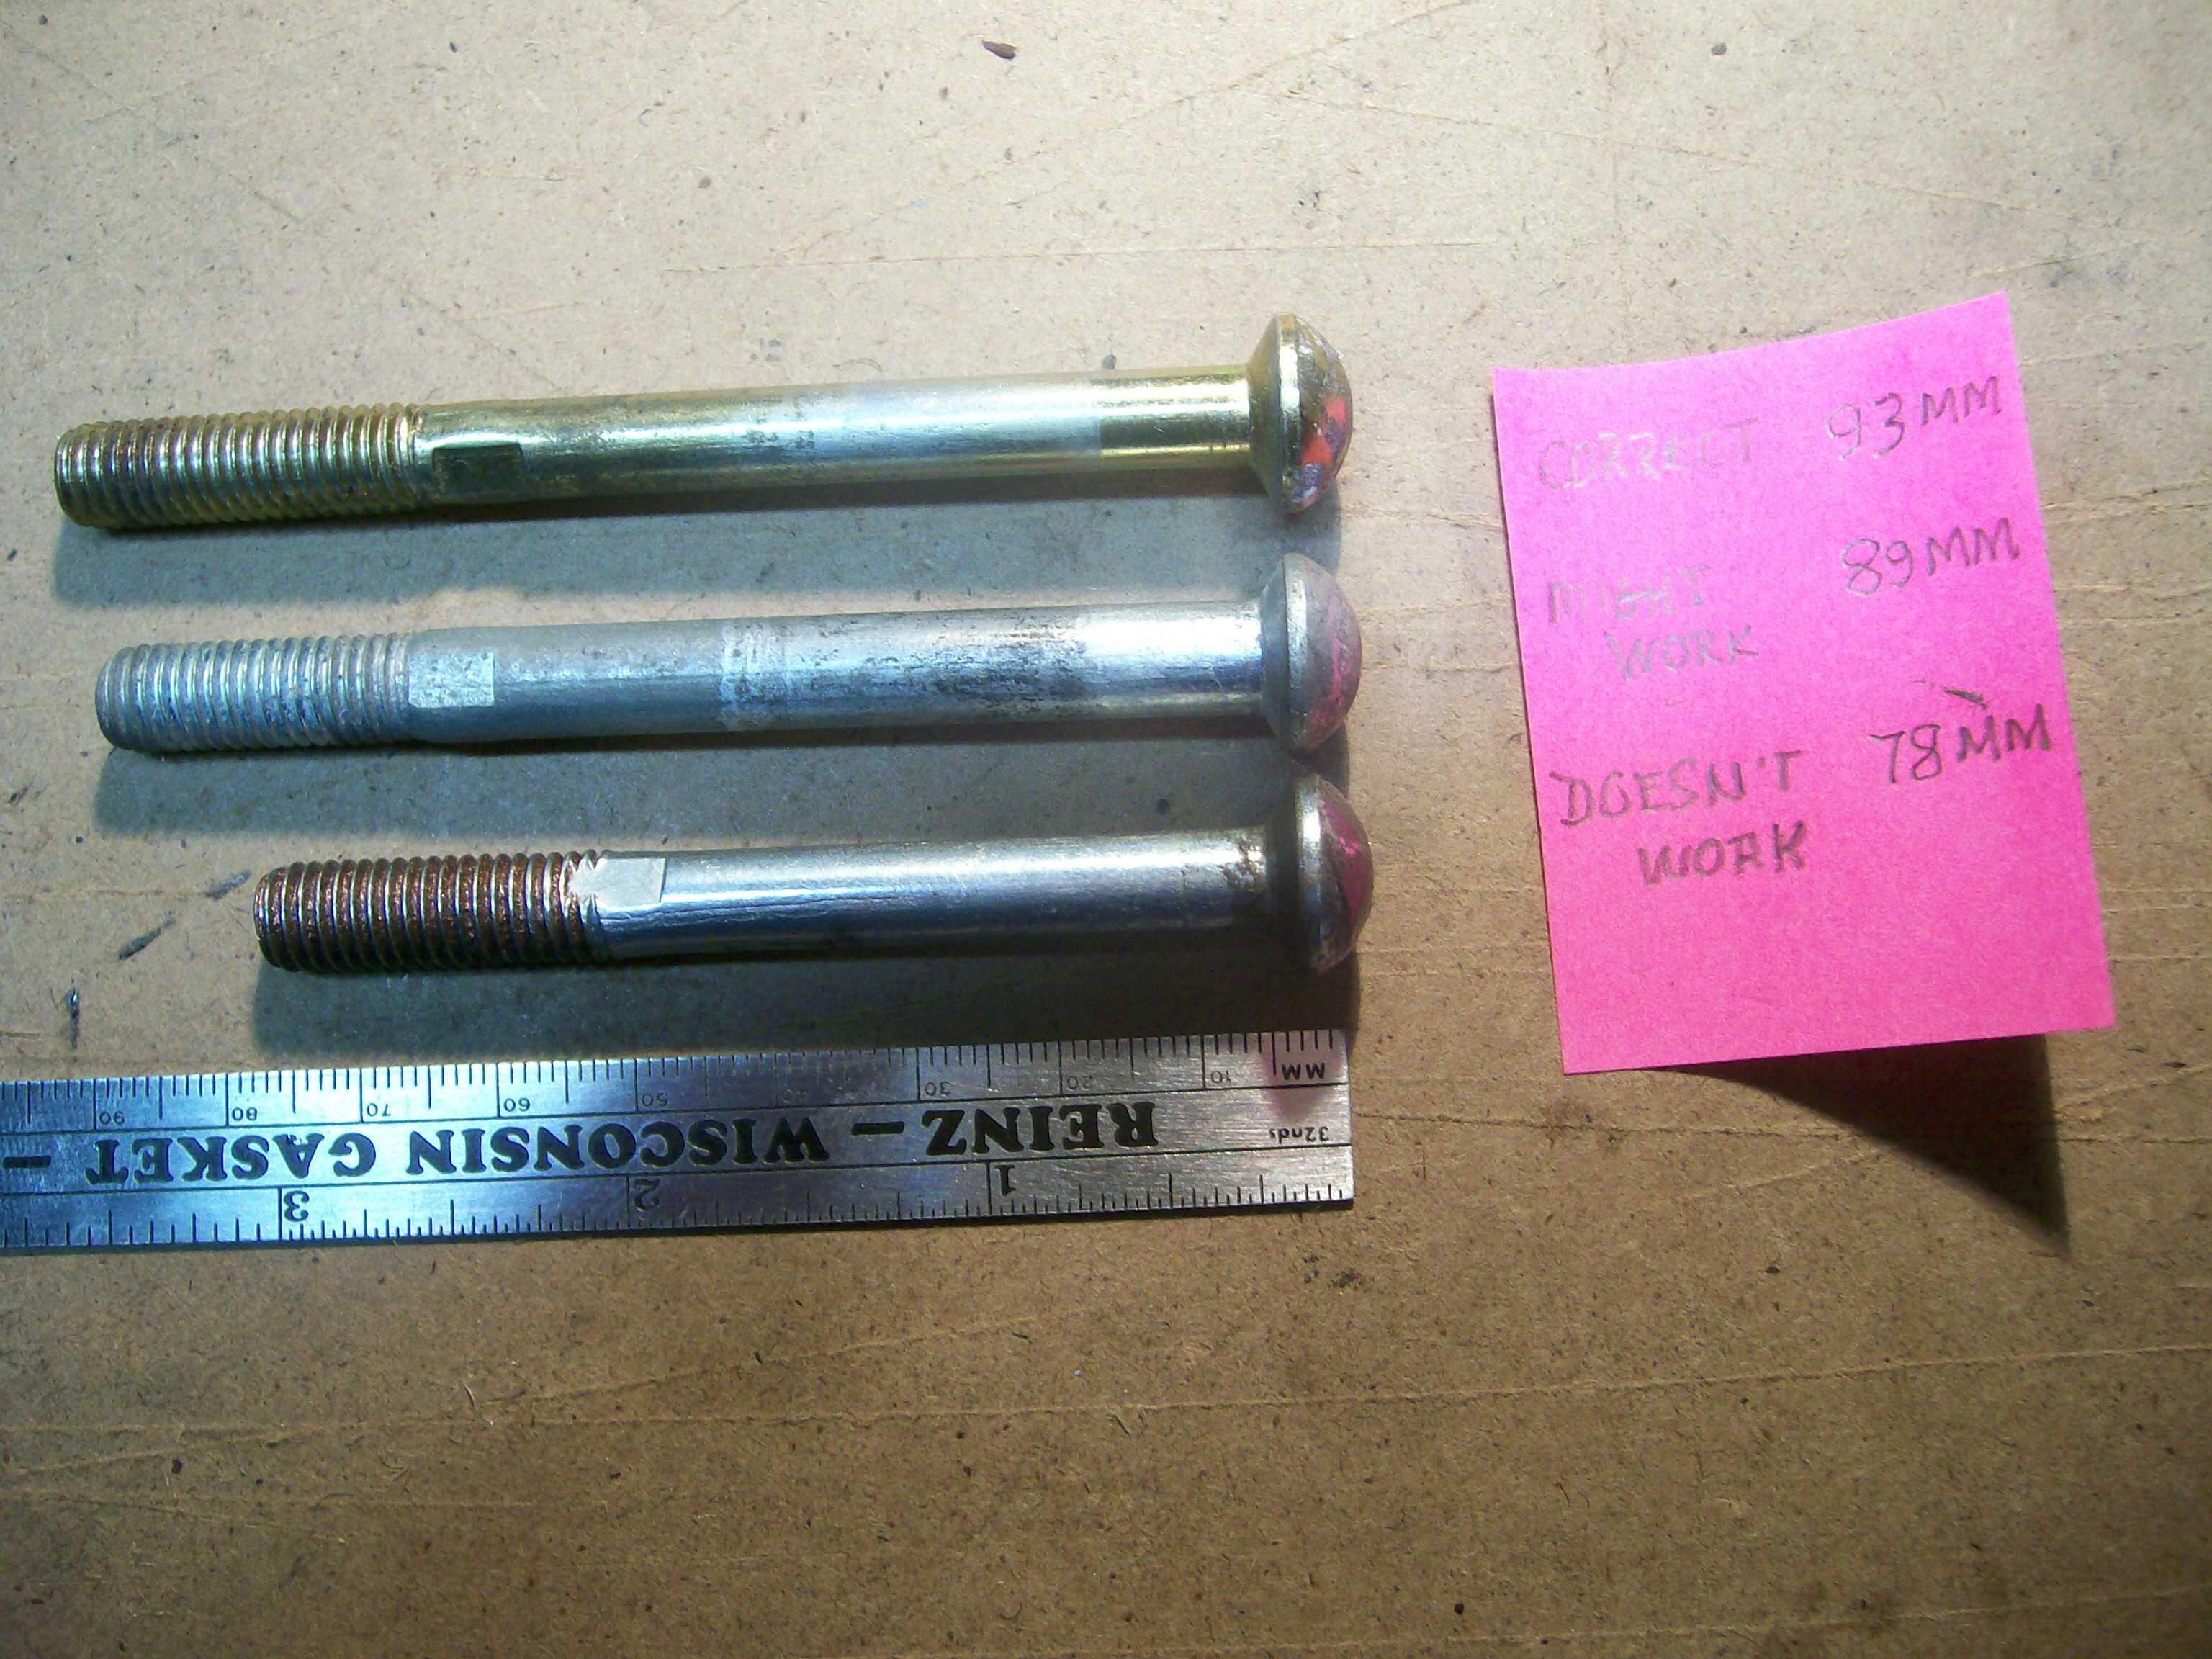
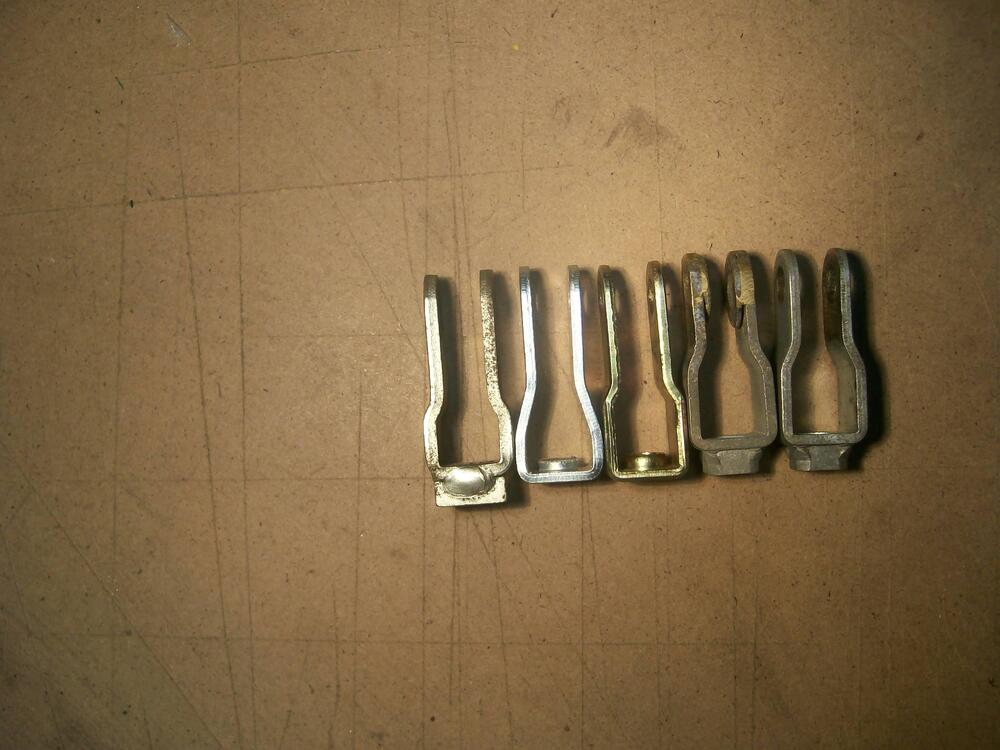
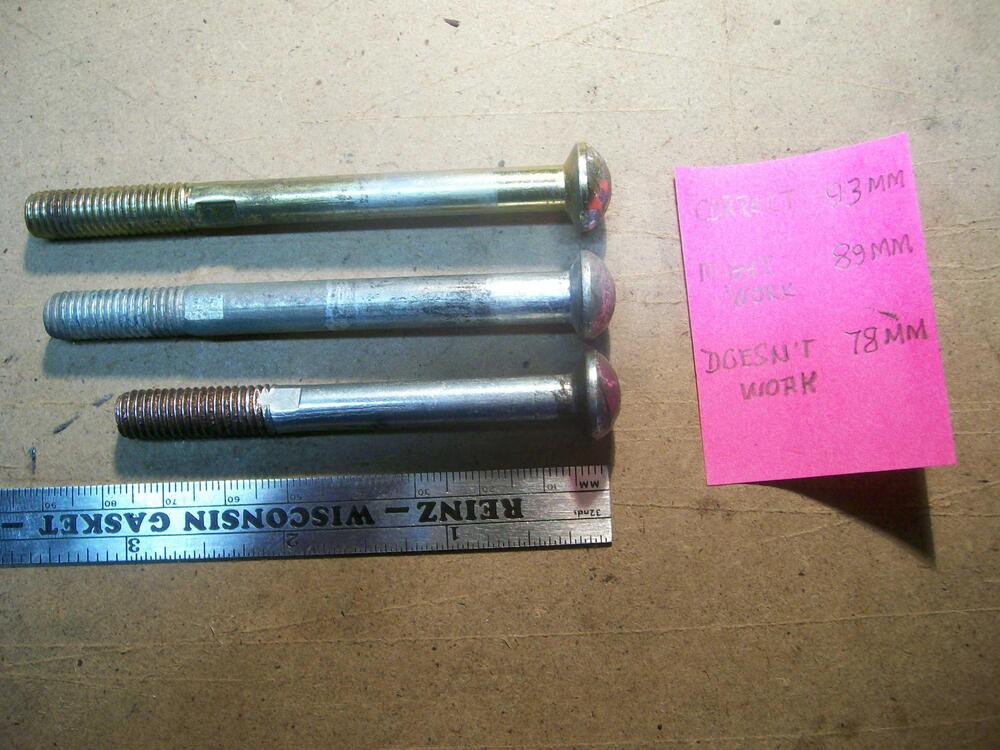
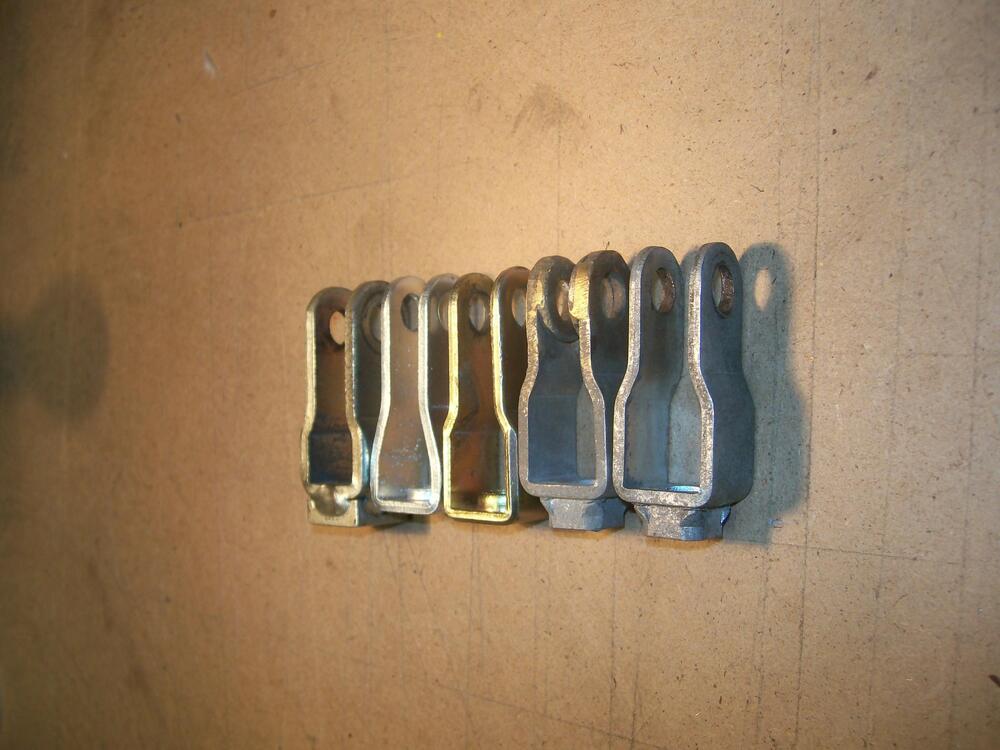
These three photos may provide some additional insights... although they may just add to the confusion. I have four master cylinders and two Mastervacs in my parts collection. I've discovered that these have provided me with three different pushrod designs and three different clevis designs (although I can't say for certain whether they're all Nissan OE parts). Mixing them up creates the potential for 9 different geometries...
-
That's a nice-looking car. Like the wheels. Your leather seat covers with the contrasting stitching help to liven up the interior 🙂.
-
Work is coming along nicely. Just noticed your Volvo Hatch in the driveway. I always liked these -- except for the Interior (the word 'plain' doesn't do it justice).
-
 This set of .pdf files can be used to print full-size templates for all of the various foam gaskets used in the 240Z Series 1 Heater and Blower assemblies. These are a companion piece to my separate article on rebuilding the Heater and Blower. The article provides recommendations for the types of materials that should be used to create the various gaskets.Free
 -
Looking at Photos #1 - #3, it appears that part of the shop's technique for the floor pan replacement was to first cut away a 'skirt' from the transmission tunnel and then, working off the vehicle, fit and weld that to the KFV panel before installing the finished result in the car. I suppose that would give a perfectly-shaped welding seam along the top of the 'skirt', but I wonder how they judged the alignment of the skirt relative to the KFV panel before joining the two pieces during the off-vehicle procedure (similar to what seems to be going on in Photo #1)?
-
Interesting photo, to say the least!
-
I'm going to speculate that these little 'dents' were used as master positioning markers. If so, were they created to guide the panel-stamping/forming process? Or, instead, were they used to guide and/or check the positioning of the stampings in their jig prior to welding? The latter seems more likely. One wonders, then, what prompted the change in orientation of the dent in the rear floor deck stamping after less than 100 units had been assembled. Perhaps the performance of the assembly jig in its original design iteration wasn't delivering adequate results, making this small-but-important change necessary before the production process ramped up to full speed.
-
Are these 'door lights' the ones that appear in the Parts Manual (Electrical - Step Lamp and Map Lamp) as PN 26420-E4100 ?
-
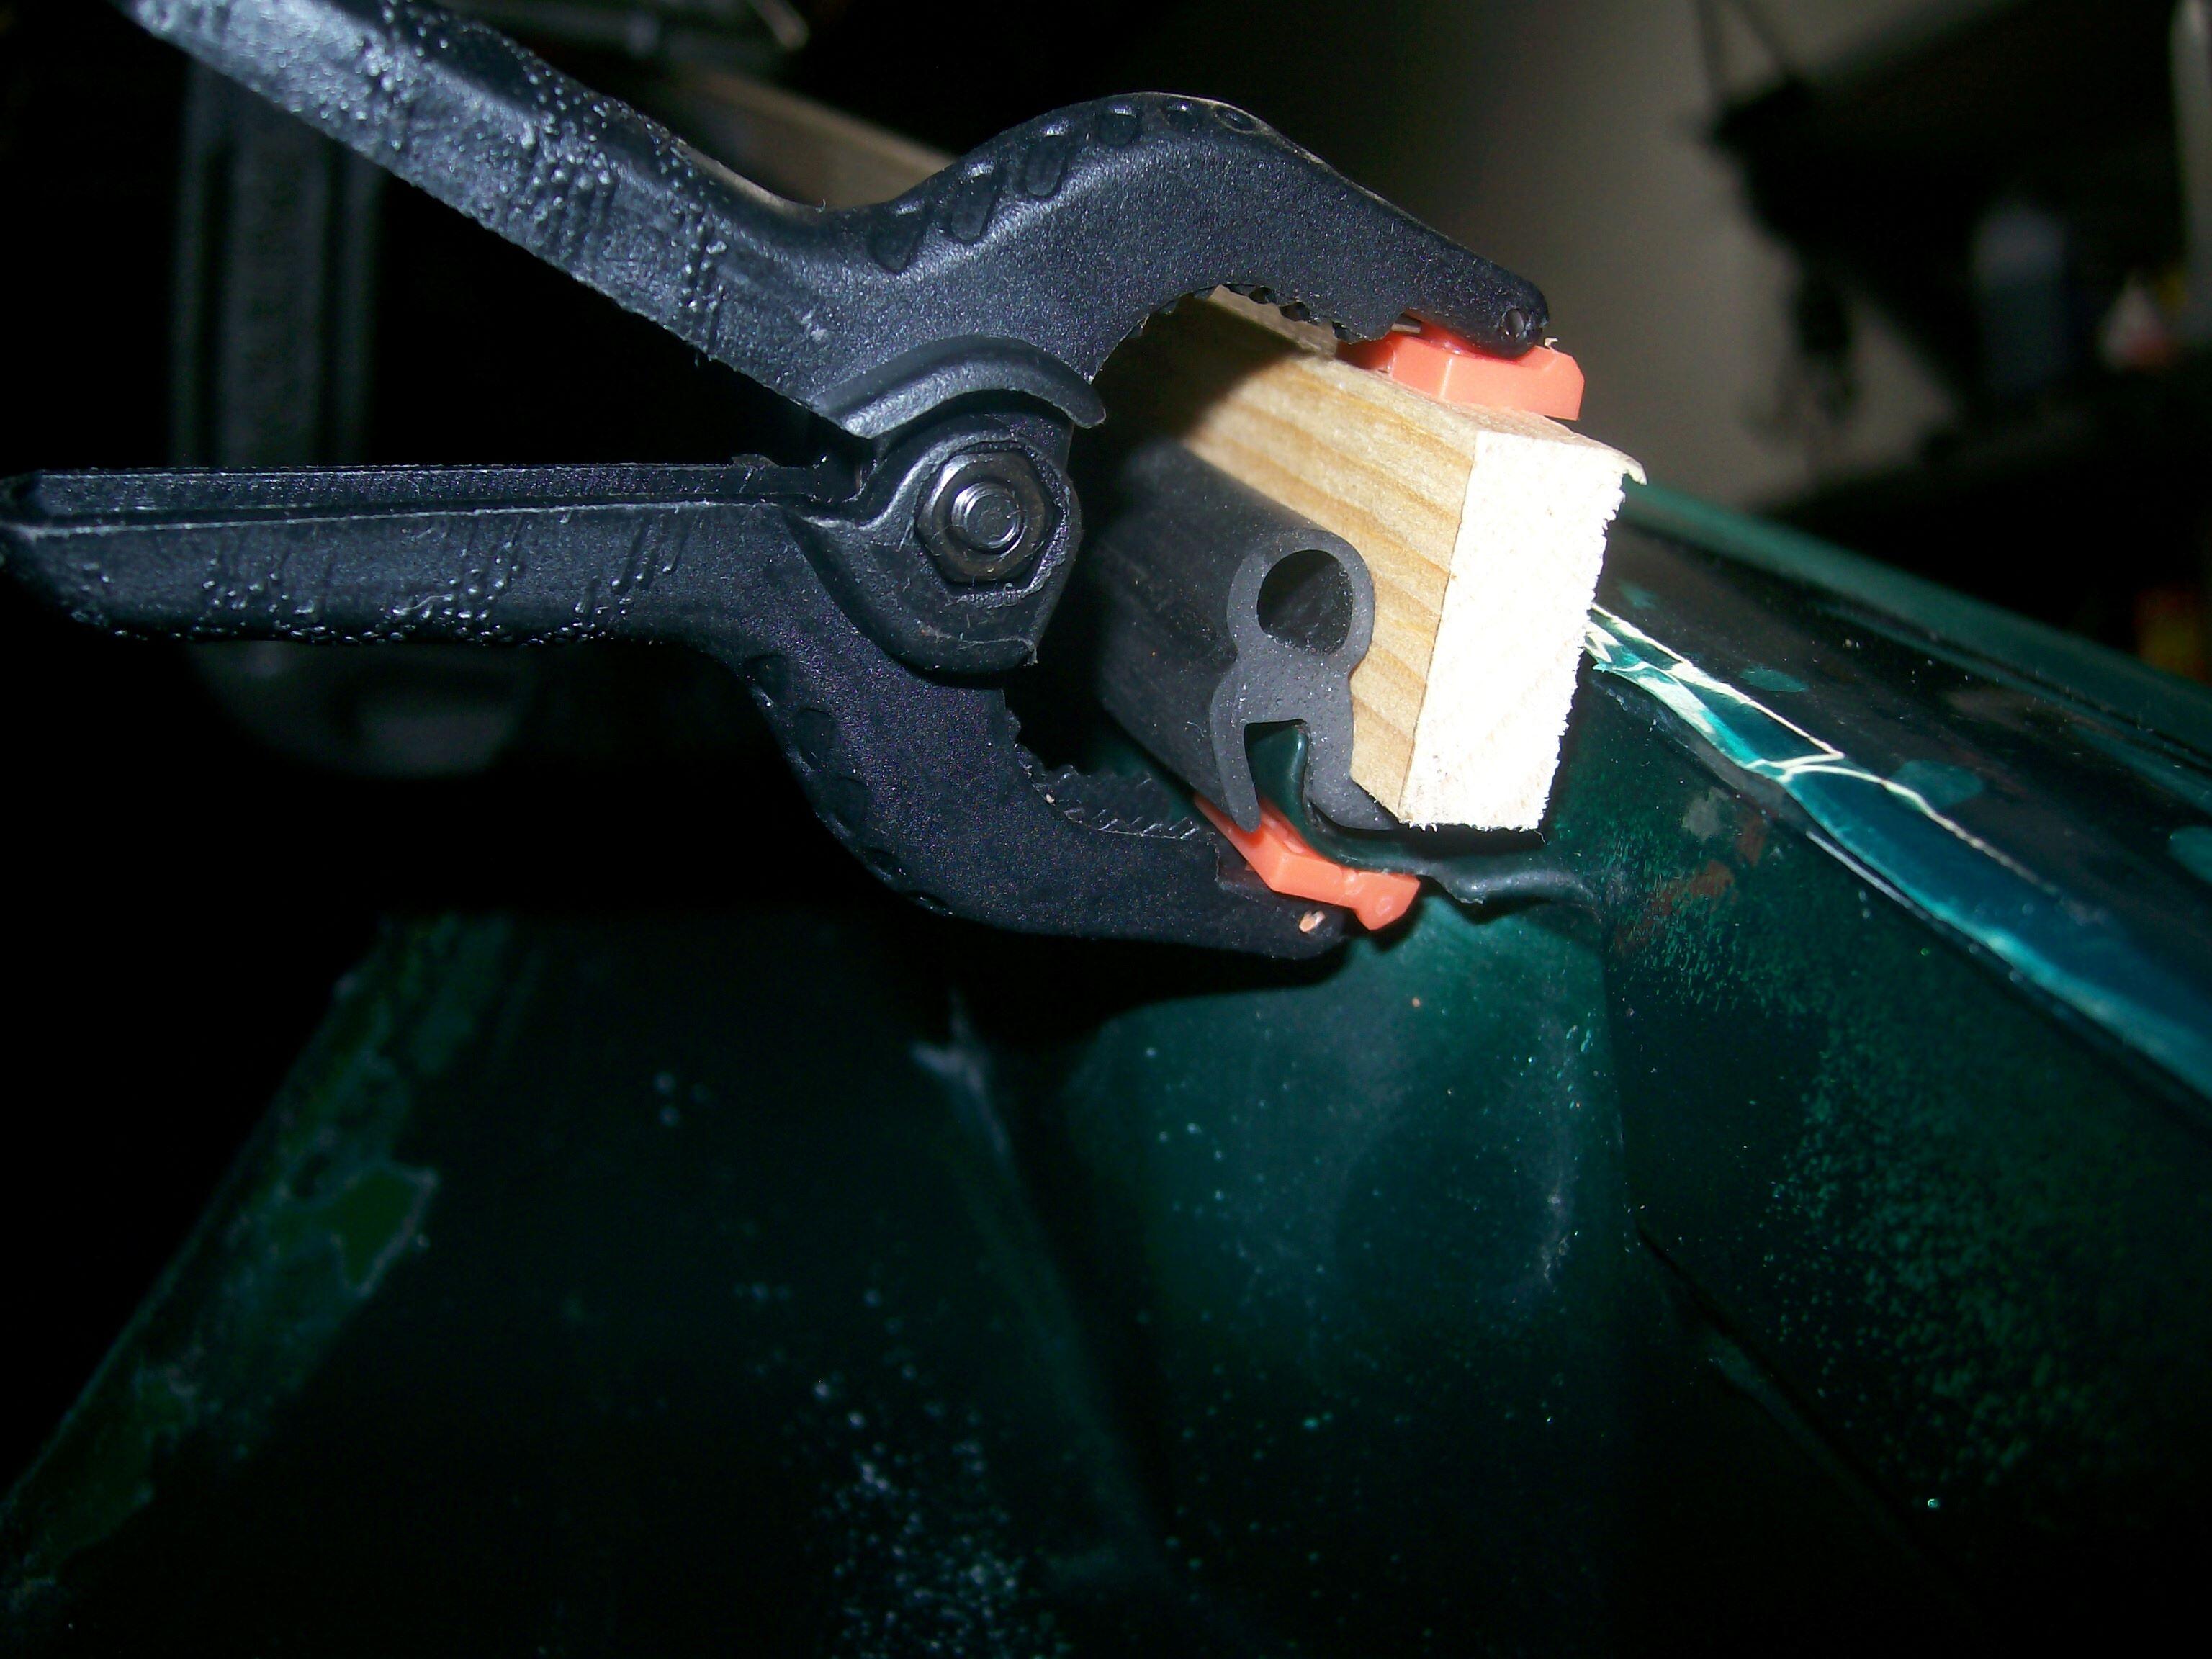
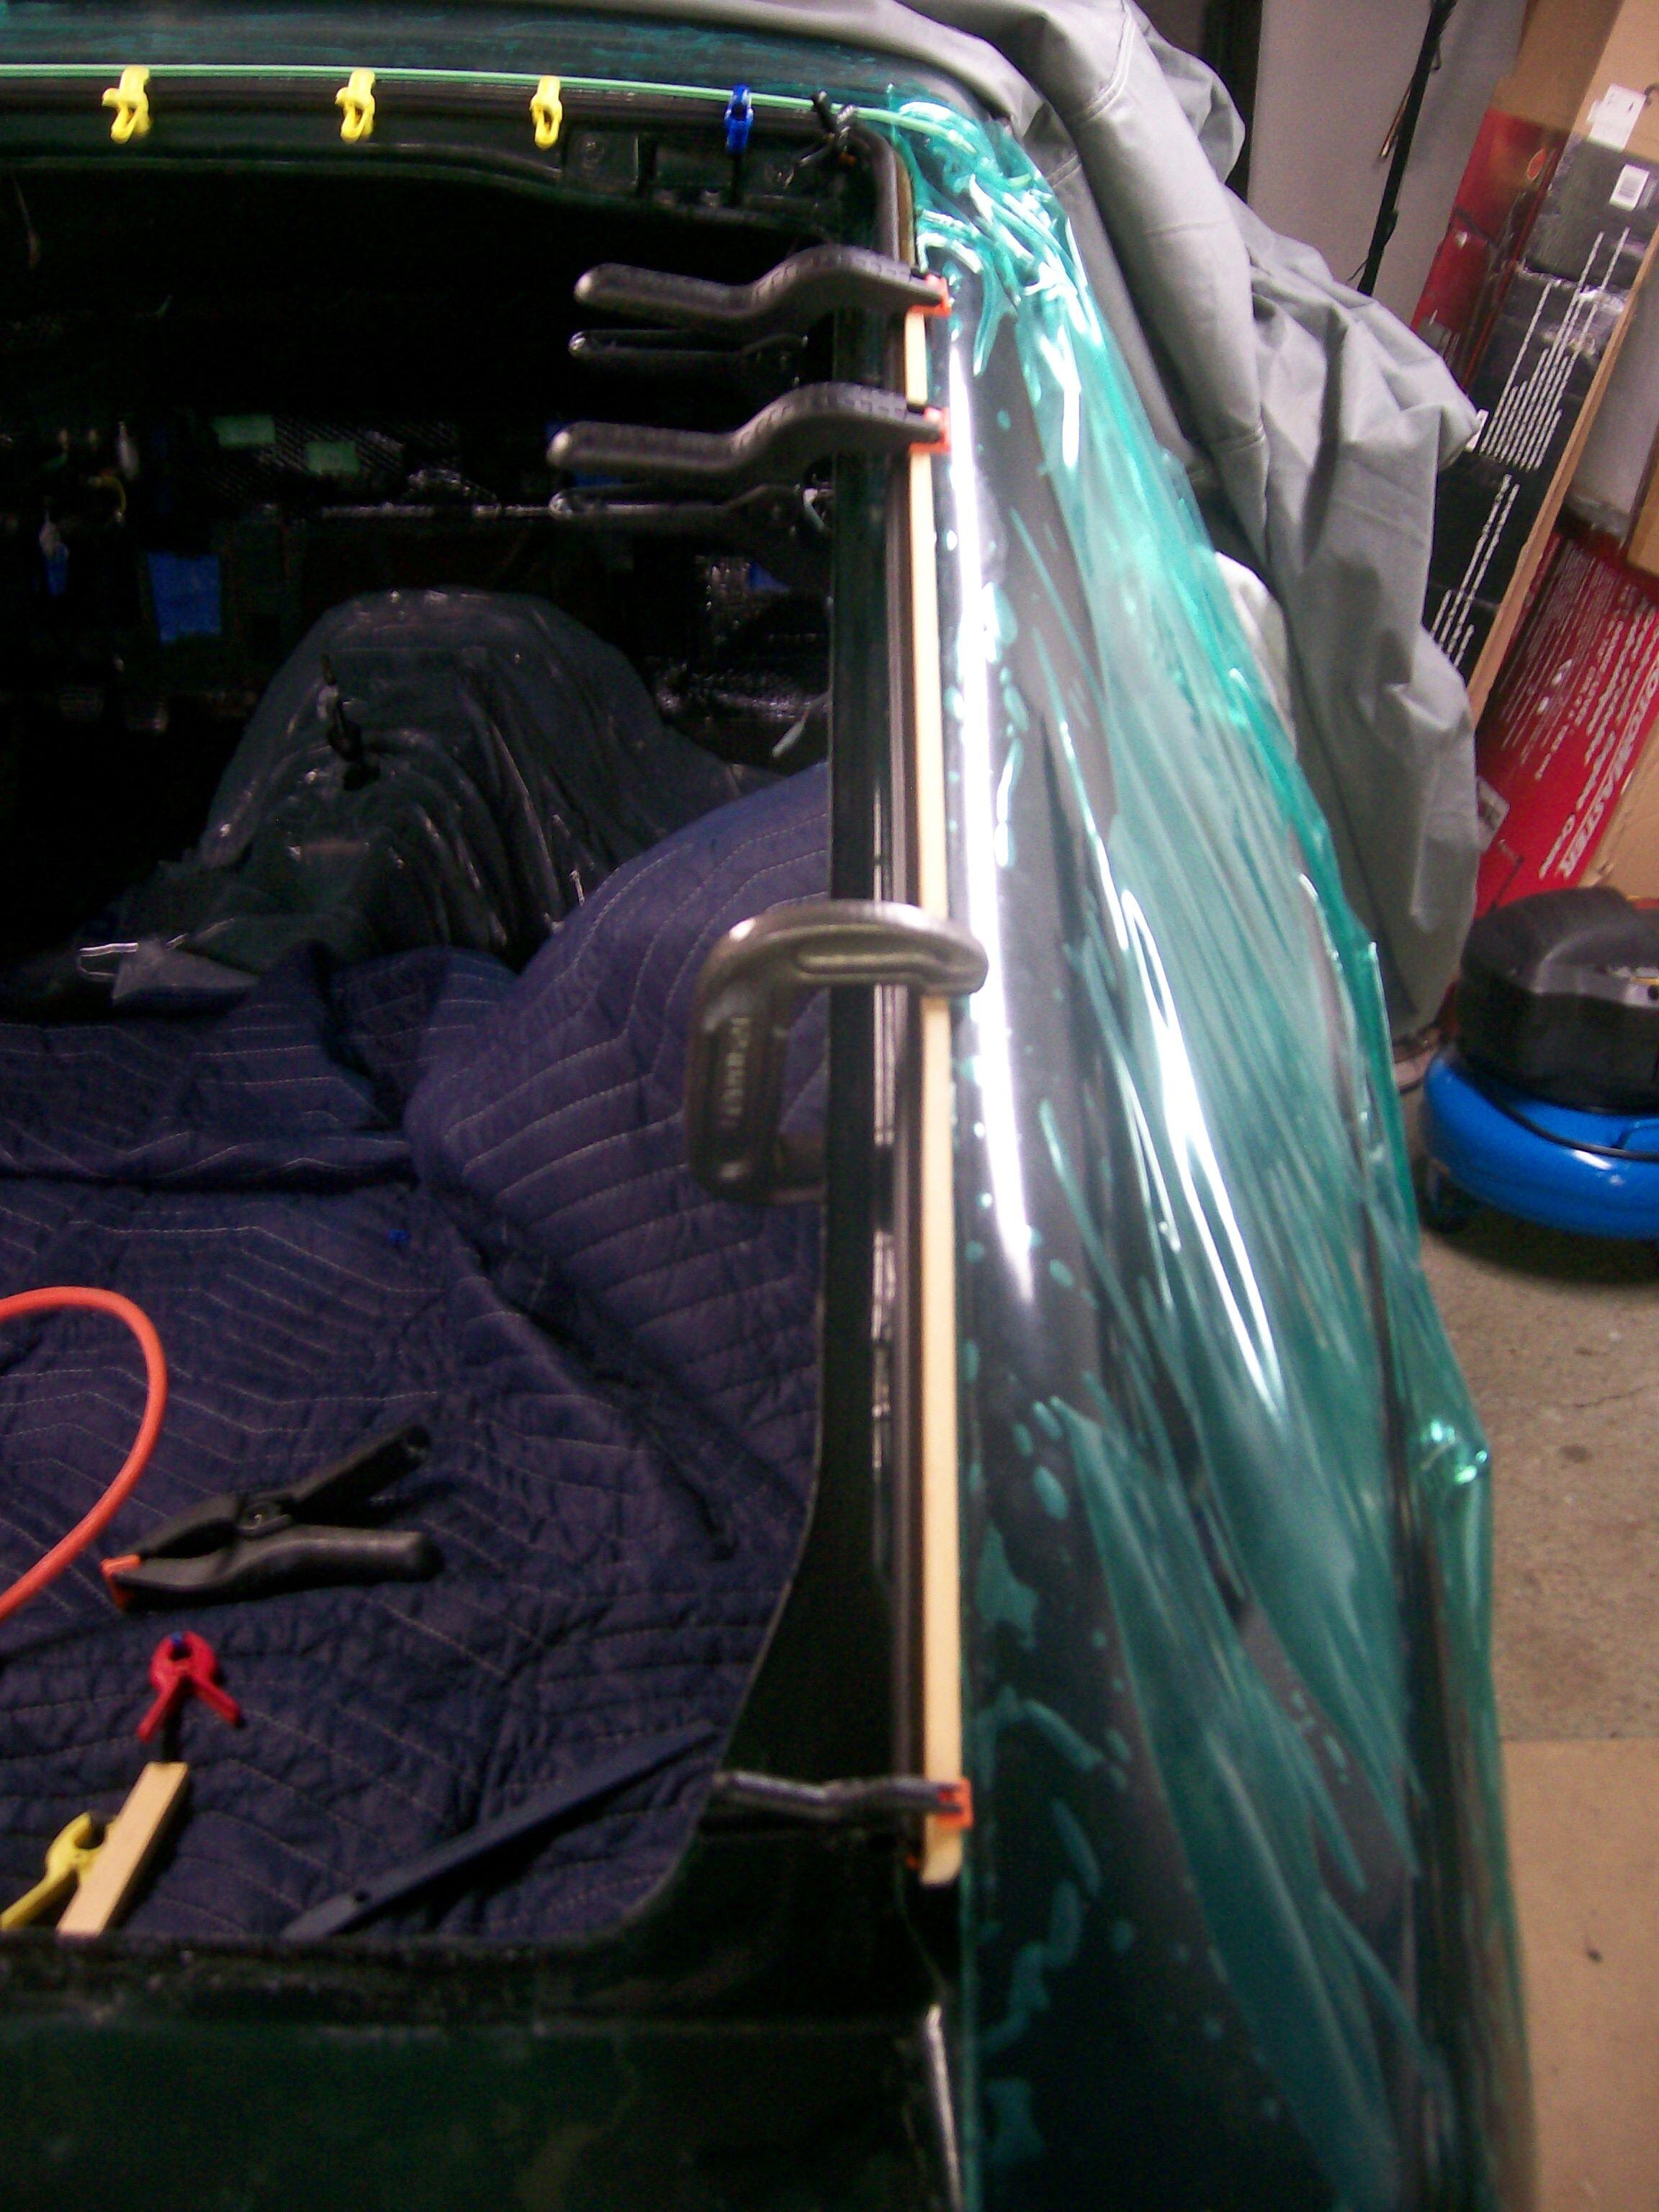
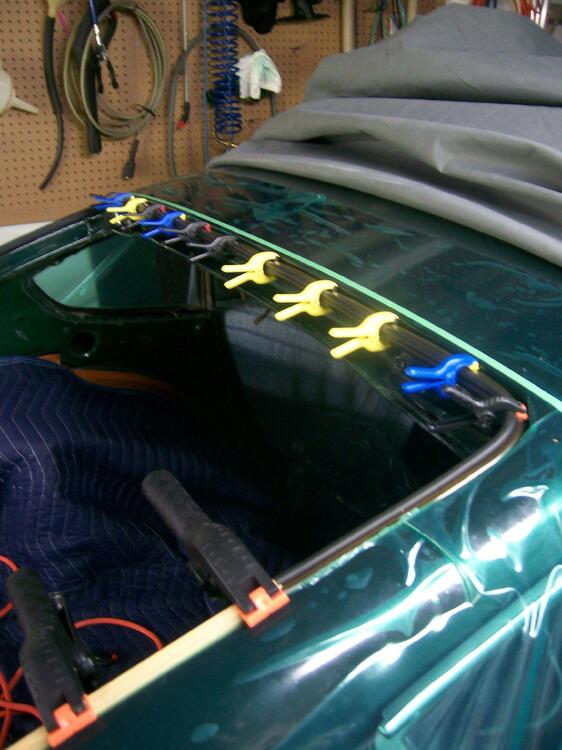
Here are three photos from my installation. A length of 1 x 2 clamped along the side channel helps to distribute the clamping force. The plastic pinch clamps are cheap and worked nicely.


-
There's lots of discussion and photos available on this site concerning the Z's early and late hinge designs. The early design was a little crude (articulating 'leaves' or 'blades', with a spring that supplied a bit of resistance when closing the door) and lacked any type of provision for stabilizing the door in a partly-open position. More critically, the leaves could go over-centre if the door was forcefully thrown open by a gust of wind (I believe that the spring would pop out in the process, too). Once this happens, there's no convenient way to get the leaves to reverse back over centre. Any attempts at strong-arming the door to get it closed again would bend the leaves. The later hinge design works pretty well, although lack of maintenance (lubrication) will cause the roller pin to wear out prematurely. There's a thread here on the site that details the rebuilding process for the later-style hinges.
-
Nice photo. Boy in the front is making engine noises, right?
-
You say, 'also'. Were the 4 captive fasteners installed only on cars fitted with automatic transmissions? And the doubler panel as well?
-
It's possible that it was left there so that it could be bent back into place and welded/finished so as to return the car to 'stock' configuration at some point in the future. Or maybe it was just laziness.
-
Nice photo essay. Well done. If you or anyone else has the opportunity, a similar presentation for the rocker panel area would be a great assist for other restorers.
-
Good question. Perhaps they're used to secure the special finisher plate used on cars with the automatic transmission? The cutback in the tunnel sheet metal was a common solution for those who installed 5-speeds. As it stands, you may find that your knuckles come close to colliding with the dash trim when you select 1st, 3rd, or 5th gear. One solution is to fabricate a modified shift lever with a 'S' bend down low so that the upper part of the lever is moved about an inch to the rear. This will also allow the sift lever to better align with the outer shift boot. The 'extra' plate is, I believe, just a doubler sheet, used to provide a little extra stiffness for this region of the transmission tunnel (otherwise weakened by the cutout for the shift lever).
-
I did. The originals, although intact, were stiff and discoloured. I found some clear vinyl sheet of suitable thickness and made new ones, using the old protectors as templates.

-
Correct. And just confirmed c/o Parts Manual, which shows distinct PN's for the LH and RH 'slide assembly with lever'. These are mirror images of one another, such that the lever's shaft runs along the inboard length of each seat and the lever arm points outboard on both (makes it convenient to operate for right-handed drivers of LHD cars, but not so good for left-handers like me).