


Zed Head
Free Member
-
Joined
-
Last visited
Everything posted by Zed Head
-
 The illustrations in the Service Manual are very good. Is it yours or your buddy's? http://www.classiczcars.com/files/category/9-factory-service-manuals/
 -
I think that the E88 is the head that people sometimes put the bigger valves in. So that's an unknown. But you definitely need the flow to match the displacement. Fresh air is the limiting factor for power. I was trying to point out that the manifold is just the start of the exhaust system. The two mufflers after it and the pipes can hinder exhaust flow. John Coffey often posted about how the exhaust system after the manifold was the most significant improvement for performance. It's the first modification for power. And the 240Z system is smaller, I believe, in diameter,at certain points, than the 280Z system. And your engine is bigger than a 280Z's. From what little I know about the Unilite system, yes, .044" is to big. It was one of the first electronic systems but not a "high energy" system. Probably about like a 1976 factory electronic ignition system, which is at 0.28 to 0.031". Even the later Nissan systems spec. at 0.039 to 0.043" gap. The second two are easy to get into, take a measurement on the pipes, check the ignition system part numbers and ballast. The head will be harder to figure out.
-
You won't lose power due to gearing, just acceleration from a dead stop or very low speed. One thing that jumps out in your list is a cylinder head designed for 2.4 liters on a 2.9 liter engine. That's going to choke air flow and limit the potential. Another might be the exhaust system, after the manifold. Muffler and pre-muffler. They can choke power also. Finally, maybe inconsequential, but I don't think that Mallory Unilite is designed for .044" gap. Might be getting some missing while under power. Especially if you still are using the ballast resistor. Patcon has replied while I was writing but I'm going to post anyway.
-
And so begins a new adventure, guaranteed to frustrate yet entertain over the next few years...
-
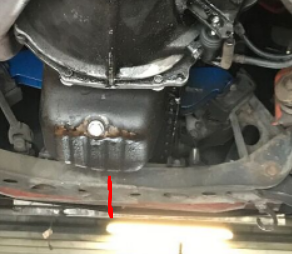
Nothing says that the casting line has to be centered! The drain plug isn't. One of the other pictures shows though that the bottom of the pan is level with the car which is right. So, just an odd angle seems to be why the first one looked weird to me. So the pan has uneven side lengths so it rides level and the drain plug is centered in the pan but not to the car. Just haven't been under my car in so long I forgot what it all looked like.

-
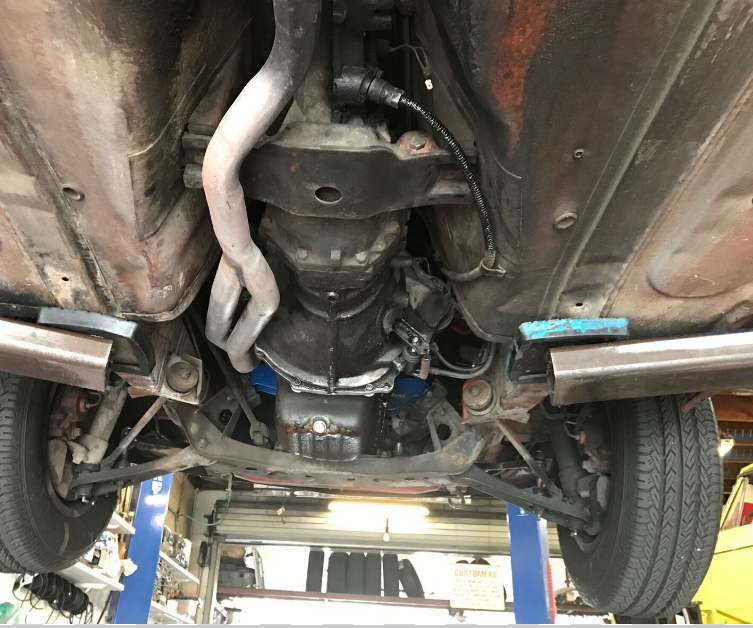
Just gabbing... The car looks very solid. The dinged up floor reinforcements, aka rails, look amazingly rust free. Even the little weep holes look like they might still have original paint on the edges.
-
Probably normal. I know that the engine is tilted. Just never noticed how far off the oil pan was from center. Look at the middle of the crossmember. I tried to find the car on the California CL's but couldn't. Wonder if he bought it yet.
-
That's a good point. Is it my imagination or does the engine seem a bit tilted? The drain plug is offset. Maybe that's normal. I can't find any similar images to compare to.
-
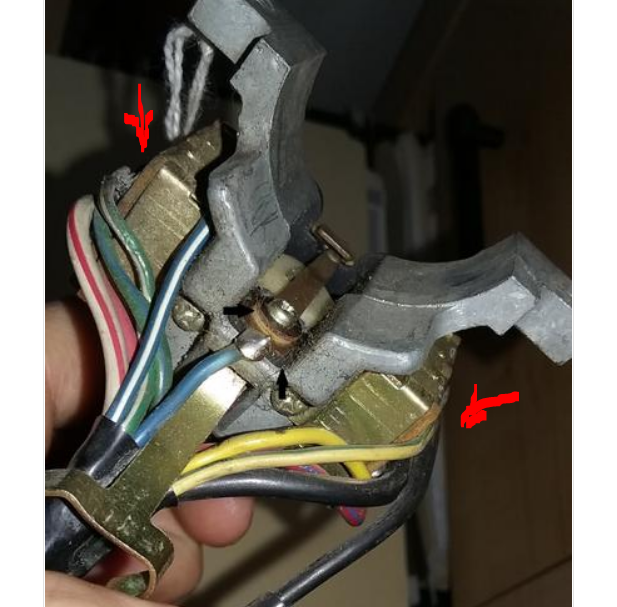
That sounds like you have a short circuit in one of the switches on the combination assembly. The whole thing is designed to bolt to the metal of the column, lots of metal to ground contact. You can bend the metal tabs back that hold the little pieces of fiber board and open the switches. You might find something shorted inside. You can also bolt the assembly on the column with the wires disconnected then see which switch causes the short by plugging them in before taking one apart. Check the wires too and make sure they haven't worn through or been pinched.
-
That is much better. Now I feel like there's a starting point, with the list of places to get a license. I got 404 errors on all of the club links though. I'm just one guy. Who complains a lot. So you might wait for a few more opinions. I meant "no offense" about the "just" part. Good luck.
-
On the home page you talk about "our team" and "our cars" and then say that vintage racing is a hobby that allows people to "hop in the driver's seat". At the bottom of the page, it says that you have to get a license from one of many organizations, but when I click Learn More there's nothing there about the other organizations. "Get your license Vintage racing organizations offer their own racing schools and accept licenses from other schools across the country." It looks like, no offense, you're just a race-prep, transport, and restoration shop for old cars. I assume that you store them also? There's a local guy around here who does that for Porsche owners. He has a shop full of Porsches and he gets them ready and transports them to the tracks, around the country, so the owners can drive them. Is that what you guys do? I think that the "Vintage Racing" branding is a little confusing. I'm not sure it's really a "thing". Seriously, are you guys trying to create a brand? Okay, I just did a Google and it looks like it started as a regional thing, in the Southeast. https://svra.com/about-us/ Looks like a small regional club thing that you're trying to make bigger. Good luck. I guess my point is that there are probably a lot of people who have no idea what it is or where it came from.
-
rturbo suggested that there weren't enough 240Z's left to be cutting a good one up. Original and complete. He's just thinking about somebody butchering a 240Z. But, still, the OP hasn't really said much about his plans. He just wants a cool car that he can drive while he works on it, apparently. But he probably wants it to look nice while he's doing that, so buying a ratty car might not be an option. Best advice might be to work out a plan on paper, with cost estimates for the various mods. If he's going for power, maybe he should get a 280Z, with the stronger body, and R200 already installed. With a vision of what the final product should be like, then he can go shopping. So, the question of value seems answered. It's worth the price. But the question of appropriateness for his plans is open.
-
The web site looks well done. Smooth and polished. But I couldn't really figure out what the product is. Am I joining a team, or renting a race car? Or is it a race prep service for my own race car? There's a link to SVRA but it's not clear what that is until you read the logo on the linked page. It seems to be set up for people who already know what "vintage racing" is. I had never heard of vintage racing as a thing until you showed up. Actually, it seems to be something that you guys have created on your own, if I read things right. Just saying, it all seems kind of fuzzy. Maybe give an example on the site of how a neophyte would get involved. Edit - forgot to say also that you should put a link to the site in your post. http://michaelsvintageracing.com/about/ " What is vintage racing? Vintage racing is an exciting and challenging way to hop in the driver's seat of your dream car and race at tracks all over the country and the world! Drivers get to race the vintage car of their choice against other enthusiasts! The atmosphere is laid-back and friendly, so you're sure to meet some new friends!
-
People do realize that they're telling the OP to spend more of his money in the long run so that they can feel good about "saving" a 240Z, right?
-
Oil pressure in these engines always runs on the low side at low RPM. And the oil pressure senders are known to be inaccurate. You can't really decide on what to do about it until you get an accurate a gauge and record real numbers. Oil pressure won't affect driveability until right before the engine seizes up.
-
Nobody asked the #1 most basic question - what do you plan to do with it?
-
You could re-mark your dipstick, or get an F54 block stick. The dip stick is designed to indicate where the oil level is in relation to the crankshaft and oil pickup, which are tied to the block. You could install a 50 gallon oil pan, but the dip stick would not need to be changed. You err'ed when you switched dip sticks. Not a huge error though. The difference between the two is 3/8", which is still within the range of the H-L limits on either stick. So if you keep it topped up, you won't run low. If you let it get down to L though, it would be below the L on the proper F54 stick. Edit - the good news though, is that you were right to ask the question. There's something wrong.
-
Another one of those things that is not as clear as people profess it to be. Endless discussions...
-
For what it's worth, my drain plug really didn't flow back in to the coolant passages well either. I don't think the connection to the main passages is very big. I used compressed air and it was prettty well plugged. But the block itself flowed fine. Still though, the path from T-stat hole to pump should be clear, and the pump is not a positive displacement, you could call it an inertia pump, it just creates a pressure differential by pushing coolant. Like a turbo. If you do remove the pump, then the passage from T-stat hole to block inlet/pump outlet will be even more clear. You could put your ear on one and hear somebody talking at the other end. If the holes at the top of the block were clear, and the head gasket is right, it really seems like there must be something in that pump outlet area. Found a picture of coolant draining, and a video. I think he's a member. Koenig sounds familiar. Good luck.
-
It's funny that ZDDP is generally recommended for "high pressure" cams and lobes but sulphur compounds, extreme pressure additives, are used for differential gears. My understanding, from past reading, is that it's not the zinc that kills the catalysts, but the phosphate. So, a sharp marketing group in an oil company could ask for a different form of zinc so that they could say their oil has "high zinc content". Might even offer the same benefits. Whatever those are. Fun topic...
-
I use plain old modern oil and haven't rounded a cam lobe yet. Break-in seems to be where the problems happen. Fresh metal.
-
Here's something interesting. An F54 block dip stick is 6 7/8" inches from the High mark to the rubber seat. An N42 block dip stick is 7 1/4". So if you had a 280Z dip stick in an F54 block you'd be low on oil, because the High mark would be lower. Probably a lot more than a fraction of a quart though. Looking at the dip sticks does make me question their accuracy though. It's just a rubber seat on a piece of metal.
-
Why do all that when a hose in the T-stat hole will tell the story? There should be nothing between the T-stat hole and the pump inlet that will stop coolant flow. Here's another experiment. Remove the block drain plug, start the engine and see what happens. If coolant blows out of the drain plug hole you'll know more. Could be that somebody filled your block for racing.
-
Probably should have dug deeper when you had it apart. There's not much to the system. The pump moves water through the block, it pushes up past the cylinders, through the head gasket in to the head, then it flows out of the head at the thermostat housing. Somebody recently left a cork in the lower radiator hose port. Had a similar problem to yours. Forgot about the cork and put everything together. If you're really stuck, check each system separately. Remove the lower radiator hose and be sure that coolant actually will come out of the radiator. Remove the thermostat housing and be sure coolant will be pushed through and come out of the block and head. You could even remove the bottom hose and the thermostat cover and everything should drain out of the head and block. Stick a hose in the T-stat hole and see if water flows backward, down to the lower hose. Redefine the problem as a coolant flow problem. Your coolant is not moving through the block and head. Why? Where is the blockage? Check for rags like JSM suggested.
-
Take the thermostat cover off and remove the thermostat. Start the engine and see what happens. If you get no flow you'll know the problem is between the pump and the T-stat housing. Or just remove the thermostat and do the same.

