


Zed Head
Free Member
-
Joined
-
Last visited
Everything posted by Zed Head
-
 Haranguing somebody publicly on the forum, to give the impression that you're trying to "resolve this" isn't really right. Doesn't help anybody. The real problem is the bad phone interaction at the beginning. If James is the guy from the phone call, putting him in charge of fixing things isn't going to make things better. Should have just stopped with the message from Tuesday, with the contact information (unless James is the guy. If James is the phone guy then a different contact person would be better). If sweatybetty wants to be compensated, the opportunity is there in the message. If he really is done with MSA then best to just leave it at that. The damage is done. That's the internet. It lives forever. Unless it's Photobucket.
 -
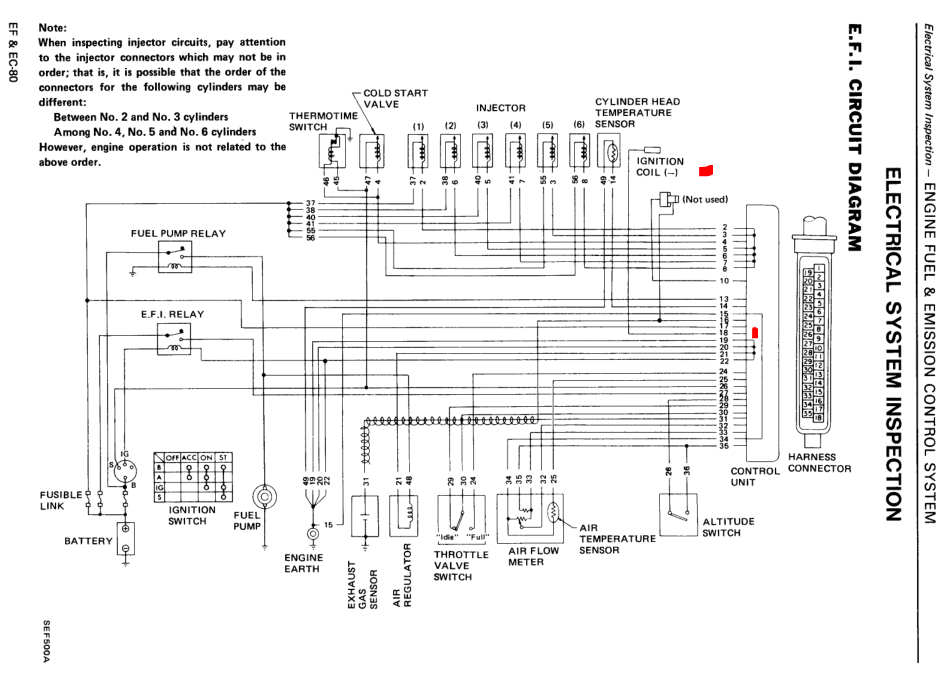
The tachometer is a real issue that I've verified on two different EFI cars, a 76 and a 78. So few people try to stat their engines with the tachometer out though, that nobody believes it and they all discount it, because, apparently, they don't understand why it would happen. No offense to the non-believers, but it's true, it really is, you have to believe me... (read this in a pleading whiny voice) . If you have a factory stock EFI car go remove the inline resistor and try to start the engine if you want to know, or generate some real knowledge refuting my claim. Again, no offense, it is what it is. Even worse, it only happens when everything is factory stock. I have a GM HEI ignition module now and it starts fine with the tachometer disconnected. BUT, JimmyB, you are way way ahead of thinking about things like that. You haven't even done the most basic, usually the first, test of the EFI system - Confirm that Pin 18 (for the 280ZX's) of the ECU connector is electrically connected to the negative post of the coil. That's what the ECU sees to know to open the injectors. You're at the point where you need a multimeter or test light and need to go through the tests we always recommend in either the FSM. It's possible that the ECU is bad but it's a lot easier to run a few simple tests first. Go to the "Electrical System Inspection" section of the Engine Fuel and Emissions chapter of the FSM. Ignore all of the ECCS and Analyzer test material, the simple tests are at the back of the chapter. Sorry, but you're at that point. The 280ZX wiring is different than the 280Z wiring but the basic functions are the same. Page 80 is the first page. See how they made a special place for the negative pin of the coil? It's very important.
-
I think that you have to upload to something like youtube then link to your post. If you're smelling fuel but not getting a start it might be over-fueling (flooding), because your coolant temperature circuit is open. Or it might be that you have bad spark and you're not firing the CSV fuel. Verify spark, I'd say, to start. Try starting fluid if you have it.
-
We don't know what "tried to crank it no luck" means. Didn't crank? Cranked but didn't start? Cranked and started but you didn't get lucky? Who knows... Not clear if there was a click or a grind or a whiirwhiirrwhirrrr. Wouldn't you expect no gasoline smell if your injectors were clogged? Per standard response - more details needed. Describe turning the key to a certain spot, and what happens then. Videos are fun too.
-
I think that you can tell if 5th gear is right by the position of the coupler on the gear teeth. In your video you can see that they all line up. Once those drive teeth are engaged the gear is "in play". If 5th is right, hard to see how reverse could be wrong. Reverse is kind of crude anyway. I'm not even sure that the teeth are fully engaged when it's in use, are they? Not really meant to transmit a lot of power. Wouldn't be surprised if the front cover actually does come into play for reverse, because it's probably not worth extensive engineering. The adapter plate balls and grooves could be worn too as you said, allowing just enough extra travel to cause problems, without the help of the cover.
-
You should list in Oz, since it's spring down there. You're kind of late in the season for selling here in the states. Los Angeles, maybe.
-
Probably not, I'd guess. (Answering my own question). There are two different 5th gear types, if I recall right. Different hubs and synchro rings. Brass versus "carbon" is the usual discussion point. Maybe there are more differences. Might be comparing apples and pears.
-
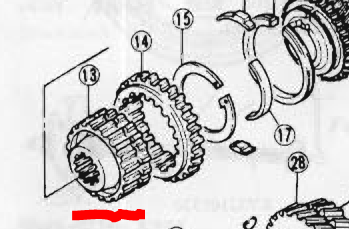
Could the OD synchronizer hub be installed backward? That's the splined piece on the inside that the dogs sit in. The dog house. It's asymmetrical for OD/5th.
-
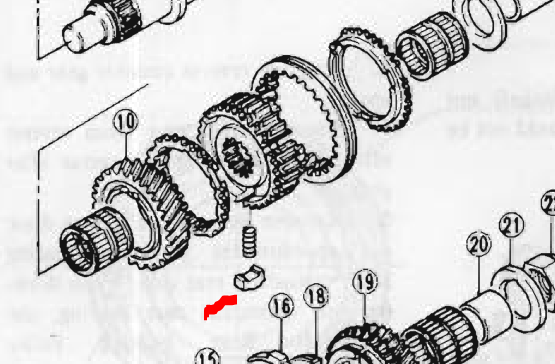
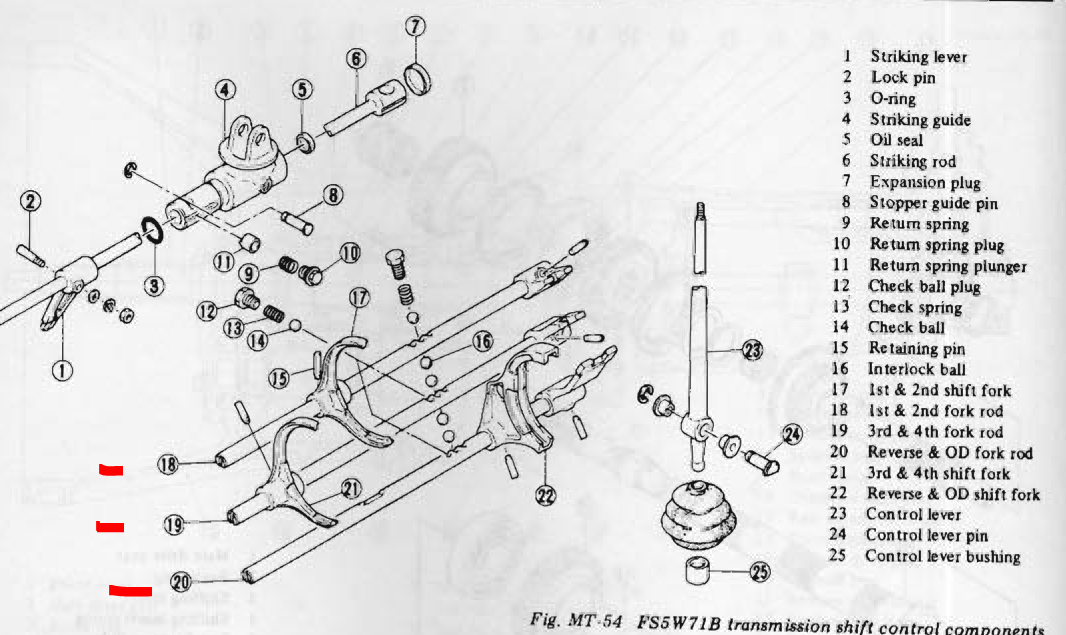
Here's an illustration of the ends of the three shift rods that are stopped by the front cover. When you move the lever for reverse the rod is stopped in its travel by the front cover. If the front cover is not installed you might be getting some overtravel, causing the gear to stick.

-
The very small rectangular metal piece with the spring under it. It does its work under the coupling sleeve, popping up and stopping its travel. It just looks exposed, to where it might be popping up when it's not supposed to.

-
Actually, the complete procedure is well written and detailed in the FSM. Mentioned, obliquely, in Posts 2, 3, 4, and CO's. Just saying, the FSM procedure is actually an easy, informative, and pleasant read. Some interesting observations - the bearings aren't really peloaded (like a tapered roller bearing might be ) even though they call it preload and actually have a torque measurement. Plus they have a torque measurement AND an end-play spec. Not sure that either of those is correct for a ball bearing, of this type. (Edit - and they don't tell you what to do if just one of the specs is off. Grease the seal?) It's a set of balls riding in two races. The distance piece is spec'ed to match the inner race separation distance to the out race separation distance (controlled by the hub casting), which should be the important part. Getting those two races aligned. It seems like Nissan might be allowing for the inner axle to expand a bit or they are setting the balls up to ride on the edge of the race. The distance piece (inner race) is closer together than the outer races. It really is interesting if you dig in to it. http://www.skf.com/binary/tcm:12-114679/140-710 BIMG 11_2012_tcm_12-114679.pdf Something that's come up in the past - using the axle nut to pull one of the bearings in to tis seat. This loads the balls at singular points on the races and should be a no-no. This puzzle is really about what came out of M. Abate's car, and why the carpartsmanual diagram is wrong, I think. Sorry, I love a good technical deep-dig...

-
I thought you said that you found one stuck in the grease, and couldn't remember how they came apart? Regardless, Nissan, the company, has no record or documentation describing anything between the bearing races except the distance piece. Seems like there's only one path forward though, when putting it back together. I think that the diagram is just wrong and that's all there is to the bigger picture. This puzzle is more about where the diagram originated. And maybe about where those washers were in your car, but if your guy threw all the pieces in a box, who knows? Or, somebody did measure the distance piece in the past and decided it needed to be thicker, so they stuck a washer in there. There are letters on the hub and the distance piece. Do they match? that would be a clue. No tools necessary. Looks like carpartsmanual is the source. I've often wondered where they got their information. http://www.carpartsmanual.com/datsun/Z-1969-1978/axle/rear-axle-drive-shaft
-
Actually that is a common cause of wonderment, but, as Captain Obvious pointed out to me many moons ago, is normal, for a parallel circuit. You're just measuring voltage on the other pin through one of the other still connected injectors. The voltage that you're measuring will have its path to ground through the transistor circuit in the ECU. The grounds are ganged together at the transistor in the ECU. That's why disconnecting the ECU breaks the parallel circuit. I think that you can move on from that concern and go to the basics, like spark, and injector opening. Have you verified spark, and tried to start it with starting fluid? Starting fluid will tell you that you have spark, and compression, and that all of the important timing events are correct. If it runs with starting fluid, you can focus on injector opening, or vacuum leaks, or similar. If it doesn't run with starting fluid then all of those other important timing events are suspect. It's a simple quick test that will get you much farther ahead than where you are now. You can usually sit at the engine intake with the can of fluid and keep the engine running for a little while, just to hear how it runs.
-
Probably more fun to study the diagrams, but I inadvertently developed a simple test for battery draw after modifying my 76 for an internally regulated alternator. Look for a spark when you connect the negative terminal. Seriously, a 0.3 amp draw from relay will make a sizable spark. I noticed it after I did mine, thought it was odd, then realized there was a problem when my battery was dead the next day. In my case it was the brake warning lamp check relay.
-
Me? I'm not a fun-poker. Doesn't this just sound a like discharged battery, and taking measurements at low RPM, where the typical alternator is barely generating any current? When he disconnects the battery the alternator doesn't have the battery load to deal with and the current draw drops. If it wasn't at low RPM voltage would probably jump to 16 or 17. There's no S circuit anymore with the battery disconnected. auvelas, don't disconnect the battery while the engine is running. It can damage your alternator. Leave everything connected correctly, and take a voltage measurement at higher RPM. Like the FSM says. More details, like SteveJ says.
One of the first things I heard when I got on these forums was that there are many mistakes in the documentation. Translation errors and such. The TSB and FSM descriptions of the processes seem to make it pretty clear though, don't they, that the washer in question goes outside of the distance piece area? The only questionable thing is the image with the part numbers. There are no words describing washers or shims between the bearing races. Just that one drawing. FSM's 1970-1978 all support no washers between the races. And describe measuring and verifying. Is that drawing from the microfiche CD, or is it from some other non-Nissan source?
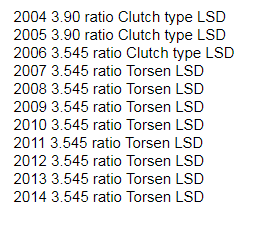
You're in Greece George, which seems like a foreign country to us. Shipping costs make those options not worth considering, for us, over here. The Traction Concepts product and others like it are generally seen as cheap, low quality options, to get both wheels to spin. Not "real" performance products. More of a gimmicky work around, one step below a welded diff. I don't think I've seen anyone on any of the Z car forums I've been around actually buy one and use it. It's surprising that the product is still available. One interesting thing about the Subie diffs are that there are two types, Torsen and clutch. So you have to make that choice, if it matters to you. Another thought is that it's actually fairly simple to change gear ratios, via a new ring and pinion gear set. The cost comes in having a good shop set the clearances back to spec. correctly, after installation. One thing that's fairly common to do is to assume that the backlash and the bearing preload will stay in spec if only the carrier is changed. I know that certain skilled people on this forum have done that with R200's and been fine. It's common across OEM diffs, the housings are the wide-spec. parts but the carriers are typically precise and accurate. They can be swapped, across gears and housings. But then you can have those night sweats that gnosez gets. I just went through all of this with a Ford diff, swapping an LSD diff and carrier in to an open diff housing. There's a bunch of different ways to get it done, but that means there's a bunch of different ways to make a mistake too. There's a ton of videos and instructions out there. It's a fun DIY, and even if you choose to have a shop do it at least you'll know what they're talking about. And here's another option, the Cusco, which seems to get good marks. https://www.rallysportdirect.com/part/limited-slip-differentials/cus-lsd-182-l15-cusco-rs-rear-lsd-1-5-way-r180 Obviously, the work will make you chew your nails... eeeew...
 But where are they? The numbers from the cost comparison. I think we're looking for numbers and sources, not so much opinions about what somebody thinks is the best way to go about a project. Many people enjoy building their car themselves. Some people just take their ideas to a shop. 7tooZ asked you where a person would get a Quaife for an R180 back in post #4. That might be useful info.
I was mainly responding to gnosez. Somebody always has a less exepnsive way to do things if everything falls in to place just right. He didn't really offer an details. If you take your $250, and silvermine's $375, and add say another $100 for the pinion flange, you're at $725, for bolt-in R180 swap. Not bad. http://www.silverminemotors.com/datsun/datsun-240z/drivetrain-17/lsd-r180-sti-out-output-flange-conversion-stub-axels The hybridz thread linked in the wolfcreekracing page has many stories from people who tried John Coffey's axles. They loved the final package, from what I read. Looks like the link is broken though so here it is - http://forums.hybridz.org/topic/78123-subaru-wrx-sti-r180-side-axles/ And here's a Google with a bunch of the development thread work linked - https://www.google.com/search?source=hp&ei=vvwJWrG6Kc28jwOdlLqYDg&q=site%3Ahybridz.org+subaru-wrx-sti-r180-side-axles&oq=site%3Ahybridz.org+subaru-wrx-sti-r180-side-axles&gs_l=psy-ab.3...1370.8646.0.9920.18.18.0.0.0.0.93.813.18.18.0....0...1.1.64.psy-ab..0.5.322...0j0i131k1j0i10k1.0.dtx90L00WPY It was pretty well thought out and ended well. So well that other people are riding John's coat-tails.
If you buy all new, or assume that a used Subie diff will be rebuilt professionally, then it's probably a wash. But John C had the axles made for DIY people, assuming that they were buying wrecking yard Subie diffs and rebuilding them themselves or just using as-is. If you're just going to open a wallet there is a wide range of possibilities.
I saw this over on Hybridz a while ago. It really works. It's an add-on that somehow pulls in Photobucket images. It doesn't work in Incognito mode, only in normal Chrome mode. Boy from Oz contributed it. Hybridz is now on the same platform as CZCC so don't get confused as to which site you're on. http://forums.hybridz.org/topic/128090-old-pictures-only-show-as-namejpg/?tab=comments#comment-1197332
My impression has been that it's just an old out-of-business aftermarket supplier, or maybe even the supplier to a supplier. You might have more luck just looking at injector images, but I'll bet that at some time in the past, pre-internet society, when you went to Autozone or Oreilly or one of the others and bought Brand X injectors, you got those injectors and the "RAM" is just an artifact, unconnected to the brand name of the supplier. Random Access Molding maybe, did the injection molding for the plastic portion.
They do seem exposed. The ends of the shift rods are all stopped by the front cover. You might make sure that all three rods are on the same plane and see if the inserts are still exposed. Could be that the coupling sleeve is just moving farther than it will when everything is fully assembled.
The synchro that you're looking at is the 5th gear synchro. I haven't really studied the way that Nissan added 5th gear to their 4 speeds but it looks like they made the reverse gear in to the coupling sleeve for 5th. Pretty cool. When it's uncoupled to 5th it's used as reverse. Dual usage. Never realized that. 5th gear will be engaged when you're cruising down the free way at 60 mph and those parts are rotating. Not sitting, with no rotation. You might be making much from not much.
But where are they? The numbers from the cost comparison. I think we're looking for numbers and sources, not so much opinions about what somebody thinks is the best way to go about a project. Many people enjoy building their car themselves. Some people just take their ideas to a shop. 7tooZ asked you where a person would get a Quaife for an R180 back in post #4. That might be useful info.
I was mainly responding to gnosez. Somebody always has a less exepnsive way to do things if everything falls in to place just right. He didn't really offer an details. If you take your $250, and silvermine's $375, and add say another $100 for the pinion flange, you're at $725, for bolt-in R180 swap. Not bad. http://www.silverminemotors.com/datsun/datsun-240z/drivetrain-17/lsd-r180-sti-out-output-flange-conversion-stub-axels The hybridz thread linked in the wolfcreekracing page has many stories from people who tried John Coffey's axles. They loved the final package, from what I read. Looks like the link is broken though so here it is - http://forums.hybridz.org/topic/78123-subaru-wrx-sti-r180-side-axles/ And here's a Google with a bunch of the development thread work linked - https://www.google.com/search?source=hp&ei=vvwJWrG6Kc28jwOdlLqYDg&q=site%3Ahybridz.org+subaru-wrx-sti-r180-side-axles&oq=site%3Ahybridz.org+subaru-wrx-sti-r180-side-axles&gs_l=psy-ab.3...1370.8646.0.9920.18.18.0.0.0.0.93.813.18.18.0....0...1.1.64.psy-ab..0.5.322...0j0i131k1j0i10k1.0.dtx90L00WPY It was pretty well thought out and ended well. So well that other people are riding John's coat-tails.
If you buy all new, or assume that a used Subie diff will be rebuilt professionally, then it's probably a wash. But John C had the axles made for DIY people, assuming that they were buying wrecking yard Subie diffs and rebuilding them themselves or just using as-is. If you're just going to open a wallet there is a wide range of possibilities.
I saw this over on Hybridz a while ago. It really works. It's an add-on that somehow pulls in Photobucket images. It doesn't work in Incognito mode, only in normal Chrome mode. Boy from Oz contributed it. Hybridz is now on the same platform as CZCC so don't get confused as to which site you're on. http://forums.hybridz.org/topic/128090-old-pictures-only-show-as-namejpg/?tab=comments#comment-1197332
My impression has been that it's just an old out-of-business aftermarket supplier, or maybe even the supplier to a supplier. You might have more luck just looking at injector images, but I'll bet that at some time in the past, pre-internet society, when you went to Autozone or Oreilly or one of the others and bought Brand X injectors, you got those injectors and the "RAM" is just an artifact, unconnected to the brand name of the supplier. Random Access Molding maybe, did the injection molding for the plastic portion.
They do seem exposed. The ends of the shift rods are all stopped by the front cover. You might make sure that all three rods are on the same plane and see if the inserts are still exposed. Could be that the coupling sleeve is just moving farther than it will when everything is fully assembled.
The synchro that you're looking at is the 5th gear synchro. I haven't really studied the way that Nissan added 5th gear to their 4 speeds but it looks like they made the reverse gear in to the coupling sleeve for 5th. Pretty cool. When it's uncoupled to 5th it's used as reverse. Dual usage. Never realized that. 5th gear will be engaged when you're cruising down the free way at 60 mph and those parts are rotating. Not sitting, with no rotation. You might be making much from not much.


Important Information
By using this site, you agree to our Privacy Policy and Guidelines. We have placed cookies on your device to help make this website better. You can adjust your cookie settings, otherwise we'll assume you're okay to continue.