Mikes Z car
Free Member
-
Joined
-
Last visited
Everything posted by Mikes Z car
-
 I check the classifieds infrequently maybe every month but I don't need parts right now. Because I can't make the search function for forums work that well I like the current classifieds better than having the classifieds as a forum. I might be the lone ranger on this one.
 -
This is the original fascia nut and odd looking squarish washer that came out with it: One of the captive nuts on the fascia on my car was stripped out so to fix that I made my own captive nut by cutting a rectangle shape out of a repair metal from Thrifty hardware and drilling and tapping it for the 4MM original machine screw. I used a bench grinder to make the new nut have the same size as the original and to have the beveled edges the original has. The existing machine screw size is 4 MM and according to my drill and tap sheet the drill size to use for tapping is 1/8" (or 3.3MM) which worked well. The fascia nuts I had were stripped out bad enough that I could not be sure what the pitch was so I won't list that to avoid posting inaccurate info. The existing captive nut can be easily removed by prying open the two metal retainer strips that are in front of and in back of the nut that hold it captive. I had to use care to pry the strips just far enough so that the stripped nut was removable as otherwise the new nut would want to fall out if the strips were sprung out.
-
My learning experience with poor grounds doing weird things was with an old Pontiac my late dad had. When you hit the brakes the interior lights on the door would come on. I never forgot that lesson.
-
You gotta figure, you wouldn't be able to tell the difference between OEM back bumper rubber strips and rubber strips made from old slicks or Home Depot threshold strips at, say, a distance of 1/4 mile. Mike Edited later: As in a post below by psdenno, I will also add my apologies for those who were looking for serious help with the rubber bumper strip.
-
Now THOSE are creative ideas. Mike
-
Being a professional tightwad at times I looked at making bumper rubber from black household door thresholds.
-
Don't bogart that bottle, my friend, pass it over to me...
-
I may be missing something but your picture files appear to be too large. The 128 MB I imagine is the sum total maximum of all pictures uploaded for the ad but each individual JPG can only be 1.91 MB if the info I got off of my blog is still accurate. Assuming I am following you try resizing one of your JPG pictures to less than 1.91 MB and see if it will upload. That won't affect the viewing quality much. In windows the picture viewer will do that but it has been a while since I actually did that with windows, someone else might have to chime in on that. If the horizontal resolution is greater than 1281 it needs to be made smaller than 1282. On a Mac the preview program with OSX 10.58 has a tab that can be clicked called tools which reveals a size button to resize. Both horizontal and vertical resolution will be shown and new numbers can be typed in so neither exceeds the maximum, normally I just type in a new horizontal number and the vertical number is fine then. Then when saving the quality of the JPG can be adjusted with a slider with a readout showing the resulting file size if the file is saved at that point to ensure not going beyond the 19.1 limit. Hope this helps.
-
Can you maneuver to the file on your computer that you want to upload to see the file extension for it? Also it may be too large or have to much resolution see allowed sizes I found below. The first part of this info I found at the bottom of a blog post I did, the allowed file sizes showed up when I went to upload a file to the blog. Valid file extensions: bmp com doc dwg dxf gif jpe jpeg jpg pdf png pps psd swf txt xls zip Filetype Max File-size Max Width Max Height bmp 1.91 MB 1024 768 com - - - doc 1.00 MB - - dwg 1.00 MB - - dxf 1.00 MB - - gif 1.91 MB 1281 1025 jpe 1.91 MB 1281 1025 jpeg 1.91 MB 1281 1025 jpg 1.91 MB 1281 1025 pdf 10.00 MB - - png 1.91 MB 1281 1025 pps 1.00 MB - - psd 1.91 MB - - swf 1.00 MB - - txt 1.00 MB - - xls 1.00 MB - - zip 1.00 MB -
-
If this gets any better someone is going to hire you gentlemen for a sitcom. Dare we call it twin pipes?
-
On my '70 240Z the screw hole itself for the plastic choke handle is missing. Maybe the metal choke control that the plastic knob fits on is a replacement for that to be true but it doesn't look all that new to me. For the '70 model is that also an M3 screw and does anyone have a guess as to the pitch? Ebay is selling taps that are M3 but they are selling them in .6, .35 and .5 pitch. They also sell self tapping M3 screws which I would guess would be the easiest solution for me.
-
Putting stuff under the house can work in desperate situations.
-
bhbarr, No problem. Yes long live the Z brotherhood. We will have to come up with a secret handshake though if we talk about it here it won't be a secret anymore. heh heh. I am moving and the part you were asking about was under the house. Your question gave me an excuse to get the Z parts under there out and ready to move, no more putting it off. I didn't see any spiders either. Mike
-
Per your profile you have a 1972 240z? These pictures are from a heater blower from a 1/1972 car: V spring position 1: V spring position 2: This writeup someone else did which may help some (or not). The top lever controls a) the fresh air vent that opens at the firewall vent valve behind the heater blower motor (the longest cable) AND the internal flap valve that ducts the air through the heater core OR straight through to the side and center vents in the dash. (the cable connected to the uppermost connection on the heater box on the left side) (FYI: There is NO position for the heat to flow out of the side and center vents, you will only get fresh air ... or not.) The middle lever controls the hot water valve. (right side of heater) The bottom lever controls the two side doors on the heater box (left lower side of heater box). When the doors are shut the air is forced through to the defroster ducts, otherwise the air is allowed out to the "room".
-
That is a really good looking car, nice work!
-
I used varnish on my wheel and it looks good, I thought it was too far gone but the color came back.
-
Might be when I drove across four states at the drop of a hat to see my first girlfriend at her college in my orange 240Z back in the late 70s. Took her to a fast food place. Good times.
-
Thanks zKars for the link to bearing failures and to everyone for the great information.
-
I like to shoot for forever when doing maintenance realizing there might be some unobtanium in that idea. The Toyota Tercel that is my DD went 179,000 on the rear bearings before they needed replacing. I actually had two of those cars back in the old days and the other one went to a similar mileage before the rear bearings started getting noisy.
-
Is there room to put a zerk fitting in the hub or would it bump into something else? I am not sure from what you said if it would be a good idea to even try it.
-
Ha! I thought I was the only one who used shiny cars behind me for testing lights. My speedometer is dim enough that if a cop ever pulls me over for speeding at night I can honestly answer that I have no idea how fast I was going. I always thought the dim instrument lighting added an ambiance, though I may upgrade to brigheter someday.
-
Since the front wheel bearings are easier to repack with grease they tend to be greased much more frequently than rear wheel bearings, right? Do front wheel bearings tend to last a lot longer because of this indicating there might be wisdom in periodically re-greasing rear wheel bearings assuming there is a procedure for this? I have heard of a pin injector like used for putting air in basketballs that can be used for wheel bearings, don't know if that might work with an early Z.
-
Consider the idea that if you were an automotive engineer you would design them properly!
-
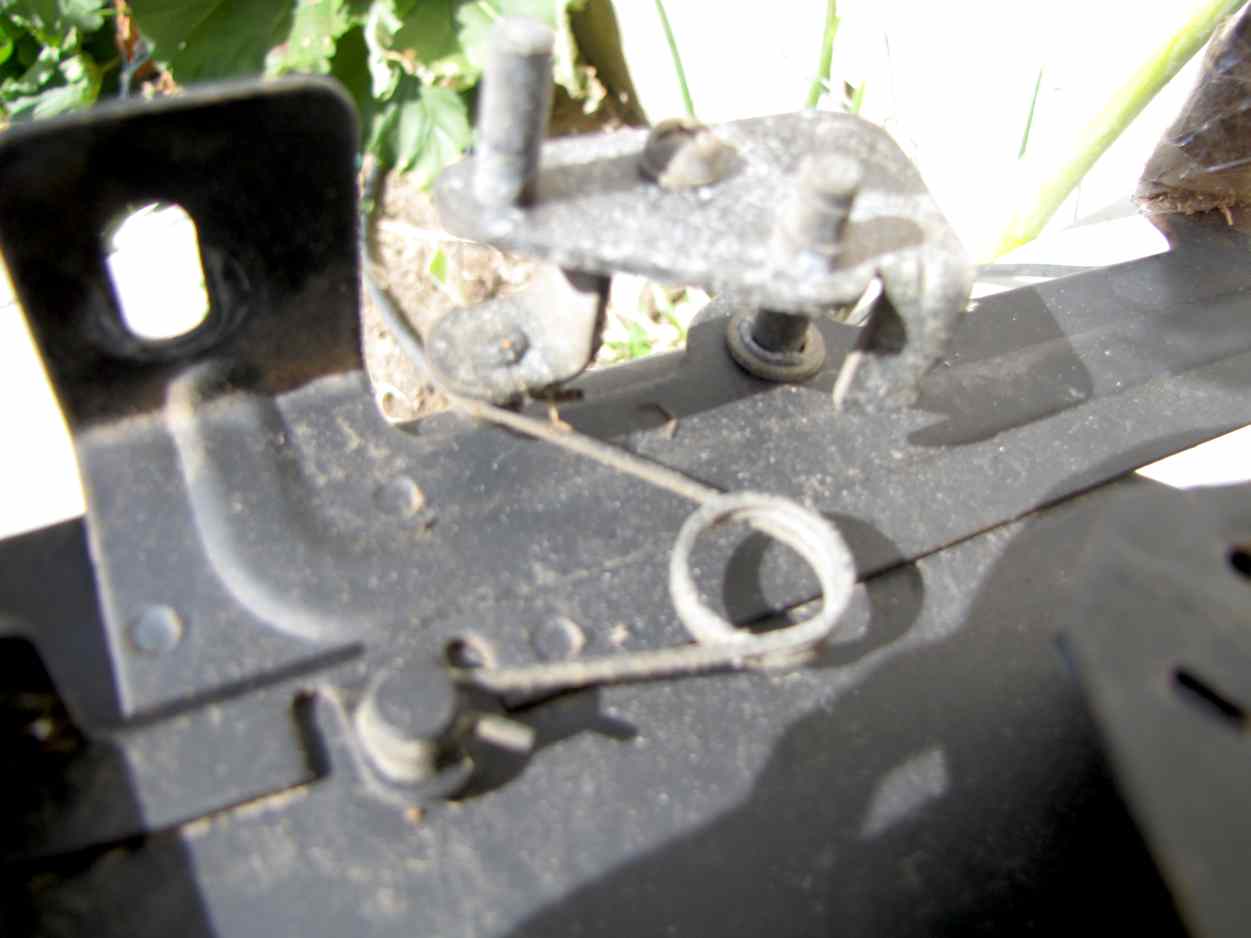
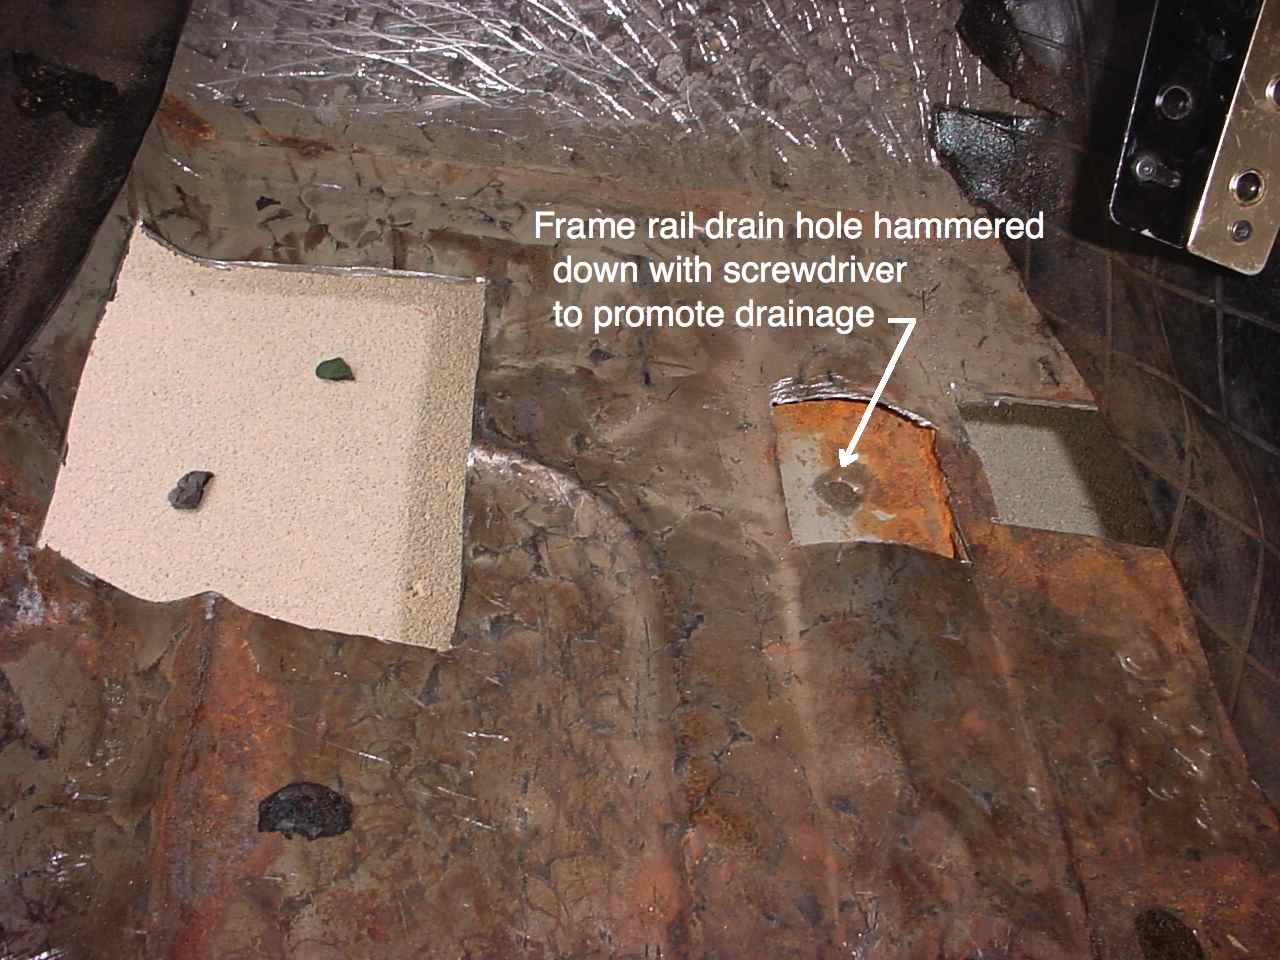
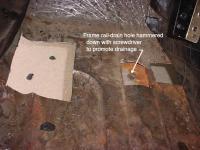
I think that is an important discovery and may bring to light the real reason the front frame rails under the seats rust out. There are two drain holes that I have seen in the frame rails under the seats. One is toward the front of each frame rail under the feet of the driver and passenger. Another hole is towards the back of those same frame rails somewhat in line with the back of the seats. The bottom of those frame rails are fairly flat and unless the water just happens to find the hole it won't all drain out at least that is what I think is happening. The attached picture is of my car before I had welded in new sheet metal. I used a hammer and screwdriver to hammer the hole downward under the driver's feet to make it easier for water to drain out as I had access due to metal that was cut out for rust repair. There may be another way to pull the metal down around those holes to encourage draining or it might be possible to make additional holes in the frame rail with the edges of the holes bent down. A metal structural engineer would know more about how holes in the center of a beam don't affect the strength much. I'd say what you saw is likely normal though the water may have come in through a hole in the front of that same frame rail where the front wheel can throw water on any hole in the area just above of the tension rod mounting point where those two rubber bushings are. A hole there might need to be plugged to prevent that. Hope that made sense. Frame rail under the seats visible where hole is:
-
Like I know anything about transmissions but I am curious, if you are going down the highway in 4th gear and you push in the clutch and then pull the shift lever out of 4th into neutral is it easier to pull than pulling it out of the other gears into neutral under similar conditions?