Zedyone_kenobi
Community Member
-
Joined
-
Last visited
Everything posted by Zedyone_kenobi
-
Will try to upload a movie of it running. I tried twice but its 17MB. But it is running. Carbs are still not acting right. I have dead even flow through them, all the same across 6 carbs. Same jets, but my plugs are all over the place. I installed all new floats, float pins and needle and seats in all three carbs. Getting wildly different readings on float level using the Keith Franke clear acrylic tube method. I am 22mm, 25mm, 24mm from the top, which if I recall is to high on all of them. I have 29mm from the tip as the correct setting, but I have to go research it up again. IMG_8791.MOV
-
UPDATE: I got her running!!! New 123 is installed and at this point I can say it performs as advertised. Could not start it up for the first 10 minutes and was about ready to cuss as I spent so much time going over the manuals and ensuring all was hooked up properly. Made sure my grounds were good. Then I realized I had not hooked up the last black wire on the dizzy. Yeah, it fired right up afterwards into a steady 500 rpm lope. LOL
-
I received my dizzy last night. It was well packaged and felt decently made. I played around with the cap and rotor and had some fitment issues (completely on me, I did not fully seat the rotor), so I called the owner Ed. Figured I may or may not hear back. Not only did he text me back at 7:30 PM, he sent me videos about how to properly seat the rotor and what to check for. Then we talked about 20 minutes about the install process and how to set it up. Ed was such a super nice guy, who was very willing to listen and offered great replies and made sure he understood what I was asking. He confirmed that post dropping in the distributor and getting it running you have to throw a timing light on it, and turn the distributor to ensure the measured crank advance matches the advance in the app. Once the app matches the engine, THEN and only then can you begin to modify the curves. So what does it mean: make the app match the engine. Well distributor degrees are 2x what crank degrees are. If you want 10 degrees of advance measured at the crank, you have to ask the app to give you 20. (double check me on that guys). Make the change, check the timing. Make any other changes, check the timing. A timing light is essential for this to work or else you will be chasing your tail.
-
I need to install this to see where I end up when the engine is mechanically at TDC. I think I would modify this. Bring it to TDC Drop it in Turn it until the light comes on. Lightly snug it down the cap only fits one way. So when you drop it in, it will likey NOT be pointing at a wire contactor inside the cap. Connect the app and set the advance to 0 degrees across the board. Turn off MAP readings entirely (No vac advance) Try to start the car. If it starts then whip out your timing light to see how far off you are from 0 degrees advanced. Rotate the 123 until you have about 12 degrees or so at idle then lock it down. YOu can then modify the curves from the initial 12 degrees of static advance. This is my plan. I just do not see how it can be install and and play until you get the timing light and programmed advance on the same page. You could set the start up advance to be 12 degrees, then get the engine started, then with a timing light make sure you have 12 degrees of advance. Either way, I need to figure out if a stock 240Z tach needs a ballast resistor to work properly. I have an old 1.5 Ohm Pertronix flamethrower.
-
dizzy arrives today. Wondering if I should just buy a new coil while I am at it. I have a 1.5 Ohm flamethrower now with the ballast in place. Maybe I go to a 3 Ohm coil and drop the ballast? Need to go back into the dizzy notes to see if the factory tach needs that ballast to work.
-
I think I have found a concern with the 123 dizzy install. I have watched about a dozen videos. @Patcon please help me out with this. My new 123ignition tune + comes in this week. Let me walk folks through this install process. And let you know my thoughts. If the car runs, warm it up a bit. You want the car to be easy to start when you get the new 123 in. When it is not too warm to touch, remove the spark plugs, this will make manually turning over the engine at the crank manageable. Put the engine on top dead center using your timing marks on your balancer. If you do not trust this, you can verify by looking for the piston to be at the top AND pull the cap and off the old dizzy to verify you are pointed at #1. If your dizzy is already out, then pop off the valve cover and look for the intake and exhaust valve on number 1 to put pointed up (some people call this rabbit ears position) Take pics of the rotor position Take a pics of the wiring hook ups as they are currently (for a known good config) Disconnect the old dizzy and pull it out. Install the new 123ignition dizzy so the offset tab drops into the housing. (it will only go in one way). The 123Ignition rotor is 90 degrees to the alignment tab on the oil pump shaft. (factory dizzy is parallel to the tab) - from what I have heard on 'the youtube'. Regardless. The next steps are to take the slack out of the 123 rotor and rotate the dizzy housing until a green light comes on, then tighten it down. This is the NEW TDC firing position for cylinder 1 with 0 degrees of advance. This is an issue in my eyes. With the distributor tight and the cap only going on one way, the rotor will most likely NOT be pointing at a plug terminal inside the cap. You will be advanced or retarded a certain number of degrees while the piston is at TDC. The spark should have already happened by now, so when you reallocate the wires you can make sure the number one plug is behind rotor rotation. But you will have no idea how much off you are unless you put it on a timing light (if it starts). So how will I solve this 'mismatch'. This is my plan. With the distributor installed and wired up, I plan to fire up the 123ignition bluetooth app. Set the total advance of the engine to 0 degrees on the centrical advance, and I will block off the vacuum advance tab entirely and set it to zero. This should allow me to put a timing light on it (assuming it starts) to see how off the distributor is off from true top dead center. At this point I am not sure what I would do. I am not sure how the 123 works. Can I adjust for the offset in baseline timing on the app? Or should I just leave the baseline in the software at 0 degrees and turn the distributor until it reads zero so the dizzy position matches the software. Until the dizzy position and software agree, no sense in messing with the app. Either way, a timing light is a must have tool on this install and I am shocked nobody is mentioning it. If they would have kept the rotor position the same as the factory position, this would have been a lot less an issue. Patcon, I would love to pick your brain! Zedyone.
-
I have been talking with a fellow Z buddy. He was a regular here and he went with the 123 ignition early on. I think I am going to go that way. I have long wanted the ability to custom tune the ignition curve without having to take apart the dizzy and mess with weights and springs. While that worked with the mallory, I still had some pinging at full throttle at times. It is completely crazy I cannot find a cap for a mallory now, but I suppose time stays still for no one. So this friday I am making the 123 order.
-
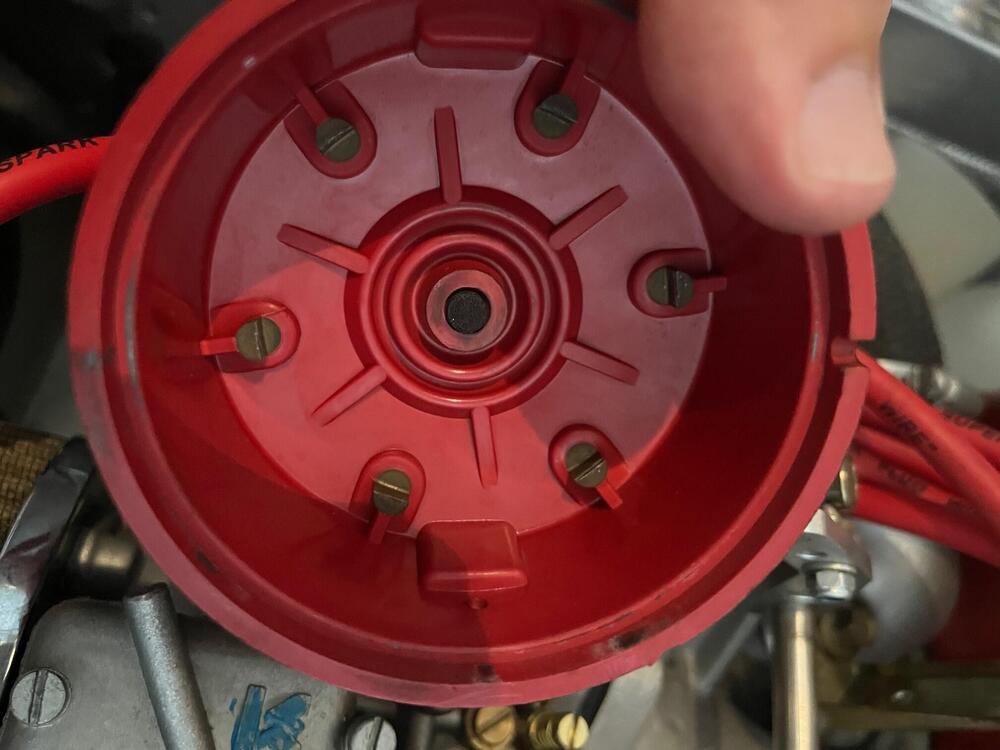
good question. But nope the electrode does not move at all. It will not push or pull at all. It is like its welded in there.
-
The distributor is fine. I even have 4 rotors on the way. I bought all Holley had in stock thinking I could find a cap. Silly me. But the distributor is 100% A okay. It is just without a cap, its useless. Now, I would imagine an L20 could use it with a different rotor maybe?
-
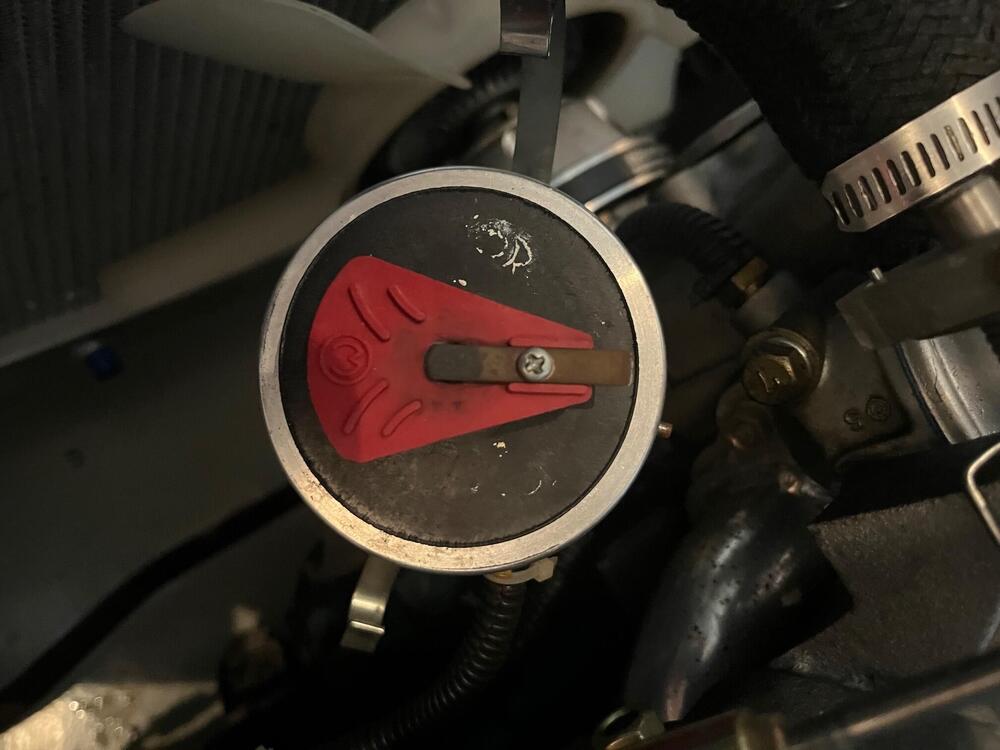
cap shown is what is left of the electrode. It is no longer spring loaded. That is it. It does not move. It is fixed. New pics of the cap have a rounded nub on the end. That is GONE. The rotor looks blacked and burned.
-
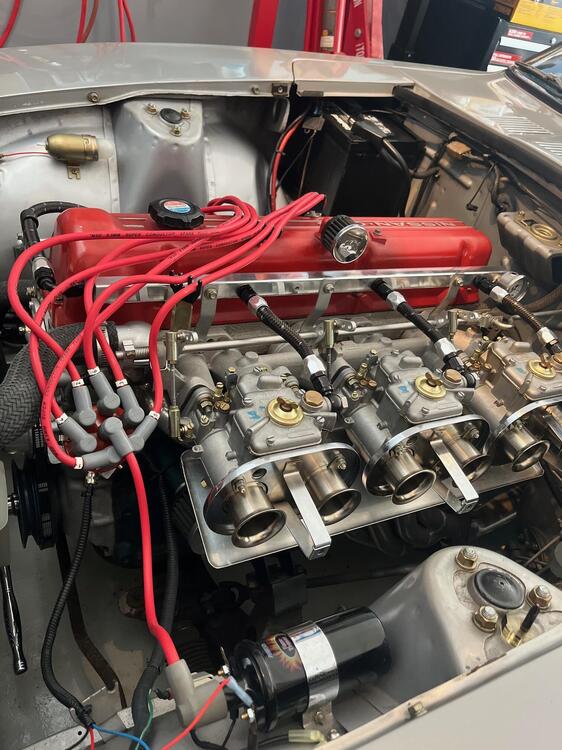
I cannot run a vacuum advance anyway. I have triples and no port for vacuum. I need a dizzy that only relies on static advance and mechanical advance. Probably run about 15 degrees BTDC at idle and hope for another 15 - 17 more on mechanical. But that will require a custom curve. Only place that can do that is 123 and advanced Distributors. It is heartbreaking really. A perfectly good Mallory is just going to get tossed.
-
I also have a note in my Z journal mentioning Advanced Distributors. They can recurve an OEM dizzy if I recall. Are they still around?
-
My Z has been struggling since COVID to run perfectly. From 2008-2021 the Z was as reliable as toyota 22R. But not driving for a year did unspeakably evil things to the fuel system and triple webers. After many attemps I do believe I have the fuel system sorted. Now a more nefarious issue has crept into my life. One that I cannot believe is actually happening. I was doing a post carb tune up. Checking plugs and wires, the usual. I have had a Mallory Unilite since 2008 and never had any issues. However, I did notice some misfires at my last drive, and now I know it was not my webers. I pulled off the distributor cap and the center electrode that rides on the rotor is all but gone. NO more spring loaded nub. Just a flush piece of conductor that is even with the plastic. The rotor is charged as well. I can only assume that it has been arcing a LONG time to cause that kind of erosion. So buy a new cap and move on. Right? NOPE. this is the kicker Nobody in the entire world has a Mallory 270 distributor cap. NOBODY. They stopped making them. The folks at Holley who bought them, said, yeah, "get another distributor". So a 600 dollar billet distributor is now a paperweight. Makes my blood boil! so I am considering options. 280ZX? 123 ignition? 280Z. All have pros and cons. I have not dabbled in the ignition world in a while, since mine... well it worked. Is 123 ignition a solid option. I have a hard time trusting any website where I cannot call them. Is the ZX or 280Z option valid, or will I have to rewire, or get a new tach? I have no vacuum advance because of the webers. Is there a dizzy that gives me decent mechanical advance left? Need options here.
-
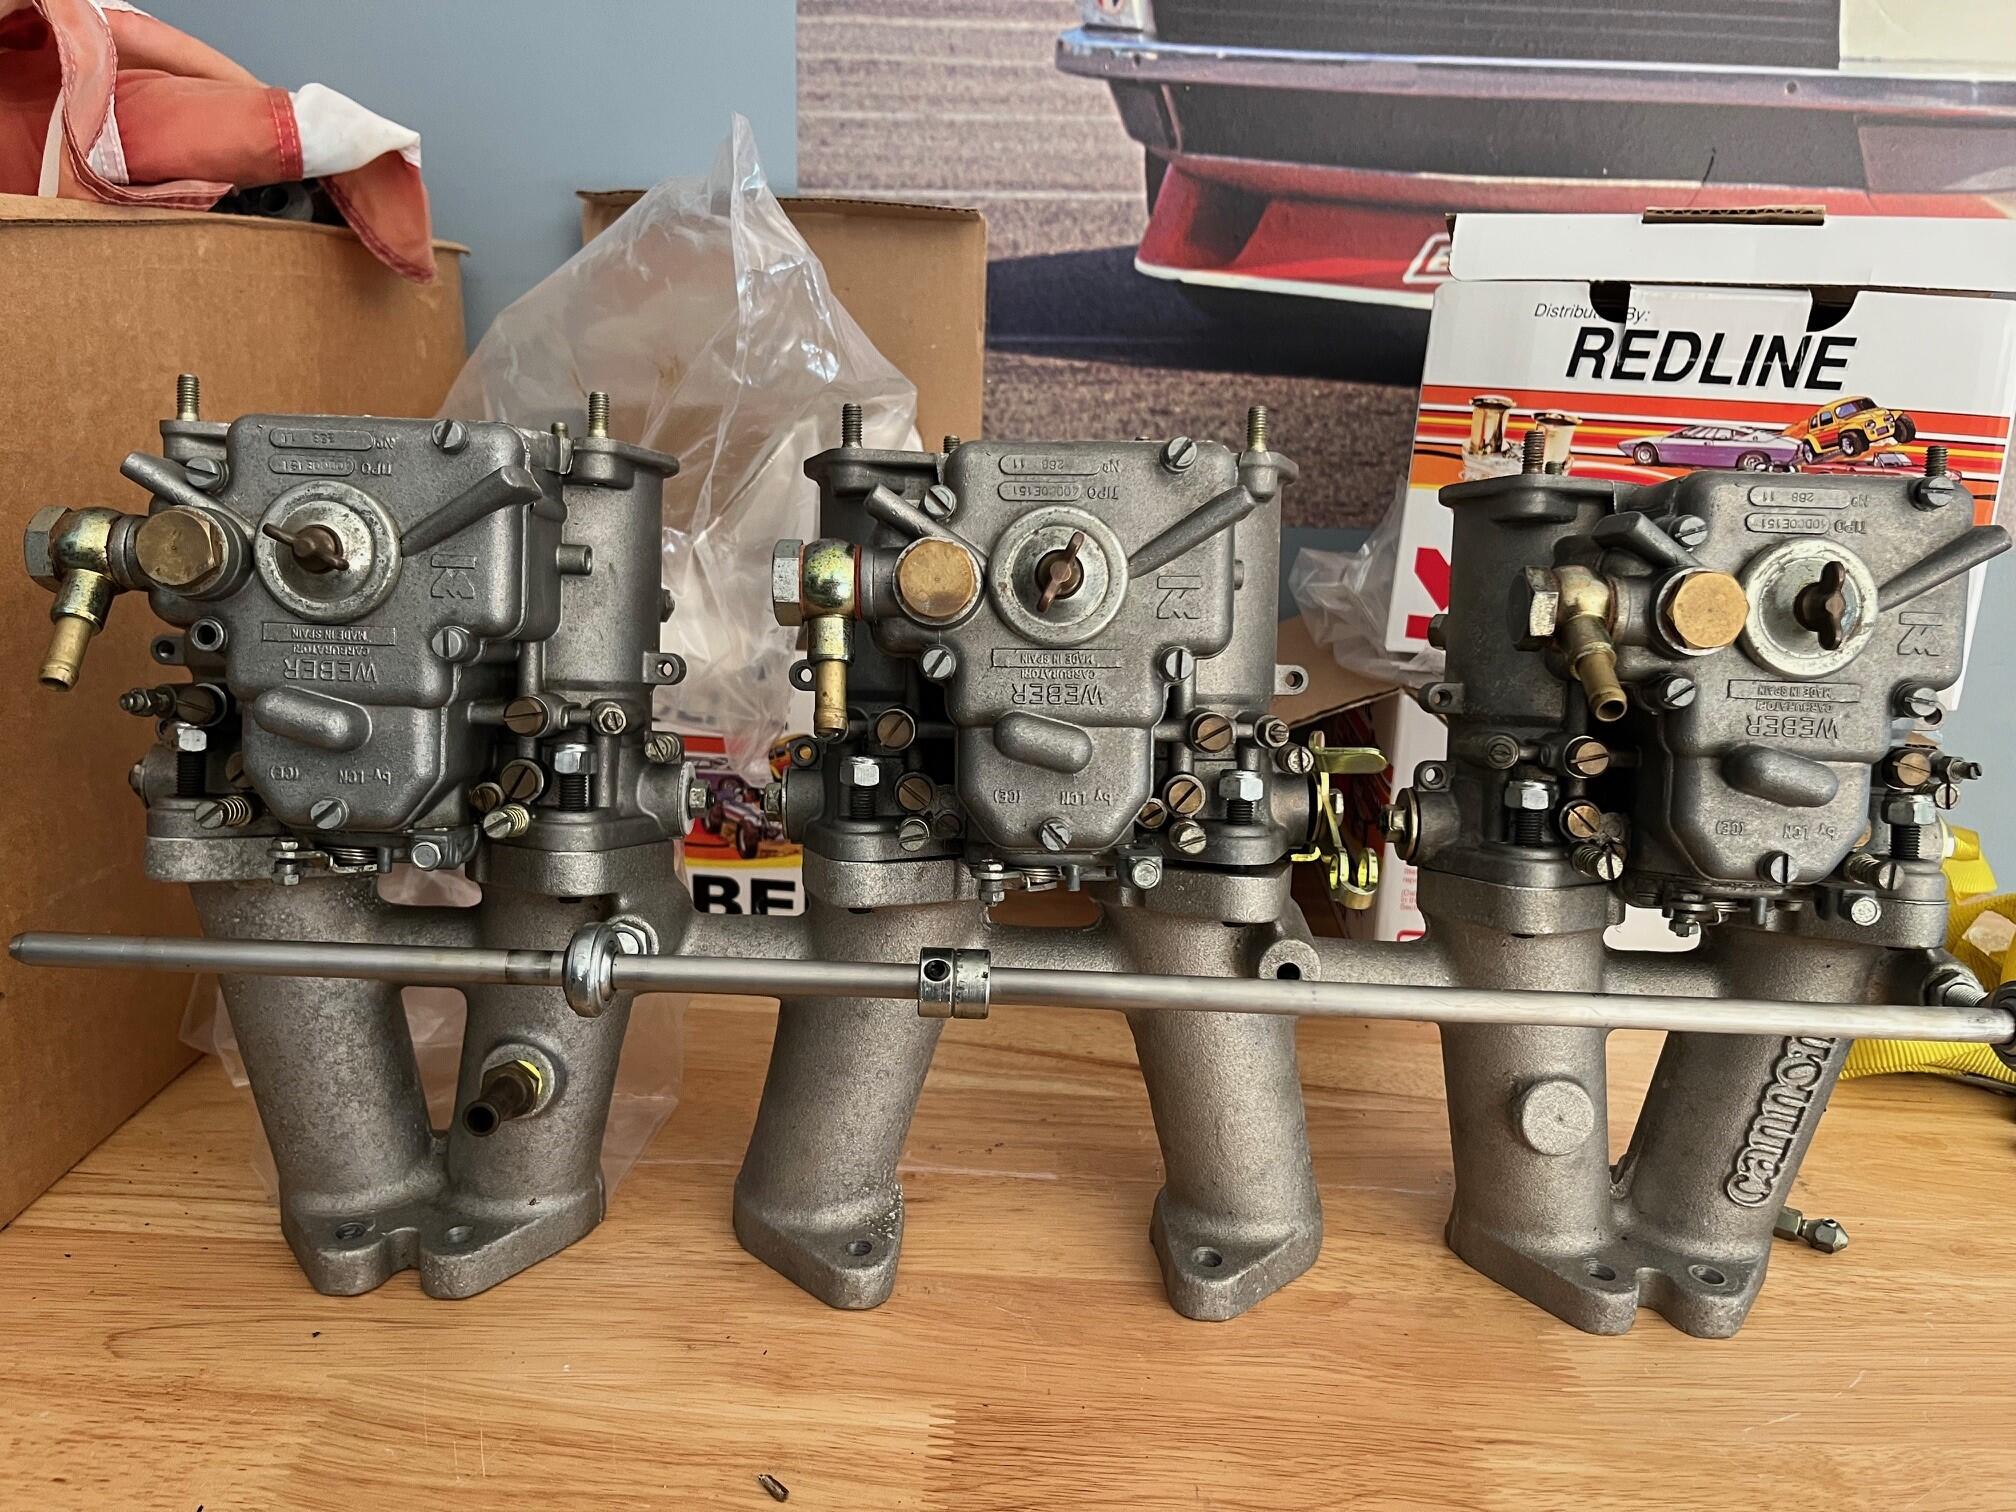
Cannon Manifold and three 40 DCOE 151 (spanish pedigree) weber 151s. I have had these apart and cleaned them but they still need to be gone through and verified. I had them on my Z car running since 2012. Pulled them off and need the space in my garage. Comes with oversized rod ends, and throttle arm mounting bar (less deflection), which is a modification of my own. Carbs are complete. I am pretty sure I have the air horns that came with them. I can ship to anywhere in the CONTIENTAL US, but shipping will be on the purchaser. I will box them up in a protected WEBER carb box individually. For the manifold and carbs I am asking 800 dollars plus shipping. Please give me an email at sdamico555@Gmail.com

-
I have always wondered why a vacuum pump on a booster would not do the exact same thing as manifold vacuum. It would not even need to be that big a pump as the master vac is relatively small. Only need to maintain about 45 mmhg.
-
My new check valve came in today so I will be seeing how it performs on the car compared to the one I have currently. I suspect it will be identical, but we will see. I was walking the dog the other morning and a thought came to my mind. My brake pedal has great initial bite, but then goes hard as a rock, with no give in the pedal. I also recalled that while the car is in neutral, I cannot roll it. At all. Takes every ounce of strength to push it. When all parts were more 'fresh', I could push it up and down the garage with relative ease with one hand. Just to further flush this out, I am jacked up both sides by the diff adn wanted to see if I could spin the rear tires with the car in neutral. NADA. Drums are darn near seizing up the rear end. How long has this been going on? Not sure, I drove it around town about a month ago. No issues, but again, car did not want to roll without engine help. I now suspect something is amiss with the wheel cylinders / emergency brake adjustment. Perhaps a complete brake overhaul is not needed. Maybe just a refresh of the rear and some better pads would do on all four corners. I think rear disks would be a worthy upgrade. Anybody running around with just a rear disk brake swap.
-
You are correct, I always has a very good pedal feel and then I did not. I think part of the issue is a bad check valve, and here is why I say that. I ran the check valve test with a vacuum gage installed down stream of the check valve in between the check valve and the brake booster. Warmed up the engine Let the vacuum gage settle down to about 45 mmHg or so (I think that was the number) Shut off the car and watched. The needle proceeded to drop and drop and drop and drop down to zero after about a minute or so. If memory serves last time I did this test, it held. So I ordered a new one. I will have to see if this helps or not. Either way, I suppose it is time to change it out as I installed that one back in 2009 according to my Z maintenance book I keep.
-
Front willwoods look awesome. Will they fit under a 15" panasport though. I have no desire to change wheels. I love my old panasports. Reaction disk had occured to me, but I was under the impression those fall out during installation. IF it was right for years, how could it fall out now? I need to go back to the manuals and check. 8.5" Brake Booster Upgrade Kit for Datsun 240Z 1969-'72 New Version – JDM CAR PARTS they do still sell a 8.5" brake booster that uses factor that its a bolt on with 'no siginificant modifications' . Sounds like it may require the 70/71 Z's master mounting holes be be drilled out a bit like so many other kits. I will run the vacuum checks on my check valve this week to see if it in fact malfunctioning. I replaced it a while back with a new one when I installed a refurbished brake booster back in 2013 or so.
-
I have loved and enjoyed my Z since 2008. It has been a loyal friend to me over many many many miles. The other day I was driving her round and the brake pedal was starting to feel a bit hard. I mean hard in a way where no matter how hard you mash the pedal, the braking force does not increase. I find this entirely unacceptable. I am currently 100% stock. I have refurbished front calipers and OEM stock (but not original) rear wheel cylinders/drums. I think the time has come for me to take a serous look at my brakes. The time for another Zedyone Build thread is YEARS overdue and this is something I have always wanted to do. My options include: 1) Complete overhaul: Front redo/rear disk/larger master 2) Just do rear disk conversion (probably end up doing CV conversion as well from u-joints) I worry about needing a larger master to handle rear disk brakes. I have looked at Wilwood conversions and some from silvermine, etc. All appear to be the same thing packaged a bit differently. But I do think the time for 4 wheel disk brakes has come. is there any advice from my Z buddies on this conversion. I want to entirely rejuvenate my braking power.
-
Update: My new alternator came in and when I tested the voltage regulator cap the leads that go to the diode read OL in one direction and when I switched the leads it read 0.597 V. That is what a diode should do. Low and behold the alternator is now outputting voltage. :) Problem solved. Now I have a spare alternator :)
-
-
-
So, while the failure seems possibly diagnosed, lets talk about why. What makes the alternator stop charging if that diode burns out. I have been looking a LOT at a 72 wiring diagram (I do not have a nice color 71 Z wiring diagram). I am trying to find something that looks like a feedback loop with a sense input, internal regulation and finally, output happens. I assumed the white wire with the red stripe coming out of the back of the alternator was the output voltage back to the fusebox and battery respectively. Is the T connector used in the feedback loop which tells the alternator to 'activate'
-
I already have another MSA alternator kit coming from MSA as we speak. It will be here in a few days. When I was just SURE it was the alternator I ordered one. But now it may look like I have a spare. It will come with the bypass clip for the Voltage regulator and I will swap it out then. If I had a spare diode laying around I could just solder up one with clips, but I am pretty sure I do not have one.
-
Okay, I went into the electrical lab at work and borrowed a Fluke. with the Multimeter on Ohms, with the leads going red to black (left to right) on the two pins with the diode the Resistance is 23M Ohms with the leads going black to red (left to right) on the two pins with the diode the Resistance is 1 M Ohms I then switched the Multimeter to Diode Tester. Red to black or black to red the Multimeter read OL.