Leaderboard
-
Captain Obvious
Free Member3Points10,081Posts -
HaZmatt
Free Member1Points566Posts -
grannyknot
Free Member1Points5,158Posts -
Pop's Z
Free Member1Points740Posts


Popular Content
Showing content with the highest reputation on 04/24/2015 in Posts
-
great info cap'n - truth be told, i've been looking at/wondering about that mysterious little silver barrel ever since i was a kid tuning up the 3.5hp briggs & stratton on my miinibike and never quite understood what it did. just knew it was some kind of magic part that was somehow necessary and prayed i never had to be able to explain it to another kid. it was just something that came in the box of points and you replaced it with your tune-up. fast-forward to a few months ago when i replaced my rotor/cap and i was surprised to see a condensor mounted near/wired up to my coil with no points in the distributor... the good folks at o'reilly couldn't locate a new one, so i just cleaned the contacts, said some magic words and put it back where it was. brought me right back to grade-school days...1 point
-
Haha! You funny. No quiz for you! Yes, you are correct. The electronic ignition transistor switched coils don't need the condenser like the points versions do. They just have to make sure that their switching transistors are robust enough to handle the primary coil flyback (kickback) voltage without being damaged. Interesting though, the later Z's with the electronic ignition module still DO have a condenser at the coil, but the later model condenser is on the battery side of the coil instead of being on the low side (switched side) like they do in points applications. I'm assuming it's for noise reduction or for a local low impedance source of stored energy. But anyway, that begs the question... The original topic of this thread suggested the importance of a condenser on the coil POSITIVE, not the coil negative. But in points applications the condenser goes on the coil NEGATIVE. So what gives? Blue, was that an oversight on your part, or did I go off and explain the whole points thing in a "normal" application, but miss the mark on the original intent of the thread? I mean, it wouldn't be the first time I answered a bunch of questions that were never asked, but I usually know ahead of time that I'm doing that!1 point
-
1 pointSituation normal with Bring a Trailer; Two or maybe three people who know what they are talking about, but the rest of them shouldn't be trusted with crayons let alone scissors...1 point
-
You can use rubber gasoline line they use for lawnmowers, scooters etc, works fine for the bowl to carb connection.1 point
-
1 pointActually, this was posted on Hagerty Insurance website a couple of days ago. Nice car, pretty decent analysis for our beauties. Cheers, Mike1 point
-
1 point
-
What the condenser does is provide a TEMPORARY low impedance path for the primary current until the points gap is large enough that the "kick back" from the primary is not enough to arc across the gap. That's the nutshell. Here's some detail. Start with some arc theory: 1) It's easier to establish an arc across a smaller gap than a large one.2) It's easier to MAINTAIN an arc than to establish one in the first place. So if you can prevent an arc from forming when the points are first opening and the gap is very small, you might be able to prevent an arc from ever forming at all because the points gap gets wider as the cam rotates and opens it further. in other words, if you can delay the voltage presented across the points gap until the gap is wide enough to withstand that voltage, then you will not get an arc at all. The condenser provides that delay with it's temporary path. The condenser has to be large enough to suppress the gap voltage until the points are wide enough to resist the arc, but as small as possible since any energy that you use to fill the condenser doesn't go into making a spark at the spark plug. The bottom line is you should use the smallest value you can get away with before you start arcing your points. But here's the tricky part... Remember the part about it being easier to maintain an arc than to establish one? That's where the ignition spark performance stuff comes in. You might think to yourself "Heck, I want the hottest spark possible at my plugs and I don't care if I have to replace my points more often to get it. I'm not going to use any condenser at all and that way, I'll get more energy at my plugs." Well, not true... If you don't use any condenser at all and simply let the arc form across the points gap, you're bleeding energy out of your ignition coil through that arc the whole time that arc exists. So by the time the primary energy is no longer high enough to maintain the arc, you've lost a bunch of energy that COULD have been put into a secondary side spark but is no longer available because it went through the points arc instead. So if you can time it correctly such that the condenser is full at the exact same time when the primary side voltage is not high enough to jump the points gap, then you will get a faster change in the primary current and hence a hotter spark on the secondary side. In other words, the resistance to flow through an already established arc is lower than the resistance to flow though a full condenser. Use the smallest condenser you can without arcing the points. Not only will you not burn up your points, but you'll also get the most rapid change in primary current which creates the hottest spark at the secondary. Quiz on Monday.1 point
-
1 pointYou can do a few tweaks: Part 1 [WOT] Problem: Your WOT is 10.8-12.4 with the jet nozzle at 1.5mm down. You need this to be leaner at 12.5-13.5 so you need to come up a point in air fuel ratio. This means the orifice at the top of the nozzle needs to be plugged more by a thicker needle's cross-section. Solution: Raise the jet to 0mm. Use your fast idle screw on the throttle rod to get your idle at 1000-1500 rpm (or more... for test purposes) so you are in a richer part of the needle and can drive the beast at 0mm to do a test run to check WOT. Hopefully your WOT AFR will come up a point. If it has come up over 13.5 then lower the nozzle 0.5mm (1/2 a turn) and repeat until your WOT is ~ 13. Unfortunately you can not go to a higher AFR than with the nozzle at 0mm so that is your upper AFR limit at WOT. Part 2 [idle] Problem: Your idle is too lean. The needle is too thick near the shoulder and blocks the flow of fuel out of the nozzle's orifice. Solution: You need to thin the region of the needle just below the shoulder ~ the first 1/4". Spinning the needle in a chuck and sanding then measuring the thickness with a caliper is the standard way. You can also try filing with a delicate small jewellers file but it is non-standard way. This process will be try-and-test iterative AND you need to get both needles to the same shape to each pass the same amount of fuel. It seems like a challenge but you should be able to improve what you already have. You could also try buying some used needles and sanding the old fashioned way to make work.1 point
-
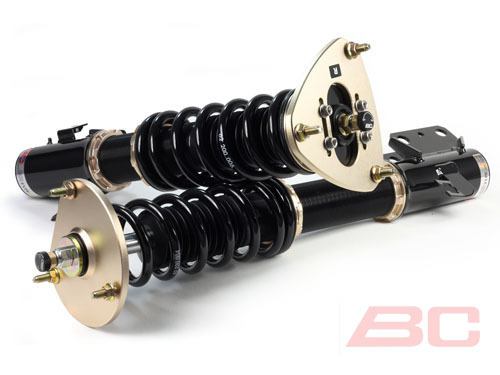
1 pointWell......I pulled the trigger and just ordered these. They are the BC coilovers from JPN Garage. They've been getting pretty good reviews over on Hybridz. I'm pretty disappointed in how my Eibach springs are sitting really high in the back. Plus I would like some camber adjustability. Has anyone else tried these?
 1 point
 -
Haha! Well I hadn't given a lot of thought about going into the knob business. I'm not sure how many shots I'm going to get out of my mold for the shift map. It's certainly not what I would consider a production endeavor. I did cast a few extras but didn't finish the process. Let me dust off the project and see what I got. siteunseen, I believe those knobs that MSA sell are Nissan's current factory offering and are the same ones that show up on ebay as well. They look very nice but it looks like the dimensions of the wood is off from the original and the font on the shift map is different as well. I mean, if your original knob is a mess, then those are certainly a huge step up, but someone who knows what they are looking for would be able to spot the difference. I've not yet seen a highly accurate recreation of the original knob other than what I produced. On all the aftermarket options I've seen, either the wood dimensions are off, the lettering on the shift map is off, or the map is just two dimensional design without the "depth" of the original three dimensional reverse lettering design. I would put mine on a stock restoration and let the show judges see if they can tell it's a repro. Other than the fact that the threads on mine aren't all stripped out inside, I would challenge even the vintage experts to tell the difference.1 point