


I'm fairly picky about vintage calipers and how they should be treated, especially with some 40 years on the clock. I'll show what I think is right... it's not really that much beyond a standard rebuild once your in there.
I'm fairly new to the site so I'm not sure if image tags will work etc. so bare with me as I figure it out.
Looks like image tags aren't the answer. I'll include some pictures of the start. I think I'll make them a tad smaller so they don't take up so much room on the server. This will be a little clunky as I'll enter a few pictures at a time and discuss.
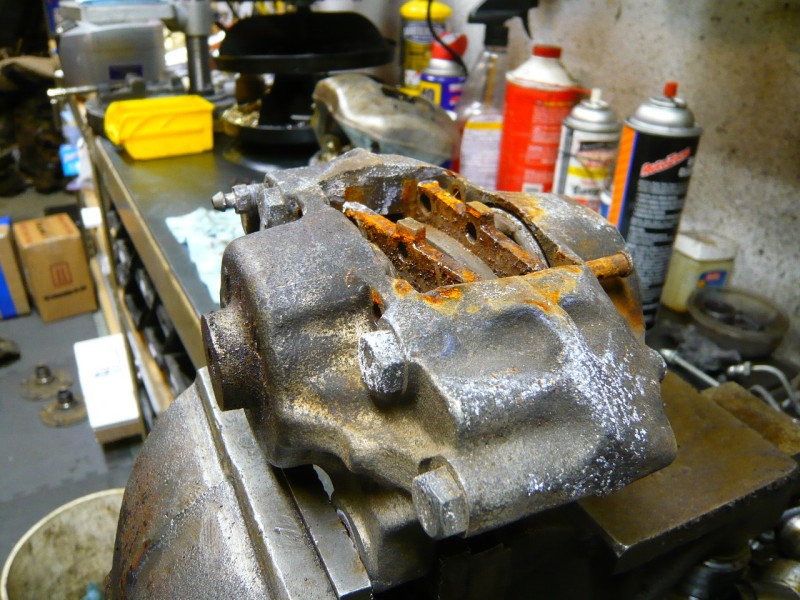
Here's what we started with. The first thing to do is prep the caliper for complete disassembly. The pins come out and the dust boots come off. Once that is done we mount them in the vise and install a 10x1 nipple valve so the pump can do it's trick:

Next we use a set of piston clamps to hold the outer piston in place while we use fluid to blow out the inner piston. There's a couple things at play here and I'll describe the tools and the purpose behind all of this.
First off, let's go back to the 10x1 nipple valve and the "fluid" comment. I'm sure that most people reading along, who have rebuild calipers at one time or another have used the "pressurized air" method. You simply clamp off a piston and blow pressurized air into the caliper and "pop" out comes the piston. This will work on most calipers that have been working on the car. If the caliper or the car has sat for any length of time, the area above the bore seal will begin to contaminate with what I like to call "caliper shellac". This is a combination of rust and fluid that has passed the seal. This is what causes pistons to bind in the bore. Nearly 50% of the calipers we service will not come apart with air. Hence, a fluid is needed to push these pistons out. Fluid is safer as well. A piston letting go with compressed air has the velocity of a bullet coming out of a gun. This can damage your pistons and your caliper. With fluid they just "plop" out. Bottom line, fluids do not compress and they will do the work that air cannot in the case of a stubborn piston.
Tools: I'll show what we're using and, in the case where there's a garage bench substitute, I'll pass that info and method along. In this post, the caliper clamp is nice but not always a necessity. You can get by with a small c-clamp holding one or both edges of the opposing piston. You just have to make sure they're not in the way of the other piston you're attempting to remove.
Inner Piston: On most calipers I like to remove this piston first as it allows better clamping access to cover that bore. You'll see how this progresses.
So here we'll hold the outer piston in place and use fluid to pump out the inner piston. In the 3rd picture you can see it coming out:

Once the inner piston is out we need to seal up that bore and pump out the outer piston. To do that we use a fairly large rubber stopper and a steel plate. I use the vise to clamp the bottom of the plate with the caliper ears and a few c-clamps on the top to secure the rubber plug in the bore. If you don't have a large enough rubber plug, a large rubber washer and the steel plate will also work. For many of these pieces www.mcmaster.com is invaluable.
Here are some shots of the cover in place in the piston removal:
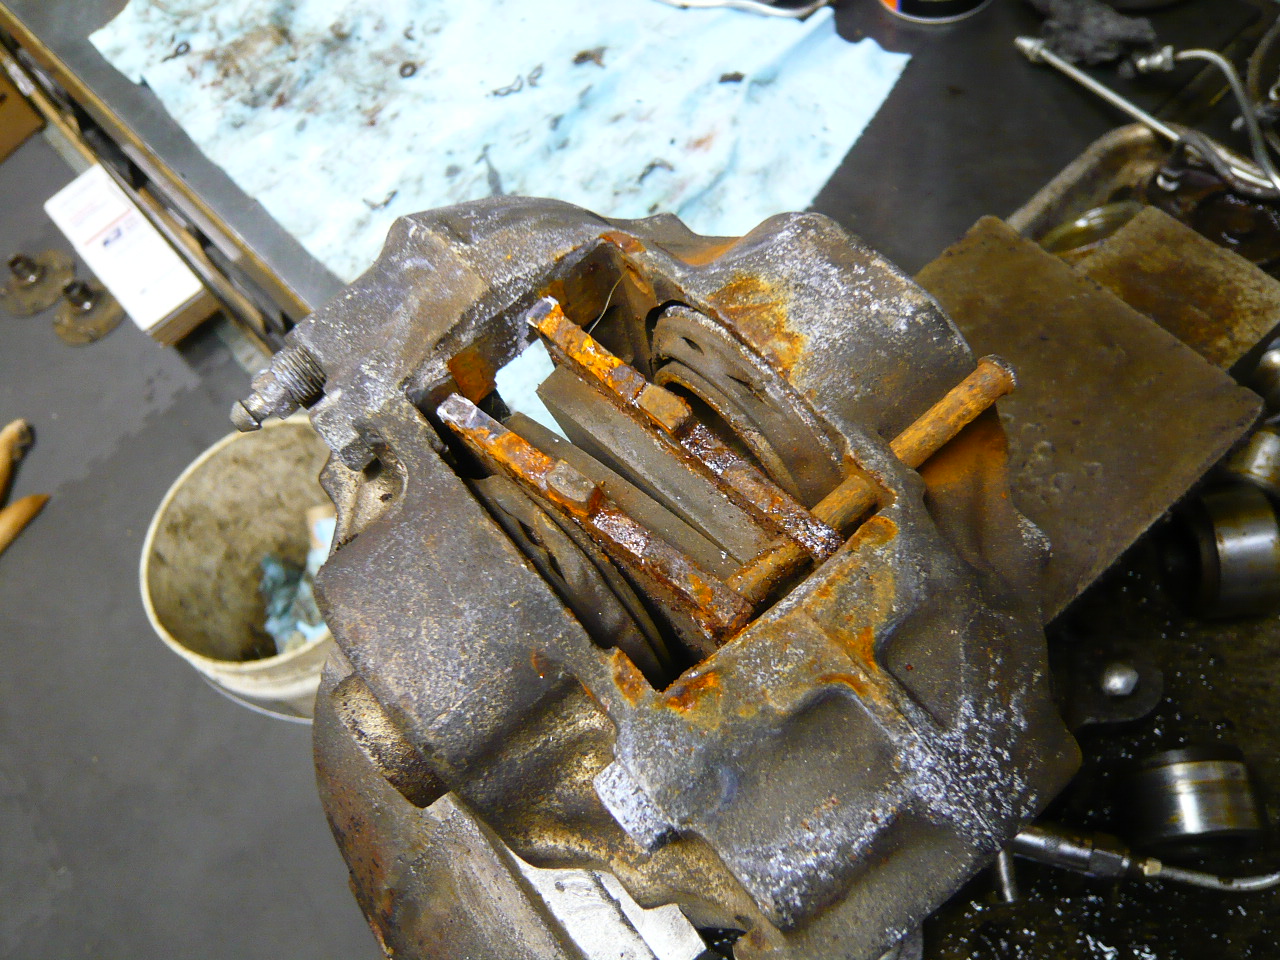
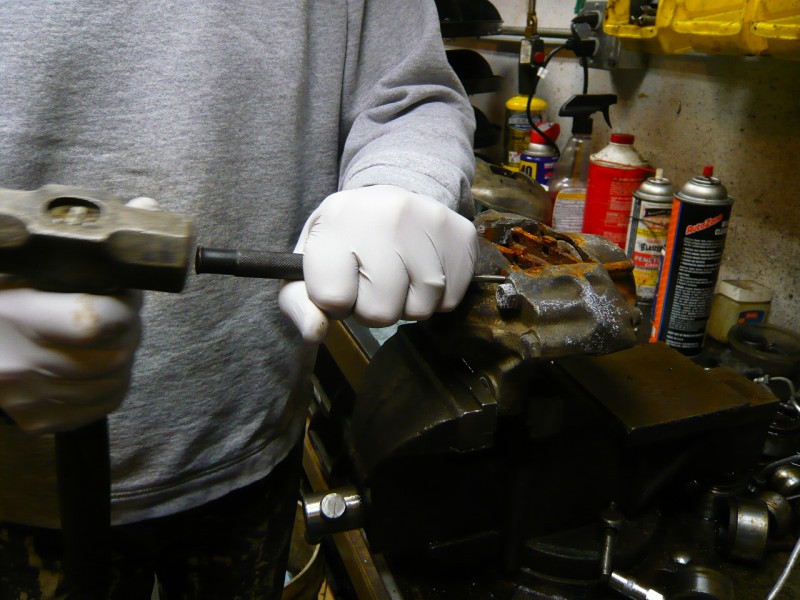
Next it's time to bust loose the 14mm M9 fasteners. These were in pretty tight so I used a longer breaker bar to get them started and then wrenched them out.
Once they're apart we simply pick all of the seals out and remove the bore plug. These are now ready for plating:
A word about plating (and yeah, I'm pretty anal about this stuff):
We get this all the time;
Quotewhy not just paint the calipers?
1. Paint only protects the outside of the caliper... not very well and only temporarily.
2. Paint comes off with odd things like... brake fluid and brake cleaner.
3. Paint can actually encapsulate the caliper trapping in heat.
4. Zinc is the factory finish and has superior "sacrificial" corrosion protection.
5. Zinc re-plates the bore, which it probably needs it by now.
Rebuilders that paint calipers do so because zinc is expensive. They can easily slap on a coat of paint on "in-house" and it speeds up the process. They can even call it cool things like "Ceramic" or "Polymer" etc. If you want your calipers done right they will need to be zinc coated like the day they left the ATE factory.
So as you're reading along, I take it you've come to understand that I'm not a big fan of painting your calipers. True. In fact, I think it's one of the goofiest trends we've seen since Porsche put the first set of "Big Reds" on a car and others spray painted their way to glory. That said... to each his or her own.
Plating at this stage of the game will probably take about 1 week out of your schedule and, if you look around you can probably get the whole shooting match done for around $50-60.00 bucks. This will ensure that your "vital" brake calipers will give you another 40 years of service.
Off soapbox...
Here's a shot off the units returned from plating:
Oh Wait... Before that, I forgot to mention that we needed all new pistons for these beasts. I've yet to do enough Z caliper to know if this is common or not (Porsche S-Calipers are the worst for this) but these were trashed. The new units look great and are in these pics as well.
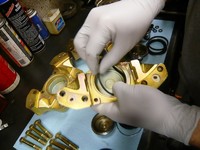
Let's get this party started.
Next we start the fun process of putting it all back together. This starts with seals and dust boots.
For the seals, I like to just walk them around in the groove and push the final bit into place. An angled dental pick can help if it gets a little twisted. Just run it through the groove and the seal will usually sort itself out.
For the dust boots, I like to install these before you put the pistons in. This may seem obvious but, I've had the question arise. I also go around and tug the edges and look at the seal to the piston from the bottom to make sure they're seated properly.
Big Derpy-Der Moment: I just realized that we didn't get any pictures of the pistons going in with the Arbor Press. I'll do my best do describer here but, it's pretty straightforward with these:
1. Get "Brake Caliper Assembly Lube". Other assembly lubes can swell your new seals and ruin your calipers. PEP Boys has it in single use tubes. We use the ATE assembly lube. I like to put a dab about the size of my thumbnail inside the bore and spread it around with an applicator brush. You can use a finger as well, just make sure it's evenly spread around the bore.
2. Simply press in the piston. I put both thumbs in and push down. It "should" slide paste the seal and drop right in. If not, a little persuasion from the arbor press is all that's needed. If you don't have a bench top press, a socket dropped into the piston cavity and a vise will suffice.
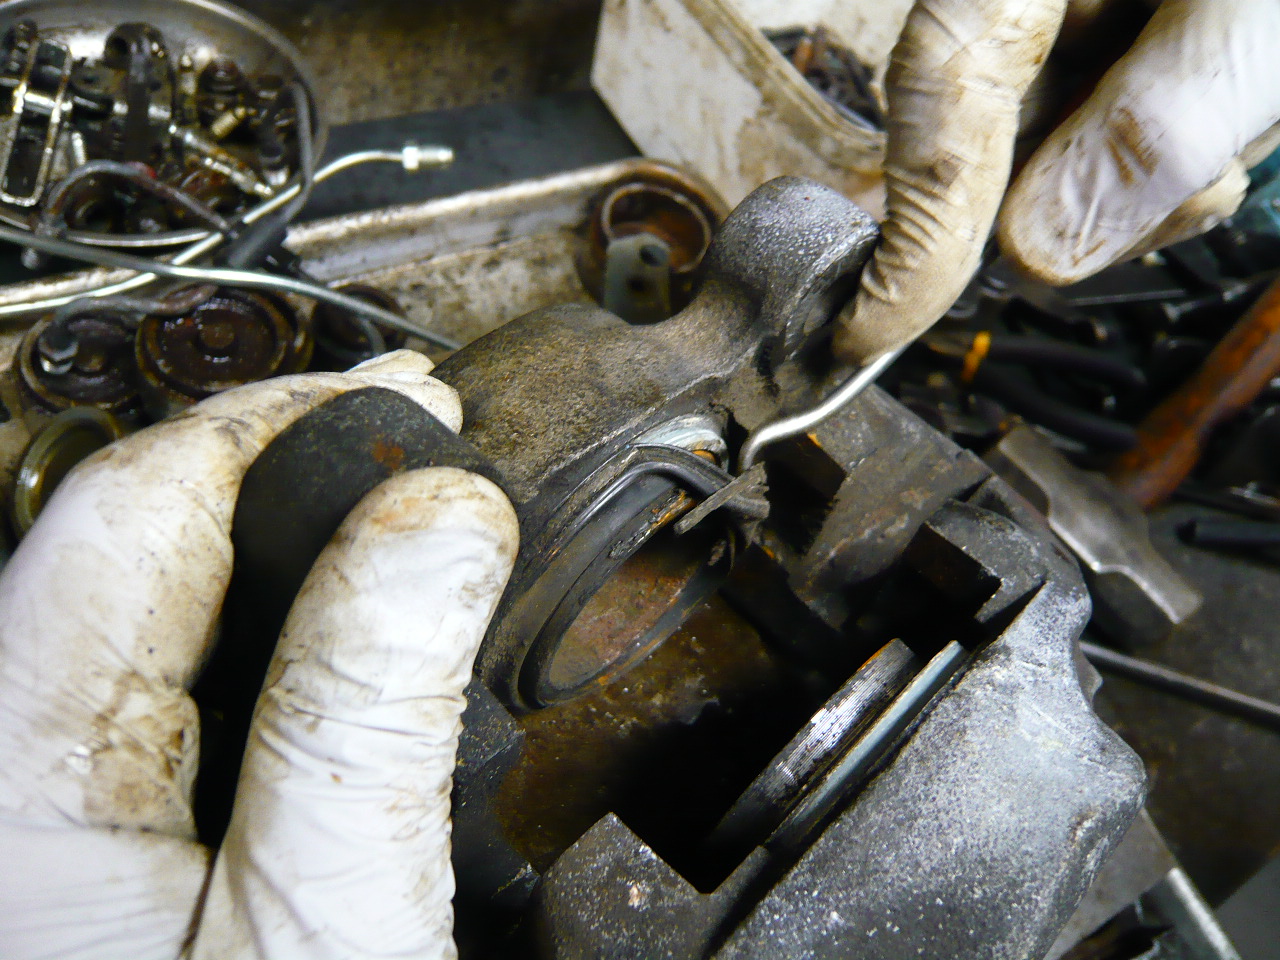
3. Once the pistons are in, make sure you wrap the wire dust boot clip over the top of the dust boot to secure it in place and keep water from getting in. Do this before you bolt them together and it's much easier.
Once the pistons are in place, install the rubber caliper 1/2 seals and drop your fasteners into the back 1/2 of the caliper. Hold the front half in one hand and pickup the back 1/2 in the other and drop the back 1/2 down onto the fronts with the new seals in place. I like to have a 3" extension loaded with a 14mm socket handy at this point as the process of screwing the caliper 1/2's together begins now:
Well... this pretty much wraps it up:
Once the calipers have been hand tightened (this is a great time to align the 1/2's before torquing them down), it's time to take them over to the bench.
We protect the plating in the vise and begin the torquing process. These fasteners are M9 so I like to use a final torque of 29ftlbs. Here's the sequence:
Number the bolts from left to right 1-2-3-4.
Torque as follows first:
10-14ftlbs. 2-3-1-4
Next, go to final torque:
29ftlbs. 2-3-1-4
Once the caliper 1/2's are put together you should have some new calipers on your hands. Install bleeders, pads, pins and clips and you'll be back in business.
A word about your new calipers and your new pads:
1. New calipers have new seals. These new seals will tend to pull your pistons back off the pad/rotor more aggressively than old seals. This means you will have a soft pedal for a while until your seals break in. Use the proper bedding procedure for your pads and it will help break in your seals. Your pedal will eventually begin to come back up as your seals break in.
2. New pads should not squeak or squeal if they are bedded properly. There are also pads designed not to squeal but they also have the bad habit of not stopping as well as the proper pads. Rob mentioned the Porterfield pads early on. These are our favorite for both stopping power and modulation. These are an extremely predictable pad and they will easily out stop compounds of the era. Great investment for anyone thinking of "upgrading". Again, following proper bedding procedures will ensure your pads not only work well but work quietly.
I hope this helps! I'm a car guy so I love to see people dig in and get it done (the proper way) no matter what the make and model.
Feel free to ask any questions about areas I may have missed.
Yes, they're a tad different from your average mass rebuilder. We get that a lot too:
QuoteWhy not buy the el cheapo mass-rebuilt, assembly line calipers other parts vendors are pushing on me?
1. Those things cost those vendors $35.00 each. They're pushing them because there's big money to be made off you.
2. The caliper bodies are vibratory tumble polished. They put them in a huge bin of media and polish all of the finish off them. Then they get an oil bath. That's it! There is "no" protective finish on them at all! Give it a few years and your bargin calipers will literally be covered with rust. We've seen hundreds of them. The ones that come from the big-box rebuilders are almost unusable in a few short years.
3. We've seen pistons in backward. We've seen two different spacers installed on one caliper. We've seen handbrake arms on various other caliper types installed backward.
4. Their fasteners (the things that literally hold your brake calipers together!) get the same oil treatment. They begin to rust within a few short years. We've had some stick inside the calipers as we attempt to tear them down.
The real benifits of zinc is the sacrificial coating properties. Zinc, by nature, will attract oxidents and literally save the metal it is protecting. Even if it is scratched off the zinc will continue to protect the steel it encapsulates. We've restored 46 year old calipers and have them come out looking brand new. All thanks to the protective properties of the zinc coating applied those many years back.
Zinc also helps protect your piston bore. While the bore is not a sealing surface, it can get wear from the piston. Wear, lack of fluid changes and rusty caliper shellac will cause a caliper to stick. This usually happens just above the seal where moisture can get in. Other rebuilders use a hone to clean out your caliper bore. We recommend against that as it leaves a fresh steel on steel surface (bore and piston). The zinc bath leaves a perfect factory finish on the inside of your caliper bore. All in all, the process will clean and replate the entire caliper and make everything good for another 30-40 years.
I'm a real advocate of having your calipers replated... obviously.
I don't want to get into the costs here because the intent was not to turn this into a SPAM thread rather than a helpful how-to.
QuoteHow did you get the zinc plating to look so golden and shiny?
That's basic "yellow" zinc as they call it in that industry. There is; yellow, clear (silver) and black as the three most common. Most of our fasteners are done in black but these were yellow. Sheen is determined by many things, metal prep and how long they're left in the dichromate (which is the final stage that makes them yellow in appearance). The metal on these calipers was very good hence the finish we got on them. Check out the last few style shots I took for the web. Rob is right, they look even better in person.
Westpak - Thanks. Again, as I mentioned in the first post, it really isn't too much different than a standard rebuild. I really want to encourage people to get to know their local platers though. Be careful though... vintage car guys going to a metal plater can be detrimental to your marriage and your bank account! ![]()
Adam - You are forgiven. There's still time. ![]()
About Porterfields. I'm a big fan and have them on all my P-Cars, even the Pig (AKA Cayenne). Here's my take on those... there are $25.00 pads and $125 pads, the Porterfields act like the $125 pads for about 1/2 the price. I like the R4-S (as in street/autocross) compound as they modulate like a dream and are extremely quiet if bedded properly.
Here's some info on the compound:
http://porterfield-brakes.com/images/portstrt2008_11_06_02_45_30.pdf
Fronts are AP114.
Rears are Shoe411.


Recommended Comments
There are no comments to display.
Create an account or sign in to comment
You need to be a member in order to leave a comment
Create an account
Sign up for a new account in our community. It's easy!
Register a new accountSign in
Already have an account? Sign in here.
Sign In Now