


I received an e-mail from mdbrandy and he mentioned finding this article on another website. He mentioned that it had been helpful to him, and felt it might help others.
So, in the hopes that it will, here it is. The double line spacing between paragraphs is in case you print it out and use it as a checklist.
Enrique Scanlon
============
I did this years ago, on another 240Z. Working mine up to that point in it's recovery. Since the first z was disassembled in a haphazard manner, (fixing one thing only to discover ANOTHER thing needed fixing which in turn.....ad nauseaum. Sound familiar?) I'll address your question from what I discovered upon reassembly.
(Anyone else get annoyed with "Reassembly is the reverse of these steps" found in so many manuals that DOES NOT warn you that you might royally screw something up if you do not ....?)
I would recommend removing the seats first. They are one of the bulkiest items in the car and removing will greatly facilitate the rest. This should now give you access to the seat belts, remove those. Also remove the parking brake vinyl boot.
After the seats, and all carpeting, front and rear, remove the center console. You could also remove the steering wheel, even before removing the seats, all it takes to remove it is to remove the horn pad (just pop off), then remove the center nut holding the St. wheel in place, give a pull on the steering wheel and it should pop right out.
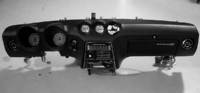
At this point you should be down to just the vinyl on the hump, and the plastic side panels. Since you can now address the dash with little obstruction remove the dash. Please note, this is kind of tricky if you've never done it before, most manuals give a very generalized description and don't mention some of the "hang-ups".
Fist remove the dash embelisher at the top of the dash. There are 5 Phillips Head Sheet Metal Screws holding it to the dash. These should unscrew fairly easily, if they don't be careful since the sheet metal "nuts" on the brackets can be stripped quite easily. If they're tight it means you have some rust there, and you don't want to strip the phillips head. Take your time doing this, a magnetized screwdriver will help you to NOT loose screws down the defrost vents.
After the embelisher, BEFORE you go crazy removing the bolts / screws holding the dash to the firewall, Reach behind the dash, on the drivers side, to the left of the Steering Column, and follow the speedometer cable up to the speedometer. The cable is attached to the speedometer via a collar, unscrew the collar and remove the cable from the speedometer. Next, on the kick panels, disconnect the wires to the door plunger switches, and in order to avoid confusion later, just REMOVE the relays and flasher switches affixed to the kick panel and leave them ATTACHED to the wire harness. They'll just hang down for now. Also disconnect the dash wiring harness from the Body and Rear Harness' behind the glove box.
Next, remove the air vent handle brackets from the bottom corners of the dash, and then remove the bolts holding the lower extreme corners of the dash. Since the center console was removed earlier, you should have easy access to the two bolts holding the center of the dash to the hump. Since you are probably flat on your back at this point, go ahead and disconnect the heater control cables at the Heater Box (2 on left side), and the Water Valve, and Main Vent control. There is a total of 4 cables. You'll need a short Phillips for these.
Disconnect the hoses leading to the defroster ducts by removing a screw at the base of these that hold them to the Heater box. Depending on whether the spring clamp at the duct / hose connection is still in place, you might or might not be able to pull on the hose and remove it from the defroster duct. Don't pull too hard as these pieces may be brittle due to age.
Disconnect the Heater Blower Motor from the Switch, either at the switch or at the heater, also remove the power wire.
At this point, if you want, you can remove the Heater Control and Center vent plate from the dash, but it isn't entirely necessary. I would recommend doing so, since the chrome panel can be quite fragile.
Remove the screws holding the fuse box in place, and disconnect the wiring going to it, so you can pull out the wiring from around any obstructions.
Drop the steering column, since the 4 bolts holding it in place also hold the dash. At this point, the dash should have ALL the electrical connections disconnected, the heater cables disconnected and speedometer cable. Look underneath and make sure you haven't forgotten anything. Don't forget to check your turn signal and seat belt / door open buzzers, these might be attached to the steering column support bracket, remove or disconnect to free the dash.
At this point, the only thing holding the dash in place, are those 5 bolts visible from the top of the dash. The two outermost are tricky, use a swivel, and if possible a magnet insert so you don't drop them down. Remove all these.
The Dash will now be ready to remove. Raise the Dash from the hump gently, and at the same time, pull it towards you. It should slide out easily, any difficulty is usually because of a forgotten connector. Once the dash is moving out, lift it away from the firewall, and ease it out the door.
If you are planning to remove the blower housing, be aware that the top of it is gasketed to the vent opening with plumber's putty. It is kind of gooey and might startle you. This is a flexible gasket used to seal the vent / heater flapper box to the body. Be EXTREMELY careful with the connecting duct to the heater core, this duct takes a square opening and transforms it into a pie shape, since it is immediately downstream from the heater resistance (used to give you a little bit of heat when you use the defrost) it WILL be brittle. If you tear / break this, you'll have to locate a replacement. If you remove the Blower Housing first it will make it easier to access the Heater Core Hose connections.
The Main Heater Box with the Heater Core inside will have to have the water hoses disconnected. I found a couple of those rubber wine bottle corks and used them to cap the line as soon as I removed them, note that you WILL lose some coolant, so put lots of towels underneath where you will be working. Now, remove the heater box mounted on the hump.
At this point, the car is mostly bare up front except for the vinyl on the hump. It may be that the vinyl is already separated or separating from the horsehair beneath it, or the horsehair form the hump.
In either case, to remove it and to avoid further damage on the vinyl, look at how this is affixed to the car. Usually it is bonded to the "horsehair" underlayment which is also glued to the transmission hump.
To remove this, I recommend a scraper 3-4" in width, and then begining at the bottom of the hump, whether passenger or driver your choice, slide your scraper underneath the horsehair and while lifting, use the scraper to sever the bond between the horsehair and the hump. You will no doubt find that you will be "tearing" the horsehair, the scraper is to limit the amount of tear. On some cars, the adhesive will be shot and it will be real easy to remove. Note: The reason for removing the Vinyl AFTER the Heater Box is that part of the vinyl goes over the hump BEHIND the Heater Control Console and UNDERNEATH the Heater Core Box.
The front of the car should now be down to firewall, foot pedals, and floorboards.
Now, going to the rear of the car, remove the rear light plastic cover, then each of the side panel plastic parts. These have a rivet with a spreader pin going through them. The book says to push the pin THROUGH the rivet and then remove the rivet body. The main problem with this, is that you might loose the bloody little pin and find that you have to buy new rivets. Since I had a bag of new rivets that's what I did, but if you don't have replacements, a friend of mine suggested drilling a real small hole in the pin, and then using a small (really small) sheet metal screw, screw it into place and then PULL the pin out. I guess you could probably find some good glue and glue a nail head to the pin also. Whatever method you use, those rivets HAVE to come out to remove the plastic panel pieces.
One method I have used to recover and reuse those pins works, but only after you've gone through the car the first time and CLEANED and I mean really cleaned inside the plenums. By cleaning inside the plenums, I mean stuck a vacuum hose in there and gotten rid of all the schmutz that can/will have accumulated there since the car was new. One car I had had over two handfuls of cigarette filters stuck in between the metal pieces, talk about your smelly mess.
Once the plenums are clean (or as clean as you can get them), you can just push the rivet pin through the rivet, remove your panel, and then using your vacuum hose and a girl's knee high stocking taped on the end of your hose (as a filter/net) you can then retrieve and re-use those pins and rivets when you put the plastic panel back on.
Once you have all the plastic panel pieces out, you should have ready access to the headliner. Here I would recommend you pause. If there is a reason, and a GOOD reason to remove the headliner, then do so, but if you are just going for a complete repaint, there is rarely a reason to remove the headliner. It is much easier to mask it off than to replace it. A good reason would be that you discovered rust THROUGH the roof panel or door / hatch openings, and you are effecting repairs.
I would recommend removing the visors, and rear view mirror.
Well that's it, I know this post is long.
If anyone can add / correct anything here, please do so.
For What It's Worth / 2¢
P.S. (heh heh) Reassembly is a reversal of removal

Recommended Comments
There are no comments to display.
Create an account or sign in to comment
You need to be a member in order to leave a comment
Create an account
Sign up for a new account in our community. It's easy!
Register a new accountSign in
Already have an account? Sign in here.
Sign In Now