7T1240
Community Member
-
Joined
-
Last visited
Everything posted by 7T1240
-
Jack, hello. Are those photos of your 260Z? If so, are there more photographs (and written descriptions ) of the restoration process you are taking your car through? Thanks, Gary S.
-
Thanks for your response Virto. As you said, 'Learn something new everyday with these cars'. Thanks to your post, I now have Zparts bookmarked along with other Z parts suppliers...I wasn't aware of them before your response. Thanks Jim, this was just the information I was looking for. Gary S.
-
Hello beandip. The car is up on jackstands right now. I've already dropped the tank as well. Earlier tonight I examined the tank itself (just as you suggested) and found evidence of a fuel leak pattern below the small nipple at the top front of the tank (where the u-shaped hose heads back to the reservoir). If my recollection is correct, this is the same hose that dogma cited as the culprit in his write-up. Put some light on it and it is indeed damaged (cut) about 1/2" from the end. Regarding the tank itself, I believe the tank seams are intact, and I only see evidence of one small dent. Rust and sediment don't appear to be problematic either. However, the tank could use a good cleaning, and would benifit greatly from a new finish. Gary S.
-
Yes. To retrieve the car at purchase I had to bus about 170 miles from home. Before leaving the seller's town, I filled up the tank, then stopped to grab a cup of coffee before hitting the interstate. That's when I noticed fuel leaking under the car - at the gas tank, on the filler neck side. At the time, I did not attempt to pinpoint the source of the leak. And after that time, I (perhaps foolishly) did not attempt to recreate the problem by topping off the tank again. At this point, I will probably take the fuel tank to a shop to have it boiled out and pressure tested (if this is how they check for leaks). As you suggested, I will also probably replace most or all of the hoses and grommets, including the fuel filler hose. Interesting. Thanks for filling me in. I was just curious what you were referring to. Probably not the fix for me, especially given the questionable availability.Gary S.
-
Just for clarification, my initial reason for broaching this subject is that I am having problems with exhaust and/or fuel fumes in the cabin, and also a fuel leak when the tank is full. I formed the question as I did because it is my understanding that this system is subject to scrutiny in states where emissions testing is still required. I solicited responses from folks who live in states where their cars are inspection exempt because the question of keeping or eliminating the system didn't seem pertinent to those in states where the system is still required to be in place. I'm not sure where the assumption was made that it might be my hope to gain horsepower by eliminating this system. I'm just trying to eliminate the various causes of fumes in the cabin. I realize that hatch seals, taillight seals, door seals, existence or absence of a rear spoiler, etc., etc. are all possible contributing factors to be explored, but the fuel tank and reservoir is the system I'm troubleshooting currently. Tom, what are the accepted devices you are referring to here?
-
No apology necessary, Ron. On the contrary, explaining that Mr. Vaughan's skillset includes welding and that his toolset includes a lathe are pertinent to this thread, as I was hoping to connect the forum to him as a resource, not turn folks off to him because they perceived his work as expensive. It was good you asked for clarification on what work was done. "Thanks for your nice words, I have family up in the Spokane /Liberty Lake area, I will drop you a line next time I am up in that area. Ron" Ron, that would be great. And Arne, if you are ever in the Spokane area, you should do the same. Gary S.
-
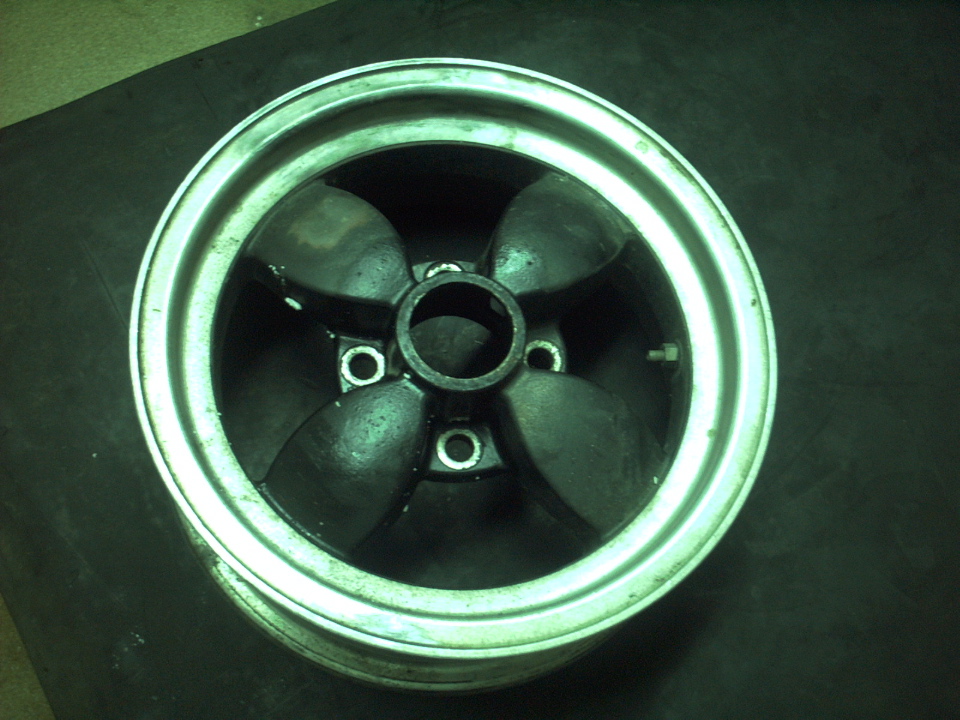
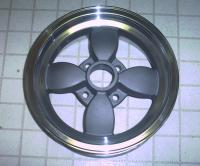
Before I shipped the wheels to Terry Vaughan, he requested that I send him pictures of all four wheels so he could give me an estimate on the cost. After my doing so, here is his response: Gary : I can make them look like this if thats what you want. It would appear that your bill would be $450.00 with the welding and machining the outer lips. if you want to proceed then ship them over. I paint the spokes an Iron cast color and my monitor is set light so I am not sure what color you see at your end. Terry So, yes, they were machined, and also required some welding, which I believe was to correct curb rash/gouges. When he states "I can make them look like this...", he attached a photo of a Libre wheel as an example. BTW ron carter, I subscribe to Sports Car International, and loved both your car and the feature on it. Gary S.
-
Hi Arne, 4 Wheels @ $110 / wheel = $440 + $40 for shipping. I also made some other miscellaneous purchases, i.e. centercaps and valve stems, which brought the total up slightly.
-
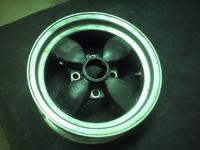
Here is a before and after pic of one of the Libre's refinished for me by Mr. Torq Thrust, aka Terry Vaughan. I found the wheels on Craigslist on the east coast advertised with the following description: 4 14' American Racing torque thrust looking wheels, no rash $40 It took several email / phone calls to the seller to determine that these wheels were in fact 14' x 6' Libre's with a 4 bolt pattern. I agreed to purchase. Shipping, at $52, was more than the purchase price of the wheels! I found Terry Vaughan after doing a search for "Libre Wheels" on ebay. He emailed me the following link to his website: http://mysite.verizon.net/res1ksb2/ As evidenced by the after photo, he has the machinery and know-how to do excellent work. He can be reached via email at: terry.vaughan@verizon.net and he is located in Burlington, Washington. Regards, Gary S.
-
If you own a 240Z and live in a state which does not require emissions testing for your car, have you chosen to keep the whole evap. tank / reservoir with attendant fuel lines intact, or to eliminate them? And why? Regards, Gary S.
-
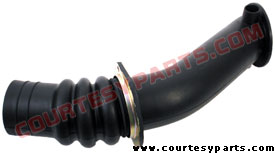
Beneath the lower right photo on page 31 of Wick Humble's How to Restore Your Datsun Z-Car, the author states "Early and late fuel fillers differ in several details - later version was a definite improvement." On the following page, under the caption Fuel-Filler Top Flange, he states "Early Z-car plastic filler necks are prone to crack." Followed by "Late Zs had a two-piece filler with only the lower section made of plastic." In searching Courtesy Nissan's parts, I found the filler neck depicted in the attached photo below. Courtesy's description: "1970 - 07/1974 - Fuel Filler Hose - 240Z, 260Z". This part, however, does not appear to be two piece. So, my questions are these: Do you agree with Mr. Humble's contentions, and, if so, where can I source the aforementioned "two-piece filler neck with only the lower section made of plastic? Thanks, Gary S.

-
Opinions please. My Z was built 12/70, and has the original plastic "Reservoir Tank" (also sometimes referred to as an evaporation tank, as part of the fuel tank / fuel supply / emissions circuit). I understand that a metal reservoir tank was fitted to later models. From a longevity standpoint, is the metal tank generally considered to be more durable? Or, put another way, are the plastic tanks prone to failure? If so, are the two tanks interchangeable? Thanks, Gary S.
-
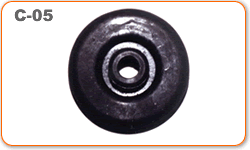
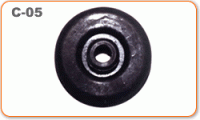
Bob M., Attached please find a photo of the Banzai Part number C-05 previously mentioned by kenz240z. Gary S.
-
Ed, thanks. Super information all the way around, especailly the referral to Bonzai. Regards, Gary S.
-
Ed, Are you still selling this grommet? If so, any idea if the opening on a '71 is the same as the '73? Lastly, any idea if this size grommet will work on any other parts of a 240Z? (I'm currently looking for rear hatch floor grommets where the fuel evap. hoses pass through the hatch floor.) Thanks, Gary S.
-
Hello Dave, I am looking for a heater control panel with original radio opening intact {not cut for a CD/Cassette/8-track} and with chrome applique in decent condition (see attachment for new example). I'm sure it's a longshot, but if you are going to be looking at the car again tomorrow, I would appreciate it if you would look for this part for me. Any chance you might be packing a digital camera along with you to forward pictures? Regards, Gary S.

-
I stand corrected. Alan, thanks for clearing up the confusion on my part. Gary S.
-
The Sports Car Market profile on "LAL909K" (British License Plate Number for the 1973 240Z Race/Rally car sold at Bonham's in June 2005 and later 2005 offered on ebay) is also available online at this link: http://www.sportscarmarket.com/profiles/2006/January/Race/ Gary S.
-
This post is to alert those who may be looking for such an example, and to bring in members of this board who may know the car. Here is the link: http://www.craigslist.org/eby/car/116823351.html Disclaimers: Not my car, don't know the seller, etc. Gary S.
-
Thank you for the replies. Ken - Did all '73's come with the electric fuel pump? And was it a supplement or replacement for the mechanical pump in the engine compartment? Jeff - I've tried pulling every which way, and even pinched onto it lightly with a needle nose vise-grip. I've been reluctant to get too much more agressive, as the yellow wire feels brittle near the boot. Wayne - The connector is a slip on of some type rather than threads and a nut (but the ring terminal is an interesting thought - see below). I believe I will try to remove the sending unit as you suggested. Maybe the proper angle for removal of the lead will present itself with the sending unit out of the tank. I'm wondering about the possibility of removing the heads from the posts on the two sending unit terminals, then cutting some threads and using ring connectors with nuts to affix. Anyone have thoughts or experience with this approach? Gary S.
-
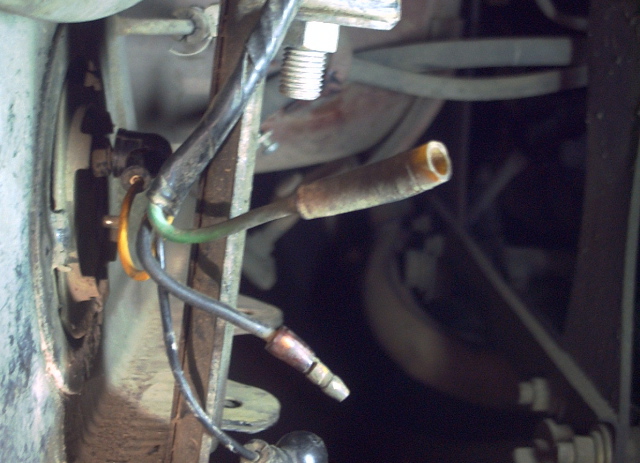
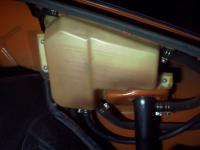
I'm in the process of dropping my fuel tank, and I've hit a snag. 1. Is there a trick to removing the electrical leads from the posts on the fuel tank sender unit? So far, I have been able to remove the black lead from the bottom post, but despite all types of manipulation I have not been able to remove the yellow upper lead (even though there is a large degree of play between the post and the connector). 2. Is this style of boot and connector available new? And if so, where? 3. There are two wires near the sending unit leads which are attached to nothing (see attached photo). One is green/female, one is black/male. What is their purpose?

-
Thanks Chris, those are the kind of specifics I was hoping for, regarding both parts prices and Australian Dashboard Restoration. And Arne, you nailed it. Just like your car, mine has the hatch vents and no holes in the steering wheel.
-
Pat, Thanks for the heads up on those ebay parts. Unfortunately, all of those parts are for '72/'73, while my car is a '71. I think I should stay with the original setup, although that '72 console sure was nice! Ed and Arne, The dashboard restoration company on the vendor part of the forum, as near as I can tell, is the Australian company Dashboard Restorations. Almost the first sentence on their homepage states "This company is in no way associated with the business trading as Dashboard Restorations USA - Brush Prairie, WA". Is there an affiliation I am not aware of? Or testimonials from folks who have traded with the USA entity? Gary S.
-
Hello Arne, Good suggestions, all of them, and options 1 and 2 are certainly less costly than the used, uncracked dash route. I read the threads in the Vendor section for Dashboard Restoration in Australia. The thought of using them is intriguing. I wonder if they have worked the international logistics / shipping issues? Gary S.
-
Hi Pat, Yes, I saw those dashes in the classifieds (and a similarly priced one on ebay). I guess my question regarding those dashes is, are those prices pretty typical? Gary S.