Ed
Free Member
-
Joined
-
Last visited
Everything posted by Ed
-
This is the way I did mine. If you have the stock springs you should use spring compressors or you will have a hard time clearing the wheel well.
-
After sitting for three year you could have several problems. Brakes sticking, master cylinder sticking, or e-brake cable. You will have to give her a "physical" start by removing the rear drums and inspect the cable, cylinder and the shoes. Once the rears are working good move on to the front. Remove the calipers and see if you can manually push the piston back into the caliper. Sometimes these will rust and get stuck to the caliper. If you plan on driving it for a while you should rebuild or get some new calipers. It's good stopping insurance. Bleed your brakes with some fresh DOT 4.
-
O.K. Now who's the dummy? I took the test and at the end it wants my credit card information to send me the results. I got my results. 127. No credit card required:stupid: .
-
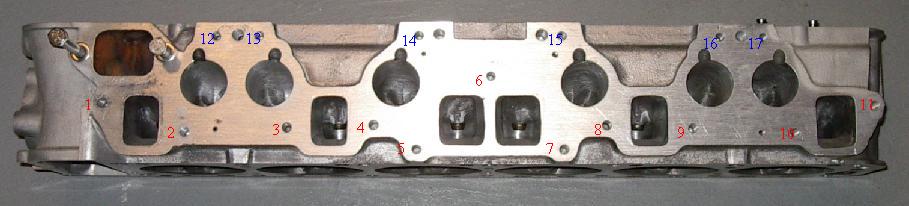
Here is a picture of a head (N42) for reference. As far as I know and someone please correct me if I'm wrong, numbers 1-11 red are all studs. And numbers 12-17 blue are all bolts. Which ones are supposed to be the long studs I don't know. Maybe someone else knows?
-
Joseph, not sure if they are the same but the bolts on my 72 have a T R and #7 stamped on them.
-
Thanks Carl, I think I'm going to go with the studs suggested by gramercyjam. They seem to have quite a good selection for a pretty good price. Edit: I just did my home work :stupid: . Anyway I pulled a couple of old studs out of my spare engine and found 2 different lengths. Total length of the short ones are 43mm and the long ones are 48mm. The thread length is the similar on both 14mm on the short side and 19 mm on the long side. The only difference is the length of the center of the stud (the blank space). The short ones are 10mm and the long ones are 14mm. (+,-.5mm) When I looked through the Mcmaster catalog I couldn't find the correct size. Sorry. I guess it's back to E-bay. :stupid: :stupid: :stupid:
-
If the oil pressure goes all the way up it's because there is a short somewhere in the wire that goes to the sender. This is a way to test the guage. You ground the wire and if it goes all the way up then the guage is working, similar to the water temp guage. It might be a short or your sending unit may be faulty.
-
Start by topping up the oil then drive it to a car wash. Use the high pressure hose to clean the engine. Then start it up and drive it home. Once you get home you should be able to see exactly where the oil is coming from. I would bet it's your valve cover gasket. You said it was fairly new but it might have gotten pinched or isn't sitting correctly. Replace it. The torque for your valve cover bolts is 5-8 lbs. If you do use a new gasket re-torque after a few days. The price tag on an engine rebuild varies alot. You can spend anywhere from $1000 - $10,000. It all depends on what you want. A basic rebuild, bearings, seals, gaskets, and rings, basically a re-fresh, no machine work just a rebuild. Will cost you close to $1,000. If you pull the engine or leave it in the car will also be a variable. How many miles does the engine have? Does it burn oil?
-
Hope this helps. 240z-chassis-measurements.zip
-
I thought they were all the same. But after seeing this I thought I'd ask. Here
-
Is there a difference in the length of the studs that hold the intake/exhaust manifolds to the head?
-
If your inclined to do a little work on your own carbs, take the bowls off and clean the piston with some fine steel wool. Use a little bit of carb cleaner to get all the deposits off. Lube it a little with the new oil and put them back together. Becarful when you go to take off the screws that hold the bowls in place. Alot of times they are stuck and are a pain to remove. Tap them with a small hammer and put some penatrating oil on the screw from the bottom. If the screw doesn't budge first try then instead of taking a chance on stripping it use an impact screw driver (the kind you hit with a hammer). Also remember how the bowl assembly goes. There is a spring in there that will come out when you remove the bowl. Take care not to damage the needle. I think you will be wasting your money getting more used carbs. Remember all these carbs are 30 years old and most of them have seen atleast 100,000 miles. The brass shaft that holds the butterfly valve wears out and creates vacume leaks. Save your money and get the rebuilt carbs. Good luck.
-
Taken from Wick Humbles "How to restore your Datsun Z car". The front grille is; matte grey-black. The rear finisher or tail light panel says: The original paint is a silver-grey "match scratcher" finish. Also, I've heard of people using satin black on the front grill. Hope this helps. Hopefully someone else knows of something that you can get over the counter.
-
Try posting in the wanted section maybe someone has one laying around.
-
Your mechanic is on the right track by replacing the 73 flat tops with the 71 round tops. The chances of getting 3 worn pistons seems a bit excessive. Maybe you should take your car to a different mechanic? When I was learning about the carbs the guys over at Z whizz helped me out, they are in San Diego just look them up in the phone book. Depending on conditions determines what type of oil will work best in your carbs but 20wt should do fine. I use ATF in mine and am very happy with it. Instead of messing with these used carbs you should get some rebuilt ones from Z therapy this way you will know that your carbs are performing correctly. Get their tuning video at the least it will help you tremendously. Whats a "yunk yurk"? Junk yard?
-
Have you tried to get the linkage from where you got the carbs?
-
-
Start by removing all that smog stuff that is attached to the 73 intake manifolds (most of it probably doesn't work anyway). Now you will hear that the 73 manifolds are better than the previous years but this is not proven and up to you. You won't need the air pump either (this is the pump on the drivers side of the engine and it has a hose that runs up to the exhaust manifold) but that is up to you if you leave the original exhaust manifold with the backfire valve attached. Or you can plug the gallery to prevent exhaust from coming out. When you attach the new manifold the only attachments you really need is the vacume for the brake booster and the vacume for your vacume advance. The rest of the carb attachments are pretty easy. Float bowl vents to the air intake box. Valve cover vents to the center of the air intake box. PCV valve to the block. Plug the water that runs through the manifolds. If you plan on using the water passages then make sure the freeze plugs under the manifolds don't leak. Also the tube that connects the two manifolds. Like Bambikiller said make sure you have the correct throttle links or you will be stuck. The 73 links will not work. Good luck.
-
I'm getting the undercarrage coated with bedliner pretty soon. Mostly the areas where the original undercoating was. I was contemplating covering the drain holes only in the floor pans and having the undercoating seal the holes. I never plan on driving my car in the rain or take it into a lake. With the popularity of shop vacs now a days. I was wondering if these drain holes are really that practical. I have five in my floor and rust seems to love these areas. Any comments? Should they stay or go?
-
-
On the back side of it (towards the rear of the car) there is a small indent. You might have to pull the handle back to see it. Using a small screw driver pry it out.
-
If you have the time and money go for it. If anything you will learn alot doing it. Sheetmetal work can be fun and challanging. Use the proper tools, read up on how to and have fun. The hardest part of it all is fabricating parts that are not available new.
-
You know after reading your original post again I find that my original answer was a bit off. Sorry, I miss understood you. I had my exhaust custom made from the header back.
-
For you slow guys. They floored the gas pedal and the engine reved to about 8700rpm. Slowly it increased to 9K and stayed there for atleast 4 minutes. Then they show a picture of the engine and you can see that they left the radiator cap off on purpose. Steam coming out of the radiator. The engine was doing great. 9k with no problems. Then finally the engine overheated. That's what killed her. :dead:
-
You say that one of your rods bit the s#!*. Did it do any damage to the cylinder wall or the block? Maybe you should buy a used engine. Then you have all the internals. I think you could pick up a used L24 for about $100 bucks from a guy I know that lives in Niagara Falls. :classic: