Matthew Abate
Free Member
-
Joined
-
Last visited
Everything posted by Matthew Abate
-
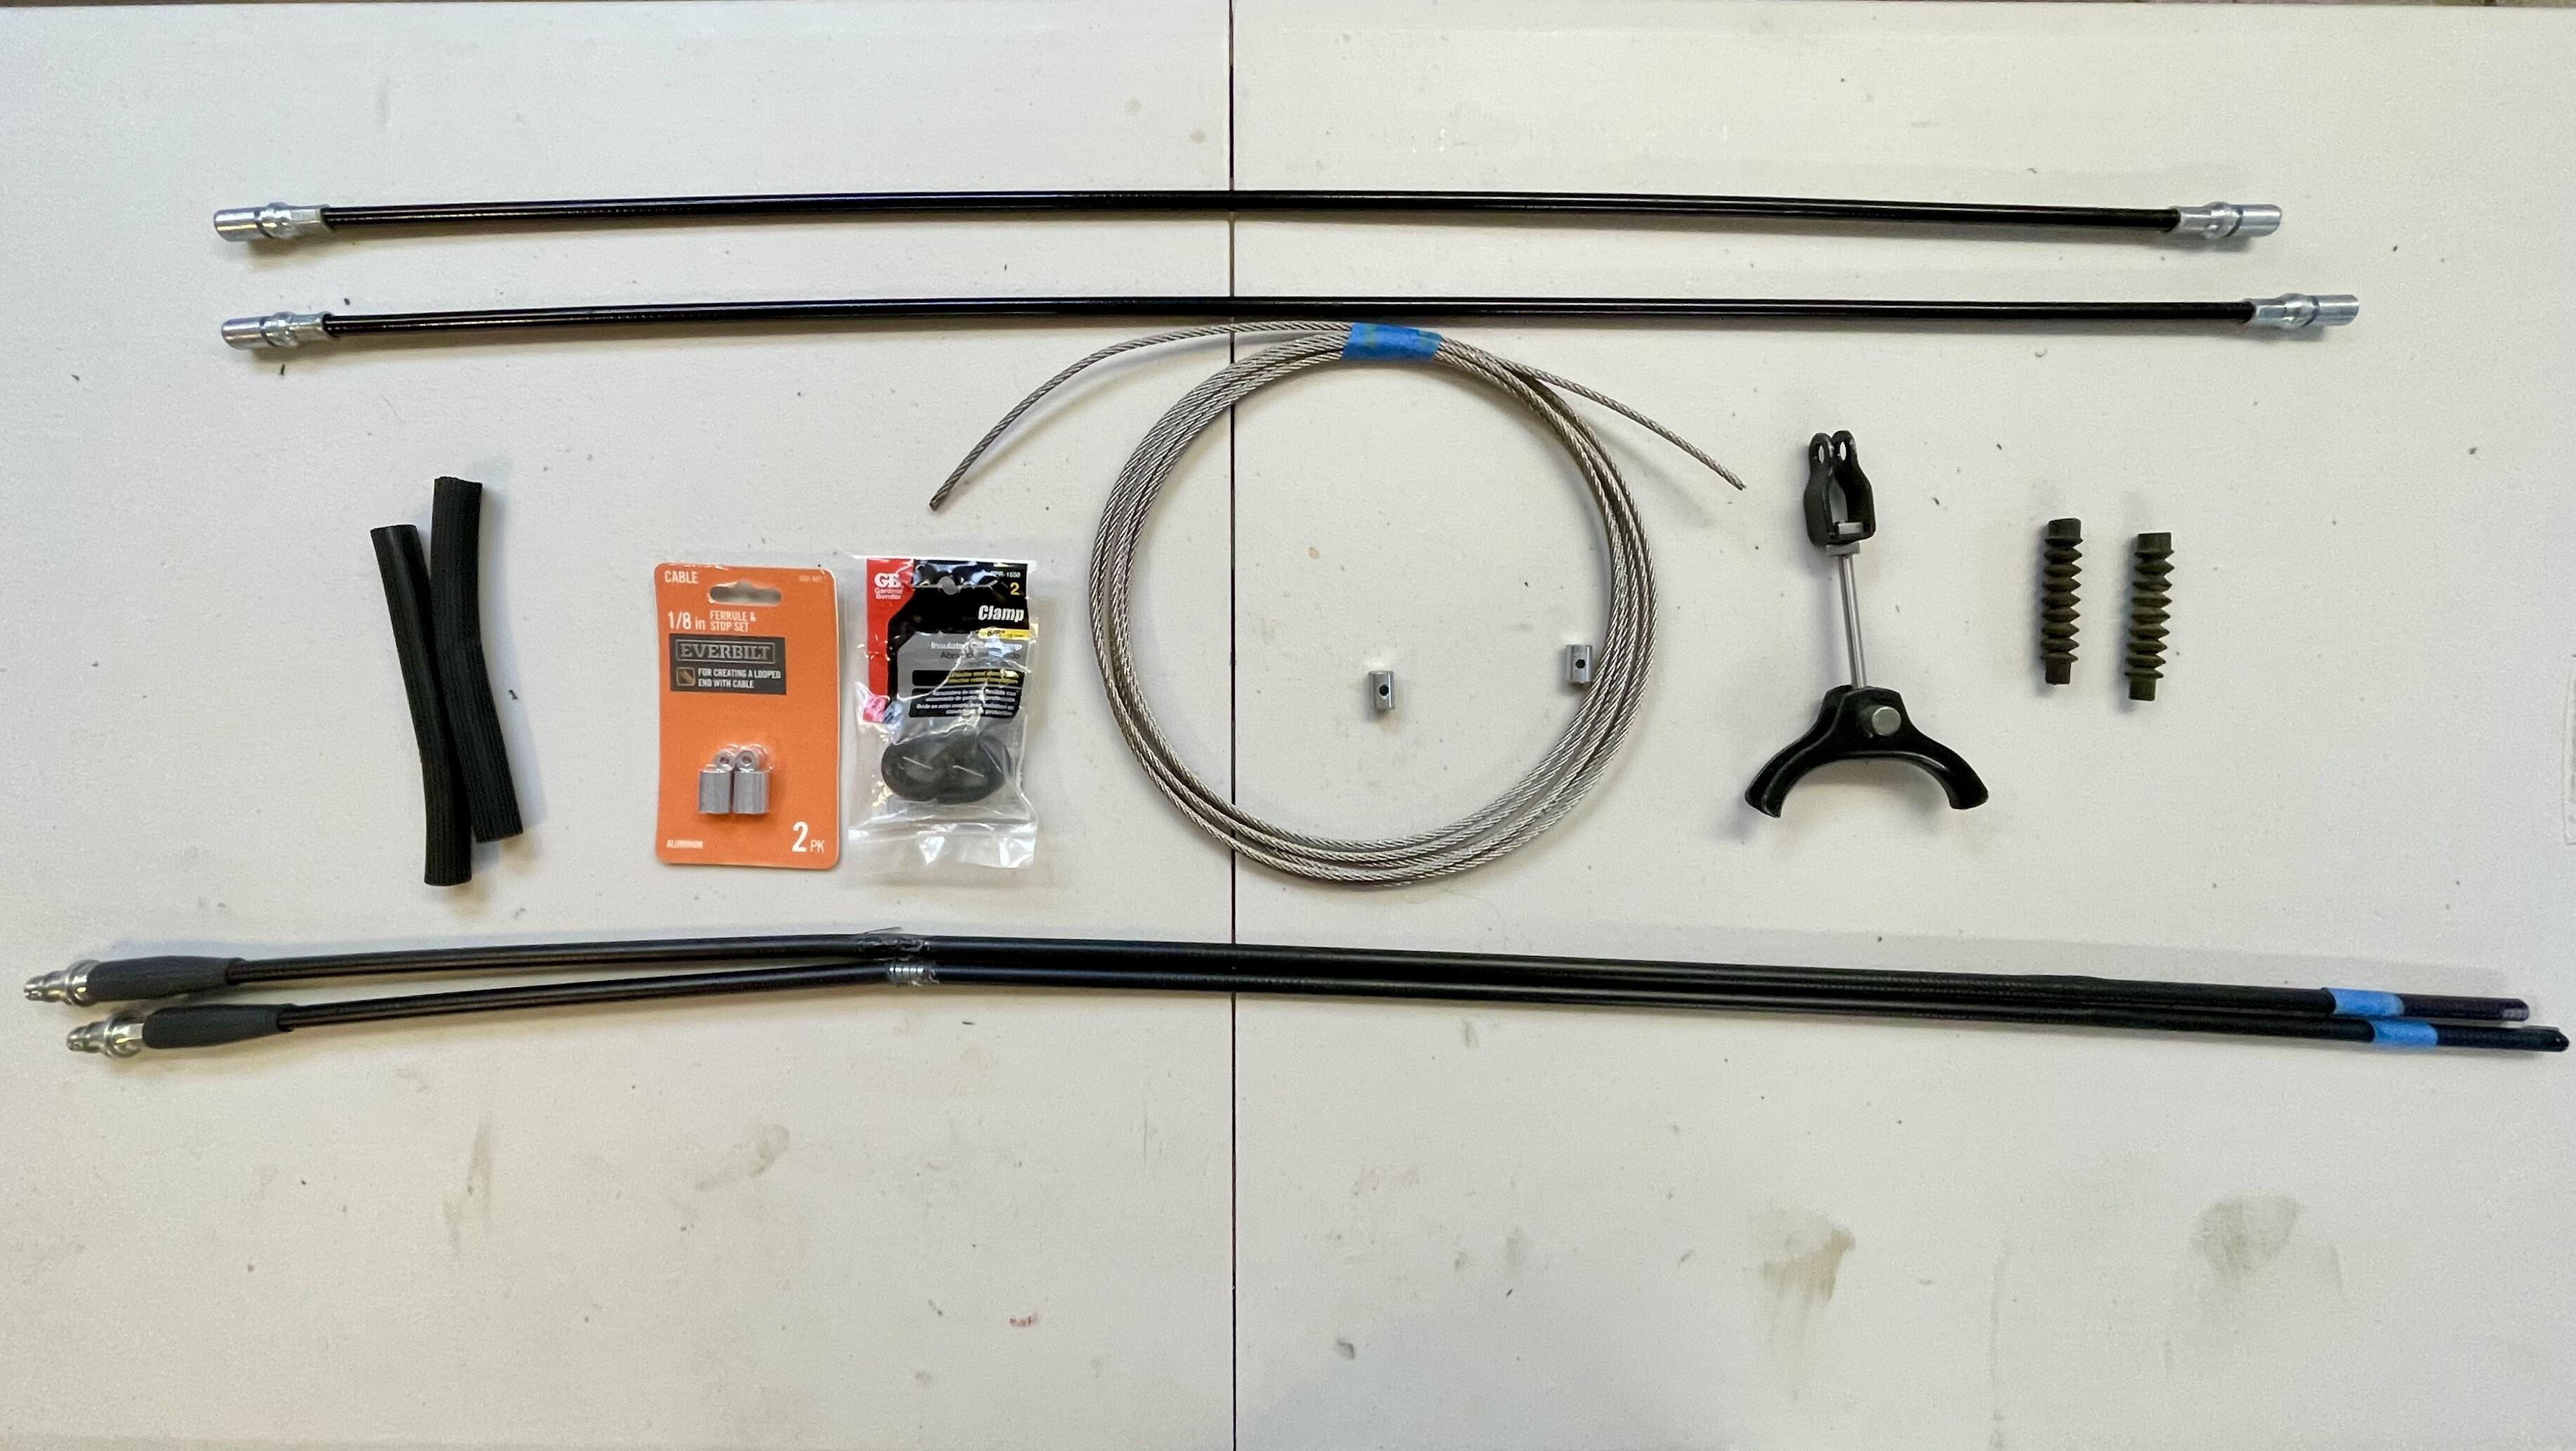
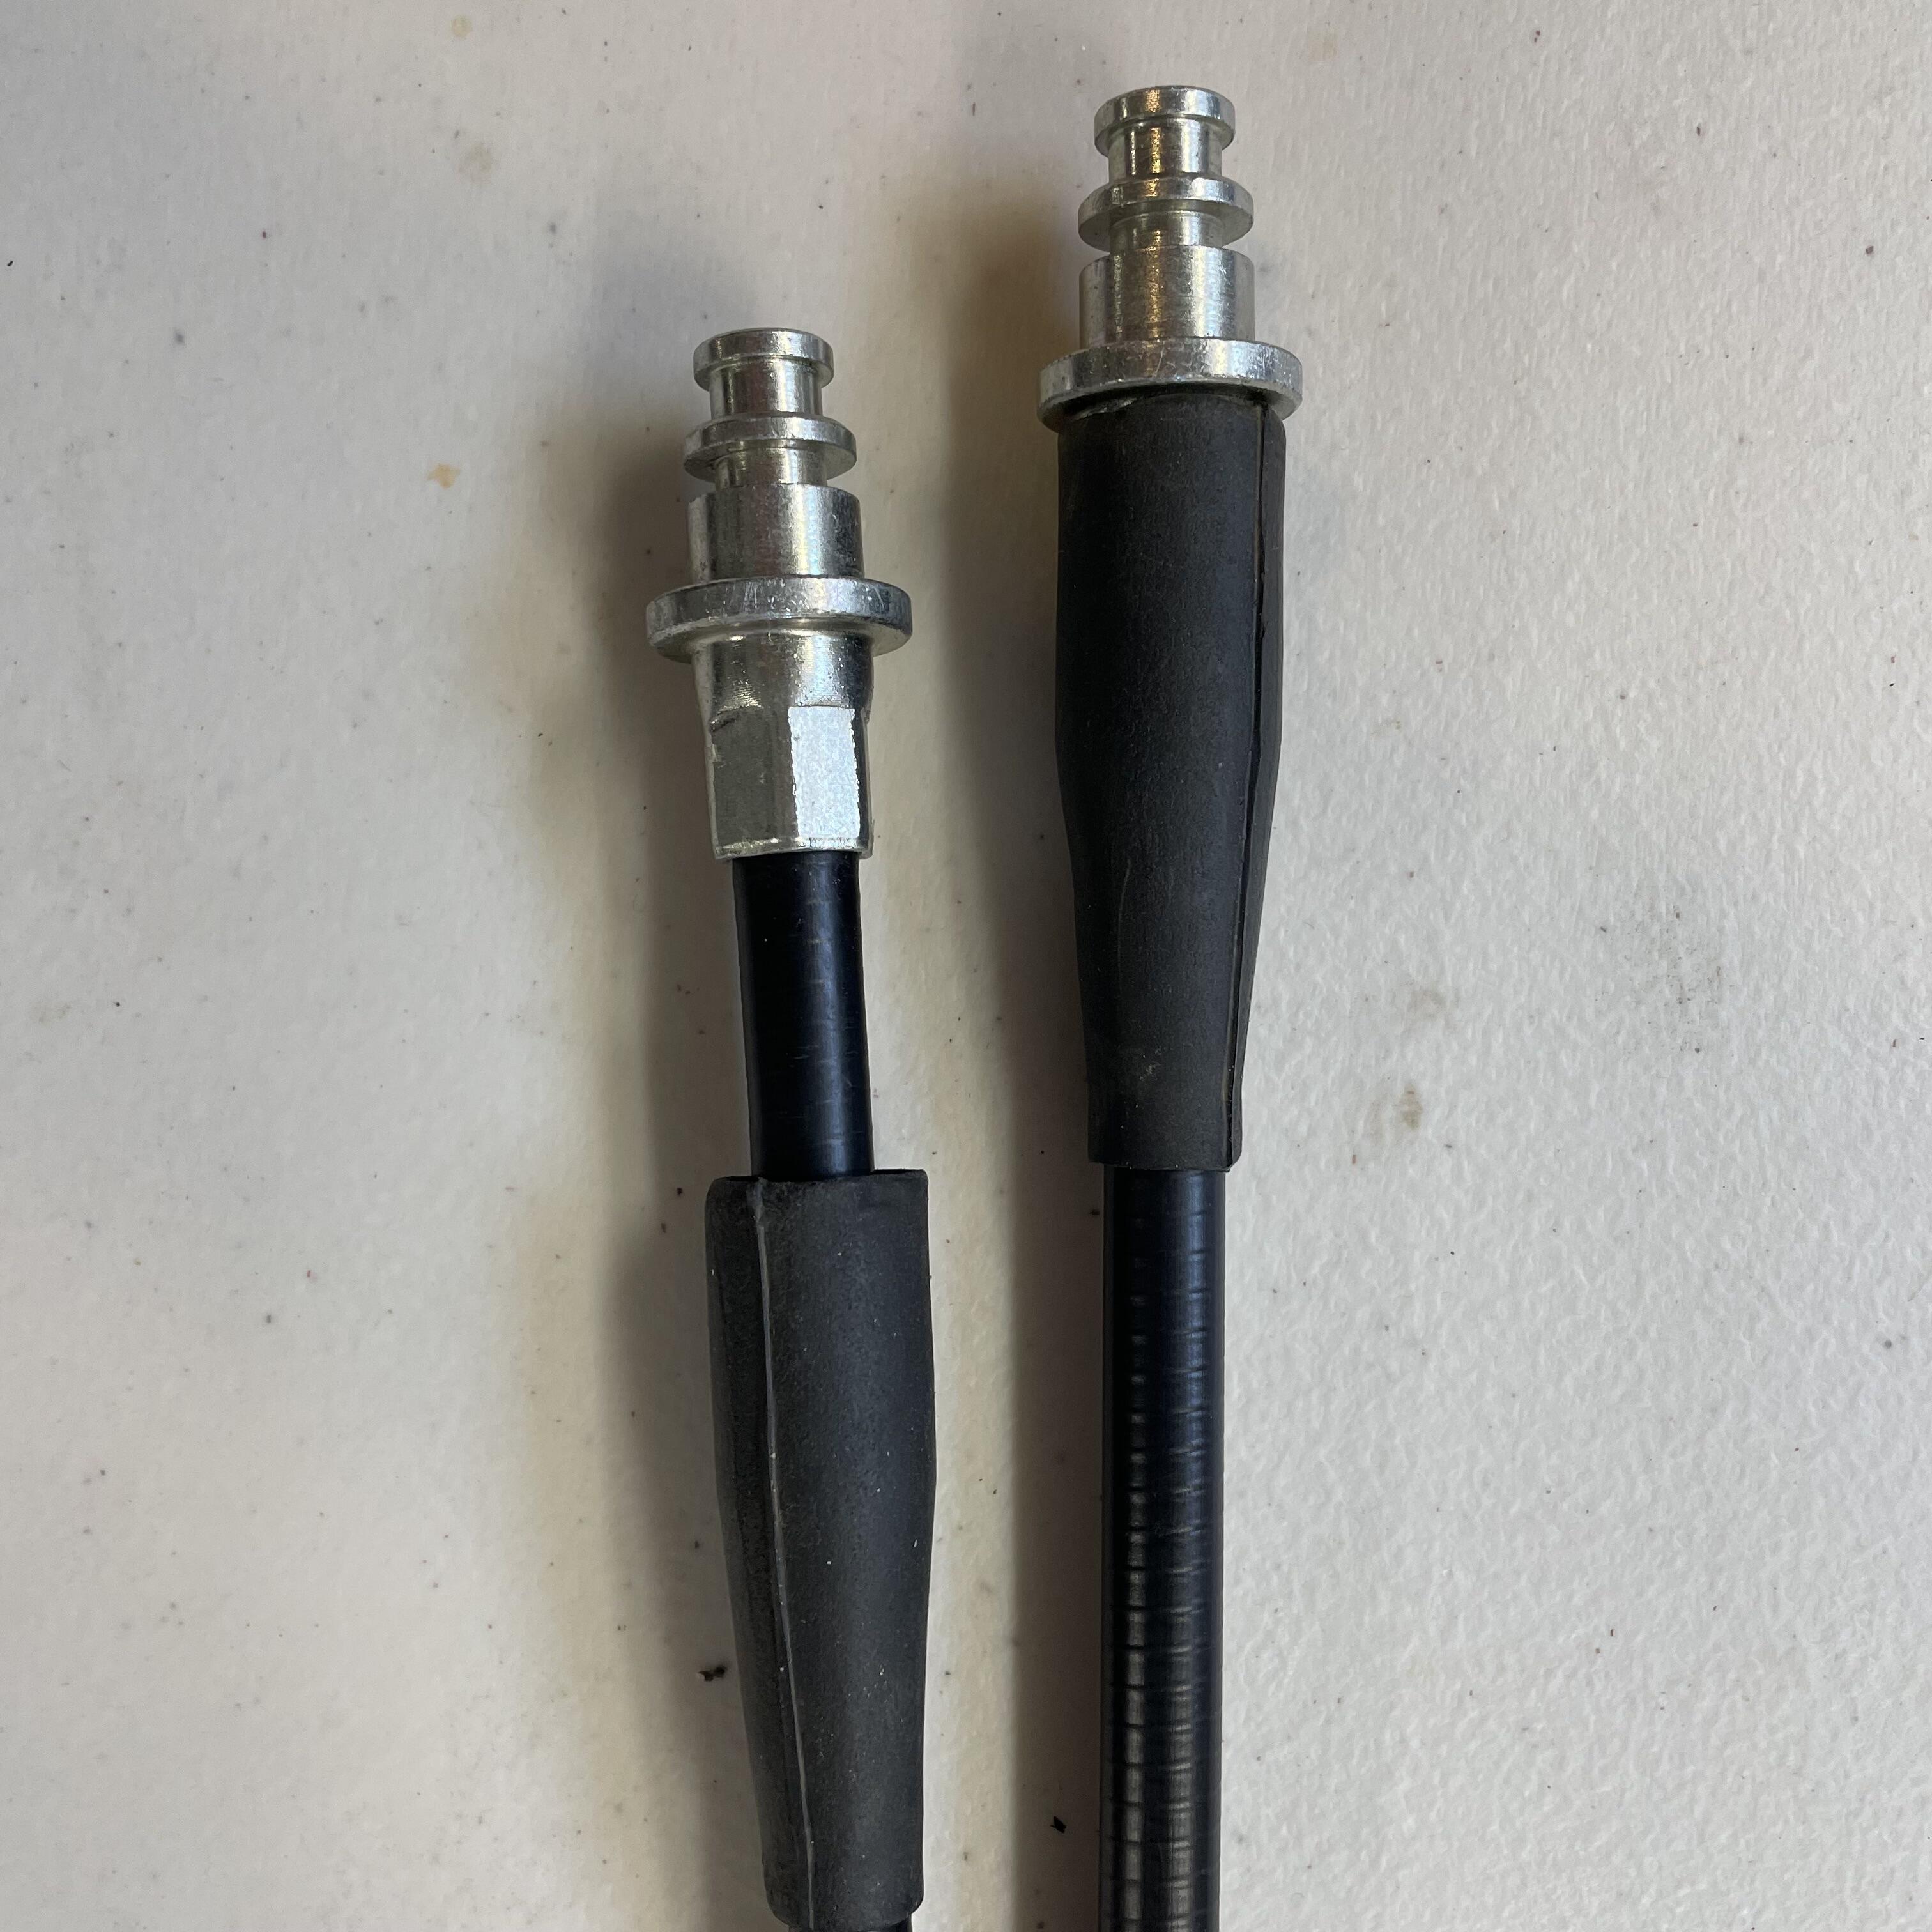
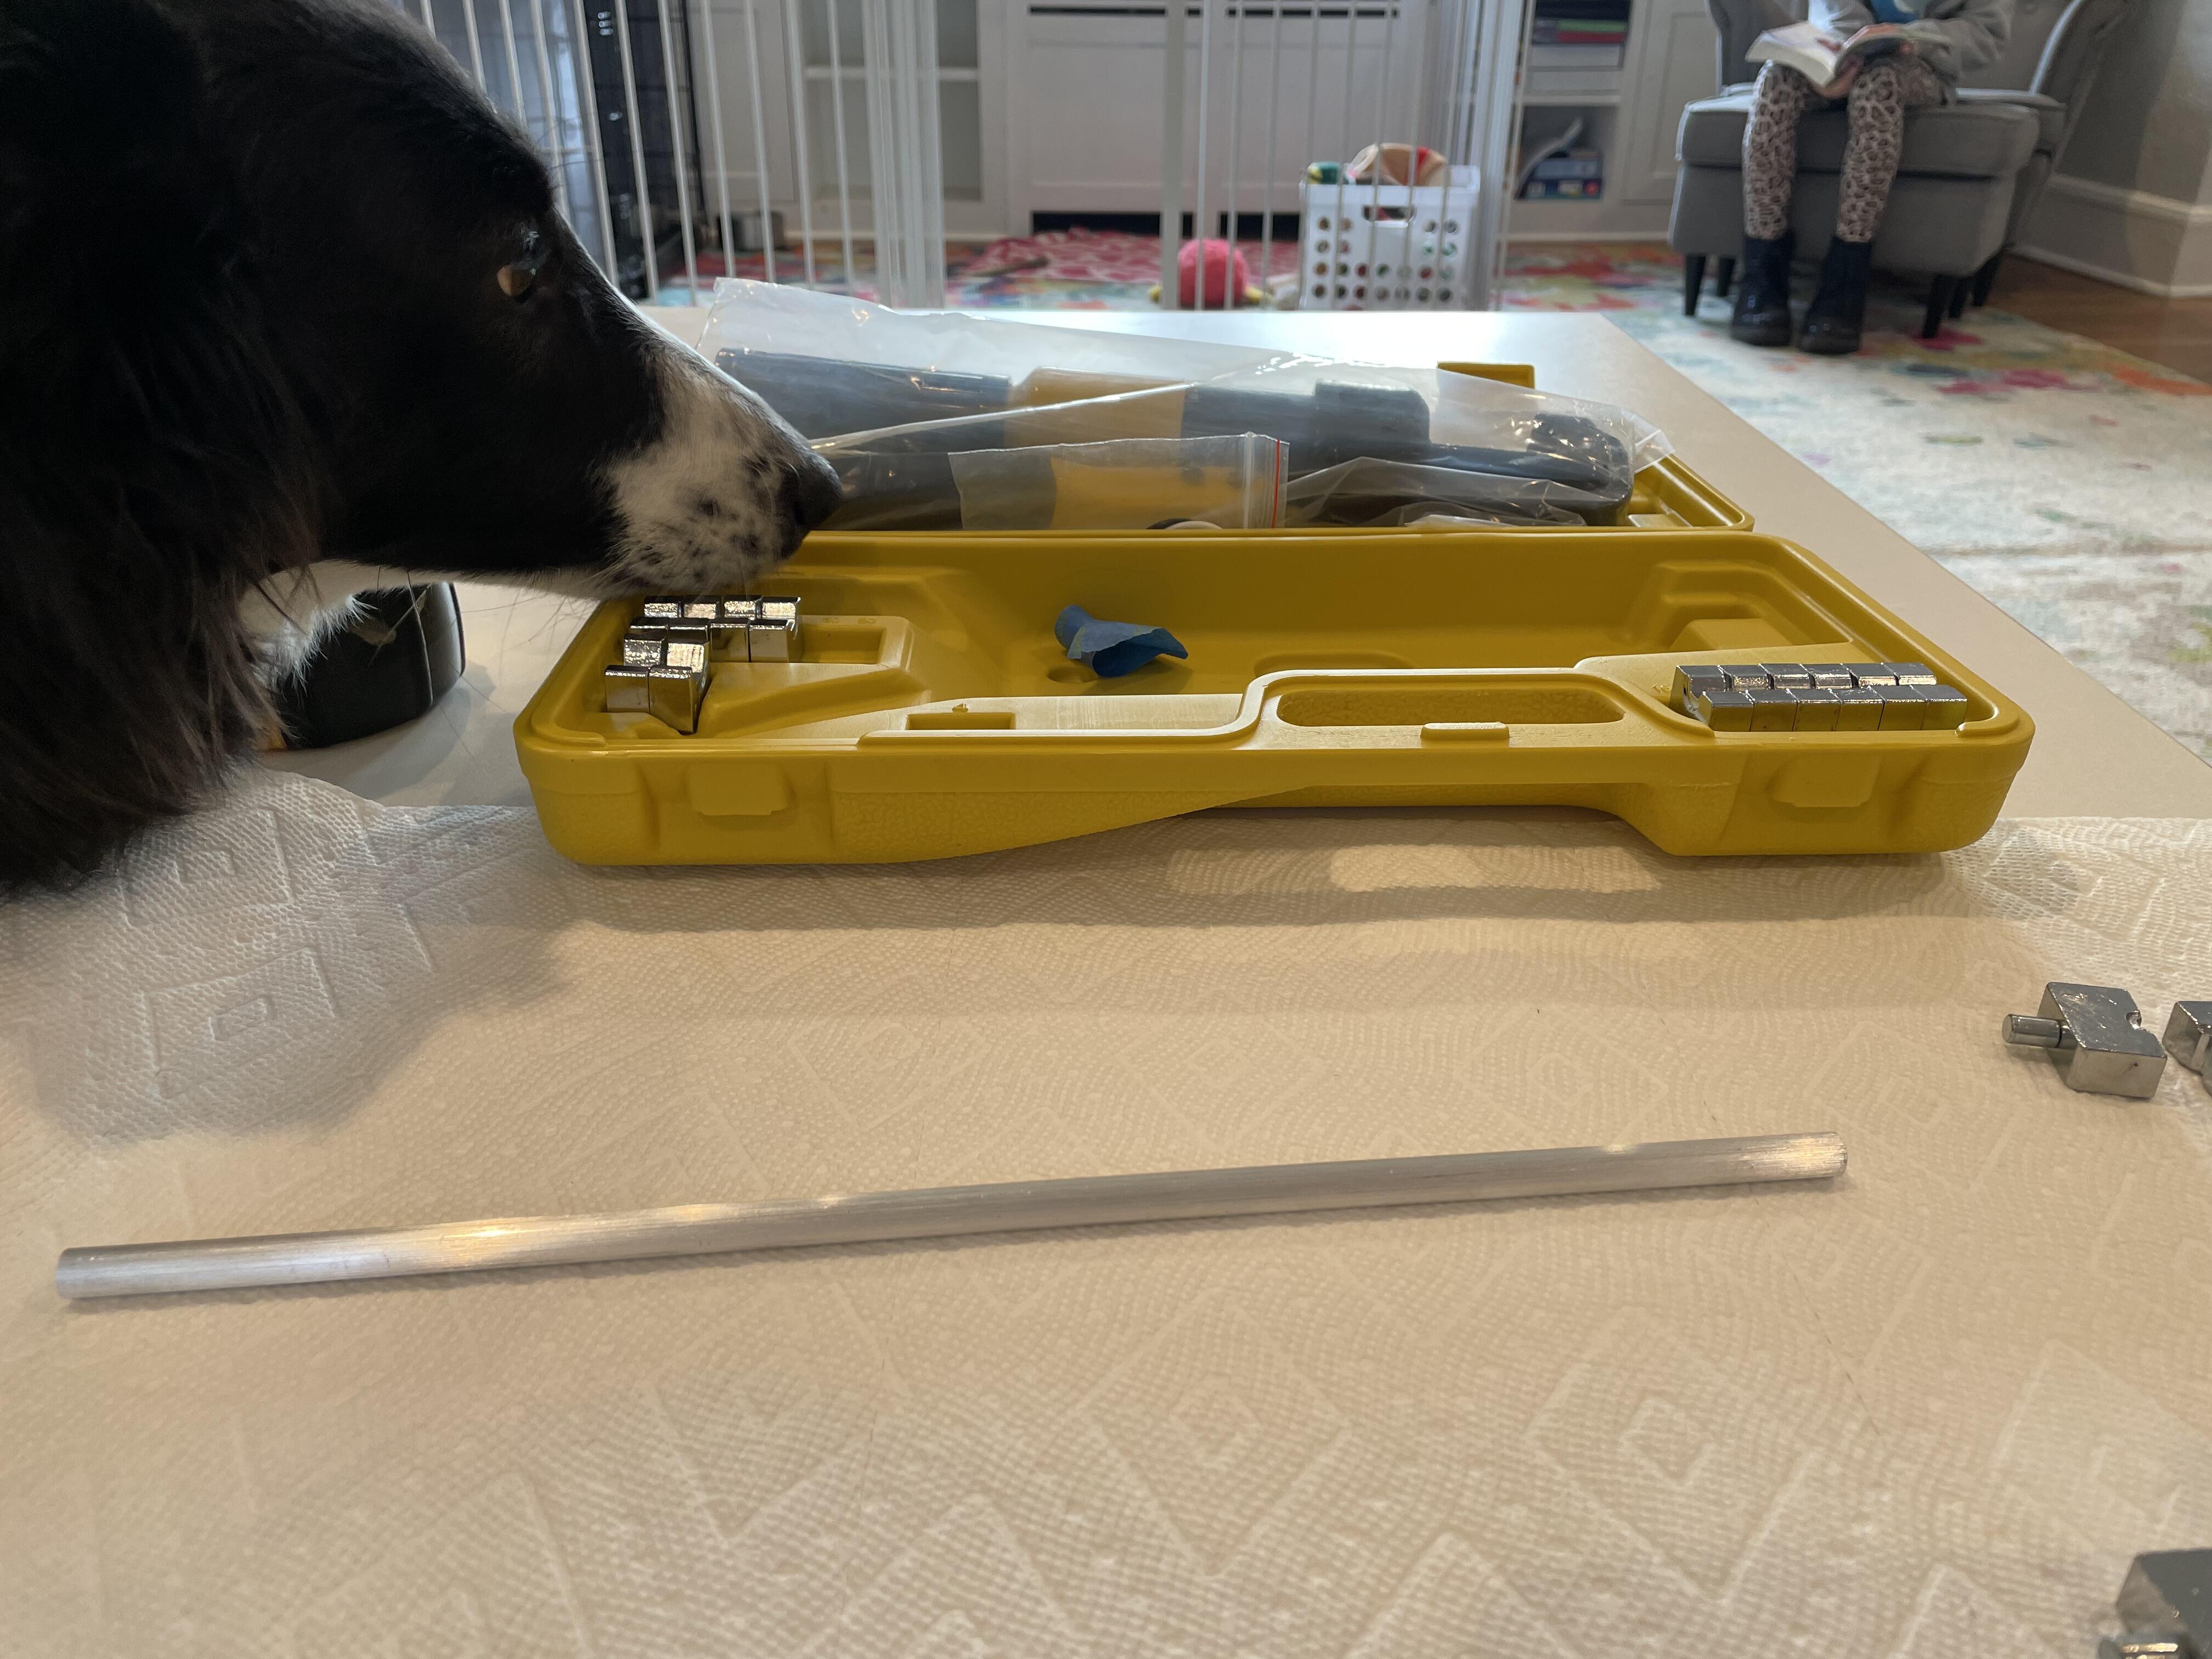
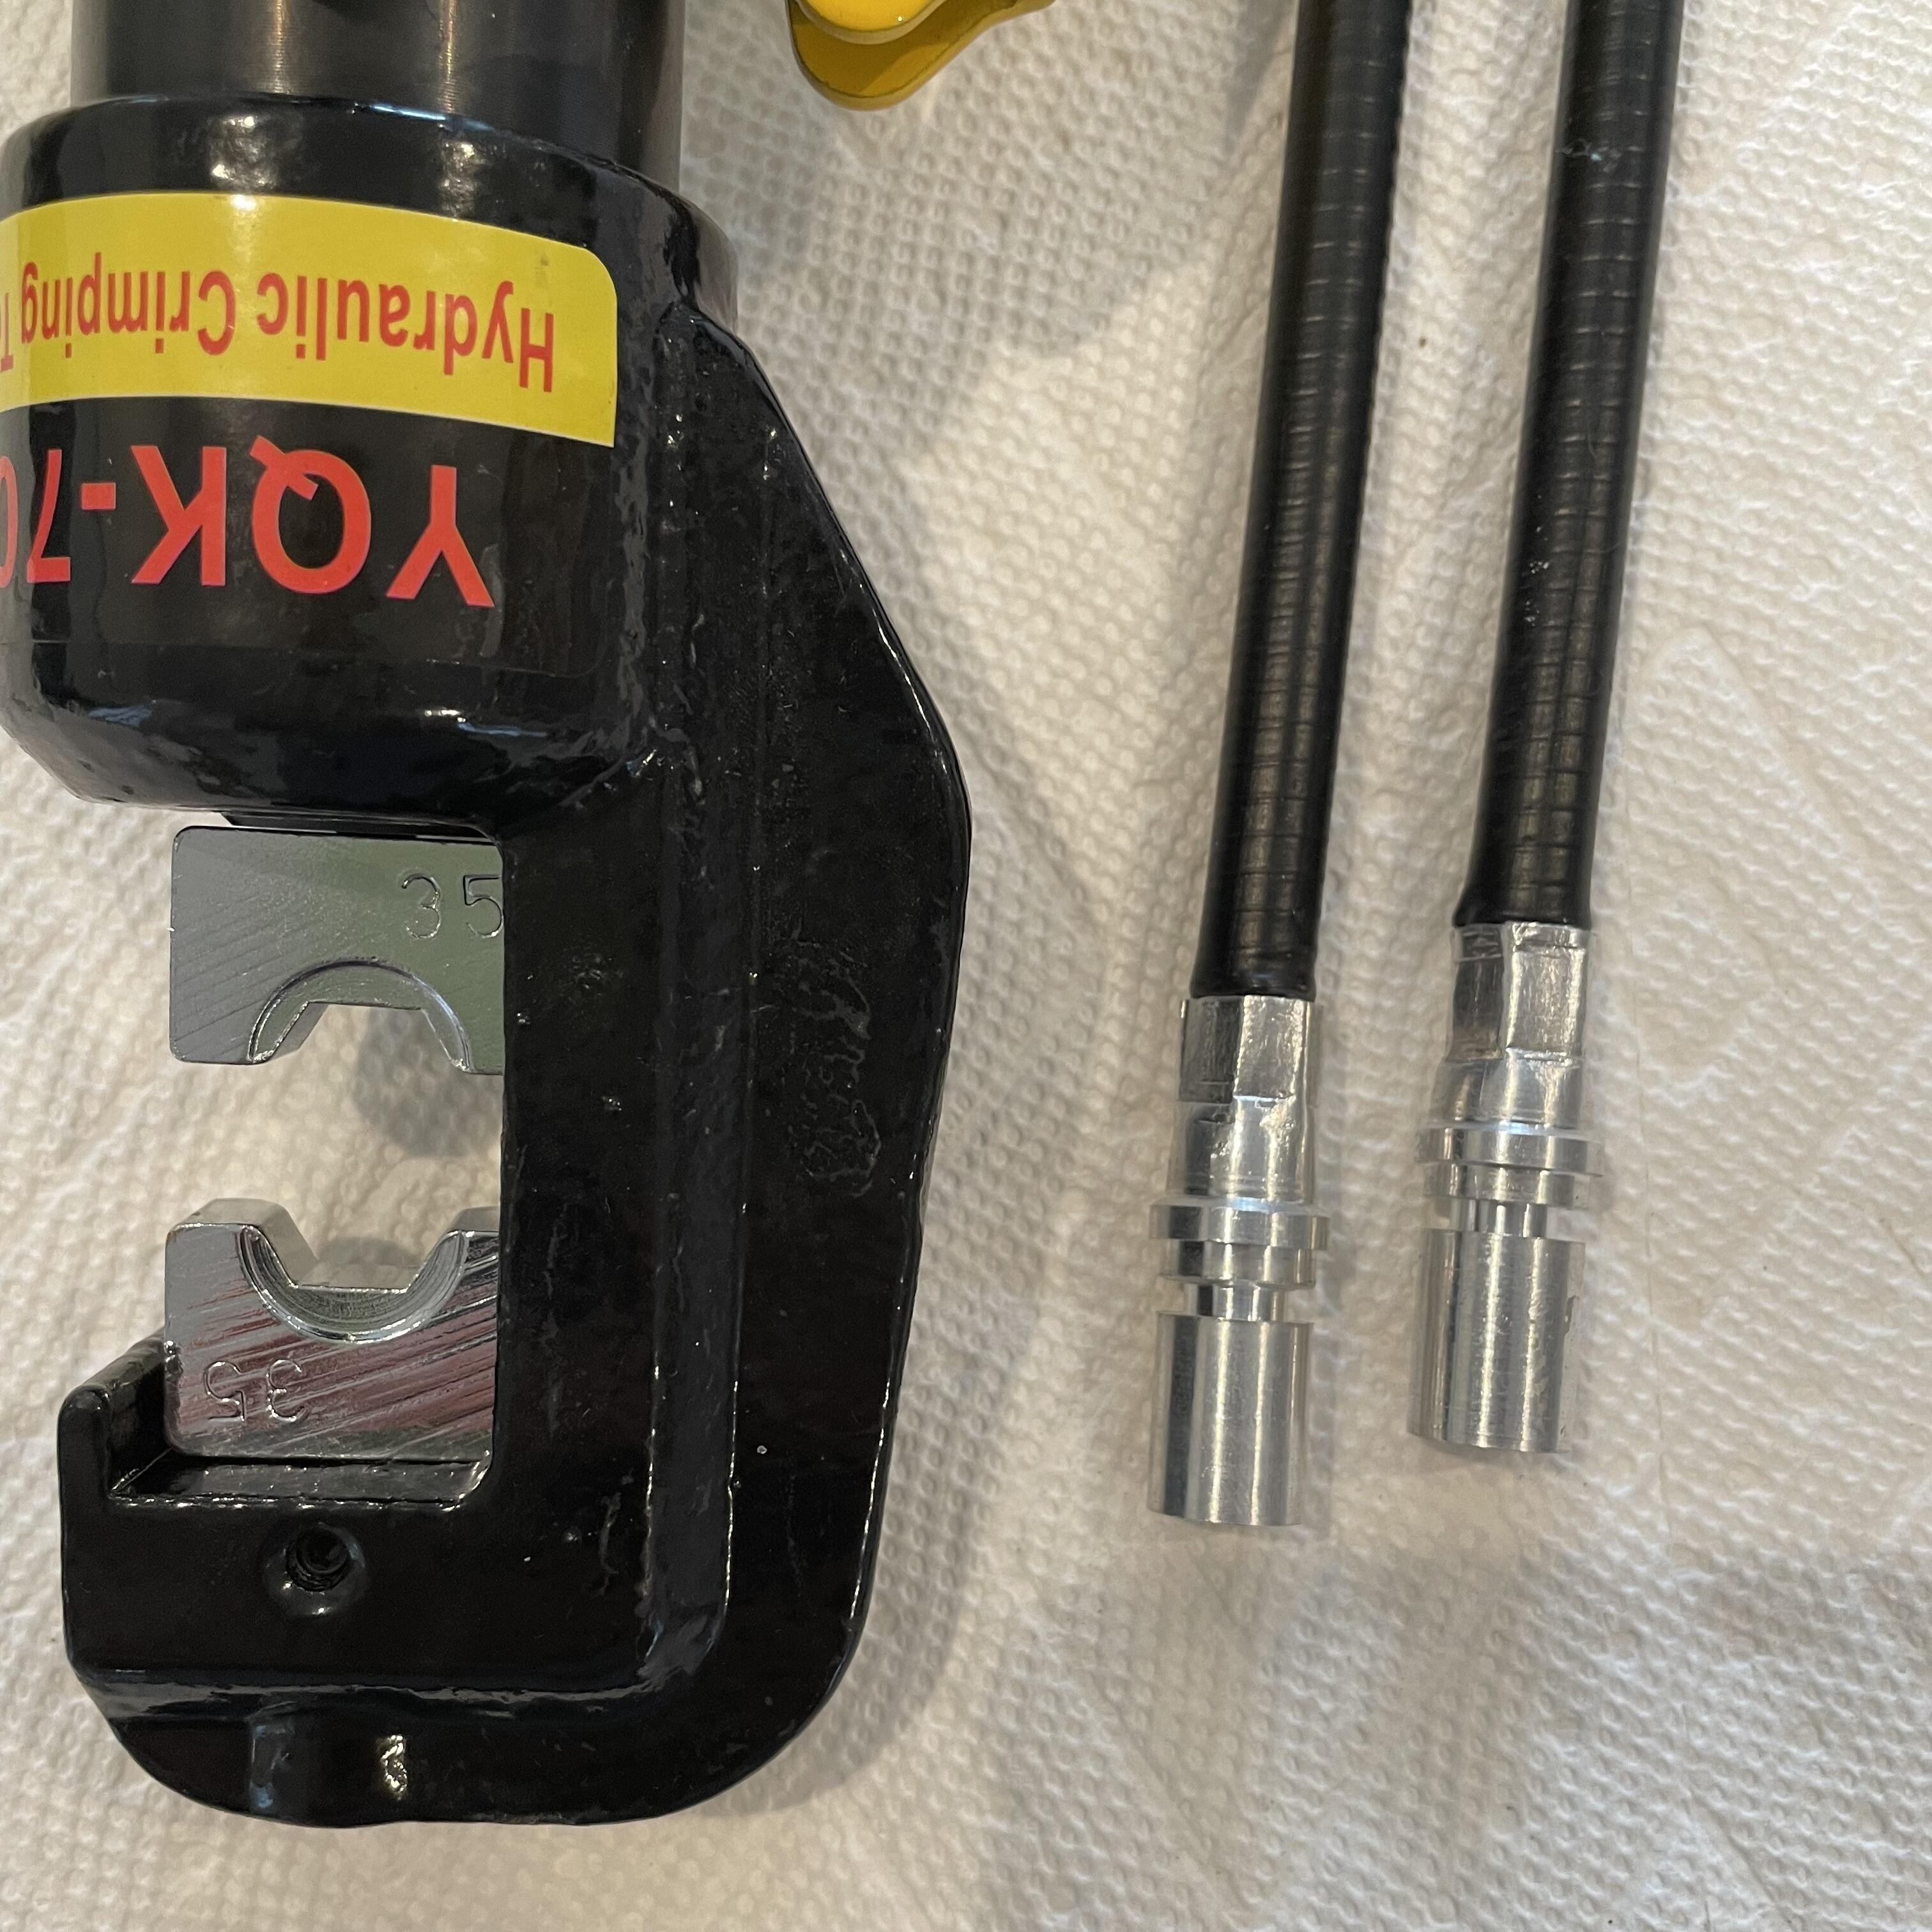
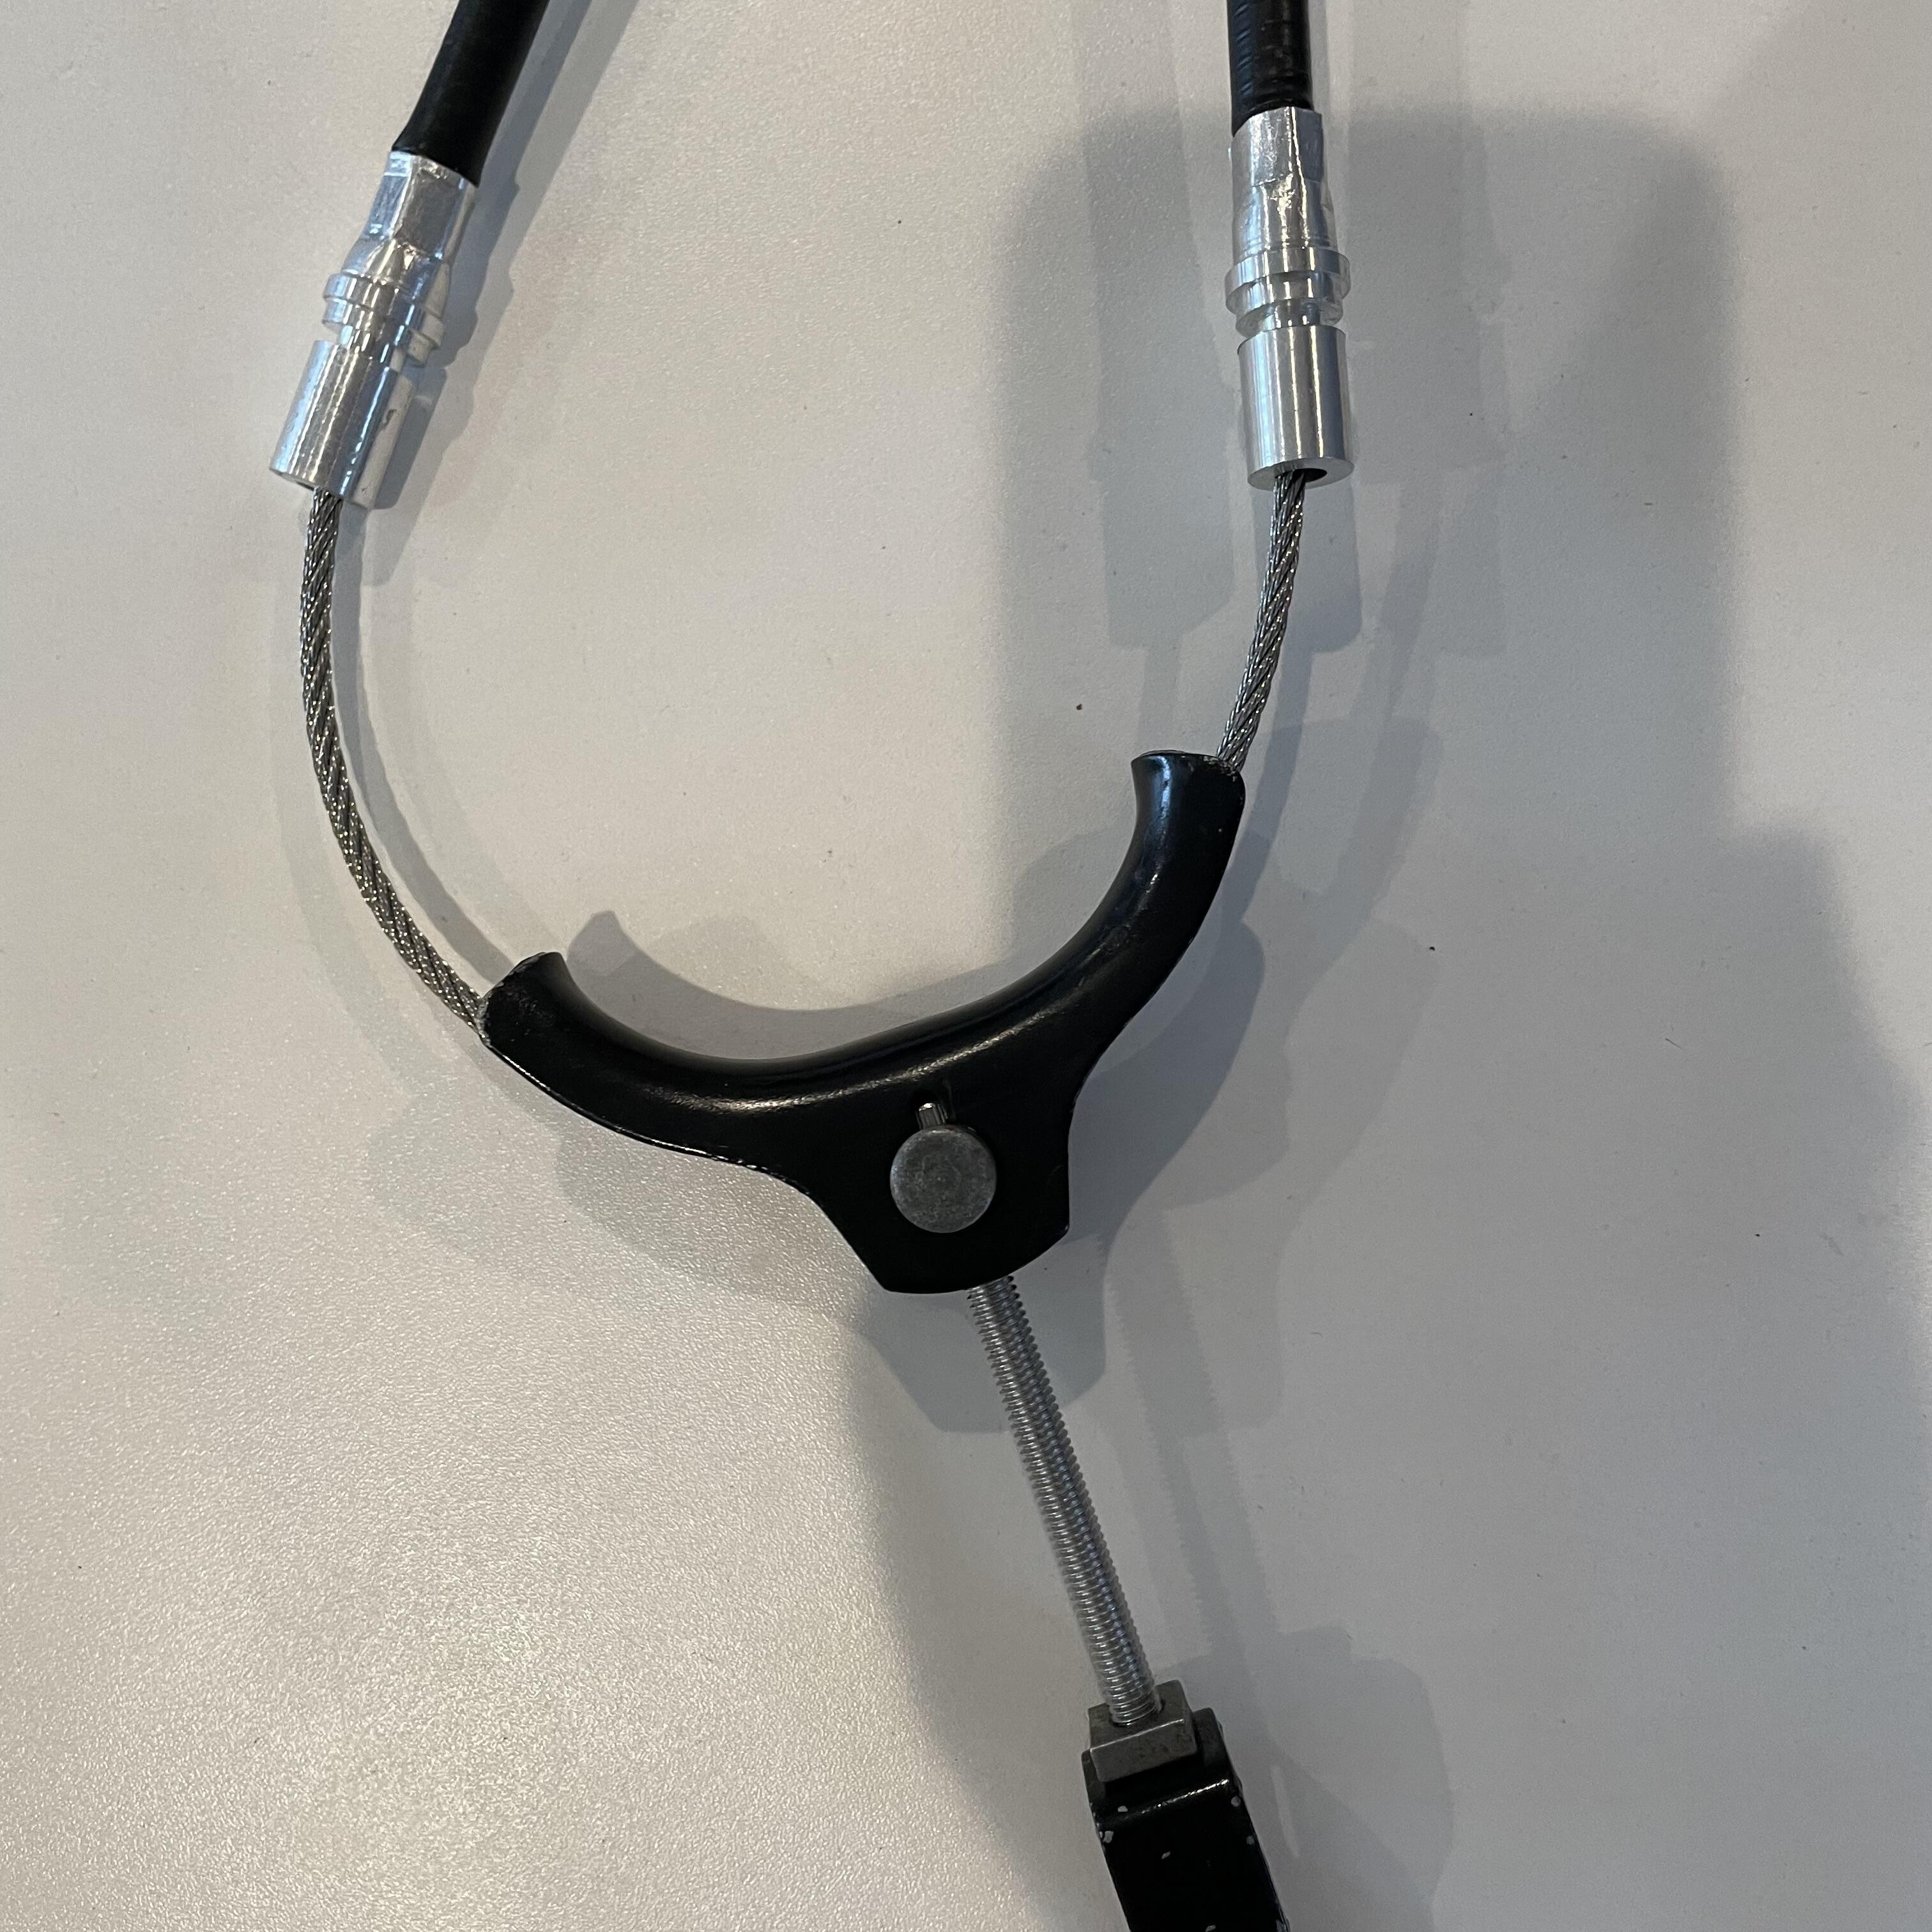
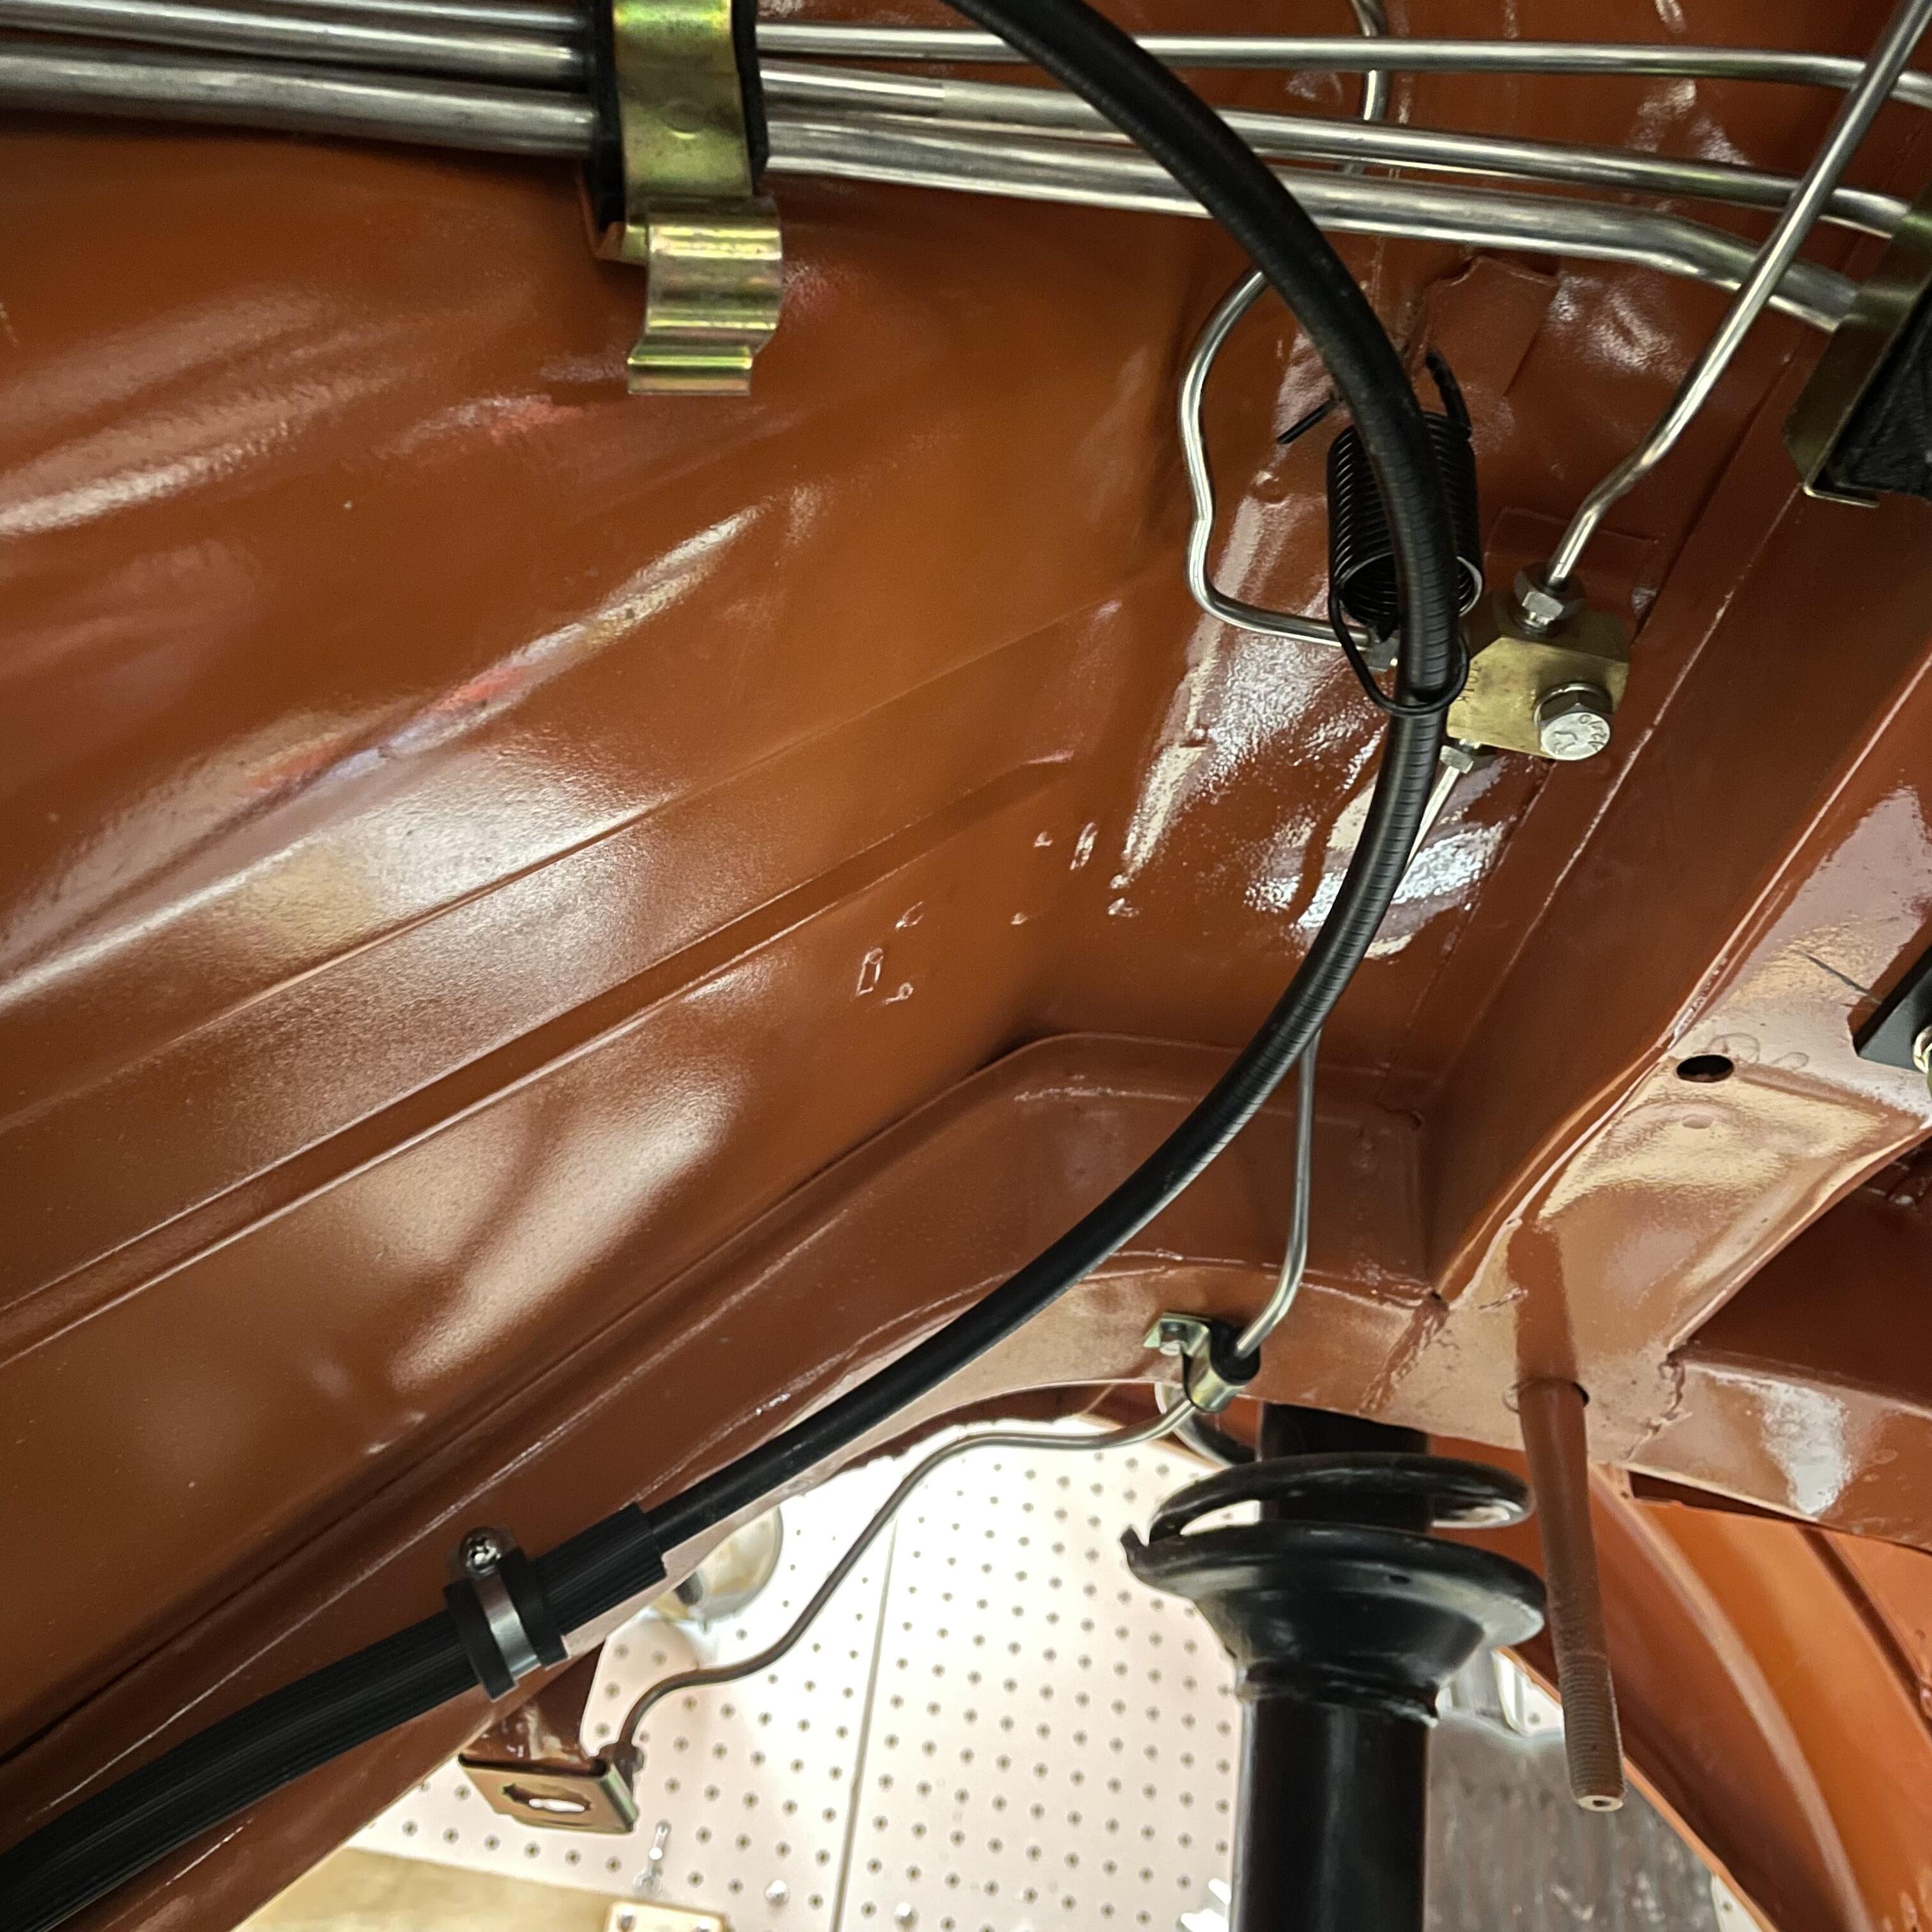
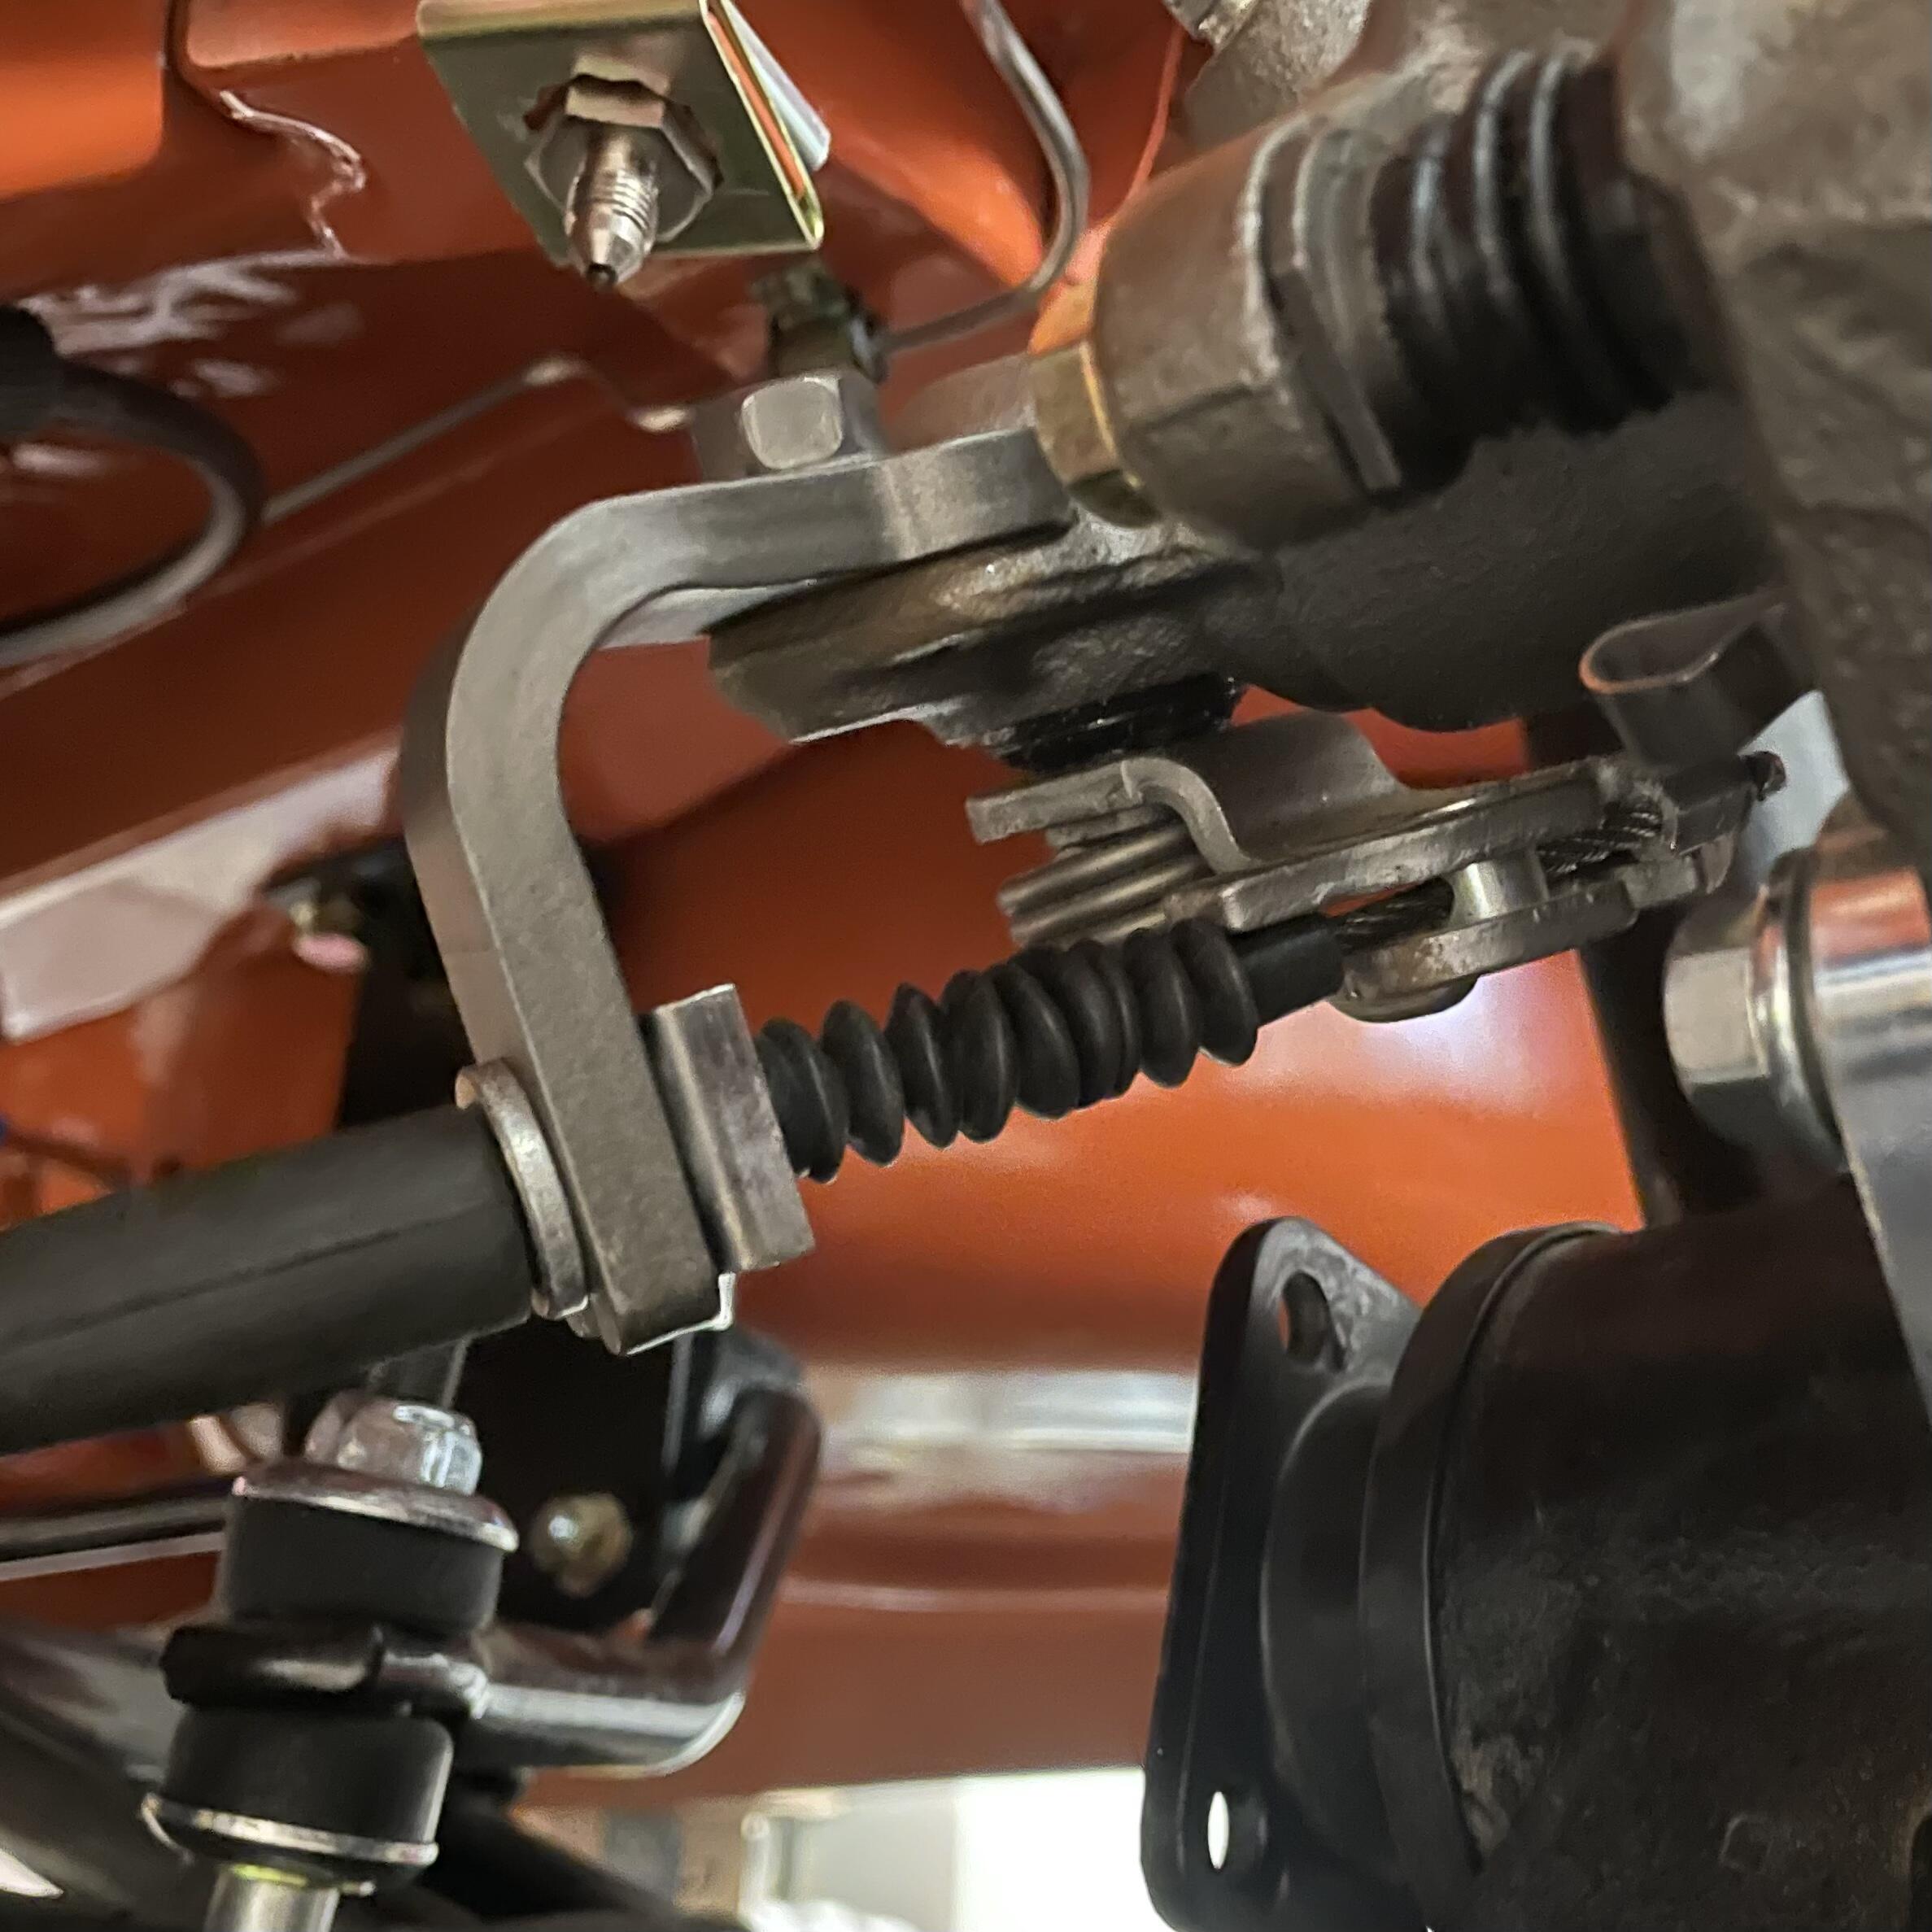
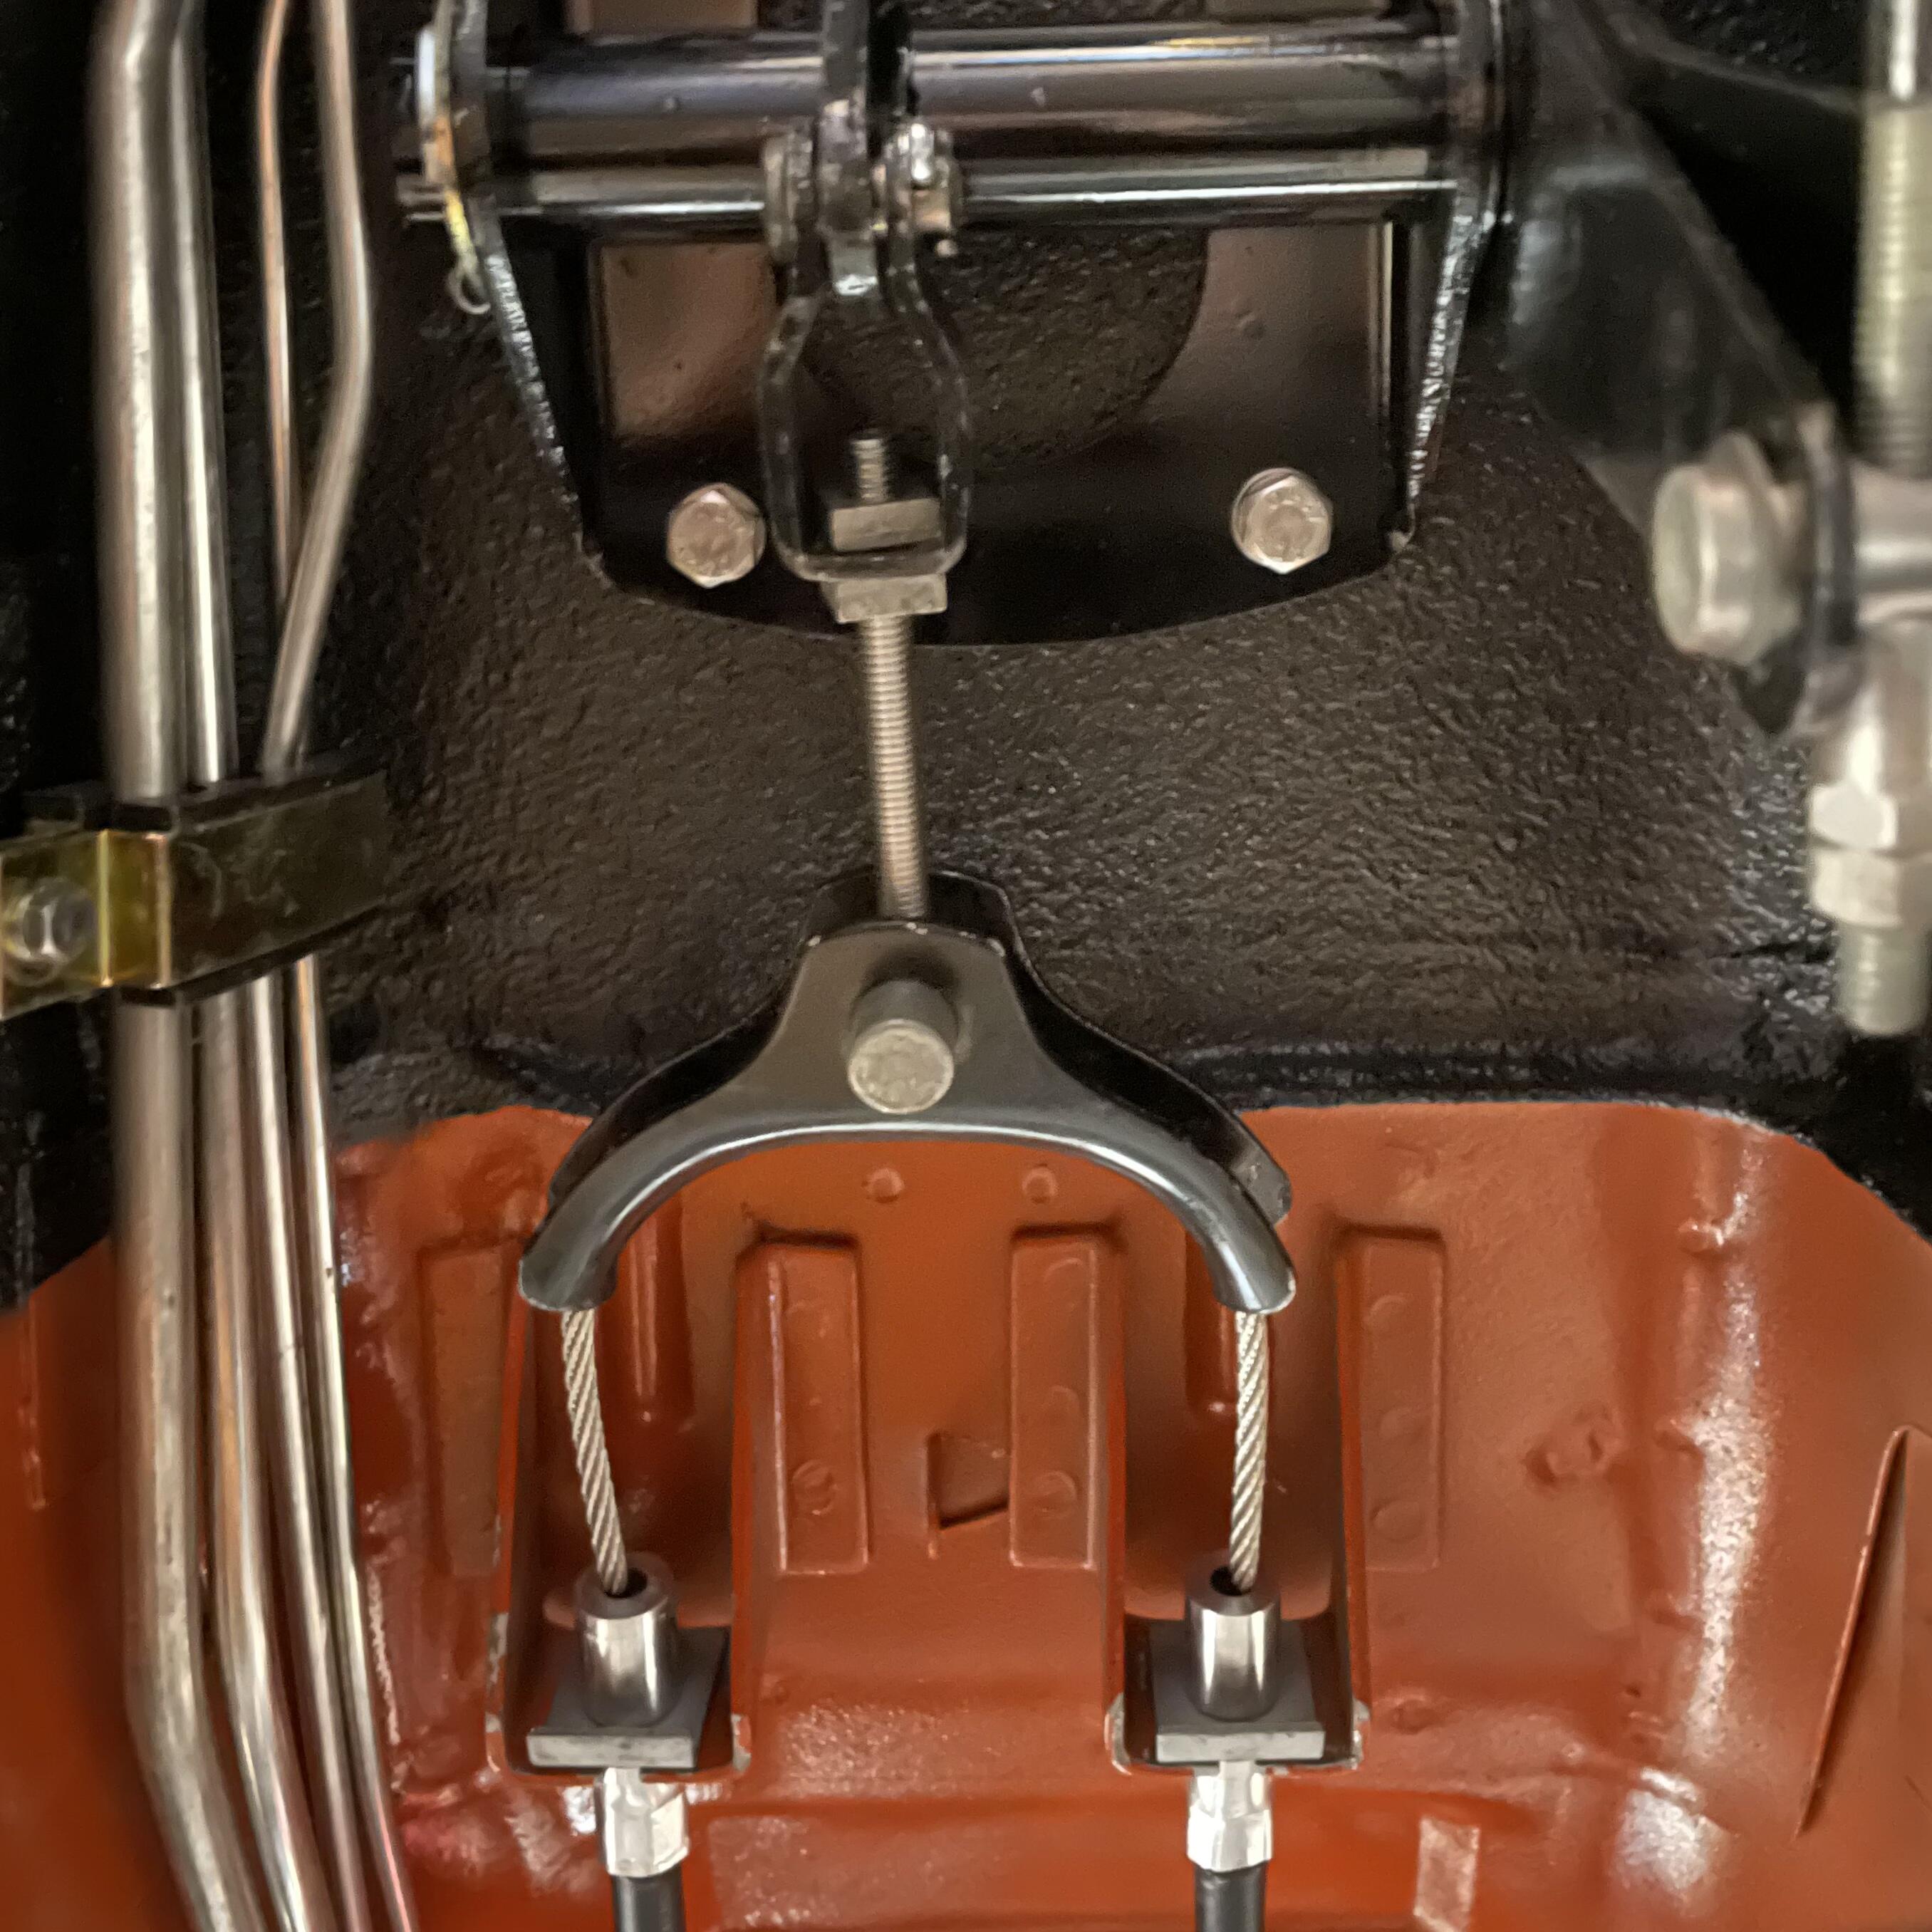
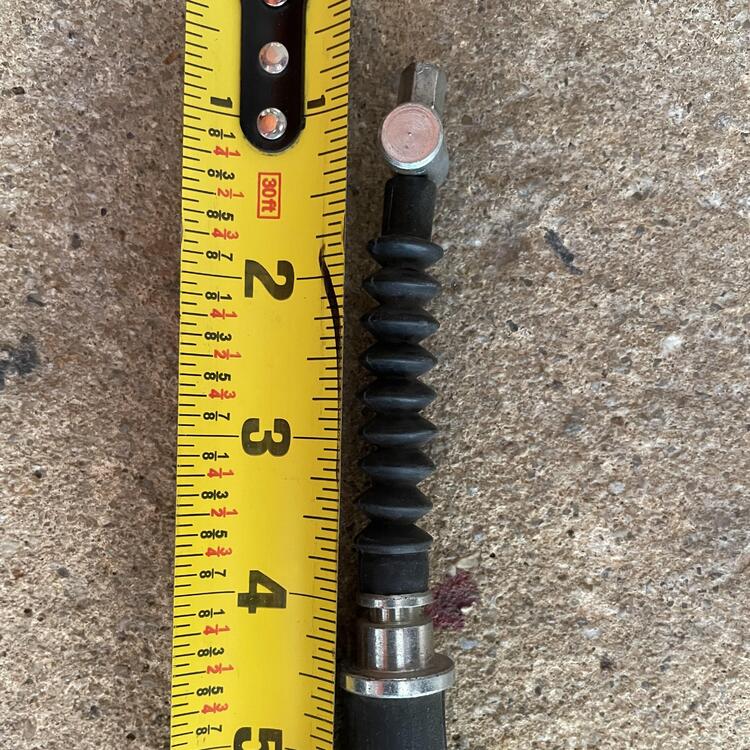
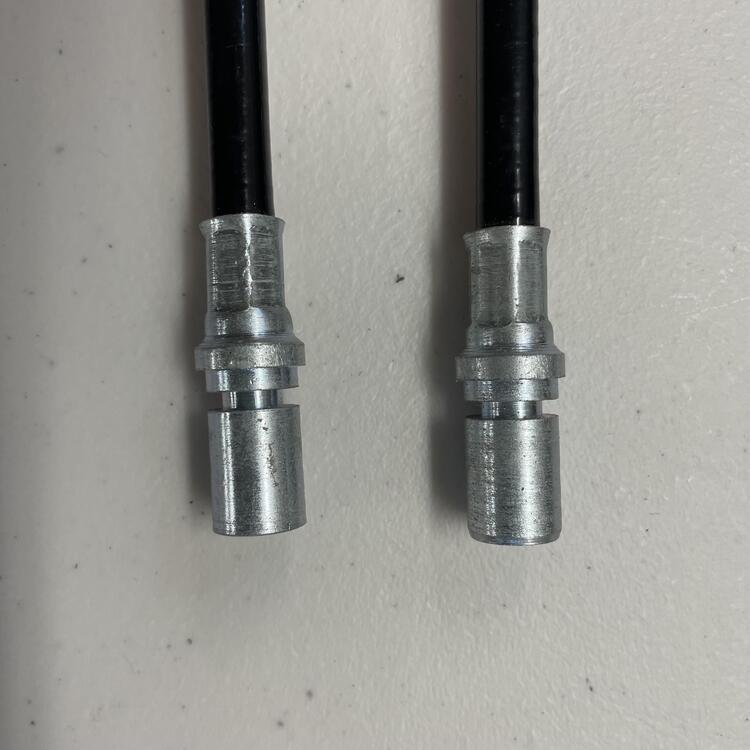
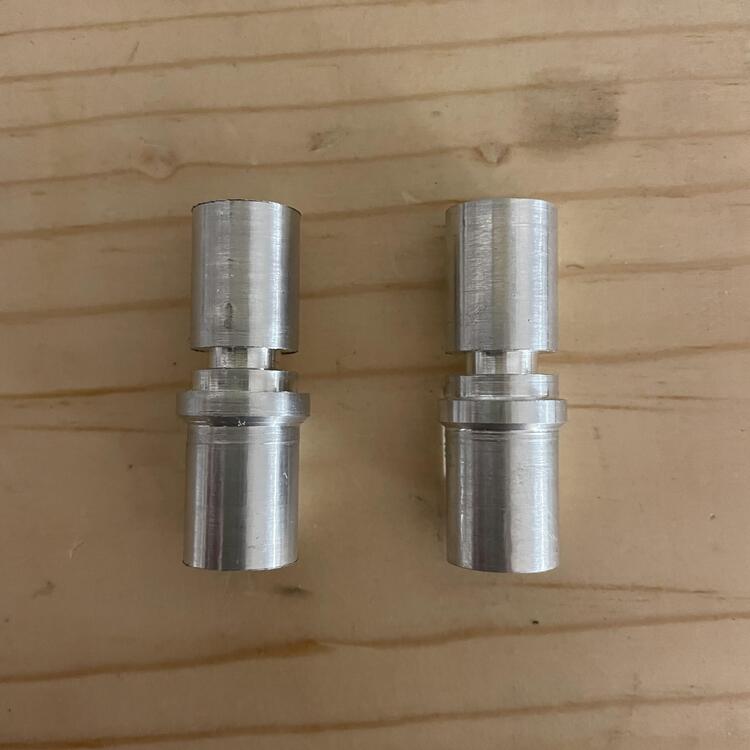
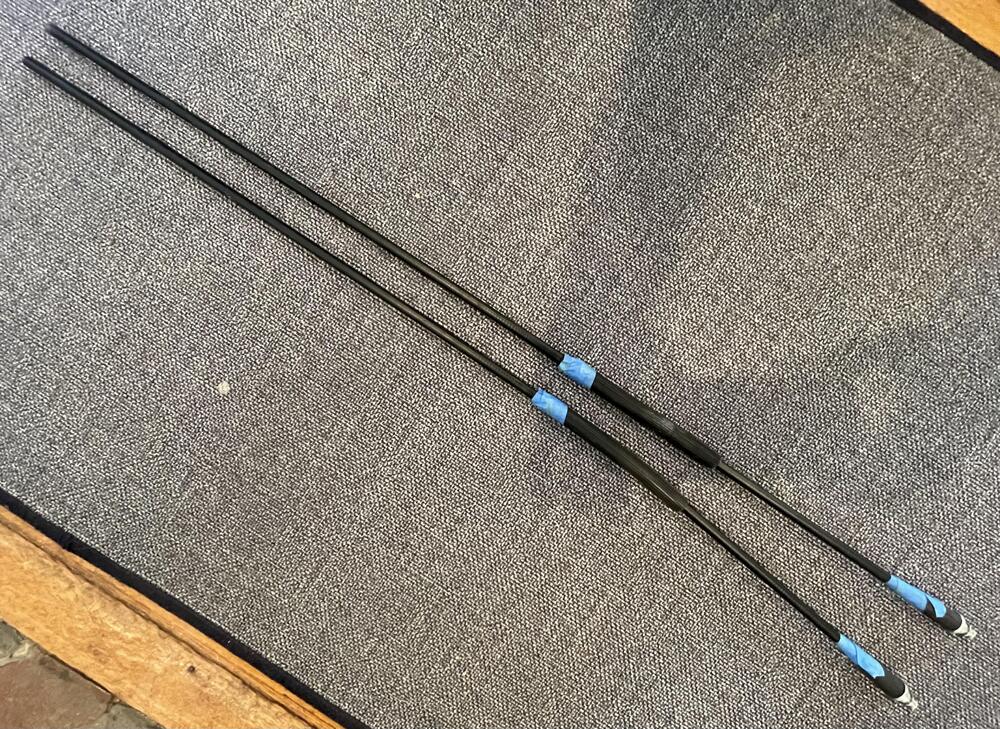
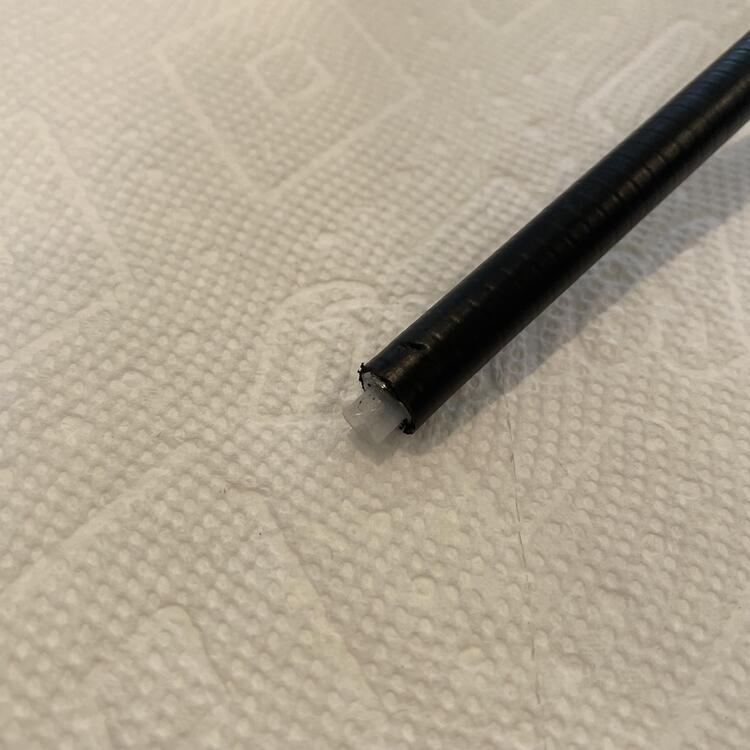
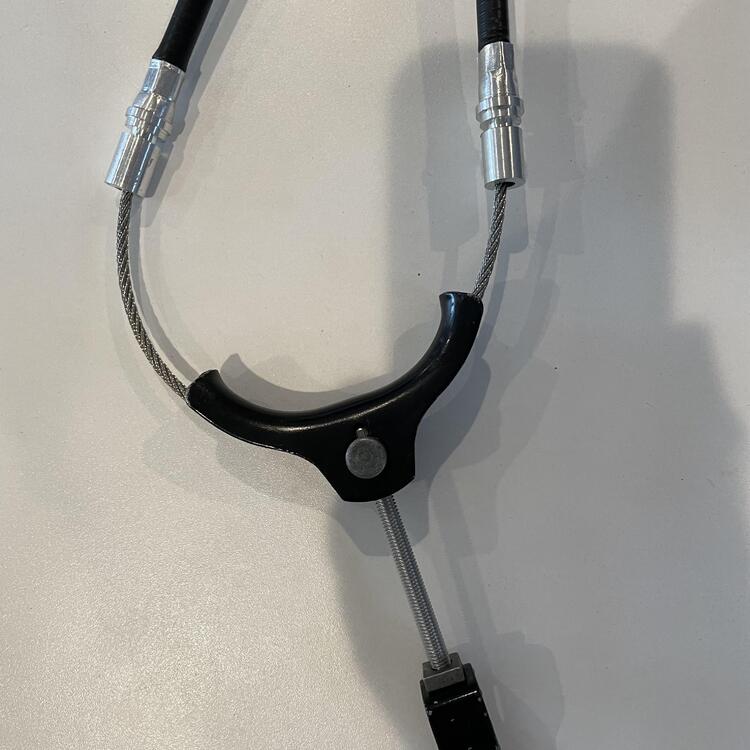
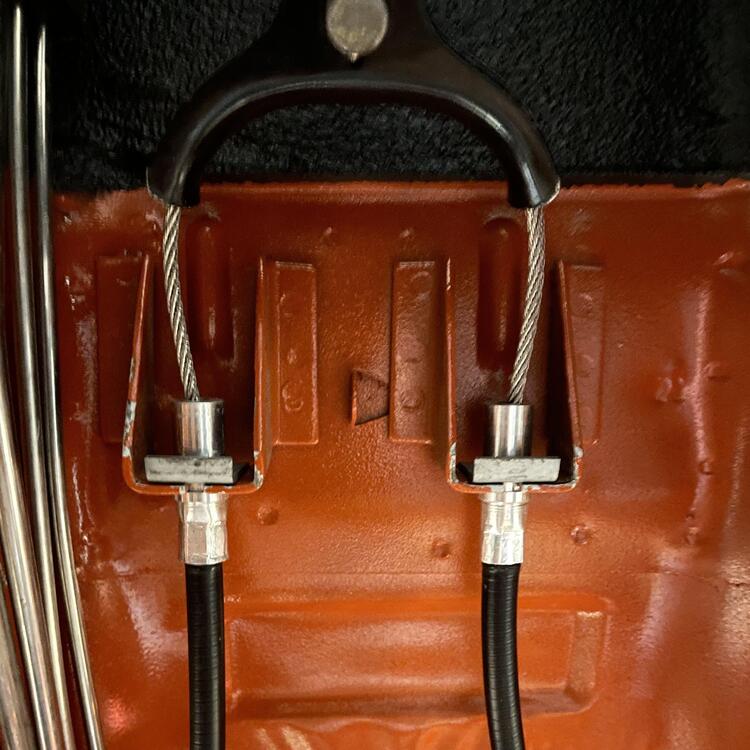
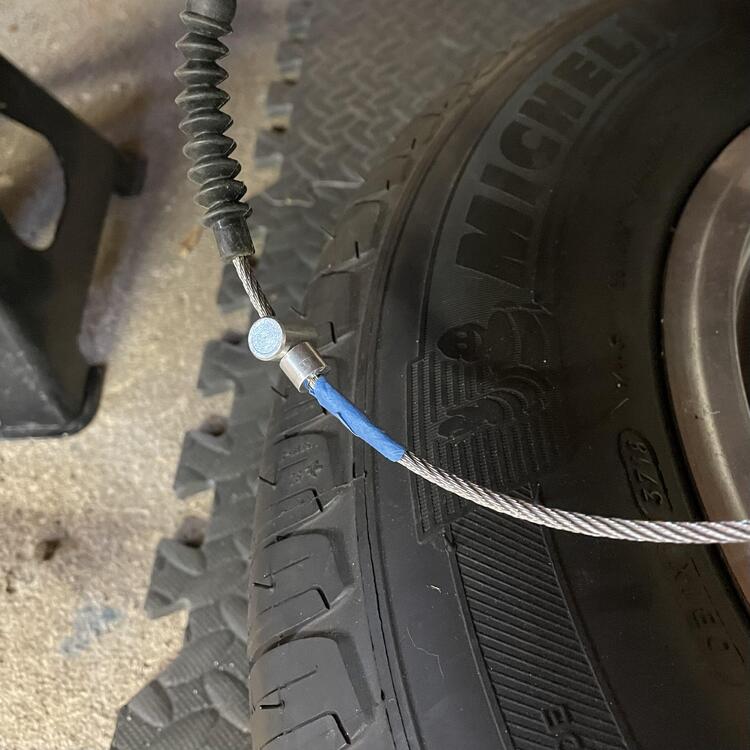
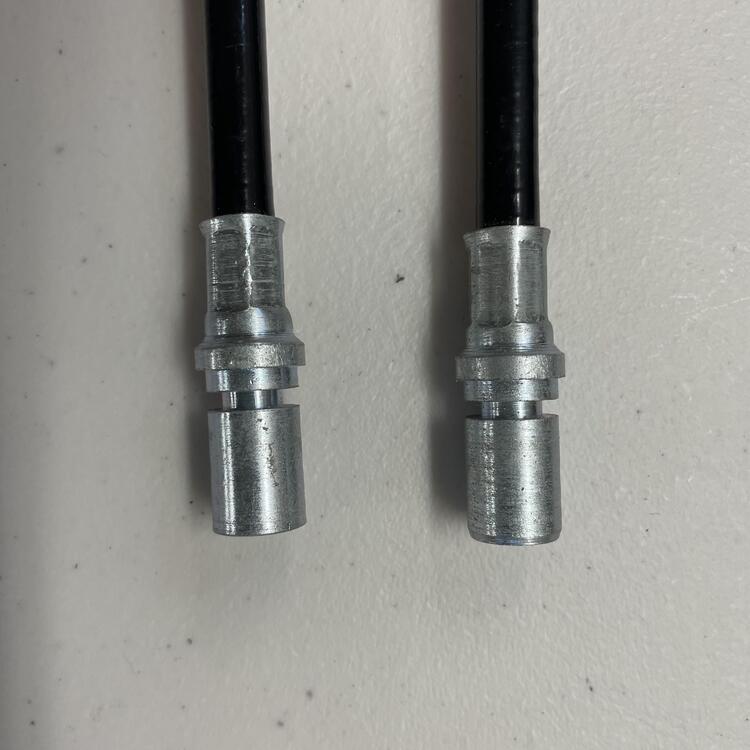
 I just couldn’t live with the gimpy hack that I had to use to get the 240z parking brake cable to connect to my rear Maxima calipers, so I cobbled together my own assembly. This probably could have been done without totally destroying the parking brake cable I bought from Z Car Depot, but I didn’t know that at the time. Here’s a step by step of how I put this together. Someone could probably evolve this and get to a better solution that doesn’t cost as much, doesn’t produce as much waste, and is easier, but this works. If you are using 200 SX calipers I am guessing the process would be largely the same. Supplies needed: 2 x 1984 Nissan Maxima parking brake cable assemblies 1 x 1973 Datsun 240z parking brake cable assembly if you are going to try to get the fittinngs to fit, otherwise you’ll need some 5/8th inch 6061 aluminum rod (or stainless steel if you have a fantastic lathe) + all necessary measurements for the fittings that mount to the bracket on the body of the car 1 x length of 1/8th inch stainless steel cable (I went with 10 feet so I had more than enough to make mistakes) 2 x 1/8th inch cable swage ends 2 x 5/8th inch insulated Adel / cable clamps 2 x Sheet metal screws JB Weld or similar metal epoxy Tools: A swage crimper with swappable hexagonal jaws A measuring tape A micrometer A razor knife Glue Cable cutters A rotary saw A drill + bits Various screwdrivers, pliers, etc. Sequence: Step 0. Either remove your 240Z housing fittings and open them up to be crimped onto the Maxima housing or take measurements from these to have a machinist make you at least 2 sets of fittings. If you repurpose the fittings from the 240Z housing, you may find that heating them with a torch and using punches will work. Mine were ferous but I could not get them soft enough to open without tearing, so I took the machinist route. Step 1. Measure how far the cables for each cable assembly extend beyond the ends of the housings. Disassemble both housings completely. Remove extraneous housing brackets and sheaths from the Maxima housing, taking care to minimize the damage to each piece. Save all parts. Step 2. Find a suitable location for an Adel clamp to mount on either side of the 240Z body. Find a good route around the underside of the car that clears all of your running gear and suspension and allows for gradual curves, preventing kinks and binding. I opted for putting the Adel clamps on the inboard sides of the Bad Dog frame rail extensions I put on the car before the paint was done, as well as using the spring suspenders that the original 240Z housing uses. Take note of where the housing will need to be cut to mount to the under side of the transmission hump in the cable bracket and mark with blue tape or similar. Note: The Maxima housing is slightly larger in diameter than the aftermarket 240Z housing I got from Z Car Depot. Those pieces won’t just slide on, and getting a set that hasn’t been crimped yet was a fruitless endeavor, because the manufacturer didn’t feel like selling them to me. You may be able to go the other way and make the piece that fits into the Maxima caliper and fits onto the 240Z housing, but I found the 240Z housing to be too short to route well without binding and opted for trimming the Maxima housings. Step 3. As stated in Step 0, either reuse or replicate the housing ends of the 240Z cable housing. I destroyed two of mine (there are four on these housings) by trying to open up the crimped ends, which may be possible with the right tools, but I don’t have those so I abandoned this path and opted for having a local machinist replicate the ones I didn’t murder. He made me four of them (2 for failures) out of 6061 aluminum rod in exchange for a 750ml bottle of Uncle Nearest 1856 Premium Aged Whiskey. Stainless steel would be better, but these parts don’t have a ton of force on them in any direction so he and I agreed that aluminum will be just fine. Step 4. Use a rotary cutting wheel to cut the Maxima housings to the length determined during Step 2. For me this came to about 37 inches from the end of the metal part that mounts to the caliper to the cut point. The housings are sprung steel with a rubbery black plastic coating. A hack saw and file might work fine but will take a while and give you a nasty edge because of the coiled design of the tube. I know this because I tried it. Step 5. Relocate the ribbed sheath with the smaller diameter to cover the area where the other sheath was glued to the housing. This is where my finished housing will go through the Adel clamp, and I found this ribbed piece to be a good size to fill the Adel clamp without it squeezing the housing too tightly or leaving it sloppy. Step 6 (optional). Fix rubber pieces in place to aid assembly. I opted to use some flexible glue that gets along with the rubber bits to fix them in place. I wanted to reduce the opportunities for moisture to get into the cable (and this is a nice feature upgrade from the aftermarket 240Z cable I got from Z Car Depot), as well as keep things from sliding around as I test fit everything. Step 7. Reinsert the white nylon tube into the Maxima housing. Trim to be flush with the cut end of the housing. I trimmed both ends to clean it up since it was a bit worn on each end. Step 8. TEST FIT EVERYTHING NOW! Step 9. POINT OF NO RETURN - Assemble the housing pieces and crimp the 240Z housing pieces onto the Maxima cable housing. Be careful to not over crimp the 240Z piece and crush the Maxima piece. CRIMP SLOWLY! The inside of the 240Z piece is going to shrink and may need to be opened up to allow the cable to pass through if it’s squeeze too far. Check tolerances and test fit often. I rushed the first set so all my careful choosing of the best bits was for nothing as my two best ripped and ended up in the trash. Also, don’t crimp too close to the collar. That caused the tears in the first round. Note: A few observations from the machinist about the replica pieces… A. The hole that the cable goes through was hard to get the right size on his 1943 lathe because of his selection of ASE drill bits not being in small enough increments. We opted to ensure enough space for the cable by going a little too big, which allowed the white nylon tube inside the housing to escape as the cable slid back and forth. After the second try I found the crimping shrank the opening enough to keep the white nylon in the housing while allowing the cable to move freely. B. It’s tough to get the channel for the spring clip precise on an old-school lathe. CNC probably could get it closer, but we opted for too tight and filing if necessary. Because these are aluminum and the spring clips are steel, a little persuasion with a brass hammer did the job. C. The reason we made 4 and not 2 is so we could test all tolerances and choose the combination of fine tuning challenges. Since these are all hand made there were differences, so I used hand tools on the fittings and the bracket to make them fit. Step 10. Test fit again. Step 11. Put the rubber boots onto the ends of the Maxima housing. Step 12. Crimp a swage onto the end of the steel cable. Put a cylindrical bead from the Maxima on the cable, followed by one of the Maxima housings with a 240z end. Put the couple for the hand brake on, then the other Maxima housing with 240z end (flipped the opposite direction), another bead and a swage end. DO NOT CRIMP THE SECOND SWAGE END YET! BONUS PICTURE OF DOG INTERRUPTING PROCESS. Step 13. Test fit the entire assembly. Make sure the screw that connects the U-bracket to the handbrake lever is fully extended to ensure the maximum available adjustment length, but lease a few threads peaking past the nut for a smidgin of safety. Note: I replaced the OEM screw with a 70mm stainless M6 1.0 pitch hex socket cap head bolt. It fits into the assembly well. The old one was bent and this one has threads down the entire length, giving me much more room to adjust it. Any cable will stretch over time so you want something like this to maximize adjustability. Step 14. Position the bead and swage end you didn’t crimp inside the caliper lever, pull the cable taught, and mark the position of the swage end on the cable with a piece of blue tape. Step 15. Remove the assembly on the side that you just marked from the caliper and crimp the swage end where it should be. Cut the excess cable off. Note: I put a bit of JB Weld over the frayed end of the cable where I cut it, bonding it to the crimped swage end on each side of the car. This will keep moisture out and gives me just a little more insurance that it will stay on, because Garage Build. Step 16. Reassemble, tighten the bolt that joins the cable to the hand brake, and test the system. Edit: The slack you see above between the swage end and the bead disappeared once I tightened up the bolt in the u-bracket. Edit: I think I might end up putting zip ties or something on the boots that cover the black Maxima housing. The glue I used isn’t holding. I might also have used a nylon coated cable if I was doing the entire thing over again. The reason I didn’t is that I didn’t trust the swage end to stay on with that nylon creating a failure point. If it disintegrates you end up with a loose crimp, and since this was done with hand tools I just didn’t feel confident about that.
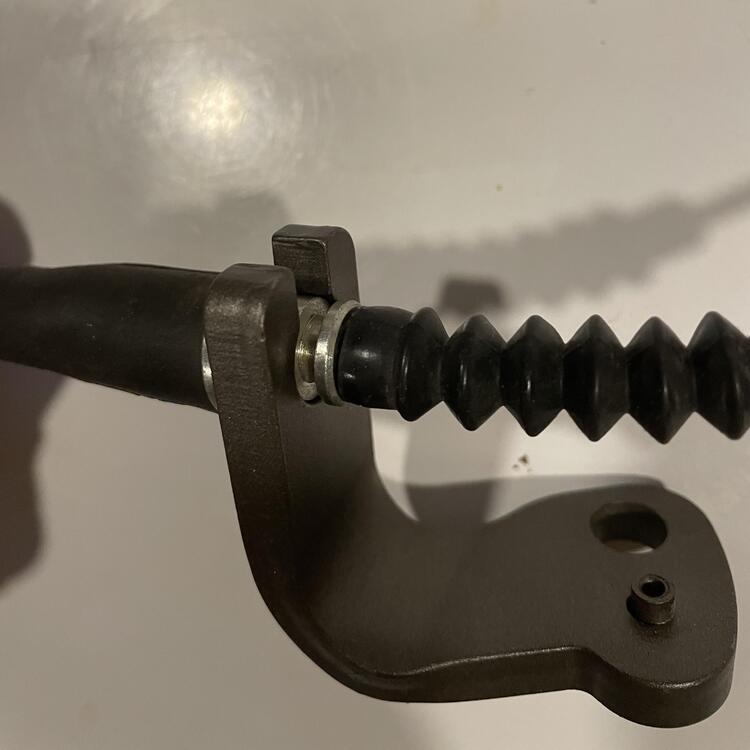


-
Okay, new tactic: anyone know where I could get a fresh set of these that haven’t been swayed yet? Im looking into having a set made by a machinist, but buying them from the people that make the zcardepot parking brake would be better.
-
I wondering if it’s possible to replace the cable and swage end fittings in one of these repro units. I was comparing the one I have to a repro parking brake cable for a newer Nissan, and the newer one has a coated cable, but the swage fittings look the same. The cable appears to be the same diameter. I’ve seen hand tools for swaging on fittings, but think it is dubious that a hand tool would provide the necessary crushing force to make something that survives repeated pulls of the lever. No one in my area has the right press for this kind of thing. But if I could find some reliable way of replacing the fittings, I could just put a new cable in the old housing and press it together.
-
I was sitting and contemplating my parking brake situation, and it occurred to me that it may be possible to change the ends of the cables to connect to the maxima calipers properly. The Maxima had cylindrical ball ends on the cables rather than the clevises the 240z has, similar to these: When I have a chance I’ll measure and see what would fit. I’m looking around now to see if there are kits to replace these, but I could probably make them out of steel rod. It’s just a question of making them stay on. Maybe welding them would work if I can’t find a reliable clamping mechanism that can be done at home. I also found a couple of places that make parking brake cables, so I am looking into that as well.
-
That’s what I’m using. The thinnest ones I’ve found are 3mm plus the foam tap they stick on with.
-
So now that my brakes are stalled out again, I am contemplating what to do about my wheel situation. Recap: I have 14x6" Shelby Cal 500 slot mags. They are just ever so slightly too tight to allow the balancing weights to clear the maxima calipers in the back. I bought some low profile balancing weights that are 3MM thick and cleat the Toyota calipers in the front, but the back is still an issue. I am not into the idea of shaving the maxima calipers to accommodate wheels that I have always planned to replace some day. I'm writing this post mostly to collect my thoughts in one place, but comments and corrections are always welcome: I've seen a range of maximum backspace on a 240Z going from 4 to 4.75 in the front and 4.5 to 5 in the rear Optimal offset for a 240z is 0 in the front to prevent tire scrubbing when steering, regardless of wheel width Maximum tire width to clear the inside of the stock fender is probably 215mm (I have Eibach springs, which have lowered the car 1.5 to 2") 215mm is also the minimum tire width on an 8" wheel Original tire diameter for a 240z was 24.95" I have seen people recommend a 7" wheel width for optimal handling 15" tire selections are getting slim
-
After reading these links, I think fabricating a bracket that corrects the errors of the kit is the solution. The only other option that doesn’t involve modifying the cable is buying the Silvermine brackets, which might give me the same problem in the end.
-
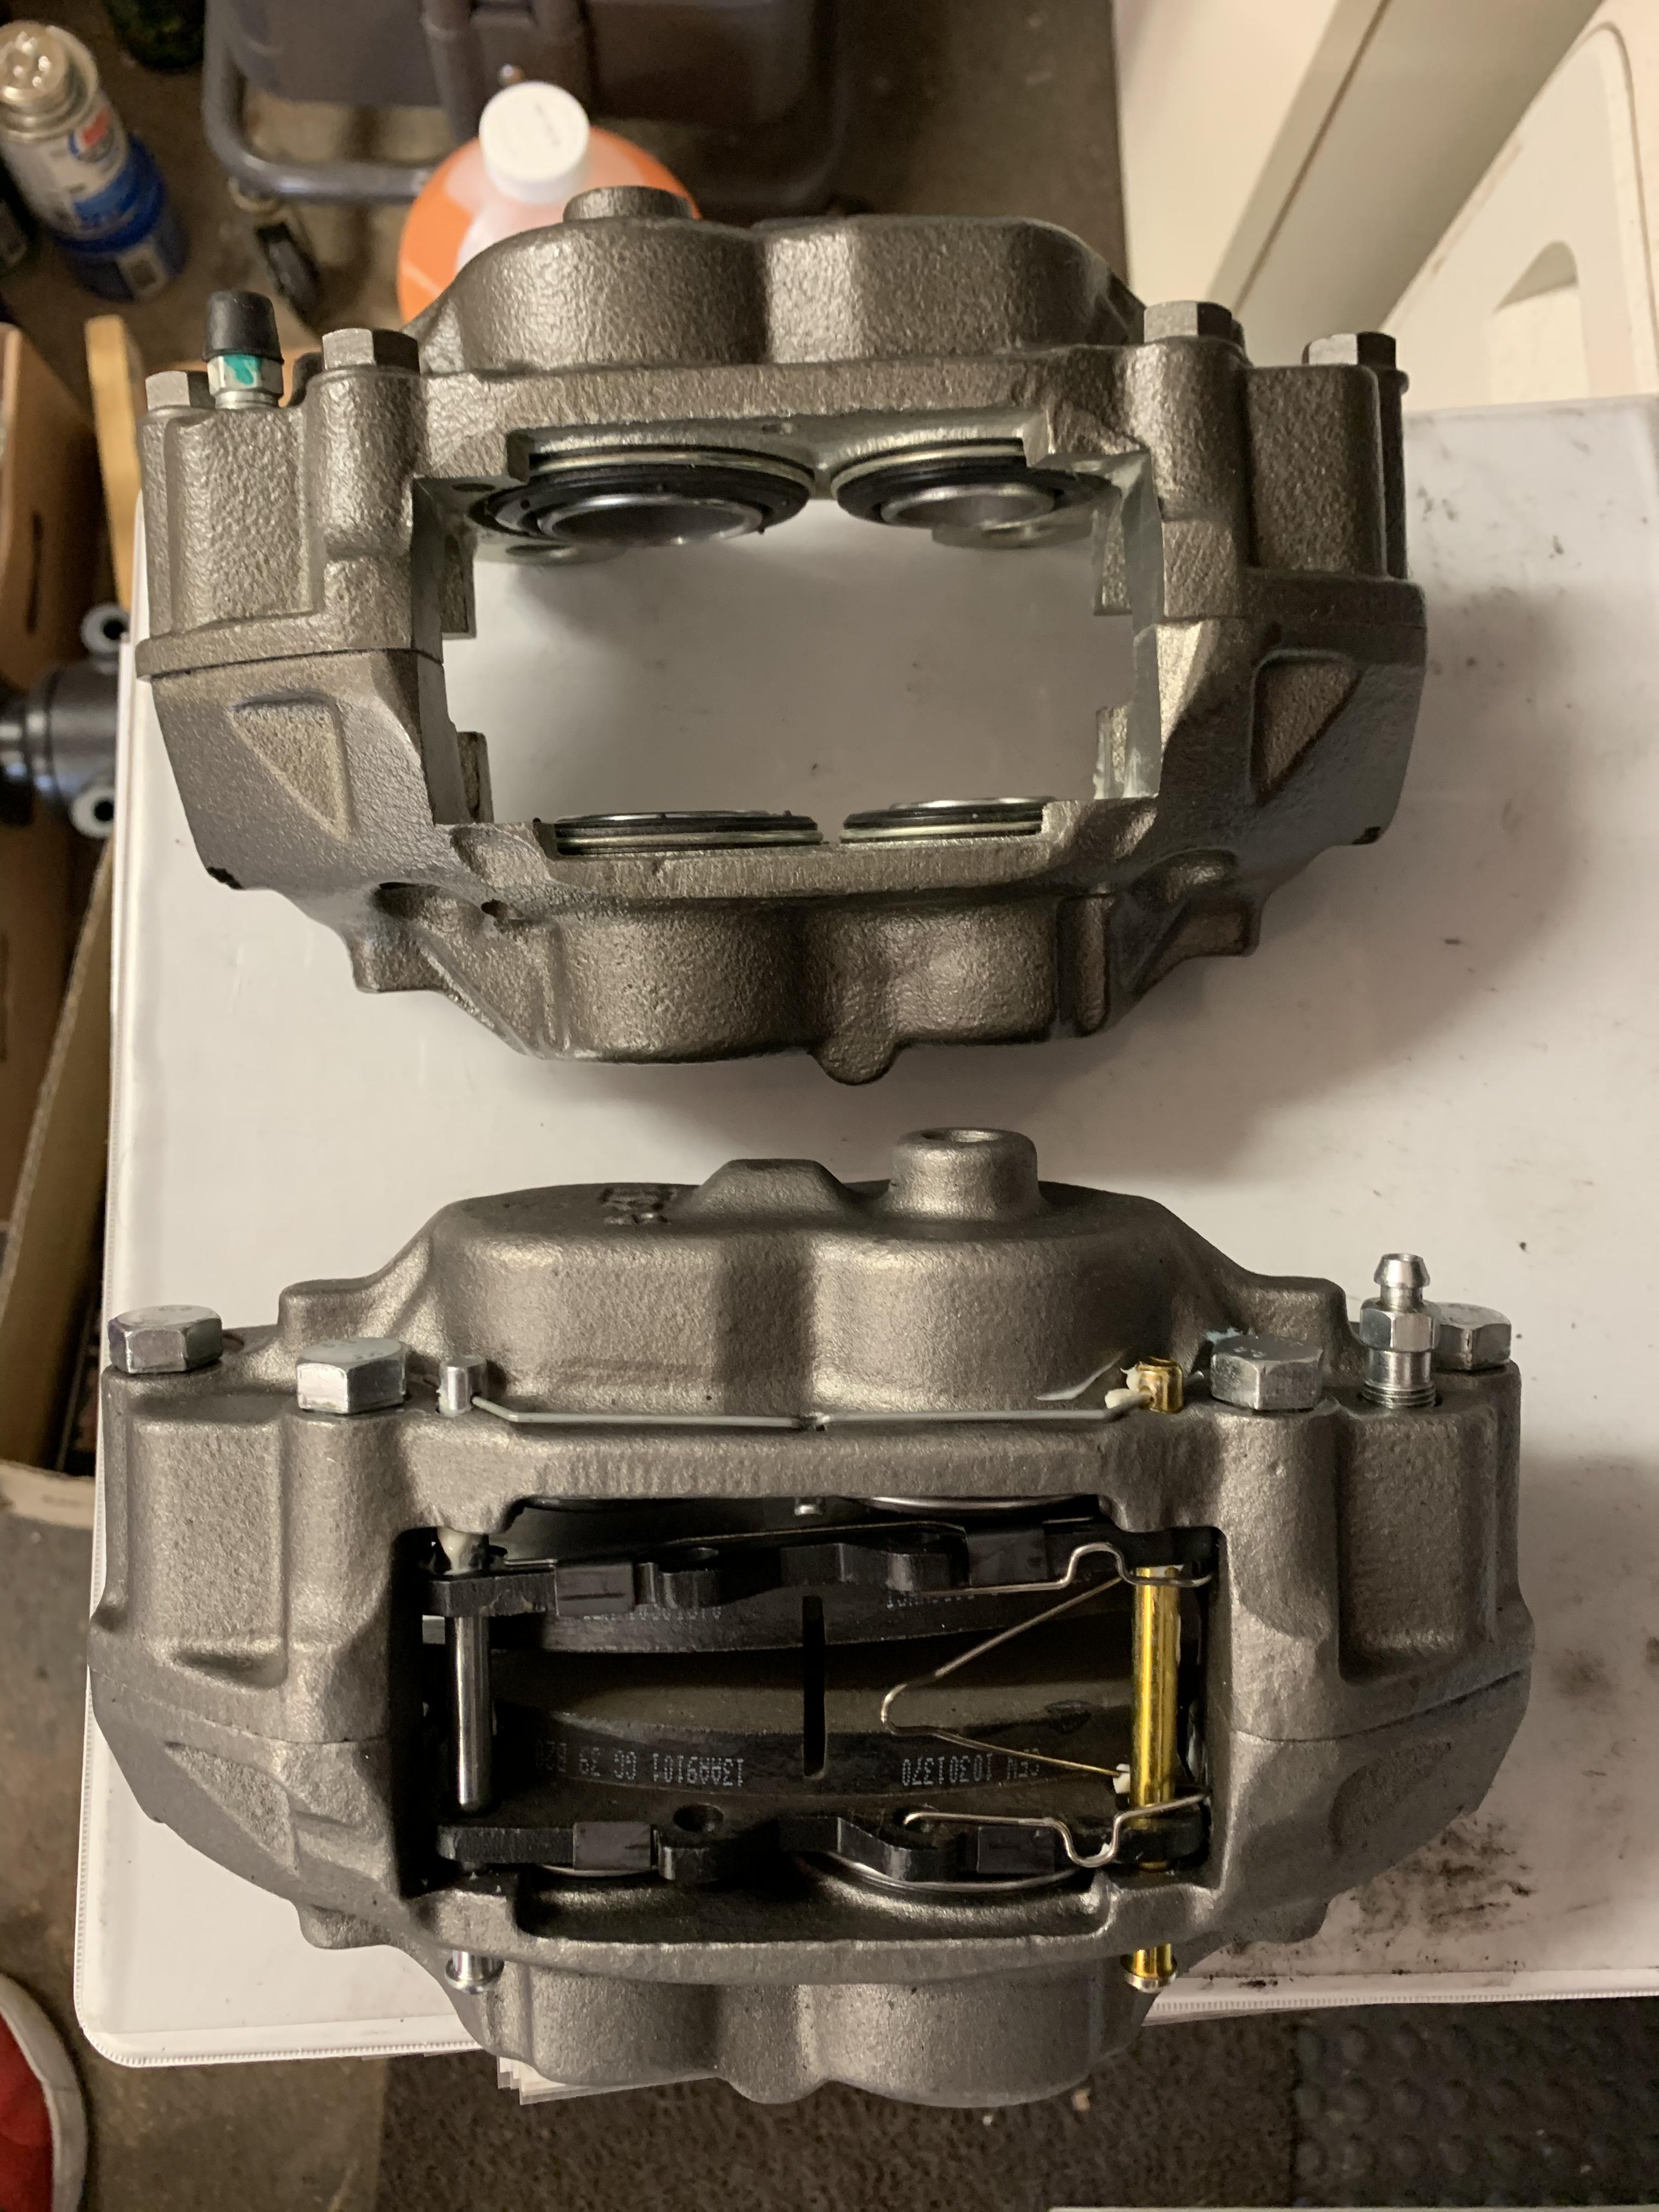
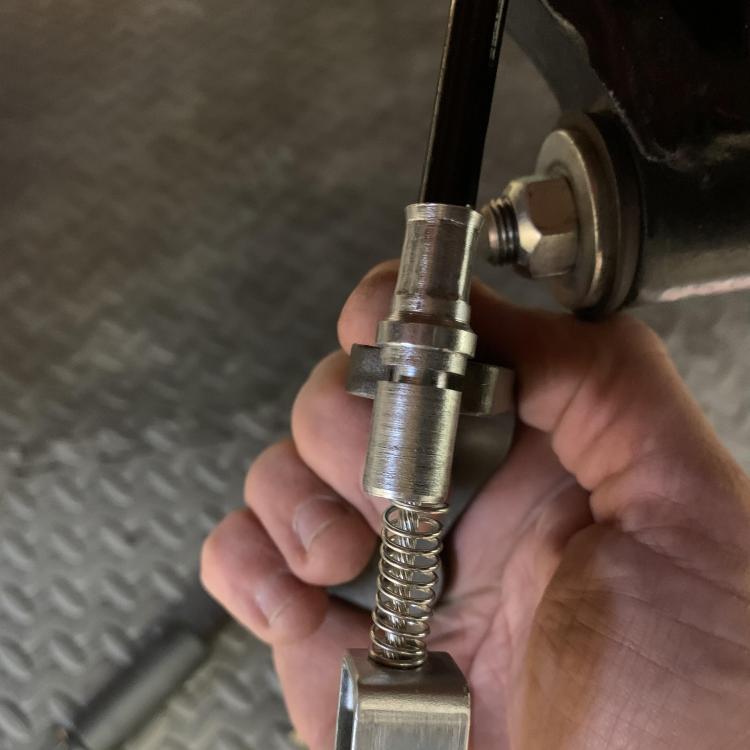
Got another conundrum: The after market e-brake cable I got from Z Car Depot is not fitting nicely with the rear caliper kit I also got from Z Car Depot. Funny that, given they market this kit as working with the factory e-brake cable and this cable as working with no mods, but I digress... The slot for the spring clip is very close to the brace on the cable that makes it clamp to the bracket. Not surprising and I should have expected that. You can see how much thicker the Maxima bracket is above. I’m going to have to cut some new slots for the spring clip. I’m not excited about it but I can do it without screwing it up (I think) if I use hand tools and take my time. Also, the end of the cable with the clevis is binding up in the hook on the caliper. I thought of making some linkage, but that puts the clevis too close to the bracket and it gets bound up. I’m thinking I need to squash it so that it fits in there a little better. I’m not stoked about this either.

-
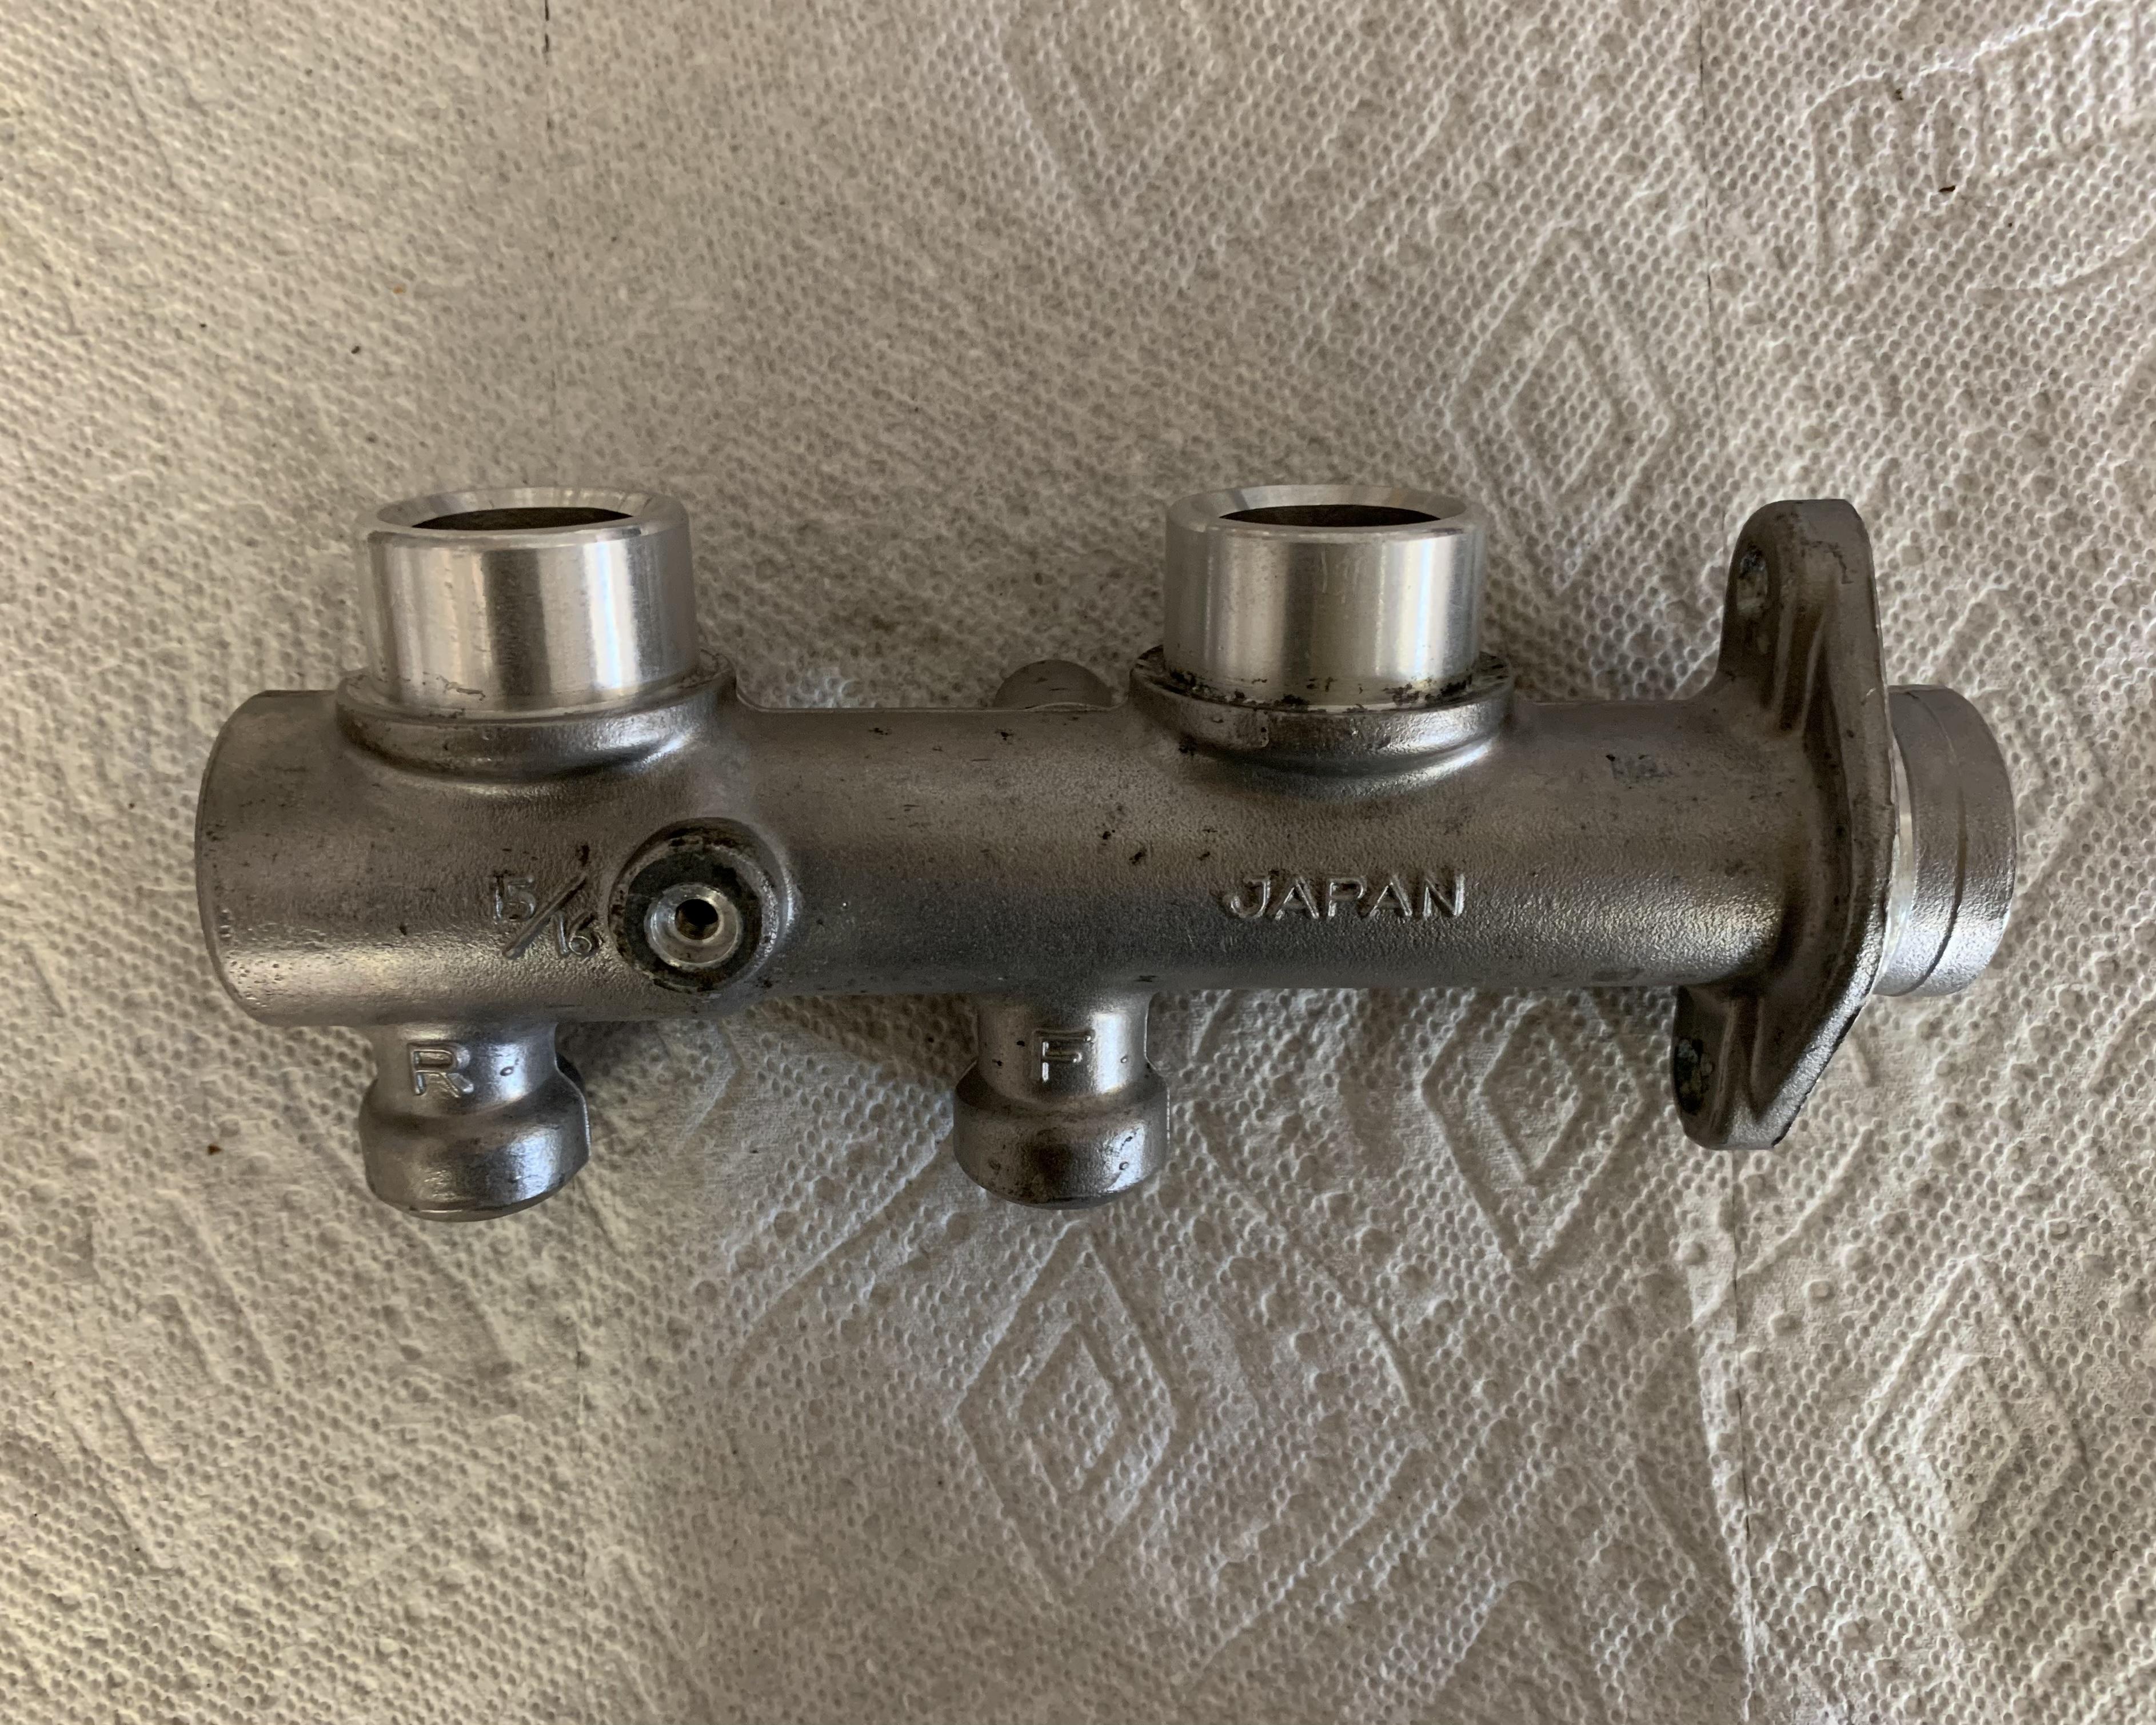
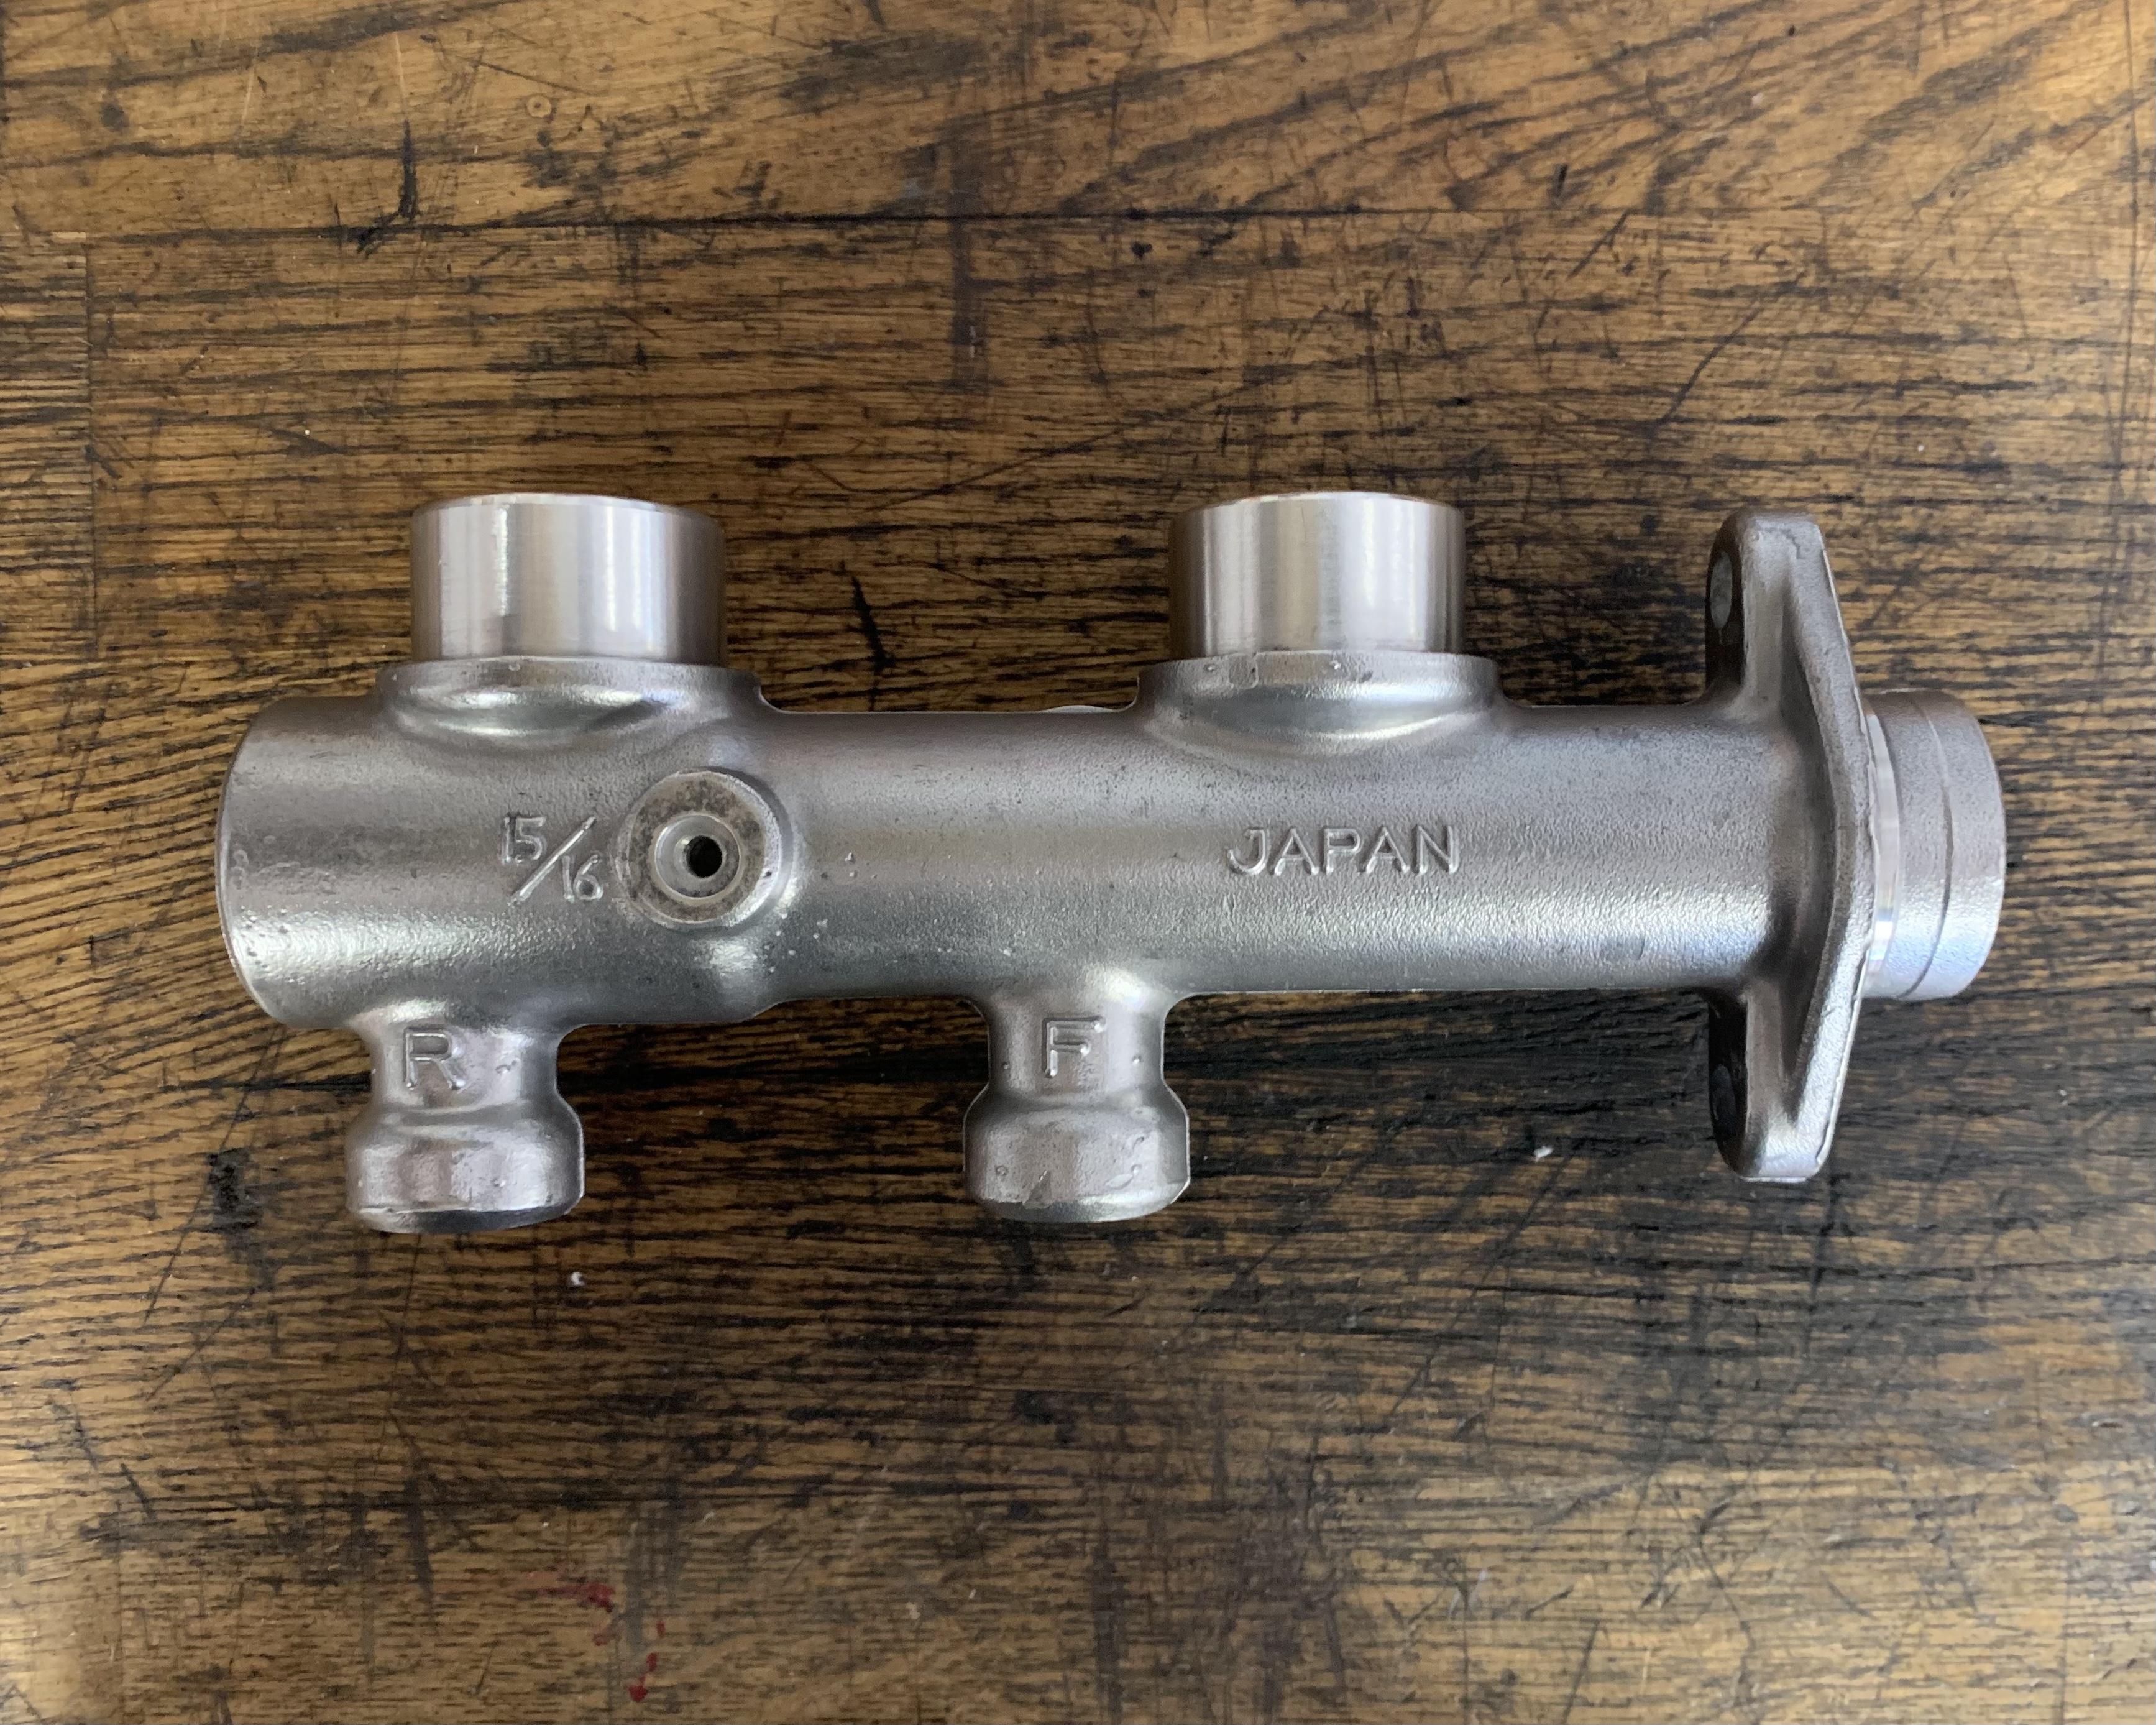
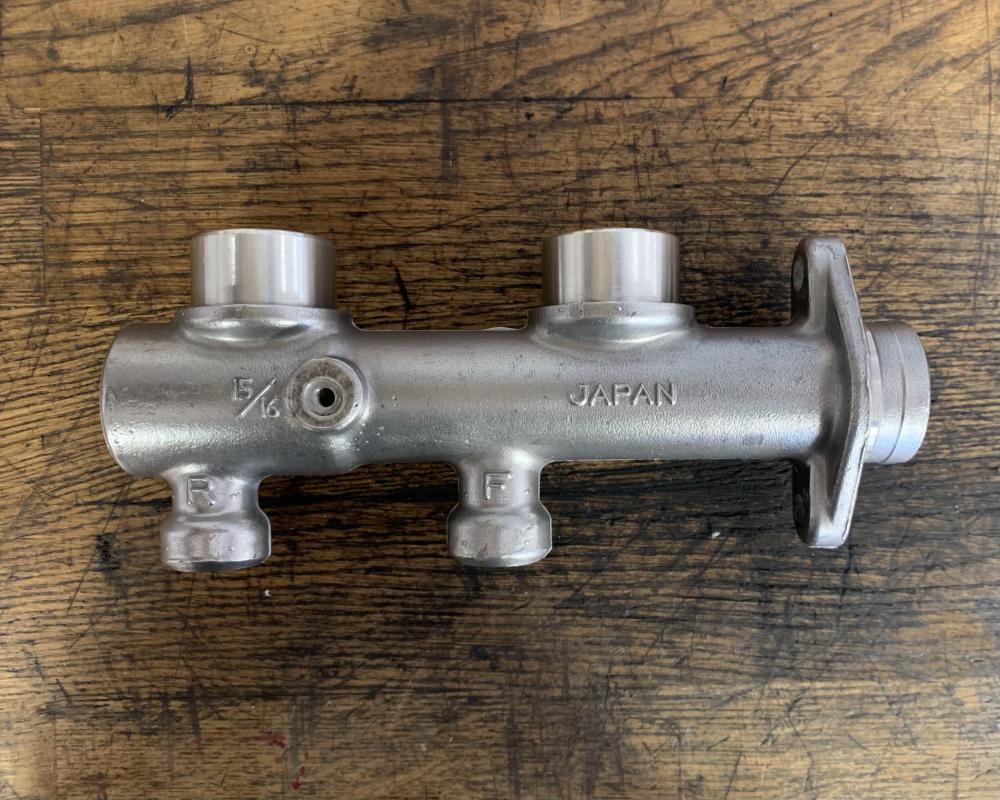
So this is interesting... The fittings on the bottom of the ZX master cylinder are m16x1.0 to m10x1.0. I am not seeing anyone selling a fitting this size online (mine look like crap) but I also haven’t looked that hard. I’m going to check my 240z MC and see if those are the same thread sizes, but at first glance they are definitively different hex sizes. Edit: I found them for the Willwood 1” MC, if anyone needs that, but I am pretty sure they are SAE male ends: http://trs-store.mybigcommerce.com/direct-wilwood-master-cylinder-to-datsun-brake-line-fitting/sku
-
So I know this is a slightly old thread, but I have a slightly different direction from what’s been mentioned that might work with bigger brakes. I have maxima calipers on the back and Toyota calipers on the front. The 14x6” rims I have fit but the wheel weights the tire shop used hit the calipers. This made me realize that a Datsun rim isn’t going to fit, so I am looking at getting a 2007 Nissan Sentra spare tire rim (PN: 40300-ET077) and fitting a Yokohama Y870B - SIZE: T135/80D16 tire to it. This should be similar to what @SoCalJim uses but closer to the stock tire diameter. I haven’t verified that the offset for that rim will work, but a spacer could solve that issue. The other thing I need to check is if that tire will fit into the spare tire well. It should be 24.9” in diameter inflated. The wheel is 4” wide plus however far the center sticks out (it’s a front wheel drive wheel). Maybe this will all work out.
-
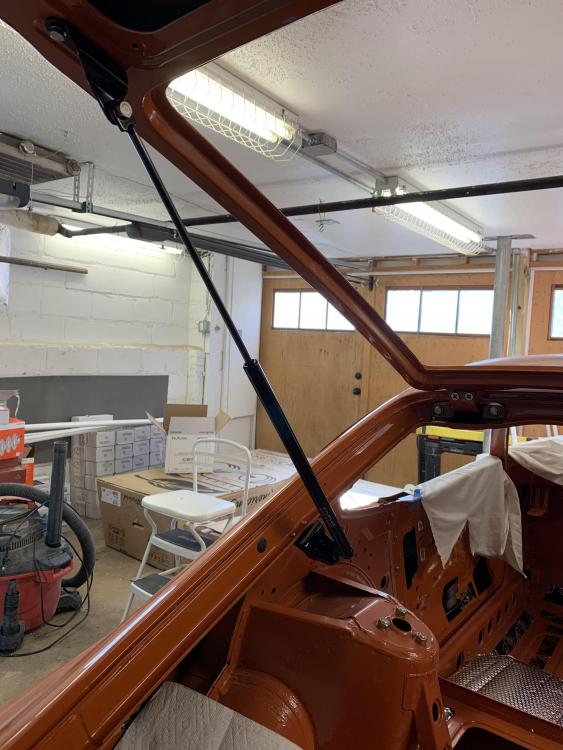
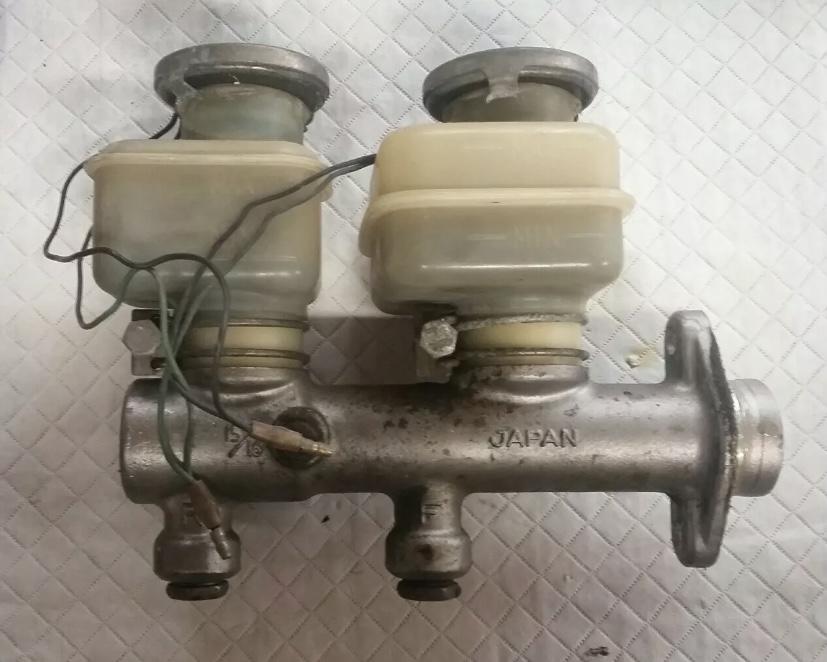
Okay, I was able to accomplish a few things this week: I received and installed the hatch bracket from @zKars and put the strut in. This made it a lot easier to get the final alignment of the hatch done. I polished up the storage box handles I got from @7tooZ (photo taken between for comparison) And I cleaned up the 280ZX master cylinder I got on eBay I have lots of cleaning on the MC parts to do and various rebuild parts coming in the mail, so that will take a while. I should be able to get the brakes totally finished by the end of February.


-
Thanks, but I want to stick with the ZX-sized tanks. I found a set on eBay and picked them up. They were more than I wanted to spend but I will have them Wednesday, so ¯\_(ツ)_/¯.
-
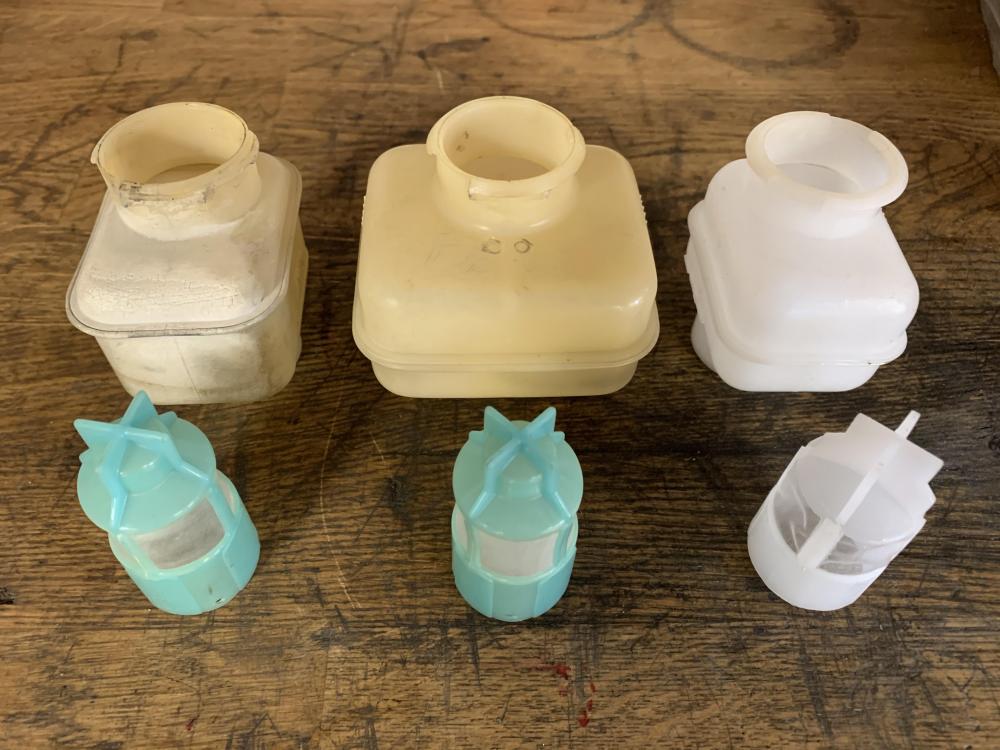
So, I’ve been collecting random brake parts, and one of the things I grabbed was a 79 ZX master cylinder. I am planning to rebuild it, and I have everything, but the reservoirs look... questionable. They still hold fluid and don’t leak, but they aren’t pretty. I know it’s a long shot, but what are the chances I can get a NOS pair from someone who’s been hoarding a set in their basement? I actually only need the big one (46090-P6500) because I have a little one that is close to if not exactly the same as the original (46091-U0502). Its either that or I reuse these or get some tilting tanks or something. PS. This is where I got the part numbers: https://parts.bayridgenissan.com/a/Nissan_1979_280ZX/_51504_8122687/BRAKE-MASTER-CYLINDER/S130_US-201101_460A_1.html
-
This is what I was referring to: https://jdm-car-parts.com/products/datsun-240z-260z-280z-rear-hatch-glass-reproduction-no-international-shipping?variant=13934211694701
-
Has anyone had good luck using a 260 or 280 rear glass in a 240 to solve this problem? A cursory Google search tells me the grid is the same and the only difference is that the glass is 5mm thicker and would need a different rubber seal, but I’m sure it’s more complicated than that. If it works maybe that opens up the available used parts enough to be able to just replace it. at this point I’m thinking I’ll polish the grid off and forgo it. The only other option is the series 1 reproduction, which is $850 before shipping. While I like the look of the vertical grid, I don’t like it that much.
-
Does anyone know if the OEM glass pieces have any films on them? If repairing the grid isn't an option, I may have it polished, but I don't want to burn through any films that may have been put on either side.
-
True, but new cars have this, so it must be possible. Maybe it's up to the place that does the tinting.
-
A couple of thoughts I had while reading through this thread: Can we can an inventory of all of the materials tried so far (stencil tape, various paints, etc.) and a review of their efficacy? I can't look right now, but I think maybe the OEM grid has a slight curve to it that makes the lines look straight on the curved glass. If I am correct, then the Frost Fighter may pose a slight problem in looking correct. Has anyone done a masking test to see which tapes do the best job? I am intrigued by the cellophane tape idea mentioned earlier. One thing I have been considering is recreating the grid in software, having a vinyl sticker mask made from that, and airbrushing the paint on after I apply the vinyl sticker. Then I won't need to remove the grid that is there. I just need to find. the best paint. However making the mask with tape might be faster and cheaper. If I make the vinyl sticker it could be reproduced and distributed. Another thing I am trying to find is a company that does these restorations. I would much rather take it to a pro to have restored. My grid is about 20% missing due to a sticker that pulled it off when I removed it. I am considering tinting my glass after I fix the grid in order to protect it. My car is a resto-mod with a bunch of non-reversible changes, so factory original isn't a concern for me. Those who are worried about the paint coming off from cleaning might consider this. (I am also considering buffing the grid off and adding a third brake light). Last thought, take a look at the electric guitar world. Conductive paint is used to lower interference in the pickups to get a cleaner sound: https://www.stewmac.com/electronics/shielding/conductive-shielding-paint.html
-
-
I could really use some help understanding the interior fabric for these cars, and the options for my year in particular (1973). I started a separate thread about this: https://www.classiczcars.com/forums/topic/64974-understanding-original-carpet-interior/ If anyone has good photos of how the sills are supposed to be covered, the differences between the various carpet kits, how the spare tire well is trimmed, etc., I would really appreciate it.
-
I am looking into the options for carpet in my 7/1973 240z and have some questions about what was original. My car didn’t have much of the interior when I bought it. It was kind of a husk on the inside. In reading about the carpet options it seems that generally people think the Newark Auto 11-piece kit is the best, followed by their 7-piece kit. Please disabuse me if this assumption if I’m wrong, but it’s what a few days of Google has turned up. I’m also seeing that “some cars” had rubber in place of 4 of the pieces, hence the 7-piece kit. Does this mean not all Zs had the diamond quilted vinyl on the transmission hump? What was happening on the outer edges at the sills? I have the trans hump vinyl in a box, and my firewall had what seems like mat-board behind the dash, but not carpet. I’ve put Dynamat down on the floors and will be putting foil-backed insulation over that. I may put carpet padding between that and that carpet, but either way I will need to go to the sills with something, whether its carpet or the afore mentioned rubber (?). Advice and photos of your setup are appreciated.
-
-
Sending you a direct message.
-
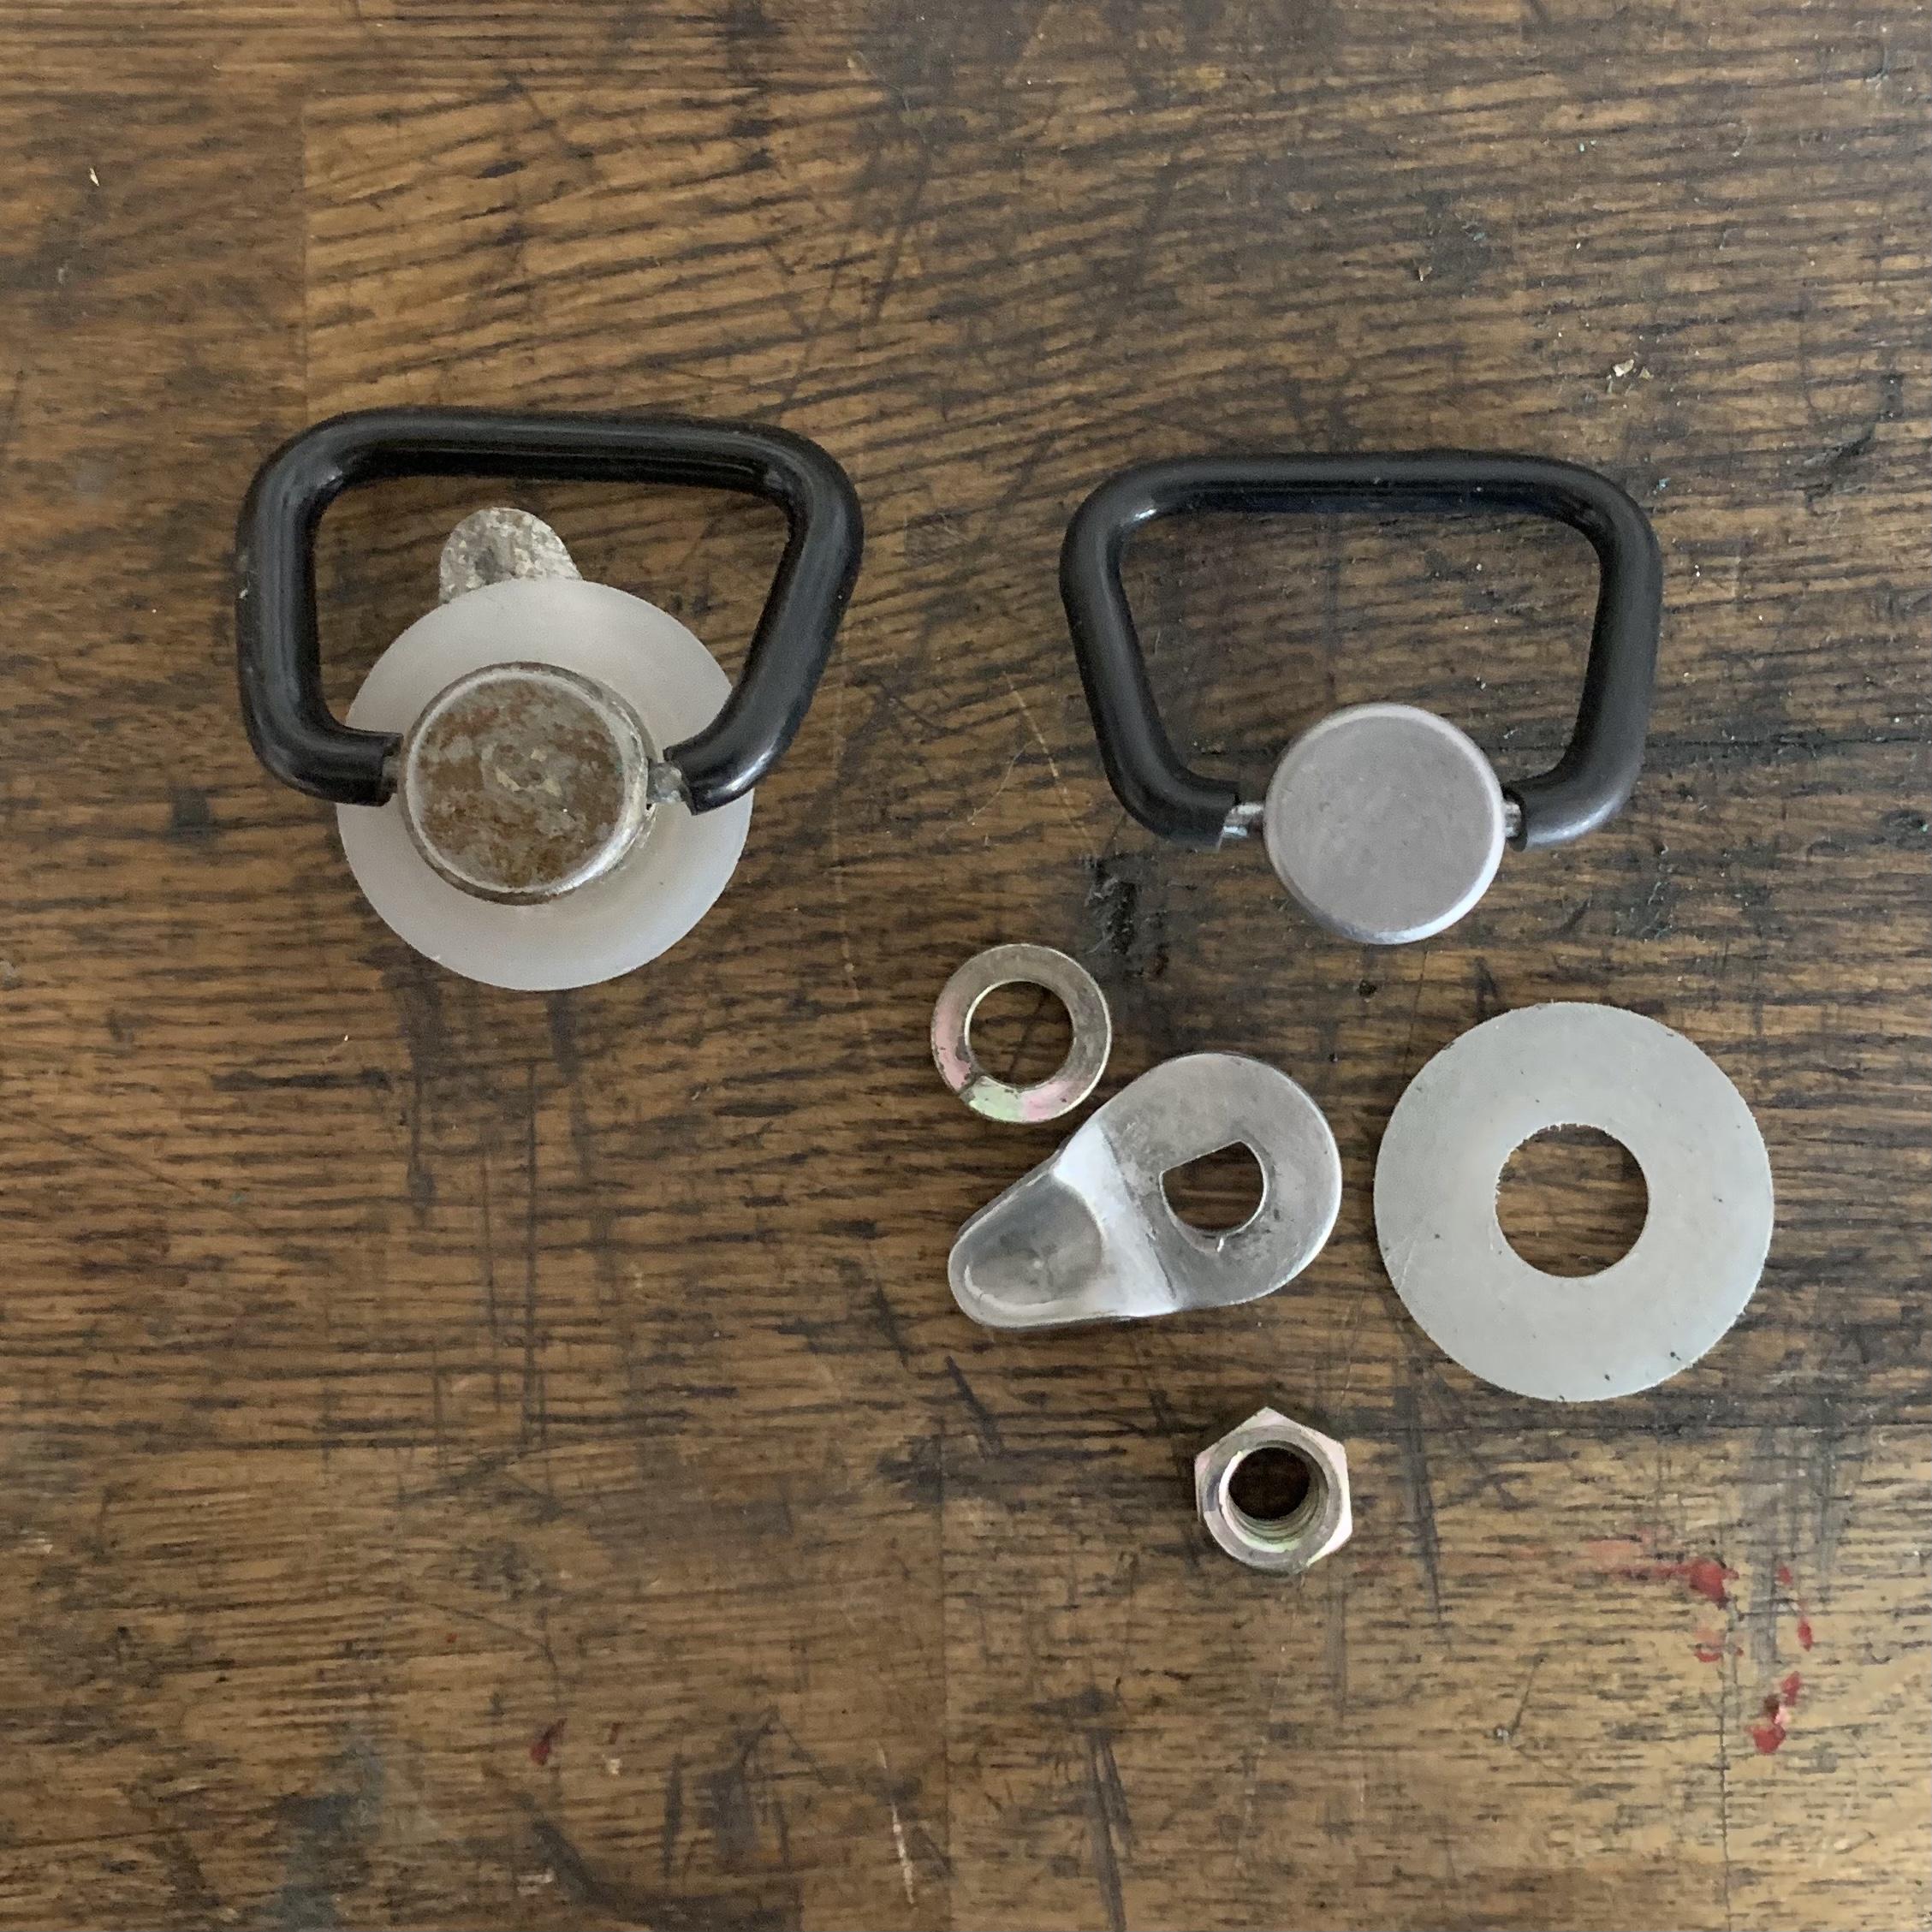
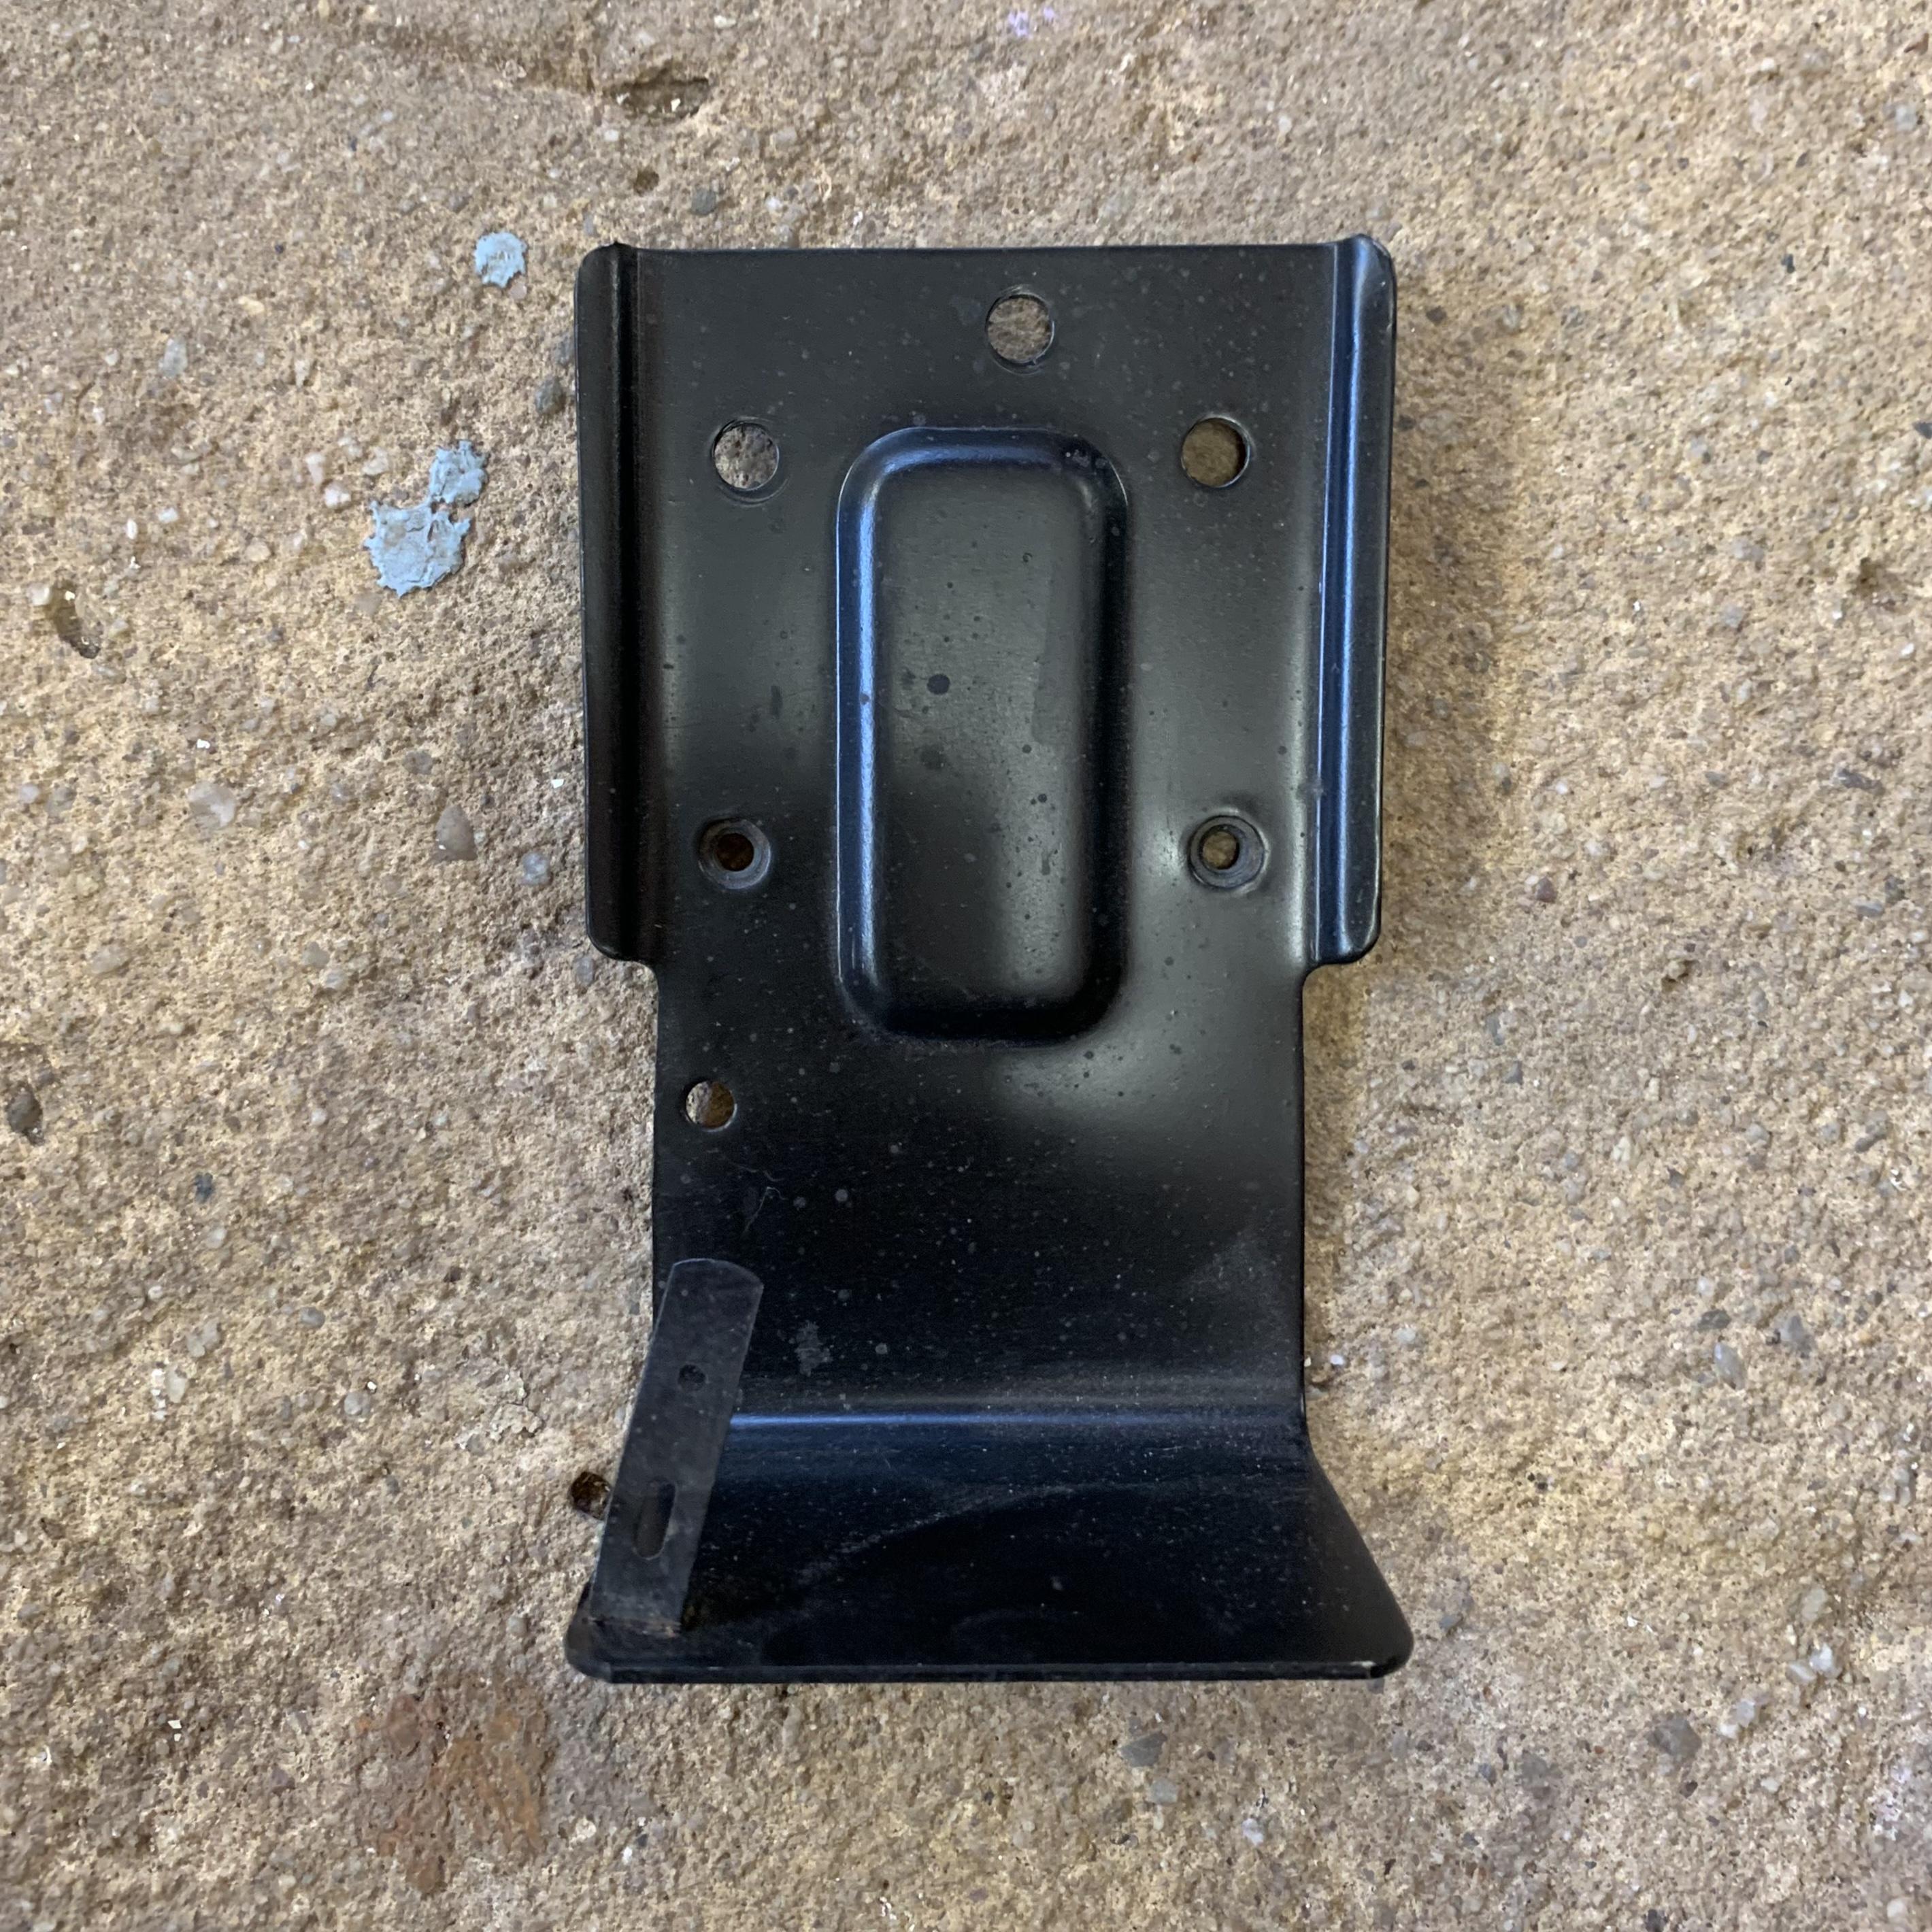
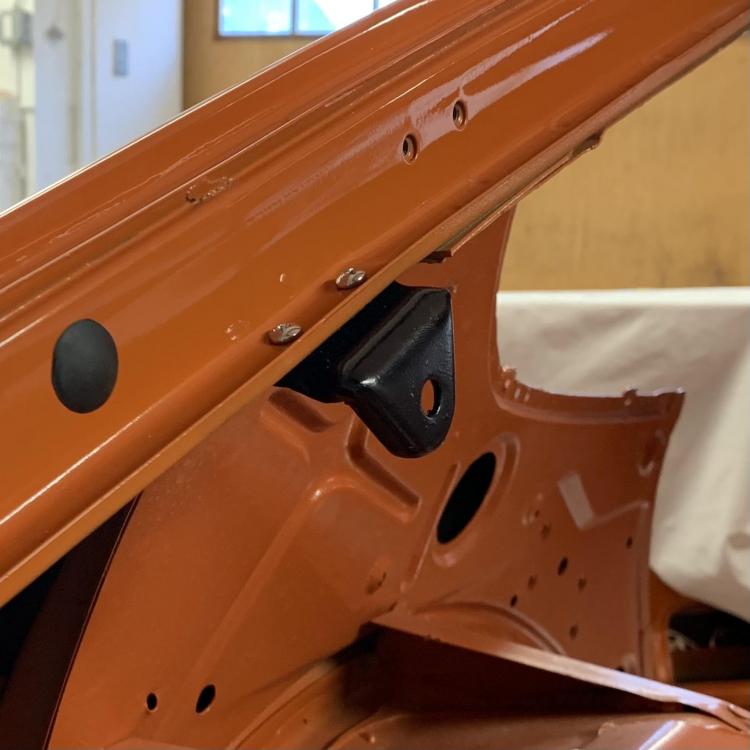
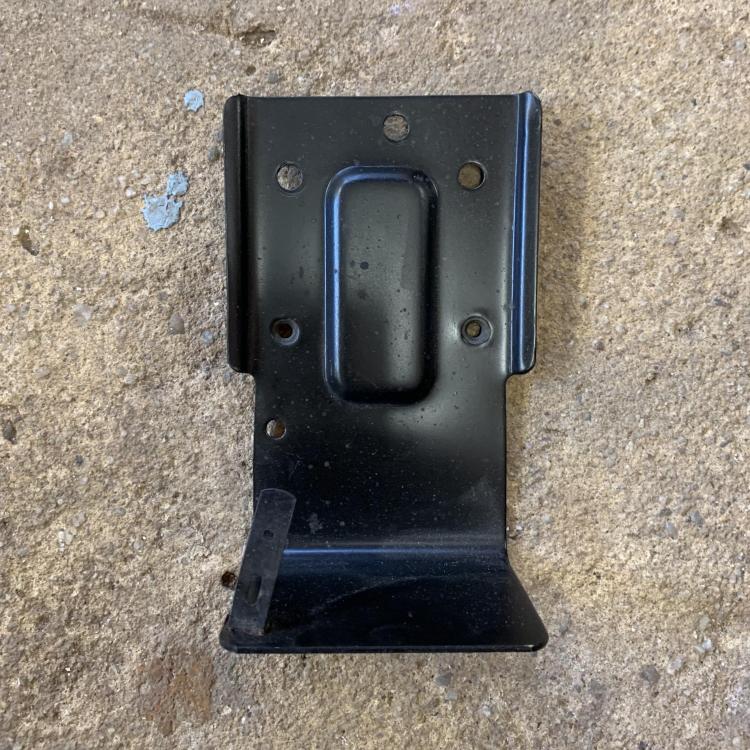
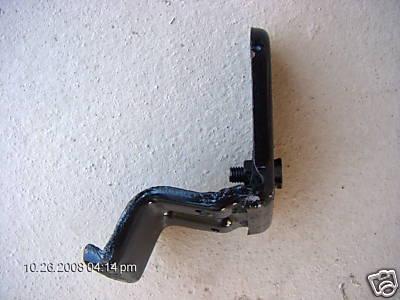
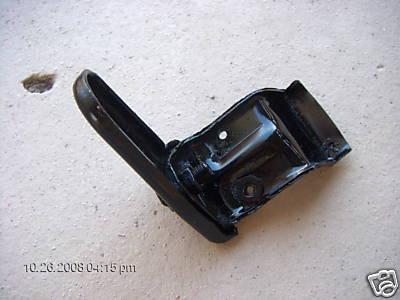
Stumped on two things: First, can someone remind me what this is and where it goes? I can’t find it in my notes: Second, does anyone know where I can get the piece that the rear hatch lowers strut bracket bolts to? I’m talking about the piece that is up under the body discussed in this thread and looks like this: I know I have one somewhere but can’t find it. I have a feeling I am going to have to fabricate one.
-
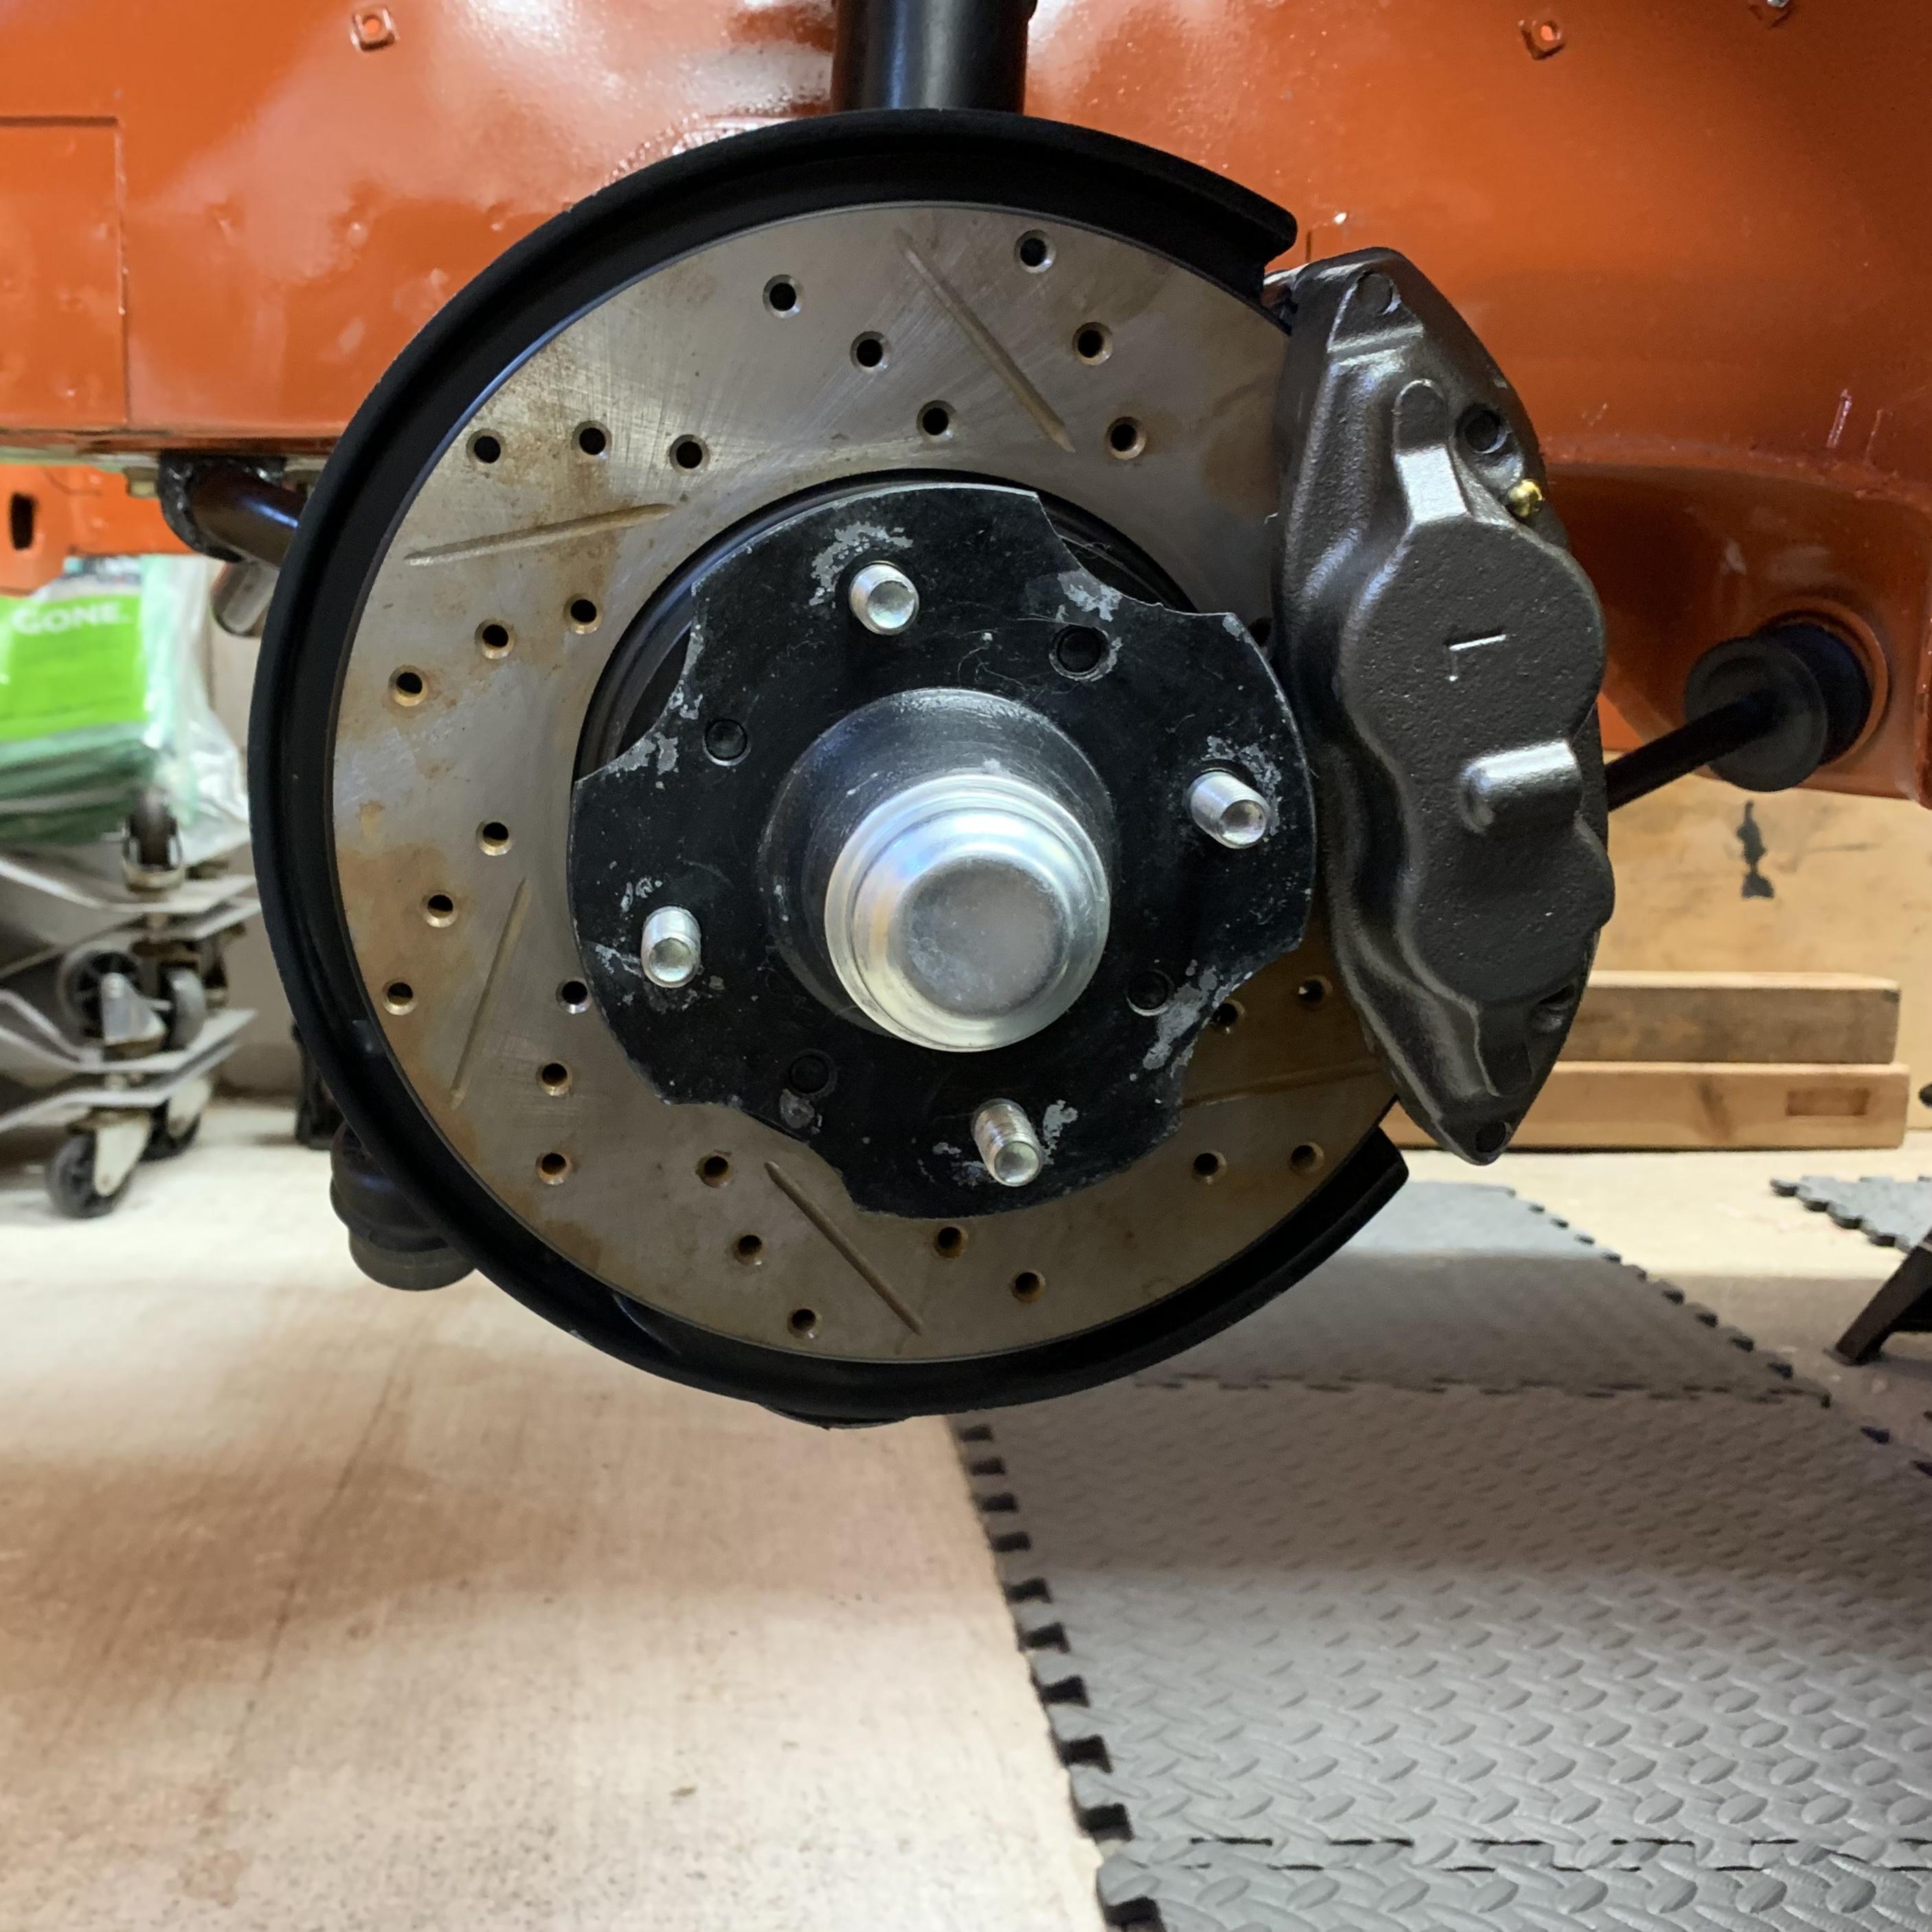
Gave the Toyota calipers a quick spay to make them match the maxima calipers... @Zed Head was right about the rears being on wrong. Got that fixed. Unfortunately I can’t find wheel weights that will work on these little 14” Shelby rims without hitting the calipers. Unless I can find some that are 2mm thick I might have to get new wheels before this car can go on the road.