


Captain Obvious
Community Member
-
Joined
-
Last visited
Everything posted by Captain Obvious
-
Oh, and BTW... It's not just you. On my first booster disassembly, it took me an hour to figure out how to get that clip out. Mine was a little gummy and a little rusty and if not for that, it probably would have fallen out by accident. But between the rust slurry making a little sticky and the not knowing what I was doing, I spent at least an hour on it. If it's clean, put it on the bottom side, press the plunger slowly, and it will fall out simply from gravity.
-
Yes, there is a little U shaped retainer at the bottom of the plunger that holds it in. But the only thing that holds it in is friction from the plunger spring. If you push the plunger in a little, it will unload that pressure and that clip will most likely fall out unless it is a little rusty and stuck. If that's the case, a small magnet can help pull it out. But to answer your question... Yes, you have to take the pressure off. And that is done simply by pushing the plunger in a little bit. If you push it in a lot, it will spring load in the other direction... There's a small "sweet spot" in the middle where that clip isn't under any load. In fact, the only thing that holds that clip in when you pass through the sweet spot is the rubber diaphragm sitting in the groove. I've got some pics that would help describe, but my picture hosting server is not cooperating today.
-
Oh, and your clamshell tool looks just like mine! I screwed some two inch long 2x4 cutoff stubs to the edge so I can use my big bench vice to turn the planks. I thought I had taken some pics of that procedure, but I can't find them. Probably misfiled...
-
The part at 7:00 to the port is the poppet valve seal. That's the part I want. In fact, in preparation for you to send it to me, my spare poppet valve fell apart earlier today:

-
Here's the comparison pic between 240 and 260 from that other thread: I'm wondering if anyone has done a similar comparison for the 280's.
-
Leon, Other recent suspension discussions reminded me of this thread and I wanted to circle back around a little. First, I took a look at putting a zip tie on the strut shaft, and with the bellows in the way I don't think it's possible. Just not enough room in there to lift the bellows out of the way. You might be able to get in there and do that if the bellows were not installed, but with the bellows (stock style with the bottom retainer clip) installed, I don't think it's possible. In another thread, there was discussion that they changed the spring perch location between the 240 and the 260. Lowered it about an inch for the 260: https://www.classiczcars.com/forums/topic/38373-240z-eibach-springs-in-260z/ Have you ever seen a similar comparison between the 260 and the 280? In other words, do you (or anyone else) know if the front perch location is the same from that point on to the end of the 280 run, or did they move it around again for one of the years?
-
Cool! I did a bunch of digging around on the website for the guy you got that kit from, and I noticed that he was using the same pictures for several of the kits. "Stock photo" and not necessarily accurately representative of what they parts really looked like. I was worried that what you saw might not be what you got. Can you take a pic of the other parts besides the diaphragm? I'd be interested in taking the poppet valve seal off your hands and seeing if I can get that onto my old booster plunger. Also, are there any numbers cast into the new diaphragm? When I had my rebuilt booster apart, there were numbers on the diaphragm inside that I wrote down somewhere. I'm wondering if they got their diaphragm from the same source. I wonder how many people in the world are casting that part.... In other words, I'm wondering do all the rebuilder companies get their stuff from the same source, or do they all make their own?
-
A build date of 8/74 seems pretty late to me. I don't know when they started with the 75 280's, but I wouldn't be surprised if yours was near the end of the run. So based on that, I would guess your 260 is a late version... Big bumpers like the 75-76 280's? Turn signals up in the grill instead of below the bumpers? And to the topic at hand... Wide groove on the steering rack requiring the wide version of the rack bushings.
-
Yeah, those bushings are too sloppy. That'll be the first biggest contributor to slop in the steering if the whole rack can wobble around in there and even slip side-to-side. I haven't looked into it in depth, but my assumption would be they changed the rack at the same time as a bunch of other 260 stuff like going to the bigger bumpers. Part of what they call "early" or "late" 260. Is yours an early or late 260?
-
Except for the fact that really wide tires on the back looks really really cool. OK. I'll stop now.
-
The reason they need a spherical bearing there is because the engine can move in any unpredictable manner, up / down / left / right. They account for all of that with the spherical bearing. Then they account for fore and aft with the shepherds hook which can extend and compress. Between the spherical bearing in that piece of the linkage and the shepherds hook, they account for every direction of engine movement. My description of taking that part apart? There is no nut on the back side, but there is a swaged (think rivet) joint holding the assy together. I cut off the flared section on the lathe and pulled the retaining ring off the back. The part I don't remember is exactly how I held it back together again once I was done. It's back together, but I don't remember what I did there. I remember threading something.... I wonder if I have any pics of that process. I'll check when I get a chance.
-
Other than it looks really really cool. I've been considering doing something like this, and it ain't for performance.
-
Kinda hard to tell from the pics, but it looks like your driver's side rack bushing may not be the correct version. They made narrow (older) and wide (newer), and they change sometime in 74 with the 260Z. Does that driver's side bushing fit tightly into the groove on the rack, or is there a gap on the side(s)?
-
Woof. No fun at all. Here's hoping for a speedy recovery! Have they got PT in your future?
-
To each his own then. Haha! My fuel pump and AFM are working great. You're the one that that refreshed this antique post about a sticky throttle body. My throttle body was only sticky when the engine was warm and only when it was running. So needless to say that mine unfortunately mine wasn't as simple as the carpet being bunched up. I also disassembled this part and made a new spherical bearing for inside. That took a lot the slop out of the linkage, but it didn't do anything to fix the sticky idle. Problem was in the throttle body itself.
-
The type of cap that really belongs on the radiator depends on whether the plastic overflow container in intended to be a pressure vessel or not. Based on the domed end shape and the thick walls of the plastic container you have, it looks like it may be capable of holding the system pressure, but the plastic cap you have on the tank looks like it has a small vent hole in the center: So if that is really a vent hole in the plastic cap (and it is the correct cap for the plastic container), then you should be using a radiator cap like the ones you pictured before: In other words... Somewhere in the system, you need to contain the pressure up to the rating of a cap (for example) 13 psi. And if you're not containing that pressure with a spring loaded radiator cap, then you need to do it at the plastic tank. But you would need a sealed cap there that included a pressure relief. I'm resisting describing how a typical system is supposed to work because I'm sure you already know all that and I don't want to explain a whole bunch of stuff you know already. But if you want, I can whip up some sketches, etc. to try to describe that.
-
Not to worry. The Sentra throttle body has not only the same mounting bolt hole locations as the original, but also has the identical throttle plate diameter. So no performance upgrade to "worry" about there. So... Since the throat bore and throttle plate is the same as stock, then one might ask "So why would you go through all that trouble to switch?" Valid question. Answer - Because it has roller bearings and built in vacuum seals on the throttle shaft. Smooth as silk and absolutely no leaks. That's why!
-
The throttle body I've been working with is (basically) from a 96-98 Sentra. There are some differences between the beginning and end of that range. Most noticeably the inclusion or lack of a vacuum port for the distributor advance. The earlier ones (96) have the port, but they stopped using the port in 97. Presumably digitally controlled instead of vacuum starting in 97. It's not a direct drop-in swap, but it's manageable. I had to make some customizations, but here's a teaser: One thing to note on the above pic is the green spring in the lower left of the Sentra throttle body. That spring is part of a system that boosts the idle when cold by acting on the throttle linkage. It's essentially the same function performed by the AAR system on the 280Z. Using the throttle body above allowed me to completely remove the AAR system and all it's associated plumbing while still having a boosted idle when the engine was cold. The tradeoff is that you have to plumb the new throttle body with coolant to heat up the built-in thermostat. If you don't mind keeping the original AAR idle boosting system, then here's another option... I didn't buy one and dissect it in my shop, but just from analyzing at the yard, I believe the throttle body from an earlier Sentra would be a pretty easy adaption as well. This is from 94, but I don't know the year range. It's simpler than the 96-98 version as it does not have the temperature controlled idle boost incorporated into the linkage. I chose the 96-98 version because the temperature controlled idle boost allowed me to get rid of the whole AAR system and still have a boosted cold idle. Note that this one has the vacuum port connection for the distributor:
-
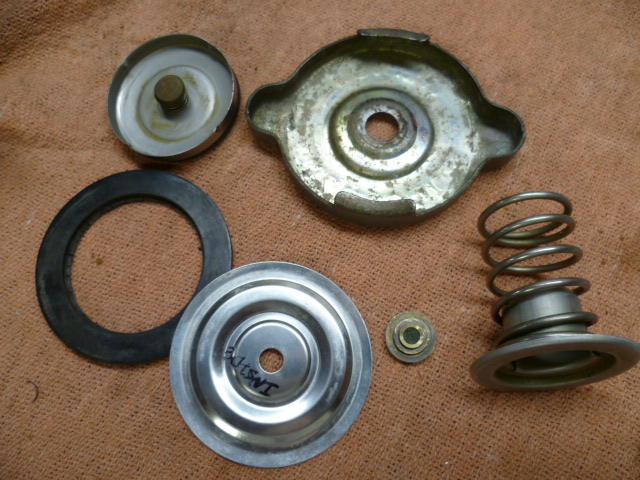
Kats, I haven't been able to follow the part numbers, but all three of these caps appear to have the check valve which allows coolant to flow back into the radiator from the overflow can when the engine cools off and draws a vacuum. I'm not sure it will add anything to the discussion, but I did a little radiator cap repair work on my 280. Here's a pic of the cap disassembled. The inside (usually hidden side) if the check valve is in the upper left corner:
-
If they won't hold vacuum (even with the M/C hole sealed off), then there is probably an internal leak. Hole in the diaphragm or the poppet valve seal is leaking. If that's the case, when you try to draw a vacuum on it (or in your case... pull air through it), you should be able to hear air entering in the assy at the pedal push rod. Through the little felt filter thingie. Other possibility of not being able to hold a vacuum is that it's leaking at the seam between the two sections of the clamshell where the diaphragm is pinched, but you don't hear much about that happening. it's usually something internal. Please make sure you let us know what you turn up for rebuild options and/or parts!
-
The FSMs says the following for the 280Z (75 - 78): Front springs for 75-78 two seater - 1.84 kg/mm or 103.0 lb/in Front springs for 75-78 2+2 - 2.06 kg/mm or 115.4 lb/in Rear springs for 75-78 (both 2 seater and 2+2) - 2.28 kg/mm or 127.7 lb/in So it appears there is a difference between front and rear as the rears are about 25% stiffer. Of course I've never measured any of that for confirmation or accuracy, but that's what the documentation indicates.
-
I connected mine up to my vacuum pump. Used a little valve cracked a little as a regulator so I didn't suck the booster down to absolute zero. You don't have to blank off the master cylinder port. The rubber vacuum seal on the output shaft should keep the vacuum in the clamshell.
-
Yup. All at the same time. Plug everything you really don't need and try to isolate the issue.
-
I'm in agreement with the theory of vacuum leak(s). Your vacuum at idle should be well into the double digits. Hopefully 15 in Hg or higher. I'm also in agreement that simplifying the system to try to isolate the leak is a good idea. Pull and plug the brake booster. Pull and plug the EGR system. Pull and plug the HVAC system. Pull and plug the carbon canister system. Carefully inspect the PCV tube on the underside of the intake manifold.
-
I've got a couple steering shafts around here from different years. I never looked for numbers on them, but will do so when I get the chance. Maybe a couple more data points for a shaky theory.


