


Derek
Community Member
-
Joined
-
Last visited
Everything posted by Derek
-
I had similar problems with my 73 and SUs. I tried everything I could think of including adding an electric pump. I ended up switching the fuel pickup to the drain plug on the tank and all my problems disappeared. This may not help you but I thought I would throw it out there. Derek
-
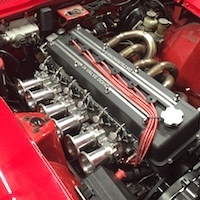
First off I know I could have picked a nicer head and valve cover but this is the best I could come up with. This is probably the last I'll be doing on the manifold for a month or so. I'm super busy right now and in this economy I better get while the gettings good. I will be doing the final design on the rear manifold in the meantime. Derek
-
Things are going well on it so at this point it's a definite maybe. It all depends if it runs or not. It won't be cheap though! I really didn't put a lot of research into this. That may sound strange but that's just how it went. I did some research on the best taper degree and where the injector placement should be for the best torque. After that it was a matter of fitting the longest runners I could in the given space and making it look cool. I've seen so many projects like this get bogged down with too much theory. Here are my levels of success on this project: It starts and idles. Amazing! It runs better than the 25 year old SU carbs. Really amazing It runs better than a MegaSquirted factory EFI manifold. Freeking Amazing. As you can see my expectations aren't too high! For me it's all about the look more than the performance. I wanted something unique that wasn't a mass produced piece. I really enjoy the challenge on a job like this and it makes me a better pattern maker and it's also a good way to show my clients what I can offer them. Derek
-
I think I have everything mocked up at this point. Here's a shot of the linkage with the throttle closed. And open This is just a practice butterfly. I need to make a jig for my lathe so I can make these as a turning operation. Milling them just isn't giving me the results I want. Say AHHH! And yes that is a giant step between the casting and the throttle tube. I have a fix for the next manifold. I just need to figure out what I'm doing on this one. This is the vacuum bleed for synchronizing the venturis. I need to lower the rear boss. Also the throttle shafts will be shorter. It looks a little shabby this way. At this point I think I have enough info to finalize the design for the rear manifold. Now all I need is time! Derek
-
It was my understanding that the Megasquirt has the map sensor built in. Derek edit ok I just went to the TWM site. there is a port on each runner for the map sensor. Derek
-
wow looks great. You might want to check out this glue http://www.glueplace.com/1081-spray-trim-adhe.html This is the best price I've found This stuff is really good. The spray pattern is very narrow and controllable. Derek
-
Anywhere you want! The wall thickness is enough that it can be drilled and tapped. I'm not sure where the TPS is going to mount. Probably on the pedal side of the linkage. The rear manifold will have a boss on the bottom of #6 for the air temperature sensor. A lot of this stuff I'm winging as I go. But that's what tig welders are for! I'll update the post here as this progresses since there seems to be more interest than I thought. Things go in spurts according to work load. Although the closer I get to having the front manifold done the more of a priority it's becoming!
-
I stopped updating this thread because this wasn't exactly a classic Z item so I was posting over at HybridZ. I figured I would give you guys an update. I'm in the process of doing the machining and fabrication on the front manifold. When I have all the details worked out on the front manifold I'll make the patterns for the rear. My design inspirations has been old school injection systems. Here's a link to the pattern development thread http://forums.hybridz.org/showthread.php?t=121021 and a link to the casting thread http://forums.hybridz.org/showthread.php?t=129941 Thanks for looking Derek
-
The soft aluminum worked great. I used tubing benders to make the bends but the aluminum is soft so if your careful you can probably shape them by hand. Find a local ac shop that makes up rubber lines. You buy the hoses and fittings from them with out having them crimped. Then you can assemble the hoses on the car getting the fittings all oriented the proper direction and the hoses cut to the right length. Then you can take the hoses back to the A/C shop and have them crimped. This worked out really well for me. I went with the mini because I was concerned with space. According to Vintage Air's documentation because of it's design it cools as well as the next one up. But that may be hype. I guess time will tell on that one. Derek
-
Yes it is. I haven't hooked up the heater yet as I'm still messing around with the cooling system. The nice thing about this system (and others I'm sure) is the servo heater valve is controlled with a potentiometer for a switch so you can blend in a little hot air rather than cycle the compressor on and off to warm up the temp. I'll add some pics of the lines later on. Derek
-
Well as anyone knows that lives in a hot climate the 240 air blows. Well actually it sucks and that's the problem. The blower motor sucking through the evaporator is not a very good arrangement. After doing a bit of research I opted to go with the Vintage Air unit. The tipping point for me was the fact that they use servo motors to control the flaps and this will work out better for me in the future. After you get rid of all of the old heater and ac unit there is a ton of room back there. The first picture is of my old unit which this being a Z car forum you all have seen before. This is the GEN II Mini with the brackets I fabbed up for mounting. With this bracket arrangement I was able to utilize the old heater mounting holes. Notice the masking tape on the squirrel cage inlet. This will help avoid removing the unit to get the last screw out of the fan when you drop it. How do I know this!!! The three vents in the front are for the A/C outlets and the two in the rear are for the defrost. The passenger side duct plugged right on with no mods. The divers side needed to be taken apart at the first joint and a small piece of the supplied hose spliced in. The supplied defroster hose was the same size as the factory hose so that was a piece of cake. Here's a shot of the back side with the brackets. I used 3/16†x 1†aluminum flat bar for the rigidity. When I slid the unit in for a test fit I noticed this hole in the dash bracket lined up nicely with the front mounting hole on the unit. I designed the rest of the mounts around this point. This is all that sticks out from under the dash. Much better than the old unit. I'm using their rotary switch plate assembly. This center plate is just my test mule until I can get every thing sorted out. Now isn't this better? Here's some info about the rest of the setup. I ordered The soft aluminum A/C lines from Vintage Air as well. This made for a much cleaner install. I then used custom made hoses to connect everything. I'm using a SD 508 series compressor with 134 freon. Fortunately It hasn't been too hot in my part of Florida yet but I can already tell it's doing a much better job that the old unit. The only thing I'll say bad about the unit is it's a little noisy when it's on high. But it does move a ton of air. I'll update this in August when it will really be getting a workout. Derek
-
Make sure you look really good for any holes in the rear area. I had exhaust smell and found it was coming in through some 6MM screw holes that I missed. I plugged them and the smell was gone. Derek
-
I know it's not long term but mines still holding up fine from January. I'll emphasize again that the SEM bumper repair has to be at least 1/32" thick over the crack. If not it will just crack again. I speak from experience. Derek
-
Electric drifting how cool! You've accomplished one thing for sure though. You have The people from Classic Z Car and HybridZ agreeing on something! Derek
-
very cool James. post more video!! derek
-
WOW great progress James! You know you could always use the loop of cable on the middle batteries in the passenger compartment (blog pic) as a cup holder. Thanks again for sharing this with us. Derek
-
That is so cool. You definitely have inspired me to rethink my long term ZCar Plans. A plug in Z would be perfect for my daily drive. Of course I'd still have to have a gas powered one as well!. Derek
-
I have Konig 15" Rewinds on my 73 with no problems Derek
-
Thanks for the info Carl. I guess I have either the stage I or Stage II springs. I'm almost positive I have a conventional shock not gas. It seems to be getting a little better the more I drive it. Probably just me getting used to the ride is all! I'll probably run it for a month or so and then tear it down and measure the spring rates. Thanks again Derek
-
Go Here and read. It's all there. http://forums.hybridz.org/showthread.php?t=104735 I'm getting ready to swap mine over as well. Derek
-
I'm starting to think I'm going to have to pull it apart and see what I have. I've been without my Z for over 12 years and I hate to bring it off of the road so soon! Derek
-
Well that's the problem. I can't remember for sure. I was going to go with KYB at the time but Frank from Zcar center in fort lauderdale ( I lived in Fort Lauderdale then) recommended a regular shock. I almost want to say they were Bosch?? Did Bosch even make shocks? You know when you park a car under tarps for a number of years you can really loose track of some of the details! Derek
-
Your too generous! I bought the springs when I was working in the parts department of a Datsun dealership. I seem to remember they listed 2 different rates for their springs. I'm hoping someone has an old Nissan comp catalog and it may jog my memory. I really wish the roads were smoother here. The car really handles well with the springs but it's going to kill me and the car at some point. Derek
-
Ok Here's the story. I purchased a set of front and rear coil springs out the Nissan competition catalog in probably 1990 or so. I put them on the car and drove it for a short amount of time then the car was parked since then. I just got the car back on the street and I'm not happy at all with the harshness of the ride. It handles like a dream but I'm making this my daily driver so I need something a little more forgiving. Does anyone have any direct experience with these springs and can maybe help me establish a benchmark as to how stiff they really are. I want to buy a new set of springs but I don't want to end up with the same ride as I have now. Thanks Derek
-
Sorry to hijack this but I have a question for Carl. I'm installing a Vintage Air unit in my Z and want to add larger more functional center vents as well. Can you tell me what you used for vents? Thanks Derek
