


Graeme Suckling
Free Member
-
Joined
-
Last visited
Everything posted by Graeme Suckling
-
Sean and all, an additional problem was evident on the 1973 240 I am re-building. Debris had collected in the cowl area below the windshield, and blocked off the entire plenum. Leaves and whatever were jammed between the inner surface of the firewall and the "chimney " for the blower motor intake. I had to replace a section of the firewall approx 300mm long and 70mm high. The floor of the plenum was also replaced as was the air intake. This time I used a short length of plastic stormwater pipe with a flange which screwed back onto the plenum floor. :devious: If you haven't taken the cowl cover off yet, do so and ensure that this area is clean and rust free. I haven't found a passenger yet who enjoys water dripping onto their feet.
-
Hey Z Kid, the whisper is that the Salisbury U-PULL-IT yard MAY have a 260Z 2 seater which will be OK. Give them a call or visit their site:- www.allpanelsandparts.com.au Also try Adelaide Z Parts at Hackham. I know thats a long way from Gawler but it is the only Z yard I know of.:classic:
-
I have finally created some online photo albums of my current projects. For those who are interested in the Datsun Fairlady rebuild see:- www.imagestation.com/album/?id=4291195515 For the progress on my 1973 250Z buildup see:- www.imagestation.com/album/?id=4291183313 I believe as a viewer you are required to "sign in" but there is no charge for this. Spring has finally sprung in good ol' Adelaide, so I will now be concentrating on the Z project. It HAS to be finished before Easter 2003 so I can cruise to Toowoomba Queensland for the Datsun Nationals.
-
Don't worry about it. As long as you used sealant on the gasket the other fasteners should seal the pump OK. In the future, or if the pump leaks, then get serious and gently unscrew the broken bolt with CRC and care.:devious:
-
Hi guys and gals, It really depends on what you want and how bad you want it. I recently purchased a 1965 SP310 from a guy in Sydney Oz on the basis of two digital pics. and his description. I knew a 1965 sports car would be a little sad but let me say this. Barring a few trim bits, the car is indeed complete as described. Yes, it has tin worm, but the car has such simple sheet metal that repairing her should be a very straight forward exercise.:classic: My intention is to restore her to original, barring a few reliability and safety modifications. I mean, when the engine # matches the Build Plate Data and it is all there, it would be a sin not to right? You really need to treat each "discovery" on an individual basis, and who knows the Corvair may turn out to be a Corvette!
-
ok so you need to remove those recalcitrant spindle pins? I knew they would be trashed by the time I was finished, so I ordered new pins and fasteners well in advance from MSA:classic: When I got down to it, the LHS just tapped out with no drama:D Now the RHS made up for all the times Murphy was not around. Soooooo to make it all a manageable problem I cut the spindle pin through at each side of the strut with a hacksaw. That leaves three short lengths of the pin to press out, 1 in the front bush, 1 in the strut base and 1 in the rear bush:classic: Now just about any shop with a press will be able to rig something up to remove those 3 little suckers:devious: Lets face it they are only about $35 each and if they have never been replaced before your rear end will appreciate a nice fresh pivot pin:love:
-
Gav240Z & other Ozzies, I'm building a '73 250ZG for 2003 Nationals. I just hope the weather will stabilise and permit me to get on with the painting:angry: I really want the car to be finished but it may be still happening in the interior department. Engine is an RB25DE with a 5 speed gearbox. My most recent buy, a 1965 Datsun Fairlady 1500 Roadster, has been totally dismantled and ready for plating, powdercoating and re-building:classic:
-
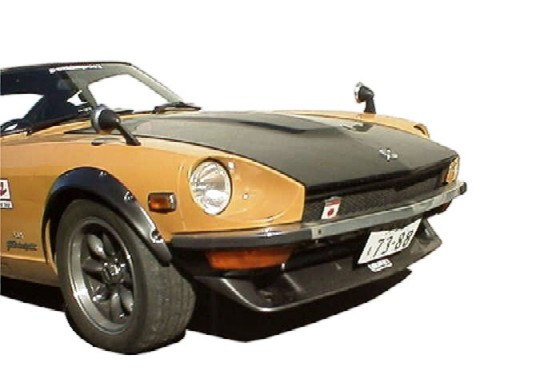
My 'G' nose is a very used fibreglass replica with the manufactures name of EVA cast into it. I bought it from an ex work mate some years ago. I can provide pics if you want, but it is pretty ordinary as we speak. I have GUESSTIMATED the design of the bonnet hinges to clear the additional nose panel, so we will see if I have guessed right! The flares I have posted look to me as the best value for money so I may just do it! My SP310 Fairlady Sports should be arriving tomorrow:love: I might have to get another job to support my habits! I will take some pics of the car and post them tomorrow. My regards to all you Nissan/ Datsun freaks.
-
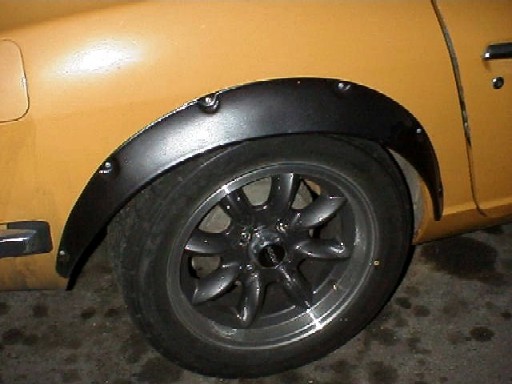
Attached pics show the type I'm looking for:classic: They are available from 2 or 3 different aftermarket places in USA but @ about $200US, this gets pretty dear in $AUD:tapemouth I assume these are what your refer to as ZG overfenders? I already have an after market Japanese fibreglass G nose so the flares would finish it off nicely:love:
 I have a '73 240Z to which I wish to fit some ZG type flares. There are several companies which offer these flares, I want some feedback on which product was used and what are your comments on the product. I prefer the bolt on type but your comments are welcome. Regards from Downunder. :classic:
You are only as old as the WOMAN you feel!
It seems you were too thorough in your cleaning:finger: I find that if you squirt some CRC/WD40 or similar on all the rotating bits the motion of the butterfly etc. loosens up.:classic: Then for good measure, drop some very light oil on all linkages and shafts.:devious: Rotate the butterfly by hand to ensure there is no binding. Lets face it, you haven't broken anything, just cleaned it:D
I'm 52 and have been retired for just over a yearROFL The only reason that I will get another PAYING job is to help pay for my bad habits - petrol and rubber:classic: I have found that this and other Datsun/Nissan forums have become a significant part of my life. If I ever get to the U S of A I hope to catch up with some of you, well the good looking ones anyway:love:
Perhaps my Roadster!
I have a '73 240Z to which I wish to fit some ZG type flares. There are several companies which offer these flares, I want some feedback on which product was used and what are your comments on the product. I prefer the bolt on type but your comments are welcome. Regards from Downunder. :classic:
You are only as old as the WOMAN you feel!
It seems you were too thorough in your cleaning:finger: I find that if you squirt some CRC/WD40 or similar on all the rotating bits the motion of the butterfly etc. loosens up.:classic: Then for good measure, drop some very light oil on all linkages and shafts.:devious: Rotate the butterfly by hand to ensure there is no binding. Lets face it, you haven't broken anything, just cleaned it:D
I'm 52 and have been retired for just over a yearROFL The only reason that I will get another PAYING job is to help pay for my bad habits - petrol and rubber:classic: I have found that this and other Datsun/Nissan forums have become a significant part of my life. If I ever get to the U S of A I hope to catch up with some of you, well the good looking ones anyway:love:
Perhaps my Roadster! Ionman, if u can pick up '69 1600 for $900US:classic: I'd go for it! They are quite a different car to a Z or any unibody car for that matter. They have a separate chassis. Parts for the R type 1600 could be hard to come by but something will fit :devious: If it has little rust, that is a bonus:classic: I'm looking at a '65 1500 with all original parts that has been in storage for 22 years:love: A little more than $900 though:tapemouth. If I can swing it my collection will then consist of:- a '65 1500 roadster a '71 1600(510) 4 door - bought new in 1/71 - daily driver a '73 240Z undergoing a ground up resto - summer special a '72 510 2 door rolling sHELL in storage - Import from USA I intend to keep the roadster parts for originality but it will probably score a CA18 motor, DOHC 1800 EFI. BTW I have copies of the factory Nissan Service Manual for both the SPL310 (1500) and SPL311(1600). Anyone interested in a copy?
Doco, I have a '73 240Z still on the rotisserie (see pics in Body & Paint section). Since day 1 of the full bare metal resto, I have been keeping an Excel spreadsheet of costs. Excluding my labor costs, I'm up to $9,500:tapemouth and I estimate another $2,000 at least to trim and finish. Because I'm doing everything myself, my labor costs are not a factor, but material costs certainly do add up! However, it will certainly be better than new by the end of the 2003 summer, I HOPE!
I have stripped two Zeds of the bituminous stone protection and it is not a pleasant job. I tried wire brushes on the angle grinder etc. but it was not effective. To do a proper resto. though I perservered with a variety of paint scrapers and had the shell on a rotisserie (see pics under Body and Paint). Once you get into it, it can come off in fairly large flakes. WEAR EYE PROTECTION! After stripping the bulk of the coating , I then used a 3M scouring pad soaked in kerosine. This softened and eventually dissolved the remnants, leaving the etch primed under body squeaky clean. Make sure you have a drop sheet under the work area, it gets messy.:tapemouth After the routine rust repairs, the underbody was prepared for painting and given a good coat of etch primer. Then followed a coat of Tetrosyl Stone Chip which is a flexible scuff resistant underbody coating. More user friendly than the genuine Nissan tar! :classic:
My new toy!:classic:
Ionman, if u can pick up '69 1600 for $900US:classic: I'd go for it! They are quite a different car to a Z or any unibody car for that matter. They have a separate chassis. Parts for the R type 1600 could be hard to come by but something will fit :devious: If it has little rust, that is a bonus:classic: I'm looking at a '65 1500 with all original parts that has been in storage for 22 years:love: A little more than $900 though:tapemouth. If I can swing it my collection will then consist of:- a '65 1500 roadster a '71 1600(510) 4 door - bought new in 1/71 - daily driver a '73 240Z undergoing a ground up resto - summer special a '72 510 2 door rolling sHELL in storage - Import from USA I intend to keep the roadster parts for originality but it will probably score a CA18 motor, DOHC 1800 EFI. BTW I have copies of the factory Nissan Service Manual for both the SPL310 (1500) and SPL311(1600). Anyone interested in a copy?
Doco, I have a '73 240Z still on the rotisserie (see pics in Body & Paint section). Since day 1 of the full bare metal resto, I have been keeping an Excel spreadsheet of costs. Excluding my labor costs, I'm up to $9,500:tapemouth and I estimate another $2,000 at least to trim and finish. Because I'm doing everything myself, my labor costs are not a factor, but material costs certainly do add up! However, it will certainly be better than new by the end of the 2003 summer, I HOPE!
I have stripped two Zeds of the bituminous stone protection and it is not a pleasant job. I tried wire brushes on the angle grinder etc. but it was not effective. To do a proper resto. though I perservered with a variety of paint scrapers and had the shell on a rotisserie (see pics under Body and Paint). Once you get into it, it can come off in fairly large flakes. WEAR EYE PROTECTION! After stripping the bulk of the coating , I then used a 3M scouring pad soaked in kerosine. This softened and eventually dissolved the remnants, leaving the etch primed under body squeaky clean. Make sure you have a drop sheet under the work area, it gets messy.:tapemouth After the routine rust repairs, the underbody was prepared for painting and given a good coat of etch primer. Then followed a coat of Tetrosyl Stone Chip which is a flexible scuff resistant underbody coating. More user friendly than the genuine Nissan tar! :classic:
My new toy!:classic: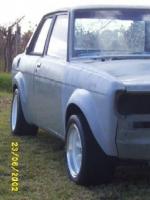 Hi to everyone, I have recently purchased a 510 2 door rolling shell. I intend to fit a VG30E, 5speed manual and Haltech F9 (fuel only) ECU:classic: Is my choice of engine a good one? I have no experience with the Nissan VG series. Re-conditioning is not an issue, I just want your opinion on my choice of engine, performance, reliability, etc. Thanks guys & gals in anticipation.
Quality issues aside, on exhaust joints I use a product available in OZ called MANISEAL. Comes in a flexible 145g tube. This is an exhaust cement made by CRC and is also suitable for kiln repairs up to 300deg C.:classic:
:classic: :classic: :classic: :classic: :classic: There is, in Australia, an old saying that would apply to a situation like this and it is:- .....YOU LUCKY BAR STEWARD...... (or words to that effect) Try to resist the temptation to "rip" into it:finger: But mechanically, as mentioned, drain/change all the fluids, flush out the cooling system, re-fill the engine with a good quality but cheap oil (to be discarded after a few days running), change all the filters, drain and flush the brake/clutch fluid with new fluid. I would consider removing the cam cover when adding the fresh oil so you could pour it all over the cam gear and down the cam chain tunnel. Jeez I wish I could be there to see it come alive again! If the engine number is matching the ID plate then you really do have a gem.
To strip or not to strip:ermm: As they say in Oz, here is my two bobs worth. I have three Datsuns., A '71 P510 4 door I have owned from new - known history. A '73 240Z that is at least 4th hand - unknown history. A '72 p510 2 door (ex U.S.A) - unknown history. Have a guess which car I would be confidant to surface prep. and re-spray to rejuvenate the paintwork?:nervous: No prize:( but it is the car that I KNOW the history of. I completely stripped the 240Z and do not regret doing it. You will never find or properly fix the hidden nasties if you don't. Sure, you can be lucky, but IMHO, if you intend to keep the car(s) like I do, I feel it is best to know the quality of the foundations before you build the house.:paranoid: I use heavy bodied Automotive Paint Stripper, safety razor scrapers, wash down with water, then a 3M Clean and Strip wheel on an angle grinder to bring the metal up bright. If not to be painted immediately, spray with CRC 556/WD40 and wipe over with hands. Prior to painting, clean carefully with Silicon and Wax remover, prepare surface with a phosphoric acid type Metal Conditioner, then prime with a good quality etch primer. I use Wattyl Super Etch which can remain uncoated for 4 months before requiring a recoat. What a bonus! The Z you see in my album (Graeme Sucklings Photos) is the same one I am describing. I am confidant that the shell will be in better than new condition when it finally hits the road.:classic:
All this camber measuring stuff is very interesting but it is essential that you start with a REFERENCE. By that I mean the car must be on a flat level surface or any readings taken on a per wheel basis may be biassed as per the entire car. Since the values we are trying to measure are pretty small, it wouldn't be too hard for the car to cancel out the camber on one side and increase the reading on the other, just by simply being on an angle. I would suggest a spirit level applied to the under side of the engine x-member to check for level. Then if necessary, a scissor or trolley jack could be used under the low side suspension arm to raise the car to be level. Hopefully we are only talking a few mm here. Any camber readings taken at the front will then be relevant side to side. Similarly for the rear suspension. All this relies on the fact that SOMETHING has to be straight and undamaged to be a reference.:classic: I'll be looking for an angle finder tomorrow!
Robb and Mac, I assume you have the air cleaner incorporating automatic temperature control but with out emission control system, i.e. only TWO large connections to the back side of the air cleaner pointing up. 1) BINGO! the vacuum advance connection for the distributor is located at the front carb. a vertical brass pipe between the carb. mounting nuts. 2) flow guide valve??? If you can point out the location I may be able to help. 3) As before, if you have only TWO large connectors at the rear of the air cleaner the front one is connected to the front carb. the rear one is connected to the cam cover. All the above is clearly pictured in the Haynes manual in the Carburation: fuel and exhaust systems chapter page 45.
Hi to everyone, I have recently purchased a 510 2 door rolling shell. I intend to fit a VG30E, 5speed manual and Haltech F9 (fuel only) ECU:classic: Is my choice of engine a good one? I have no experience with the Nissan VG series. Re-conditioning is not an issue, I just want your opinion on my choice of engine, performance, reliability, etc. Thanks guys & gals in anticipation.
Quality issues aside, on exhaust joints I use a product available in OZ called MANISEAL. Comes in a flexible 145g tube. This is an exhaust cement made by CRC and is also suitable for kiln repairs up to 300deg C.:classic:
:classic: :classic: :classic: :classic: :classic: There is, in Australia, an old saying that would apply to a situation like this and it is:- .....YOU LUCKY BAR STEWARD...... (or words to that effect) Try to resist the temptation to "rip" into it:finger: But mechanically, as mentioned, drain/change all the fluids, flush out the cooling system, re-fill the engine with a good quality but cheap oil (to be discarded after a few days running), change all the filters, drain and flush the brake/clutch fluid with new fluid. I would consider removing the cam cover when adding the fresh oil so you could pour it all over the cam gear and down the cam chain tunnel. Jeez I wish I could be there to see it come alive again! If the engine number is matching the ID plate then you really do have a gem.
To strip or not to strip:ermm: As they say in Oz, here is my two bobs worth. I have three Datsuns., A '71 P510 4 door I have owned from new - known history. A '73 240Z that is at least 4th hand - unknown history. A '72 p510 2 door (ex U.S.A) - unknown history. Have a guess which car I would be confidant to surface prep. and re-spray to rejuvenate the paintwork?:nervous: No prize:( but it is the car that I KNOW the history of. I completely stripped the 240Z and do not regret doing it. You will never find or properly fix the hidden nasties if you don't. Sure, you can be lucky, but IMHO, if you intend to keep the car(s) like I do, I feel it is best to know the quality of the foundations before you build the house.:paranoid: I use heavy bodied Automotive Paint Stripper, safety razor scrapers, wash down with water, then a 3M Clean and Strip wheel on an angle grinder to bring the metal up bright. If not to be painted immediately, spray with CRC 556/WD40 and wipe over with hands. Prior to painting, clean carefully with Silicon and Wax remover, prepare surface with a phosphoric acid type Metal Conditioner, then prime with a good quality etch primer. I use Wattyl Super Etch which can remain uncoated for 4 months before requiring a recoat. What a bonus! The Z you see in my album (Graeme Sucklings Photos) is the same one I am describing. I am confidant that the shell will be in better than new condition when it finally hits the road.:classic:
All this camber measuring stuff is very interesting but it is essential that you start with a REFERENCE. By that I mean the car must be on a flat level surface or any readings taken on a per wheel basis may be biassed as per the entire car. Since the values we are trying to measure are pretty small, it wouldn't be too hard for the car to cancel out the camber on one side and increase the reading on the other, just by simply being on an angle. I would suggest a spirit level applied to the under side of the engine x-member to check for level. Then if necessary, a scissor or trolley jack could be used under the low side suspension arm to raise the car to be level. Hopefully we are only talking a few mm here. Any camber readings taken at the front will then be relevant side to side. Similarly for the rear suspension. All this relies on the fact that SOMETHING has to be straight and undamaged to be a reference.:classic: I'll be looking for an angle finder tomorrow!
Robb and Mac, I assume you have the air cleaner incorporating automatic temperature control but with out emission control system, i.e. only TWO large connections to the back side of the air cleaner pointing up. 1) BINGO! the vacuum advance connection for the distributor is located at the front carb. a vertical brass pipe between the carb. mounting nuts. 2) flow guide valve??? If you can point out the location I may be able to help. 3) As before, if you have only TWO large connectors at the rear of the air cleaner the front one is connected to the front carb. the rear one is connected to the cam cover. All the above is clearly pictured in the Haynes manual in the Carburation: fuel and exhaust systems chapter page 45.


Important Information
By using this site, you agree to our Privacy Policy and Guidelines. We have placed cookies on your device to help make this website better. You can adjust your cookie settings, otherwise we'll assume you're okay to continue.