zKars
Supporting Member
-
Joined
-
Last visited
Everything posted by zKars
-
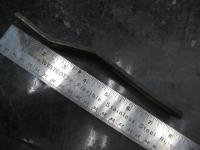
Since only Walter wants to play, here's a hint. They are more of a nut than a bolt.....
-
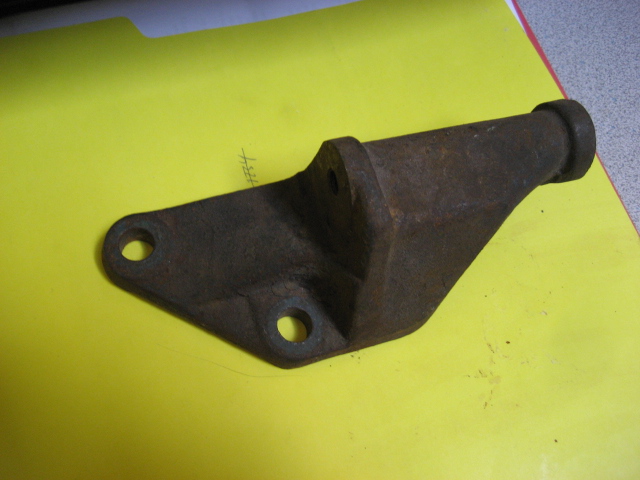
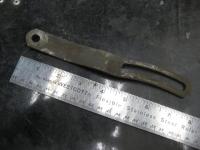
And I must learn to read more thoroughly and post with additional details. Here are pictures of the lower bracket that mounts with two 10mmx 1.25 bolts and one 10x1.25 stud (upper right). It has two 8x1.25 mm threaded holes for bolts that pass through the alternator body tabs and into this bracket. Jim


-
The reluctor gaps being way out of whack is your basic problem. If the dizzy shaft bearings are in good shape (no play you can feel), then you can use the guts for a pertronix conversion. But I'm feeling you're missing out on mechanical advance from your description of what's left of the guts. Surely there is much more performance you are missing out on! I'be be looking for a new ZX dizzy in good shape. Other options are to use any Z or ZX reluctor dizzy with a HEI module trigger. Pretty easy to put together and easy to replace a blown HEI module at any parts store. Not so with a E12-80 module. Hope this helps. Gotta spend a little money to get this fixed. Jim
-
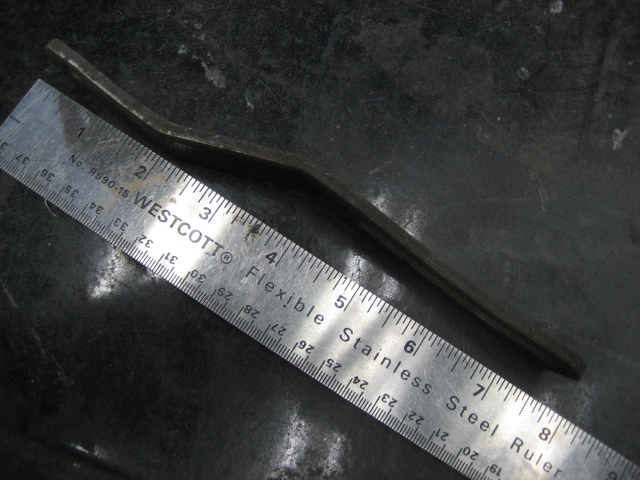
Here is a couple of pictures to help.
-
The bumper bracket bolts are 10 x 1.25. There are lots of 10 x 1.5 bolts on our S30's, head bolts for starters. And starter bolts! . Think of any others? Now can anyone name any items on Z's that have a 10mm thread, but have 1.0 mm pitch? There are over 20 that I can think of on every car. Yes, its Friday and I'm bored.... Jim
-
Sorry, couldn't resist. Clearly things were not "complete" in that picture. As well as poking some fun, I meant to add a technical advice. About your sputtering, if it runs fine around town under 3000, nice smooth and strong pull, then starts to fall apart above 4, start with a fuel pressure check. Put a guage in the line after the fuel pump and arrange it so you can see while driving, unless the issue is there with the car parked too. Should never get below 3 psi and never above 5-6 either. If you are sure the pressure is fine across the band, and you trust your float levels, and your fuel system is clean and trustworthy (tank, lines, filter), then look for ignition problems. The ignition appears stock from the pictures, maybe points are not adjusted right or the plugs are not happy, or a poorly fitting rotor (heard of several problems around this issue). Always start with good old NGK BP6ES gapped to FSM specs. Few things to test anyway! Good luck! Love the orange man. Jim
-
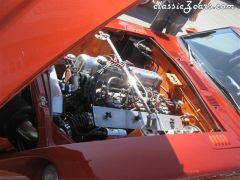
The engine bay picture is intoxicating. Nice! I love that you added that touch of "a little something special" with the lower rad hose on the manifold, and thermostat gasket on the SU, and the yellow golf tee in the vent line! Perfect! : Jim
-
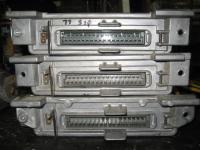
Well, of the three A11 600 000 units I have, 2 out of the 3 have the same absent pins that you see on one of yours. I can vouch that they were in running 280z's. With Mr. Blake chiming in with encouraging words, I'de plug it in and see if she flies. Little chance of harm. If you want mine with all the pins, just let me know. Jim
-
Welcome to the forum. Unfortuately that which you seek is best found at www.hybridz.org. Anyone here will gladly help with questions about original and stock features and common upgrades and problems, but advice on the swapping of drivelines is not a common topic here. What you need is found at the hybridz. All the best. Jim
-
Twenty seconds of searching and look what I found http://www.classiczcars.com/forums/showthread.php?t=21274 Jim
-
There is a very detailed thread here that describes EXACTLY what you need. Search again. The driveshaft was not one of the items you need to find if I remember correctly, but check that thread to be sure. Last one I did was too long ago to remember that detail. I think I have a 2+2 drive shaft for you if it comes down to that. PM me. Jim
-
oh oh. The FSM shows there are quite a few pins not used on that one side, but there are two (21 20) that you need and that one has missing. The first 6 on the top right are 30-35 to the injectors, then two not used (28, 29), then 27 to the IAT in the AFM which is there, but 21 to the cold start and 20 to the efi relay are clearly missing. Now are they required? Maybe not. I'de plug it in and have a go. Get the FSM from www.xenons30.com and check it out. Section EF pages EF-25-50 I'll go check my spares and see if any of them have the same pin absense issue. All were working. Need one? Send me a PM Jim
-
I have purchased lots of connectors from these guys. Love 'em! www.vintageconnections.com Jim
-
Good advice tlorber. And don't forget to put grease in them after you put the zerks in. The one's I purchased lately came dry as a bone. At least they came withe zerks in the package. Jim
-
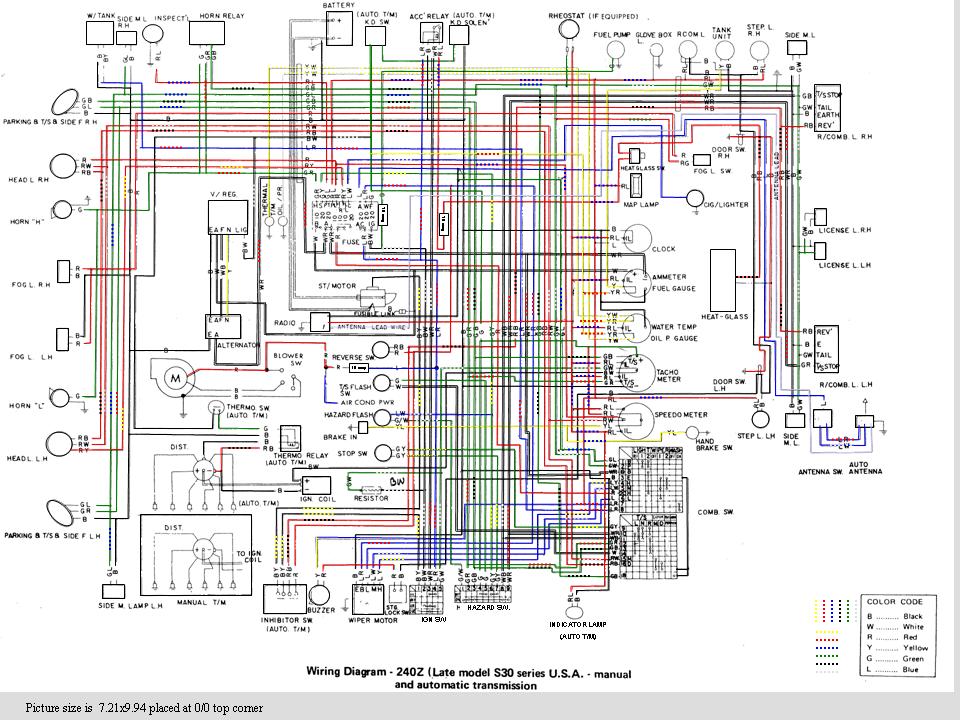
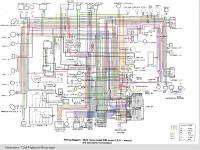
George: Welcome to the club! Always to happy to meet an original owner. Got your hands full I see, uh? From the symptoms you seem to have to no power to the small Black/yellow wire that goes on flat 1/4" connector tab next to the main battery lead connector bolt on the starter, coming from the + side of the battery. There is no relay on that B/Y line, its connected directly to the key switch in the "Start" position. The relay you found is likely the ignition relay, it puts power to the fuse block when the key is "On". A very easy way to test the starter is to put the car in neutral, key OFF, and just stick a screw driver momentarily (short it out) between the little terminal and the big bolt that the lead to battery is connected to. The starter should turn. Dont' do this with a screwdriver you love, it will get a little arc welding going on... This effectively puts +12 on the start terminal, just like your key action should do to the B/Y wire. If the starter cranks, next you have to get a volt meter and test if there is 12 volts on that B/Y wire when the key is in the start position. Since you changed the switch itself, you likely have a bad wire connector at the end that goes to the starter terminal. Chop the connector off, strip back some insulation, clean the wire, and crimp on a new terminal. Again, any Walmart or Auto-whatever will have some. Try not to fall in the trap of doing parts replacement as a troubleshooting technique. Get the schematic (search here for Factory Service manual or FSM) and a volt/ohm test set from Walmart or the local car parts emporium, study a bit and figure out what should do what, and test for power where you expect power with the meter. Check the connector on the back of the key switch, especially the one for the B/Y wire. Maybe its pushed in and not making contact. Could be that simple, but likely just the connector on the end of the wire at the starter. Post your results after you do some testing and we'll see if we can track this down. I found a decent schematic for you too. Attached. Good luck! Jim
-
I have one or two just like that! and in the same shape, too..... Sorry. Don't be afraid to try Nissan. Won't be fabric covered, but will have the right shape. Good luck in your hunt Jim
-
From your description is seems like you are talking about the welting. It overlaps the stock rubber weatherstrip trapping it between the welting's "U" shape and the metal flange on the car that it goes over. It should be around the entire perimeter except across the bottom where the black scuff plate covers the weatherstrip. Funny that you should have only found it along the top of the door, I suspect you meant the door opening. I suppose the rest was rusty and removed a long time ago. The replacement aftermarket Precision weatherstrip now comes with the welting bonded to the actual weatherstrip. Many don't like it as it tends to be too wide adn too stiff making door closing a pain. If you are buying new Nissan weather strip, you will have to get the welting separately. Not sure if it is N/A from Nissan or not. Many here (me too) have tried and liked the Kia Sportage weatherstrip as a replacement. There is a recent thread about this here. Search for Kia, you'll find it quickly. Hope this helps. Weatherstripping is a hot topic lately. Jim
-
Richard I totally agree on the issue of available quality. If you find something decent, buy 100 of them, because there is no guarantee they will be available again. My favorite bitch is about light bulbs. My daughters '92 honda didn't burn out any bulbs until about 4 years ago. First a headlight, then a taillight. I have replaced those two bulbs THREE TIMES since, about once a year. The other stock bulbs are STILL working fine, almost 20 years worth! Might consider an electronic ignition upgrade to get rid of the points once and for all. unless having something non-stock on the Z is a sin for you, which I totally respect. Oh, and let me know if you find a source of decent bulbs! Jim
-
And this is why so many of us have abandoned points and gone electronic. There are several options open to you. Do a little searching hear for E12-80, GM HEI, Pertronix and MSD and you'll have lots of information to mull over in deciding which way is right for you. Post your observations and questions here and we'll help you decide and source the parts you'll need. Oh, and "GO RIDERS!" Yes, I bleed green too. Jim
-
-
-
-
-
-
An excellent reminder to contribute to a worthy cause. Thanks for all you guys do. Jim