Leaderboard


Popular Content
Showing content with the highest reputation on 03/22/2015 in Posts
-
Zed, I wish I was as handy with the multimeter as you sound. For this page's reference I'm going to explain how I got my car to run today, thankfully. 1) I gave myself a few days off from thinking about the car, and came back this morning more clear headed. Unplugged my fuel pump jumper at the dash (see: http://www.classiczcars.com/topic/50486-fuel-pump-wiring-harness-s/) 2) I pulled the MSA voltage regulator plug and double checked the harness-side wiring to make sure the diode and jumpers were installed correctly (which they were). [see Blue's earlier post for the relevant reference thread]. To my surprise I found the WHITE wire on the car's harness side loose in the molex connector and therefor probably making terrible contact. I continued to pull the entire molex connector off and brushed, cleaned and rewired each connector into the MSA adapter plug, covering the connections with electric tape (for the meantime - rubber boot to come later). I also reconnected the voltage regulator harness-side condenser to the black-wired female connector to the inner fender where the regulator used to sit. 3) Ran an additional ground cable from the rear passenger seatbelt mount where battery grounds, up to engine bay and bolted to the starter mounting bolt. 4) Cut out the bad ground wiring around my ammeter/fuel gauge and ran new 18 gauge ground to the back, reinstalled the + and - leads. 5) Switched the key into the ON position. Double checked connections. Turned the motor over, double checking connections. Plugged fuel pump jumped at dash back in, turned motor over. Everything seemed good, so I went ahead and fired up the new motor. Ran her for 20+ minutes at around 2500 rpm. Now on to sorting out the triple 40 Mikunis and a possibly vacuum leak at the intake/manifold. Thanks again guys!2 points
-
Ok the first one is what it is. Not crazy about yellow interior but whatever. It has a lot of nice hardware but I hate all the metal panels on the tail and interior. Amazing amount of rubber under the back. The second one is sort of the same. A lot of nice pieces but way too much color, and blue and yellow don't seem to really work together. Could have been a really nice classy looking Z even yellow. Just not yellow everywhere. He also has a 93 RX7 that has $160k in it. He either has more money than he knows what do with or just bad investment skills. Charles1 point
-
1 pointI think it's the same snowman before he got roasted. Kill them then burn all the evidence.1 point
-
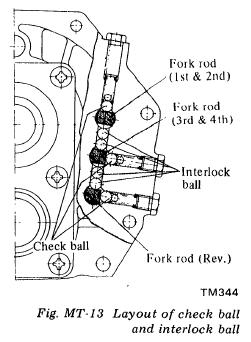
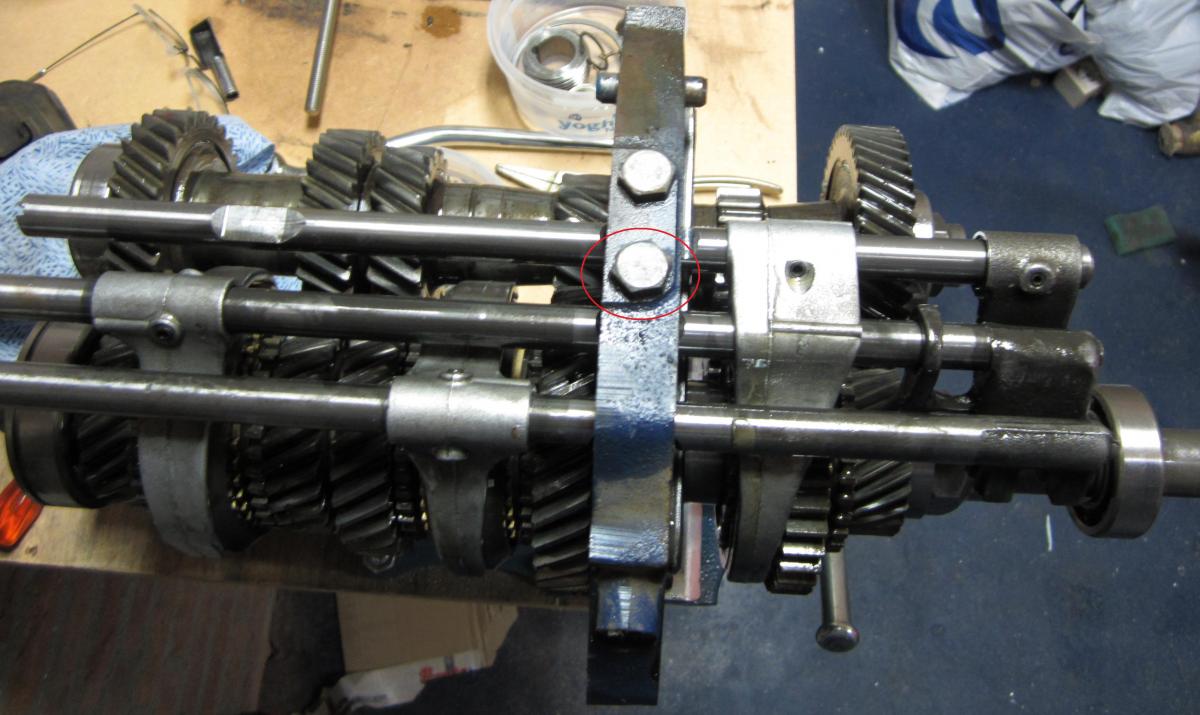
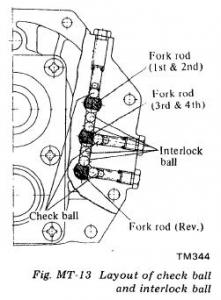
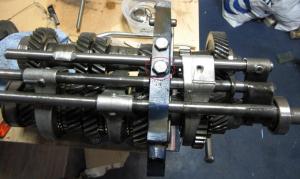
1 pointIt would help if you mention what model transmission you have and what you have done to it. Like Martzedcars mentioned its most probably your 3rd, 4th detent spring in the adapter plate. There are three of them, one from the top and two from the side. The one you need to look at is the top one of the two side detents. The springs are still available through Nissan (P/N: 32830-20100) and you can order all thre for less than $1.00. Most people don't replace them during a rebuild, but iss a very small price to pay to improve shifting. While you are at it you may want to consider changing the centering detent springs. There are two, one fits inside the other. Its the detent that returns the selector to the 3rd - 4th line when you push the gate other to 1st - 2nd or to 5th - Reverse. Inner P/N: 32852-24901 Outer P/N: 32856-24901 Gear selector bushing set 2x P/N: 32855-H1010 1x P/n: 32861-N4200 Chas
 1 point
 -
SUCCESS!!! :-D Just wanted to let everyone know that I got the carbs back on today and the car started and ran beautifully! The mixture screws were right where we put them during the last real tune and before I over-tightened them. Final tip here, to make sure it never happens again, I found it next to impossible to find the "bottom" with the spring, washer, etc., so with the carbs off the car so I could watch from the inside, I removed the spring, rubber o-ring, and washer, and found the bottom. I marked the screw (ground a bit off that side) and the carb, so now I know where not to go past in the future. Worked really well--especially for a novice like me. Hope this is all helpful to someone else! P.S. Blue, I've been reading your posts on tuning...maybe I should take back "beautiful" and just say it ran as well as it ever did...you really have some impressive information posted...I'll look it over more carefully now that I have the car running again! Wahooo!1 point
-
1 pointA great time was had with Mark & Geoff at the Lee Hotel .... Great food, & Z conversation, plus, got to check out the green machine - very nice! The rain almost cooperated, cleared up for a while. Thanks Mark for the nice surprise gift! Will enjoy it tomorrow morning. (my Z is jealous of the bling of rossiz's new hood vents)

 1 point
 -
1 pointChas On the front, I fabricated my own brackets to mount the bumper, although I still have the 240 brackets, I couldn't get them to work as easily. I offset the front license plate to the right to take up some of the gap under the bumper. Will eventually find another 280 grill the lower gap properly. On the rear sides, the bumper has some adjustment where the two end pieces attach to the center piece, as well as the welded side mounts are easily bendable. Looked ok on my 2nd test fit. I know what you mean about the recess though. Will take some pix later today. Rossiz Dual exhaust... wow, you should route it through the open holes the the bumper shocks went through. Wonder if anyone has ever done that. Would be trick. My next step is to clean up the spacer / spot weld area as well. Glad your Z is running well, are you back to driving it to work?1 point
-
1 pointI see that you're using a "straight-shot" modified fuel rail. It's possible that you might have fuel pressure pulsing issues, or pressure degradation at the last few injectors. I think that's why Nissan fed the injectors from both sides and installed a damper in the back. I've read that the large volume of more modern rails helps counteract those problems. It will be interesting to see if you have heat soak problems with the smaller rail volume, but with headers. Hope you don't but the set of parts is interesting since nobody has that combination. p.s. I assume that you found one more injector to go with the eBay set?1 point
-
I'm glad my illustration is used for good write up :-)1 point