


All Activity
- Today
-
 I’ll check tomorrow, thanks
 -
 This is all great stuff. Thanks. I'll dig into it this weekend. The Hazard light circuit is a high contender since it is the only one to bypass the ignition power circuit. The second thing that points to this is that I took the turn/combination switch/stalk out, unplugged it, and it was still going.
 - Yesterday
-
 Do you have power to anything when the key is in ACC or ON? Have you checked for voltage at the black/yellow wire for the starter solenoid when someone is holding the key in START? Start there and tell us what you find.
 -
 @Mike
@Mike -
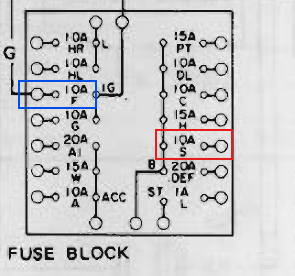
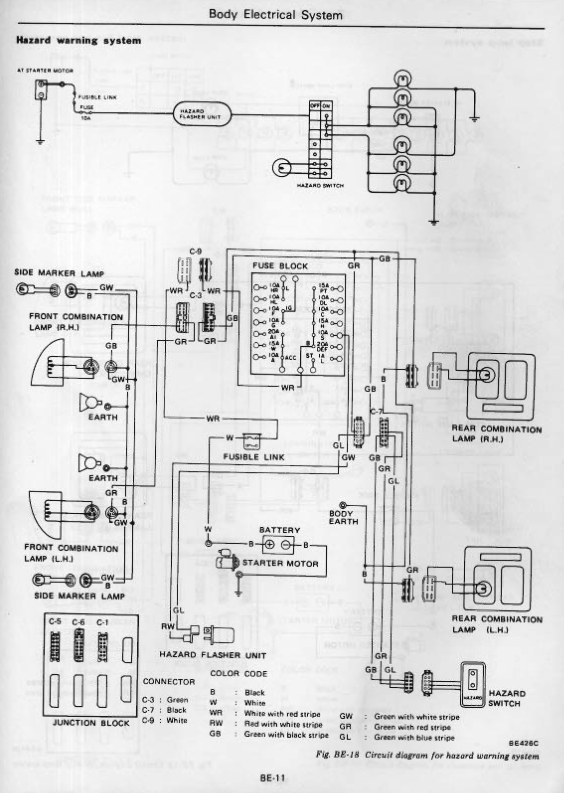
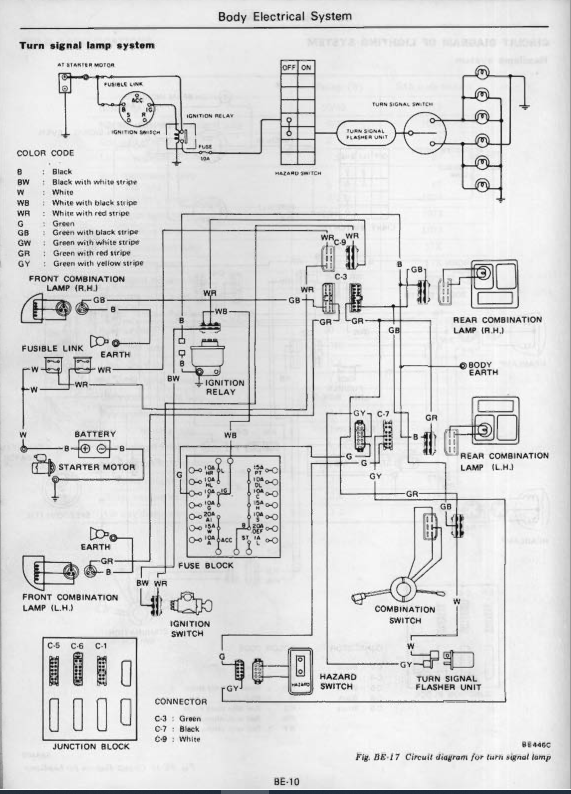
Has anybody worked on the wiring to "fix" a problem? Those "fixes" frequently involve finding some wire with voltage and tapping into that. The turn signals are powered through the ignition relay. If the key is not in ON, the ignition relay won't complete the circuit for the turn signals, As @Zed Head suggested, the next thing to look at would be the hazard lights. Normally if you pull the hazard switch that would kill the power to the turn signals. If the blinker is still going with the hazard switch disconnected, that would indicate some creative wiring has been done to the car. You can also pull the turn signal fuse to see if that kills the problem. If not, pull the hazard light fuse. The turn signal fuse is in blue, and the hazard light fuse is in red below. If neither fuse fixes the problem, that still points to creative wiring. More questions: How long have you owned the car? Have you experienced any other electrical glitches? Look under the dash on both sides and around the kick panels. Do any wires look like they have been spliced, cut, or otherwise altered? If so, look for wire colors (with stripes). Do you see any electrical tape that looks newer than the wiring harness?
-
 general hospital Budva medical centar
 -
мед клиника телефон клиники
-
So I took my dash partially out of my 73 240z to replace my heater hoses. I’ve since replaced the hoses and put the dash back. Now my car won’t crank. When I turn the key, the fuel pump runs and the relay on the passenger side floor clicks as normal but no crank. Any ideas?
-
 On second thought it might be the Hazard switch. Lots of mysteriousness in there. It has power when the key is off. @SteveJ seems to feel comfortable with it. "even when car is off"
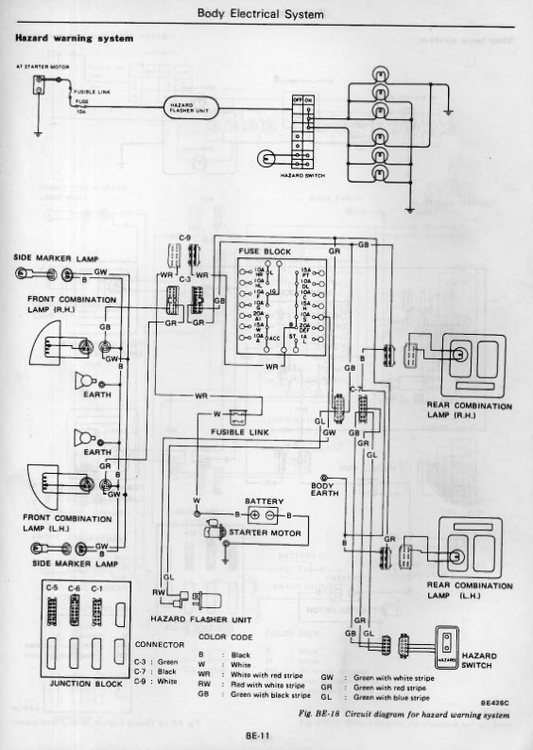
-
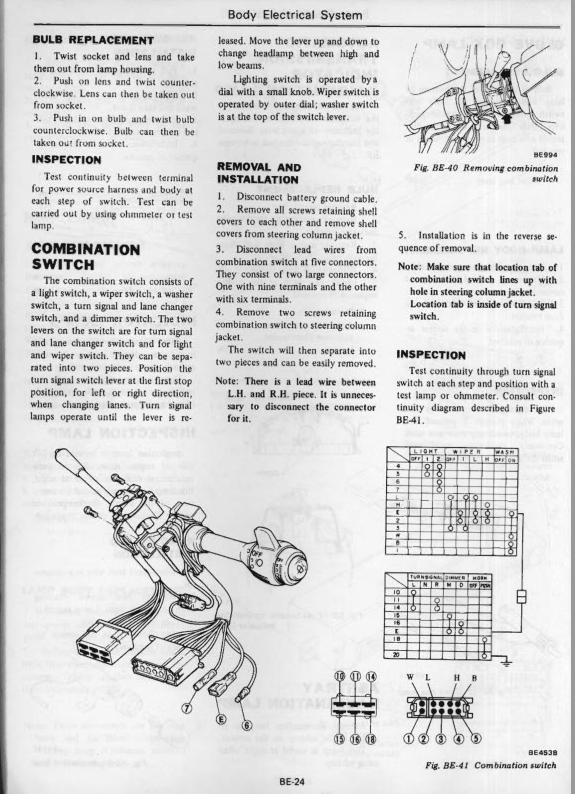
Pretty easy to remove. Something I learned - the ring around the ignition switch will pop out about 1/8" to allow you to remove the plastic shield around the column without breaking the corners off. Appears to be designed for that purpose.

-
It's probably the mechanism in the combination switch. Not likely to be the flasher. There is no separate turn signal relay.

-
1978 Z. Started the car, all of a sudden my left blinker went on. Couldn't control it from the stalk. Staid on when the car is shut off. Disconnected the stalk from the wiring harness. The blinker stayed on. I finally stopped it by pulling the blinker relay. Thoughts? My first thought is to replace the relay. Thanks
-
-
A 71 is up on BaT. Oddly, it ended up in Florida with an Illinois title, after having "spent time in Texas, Arkansas, and Oklahoma before it was acquired by the seller", Bring a Trailer1971 Datsun 240ZBid for the chance to own a 1971 Datsun 240Z at auction with Bring a Trailer, the home of the best vintage and classic cars online. Lot #200,055.
-
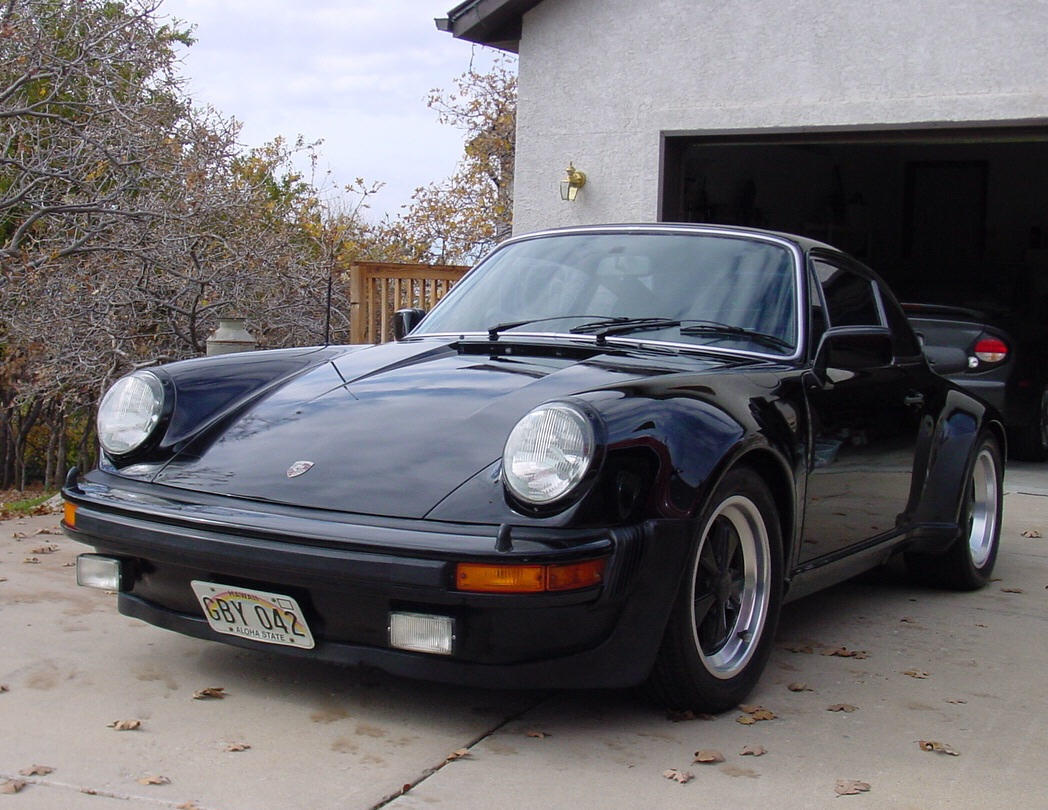
 Or a '77 Turbo Carrera (930) is also a beautiful car.
-
 As part of the 4th of July celebrations I am offering a sensible discount to any of the reproductions I make- make a sensible offer A link to my ebay store https://www.ebay.co.uk/usr/katodfa
 -
 http://www.zcarblog.com/wp-content/uploads/2023/07/7B1C3893-E7E1-4082-978E-03E86971037F-1024x1024.jpg From all of us at Z Car Garage we hope you have a wonderful 4th of July weekend! Long Live The Z Shown above in Red, White and Blue are our clients: CJ’s 1971 Datsun 240Z Mike’s 1970 Datsun 240Z Rob J’s 1971 Datsun 240Z http://www.zcarblog.com/wp-content/uploads/2022/07/bee20d36-c3b0-4195-88bf-ab197222412e-1-914x1024.jpg View the full article
 -
 Wow…..What a shame…..a real nightmare to a company trying to “get its legs”.
 -
 280zx-83 joined the community
 -
 Rightpedal joined the community
 -

-
Users interact with ChatGPT through conversations which consist of text, audio, and image inputs and outputs.[38][39] The user's inputs to these conversations are referred to as prompts.[40] They can explicitly tell ChatGPT to remember aspects of the conversation, and ChatGPT can use these details in future conversations. ChatGPT can also decide for itself to remember details. Users can also choose to disable the memory feature.[38] To prevent offensive outputs from being presented to and produced by ChatGPT, queries are filtered through the OpenAI "Moderation endpoint" API (a separate GPT-based AI).[41][42][19][43] https://en.wikipedia.org/wiki/ChatGPT
-
-
 It might be a real person using something like Grok or ChatGPT to try to converse. As SteveJ suggested early on, maybe for some sort of future scam. A Nigerian prince or someone from China maybe. North Korea? Might explain the cultural confusion. Who knows. I don't really know how a person uses these things to create a conversation. Things like this thread give me a good standard to measure against as I try to learn about it. https://en.wikipedia.org/wiki/Grok_(chatbot) https://en.wikipedia.org/wiki/ChatGPT


Important Information
By using this site, you agree to our Privacy Policy and Guidelines. We have placed cookies on your device to help make this website better. You can adjust your cookie settings, otherwise we'll assume you're okay to continue.