
kmack
Community Member
-
Joined
-
Last visited
Everything posted by kmack
-
Alfadog, the "L" in HLS stands for "left-hand drive". Your's is right hand drive am I correct? Joe71, I'll have to check and see if I still have the vents that came off the parts hatch I bought. I have new vents so I"m not sure what I did w/ the old ones. They weren't in the greatest shape, but were still in one piece. If I can find them, I'll let you know.
-
Would a well machined metal block work? Say something along the lines like a meatl lathe cutting bit? These are high strength steel and are typically rectangular in shape. I have quite a few ranging from less than an inch to over 3" in length.
-
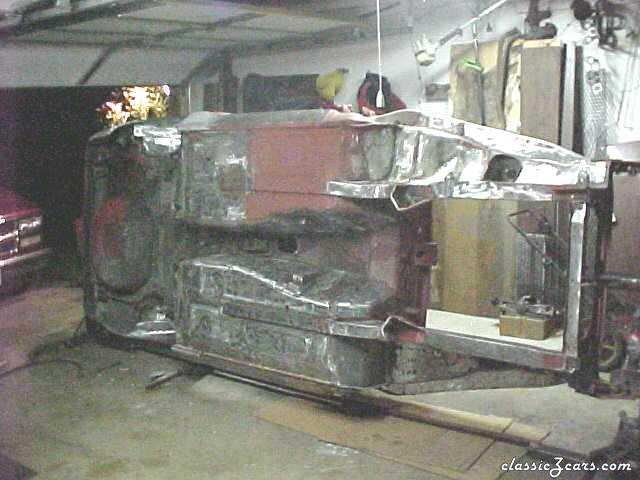
From the album: '71 before shots
Here's a shot on the rotisserie. Notice the clean shiney metal waiting for epoxy sealer and final undercoating. The primered section on pass. side is the section of floor that had to be replaced along with battery/firewall repair. -
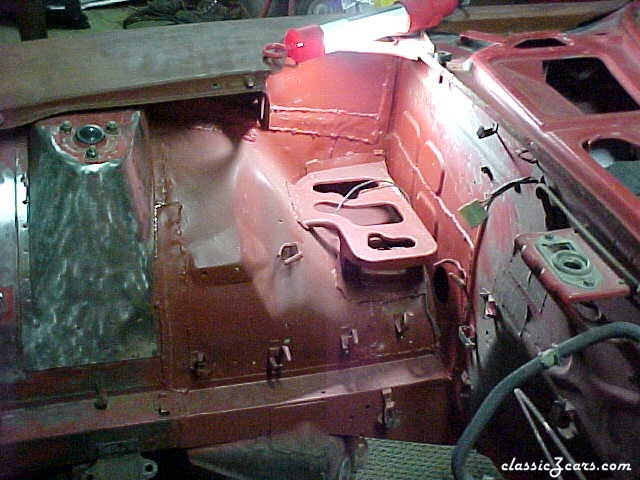
From the album: '71 before shots
This how my battery, firewall repair looked before final paint. Not the best, but definitely better than before! -

From the album: '71 before shots
This is basically what I started with...and hopefully somewhat of an idea what I'll end up with. The paint in this picture is totally shot, but you can't tell. -
I agree w/ 2ManyZs, the paint code sticker was on the drivers side on my car. It's not there anymore because you almost couldn't read it so I just peeled it off. My color code is 905, sort of a Cherry Red. An unmistakable red!
-
I found this info on a Mercedes Benz site. Lots of good stuff there. Ken Taken from Scott Grundfor Co. – Ideas for Collectors (www.scottgrundfor.com) A friend in the auto detailing business suggested a way to repair the chips quickly and economically. He proposed brush-touching the chips with a dab of paint. I thought the paint would look as if it had been brushed, but he described the process of building up the paint just above the original level then gently sanding it down. We tried it, and we could see that unless you knew exactly where the chip was, you could never see the repair. The process works best with solid colors; metallic colors may come out blotchy. A Better Way First, get the right touch-up paint for your car. For a recent model with original factory paint, a Mercedes-Benz dealer can sell you a small bottle of touch-up paint with an integral brush. If you don't know the name of the color, if it has faded, or if the car has been repainted, your local automotive paint store can match a paint sample and sell you a pint or so. Your car has a code used to determine the formula for mixing the color. Clean the chipped area. Paint will not stick to a surface with wax, grease, or silicone on it. Dilute a liquid detergent, and use a sponge or soft rag to clean the area around the chip, especially the chip itself. Clean off any accumulated residue. Let it dry. If you see bare metal, dry it immediately to prevent rusting. This works well for a small chip, perhaps caused by a rock, but a long scratch takes more skill and patience; it can be repaired, but rarely. Practice on a small, out of-the-way area so that if you make a mistake, it will be hidden. This process is not recommended for a car with a lot of chips. If that's the case, consider repainting the panel. For one or two chips, this alternative saves the difficulty and expense of spot-painting a larger area or repainting an entire panel. If you spot-paint an entire area and blend new into existing paint, you have two dissimilar paints: the new paint and the original underneath. When you spot-paint an area then finish it, you might get an exact color match then, but in time the two paints applied at different times age differently, and a ring or spot will appear. Applying Paint With the area clean and dry, you'll need a good brush with a very fine point. A large brush will slop paint over the edge of the chip. To keep the paint inside the chip, you need a very small brush with just a few bristles. Mix the paint thoroughly. Liquid paint settles as it stands, so mix in all the pigment at the bottom of the container, or the color will be off. If the paint is too thick to go on the brush and be applied in a light coat, it will need to be reduced to a thinner consistency. If you're using lacquer, you'll need lacquer thinner; if you are using acrylic enamel, use acrylic reducer. To get the desired consistency, paint should be thinned approximately one part thinner to one part paint or one half thinner to one part paint. With the brush, build successive light layers of paint into the chip. Paint shrinks as it dries, so build the layers gradually. If you put one big glob of paint into the chip, it will continue to dry for months, shrinking as it does so. Even if you finish it flat, a few months later a crater will develop where the repair was made. Allow drying time of at least an hour or two between paint layers. The longer you wait, the better the finish you'll get, so let the paint dry thoroughly. Two to four layers of paint will be needed to fill the crater. Because the paint will shrink, build the final layers a little above the crater surface. It should be fairly close but slightly above the surrounding paint. Let this dry for several weeks. In the meantime, your car won't look awful. It will look like you simply brush-touched that area, which will certainly look better than the chip. The key to this entire process is that the paint must dry thoroughly. Finishing Learning the skill of finishing is another key to success. You'll need a cube about an inch square that is perfectly flat on at least one side to use as a small wet sanding block. If you don't have something flat of this size, cut a block of hardwood. Before sanding, you might mask off the area by putting tape about an inch away all the way around. Then if you get a little aggressive in your sanding, you won't sand and scuff the surrounding area. Use 1,000-grit or 1,200 grit ultrafine wet sandpaper. You need very little; a sheet will cost about a dollar at an automotive paint store. Tear off a tiny square, enough to wrap around the block, then use a sponge to wet the area as you sand. Use the sandpaper and block to level the paint mound down to the surrounding original paint. Use the lightest possible pressure on the block, and gently wear down the little mound. Sand a little and very lightly—this can take mere seconds—then dry the area and inspect it. When you see that the mound has disappeared, you've gone far enough. Avoid sanding too much. If the paint is old or thin, or if you sand too hard, you'll go right through the finish. If you very carefully let the block float with just the gentlest pressure over the little mound of paint built up over the chip, you'll wear off the top of the new surface without removing much if any of the surrounding paint. Ideally, you'll scuff it just a bit. Next, use magnesium polish, Mother's or Blue Magic, available at most automotive stores. Magnesium is the finest abrasive I've found for compounding paint. Use a soft cloth in the area scuffed by the sandpaper and rub until the scratches are gone. Rubbing in one direction works best. After polishing, wipe the area dry and inspect it. If you see deeper scratches, do a little more polishing with the mag polish. Finally, wipe the surface clean and use wax or automotive polish (carnauba wax or similar), to finish the area around the chip. Done right, you've filled the chip and finished the top so that it blends in nicely. If you look very closely, you may see the spot. If you notice bubbles trapped in the paint (they produce white specks in the center of the chip) your paint was probably too dry, too thick. As you grow more skillful in applying wetter, thinner layers, the surface will not bubble. This method can effectively repair a chip without painting an entire panel. I've used it on show cars, where it even held up to the scrutiny of judges.
-
....and the one I like: Everyone has a photographic memory, some just don't have film. I have a few more at work that are really good....
-
I used to work at a non-profit research facility and some of the engineers there were way off in left field. If you had a question about design or something chemical, they'd rattle your brain with facts, theories, etc., but ask them to show you how to change a tire or something like that and they were stumped! No amount of "book smarts" can make up for a good set of "street smarts" and common sense. I worked along side another technician on a "Torque-loss" testing program on various production engines. We essentially took out individual parts and spun the engine to measure the amount of torque. When we got down to nothing more than the crank, we had to have some way to simulate piston/rod weight. The project engineer suggested using lead semi-circles held on by regular hose clamps. :eek: We tried to plead with him that this would not work, since the clamps would be out of balance. Didn't work. We slung the weights at about 4500 rpm and I've never seen another 8000 lb test stand jump in the air like that! Talk about having to change your shorts!!! The only response we got from the engineer when we had to go buy another engine and start over was: "I thought it would work?"
-
Comprehending Engineers - Take One Two engineering students were walking across campus when one said, "Where did you get such a great bike?" The second engineer replied, "Well, I was walking along yesterday minding my own business when a beautiful woman rode up on this bike. She threw the bike to the ground, took off all her clothes and said, "Take what you want." "The second engineer nodded approvingly, "Good choice; the clothes probably wouldn't have fit." Comprehending Engineers - Take Two To the optimist, the glass is half full. To the pessimist, the glass is half empty. To the engineer, the glass is twice as big as it needs to be. Comprehending Engineers - Take Three A pastor, a doctor and an engineer were waiting one morning for a particularly slow group of golfers. The engineer fumed, "What's with these guys? We must have been waiting for 15 minutes!" The doctor chimed in, "I don't know, but I've never seen such ineptitude! "The pastor said, "Hey, here comes the greens keeper. Let's have a word with him." [dramatic pause] "Hi George. Say, what's with that group ahead of us? They're rather slow, aren't they?" The greens keeper replied, "Oh, yes, that's a group of blind fire-fighters. They lost their sight saving our clubhouse from a fire last year, so we always let them play for free anytime." The group was silent for a moment. The pastor said, "That's so sad. I think I will say a special prayer for them tonight." The doctor said, "Good idea. And I'm going to contact my ophthalmologist buddy and see if there's anything he can do for them." The engineer said, "Why can't these guys play at night?" Comprehending Engineers - Take Four (No doubt a Teamster engineer) There was an engineer who had an exceptional gift for fixing all things mechanical. After serving his company loyally for over 30 years, he happily retired. Several years later the company contacted him regarding a seemingly impossible problem they were having with one of their multimillion dollar machines. They had tried everything and everyone else to get the machine to work but to no avail. In desperation, they called on the retired engineer who had solved so many of their problems in the past. The engineer reluctantly took the challenge. He spent a day studying the huge machine. At the end of the day, he marked a small "x" in chalk on a particular component of the machine and stated, "This is where your problem is". The part was replaced and the machine worked perfectly again. The company received a bill for $50,000 from the engineer for his service. They demanded an itemized accounting of his charges. The engineer responded briefly: One chalk mark $1, Knowing where to put it $49,999. It was paid in full and the engineer retired again in peace. Comprehending Engineers - Take Five What is the difference between Mechanical Engineers and Civil Engineers? Mechanical Engineers build weapons, Civil Engineers build targets. Comprehending Engineers - Take Six Three engineering students were gathered together discussing the possible designers of the human body. One said, "It was a mechanical engineer. Just look at all the joints." Another said, "No, it was an electrical engineer. The nervous system has many thousands of electrical connections." The last said, "Actually it was a civil engineer. Who else would run a toxic waste pipeline through a recreational area?" Comprehending Engineers - Take Seven “Normal people ... believe that if it ain't broke, don't fix it. Engineers believe that if it ain't broke, it doesn't have enough features yet." Scott Adams, The Dilbert Principle Comprehending Engineers - Take Eight An architect, an artist and an engineer were discussing whether it was better to spend time with the wife or a mistress. The architect said he enjoyed time with his wife, building a solid foundation for an enduring relationship. The artist said he enjoyed time with his mistress, because of the passion and mystery he found there. The engineer said, "I like both." "Both?" Engineer: "Yeah. If you have a wife and a mistress, they will each assume you are spending time with the other woman, and you can go to the lab and get some work done."
-
I got the new Motorsport Auto Auto News the other day. On page 18 they list a new "Performance Camber kit" for the front and rear. They are listed at $99.95 for a pair. "...our camber kit is a direct bolt-in allowing simple camber changes while requiring no sheet metal modification. Allows for 1.5 degrees of camber change. Maintains original ride height in Z's built up to 8/74...." At some later point down the road, I'd like to lower my Z a little, no more than an inch. I've heard/been told that lowering affects your camber, hence the need for adjustment. If this little gadget works, then it would make things a lot easier. Question: Has anybody heard/seen/used or otherwise have any additional info on this type of product? Is 1.5 degrees of change enough for a Z that has been lowered 1"? I know I could adjust my camber just by slotting the strut mounting holes, but I'd hate to do that sort of thing and then later want to go back to stock. Also, I'm looking at using this car for some autocross duty.
-
I've pulled the engine w/ and w/o the trans. Personally, I like pulling both at the same time. (I've usually needed to have both out at the same) It really doesn't take much longer if you pull both. Disconnect items per Royce's list but add: remove fan/clutch remove driveshaft remove shifter disconnect speedo cable loosen trans mount bolts. Once you get the engine mount bolts out and have the hoist hooked up, then drop the trans mount and let the tranny hang. Make sure you have the hoist attached to the engine so that it picks up the front of the engine first and lets the rear hang a bit. I usually find it's easier to push the car away from the hoist rather than pull the hoist/engine/trans away from the car. You'll need to pick up the engine high enought to clear the oil pan above the radiator mount. Once you've cleared that, get someone to hold up the back of the tranny as you move the assembly away from the car. That's about it. Reassembly is just the reverse. Plus I find it's easier to attach the tranny with engine out of the car rather than while it's sitting on my chest under the car!
-
Ok, I found some more information regarding the Renu product. Check out their website... Gas Tank Renu
-
Found the info on my gas tank. It's marketed as "Gas Tank Renu - USA". The dealer through which mine was done was out of Houston (409-372-9107). It carries a limited Lifetime warranty (non-transferable to next owner) My paperwork lists a bunch of dealers throughout the US & Canada, so if you're interested, tell me where you are and I'll give you the number of the closest dealer to you.
-
I used the acid by itself. Won't ever do that again. There is a way to nuetralize muractic acid. I believe baking soda or something like that. You can ask a pool supply company. They use muractic acid in cleaning pools. I'll try to find my warranty card on mine and post the company info for those that would be interested.
-
Correct me if I'm wrong here, but I think pauls240z has it wrong. You would want to keep the speedo drive gear for the transmission that you are putting into the car. If you use the 4 spd gear on a 5 spd, that would give you a different ratio going to the speedometer.
-
Word of caution about using acid to clean your tank....make sure you nuetralize the acid or it will rust again! When I first got my car back in '93, there was 3/8" of sludge in the bottom (along with a screwdriver?) and it was almost hard as a rock. (My car had been sitting for about 5 years.) I pulled the tank and it had been suggested to me to use muractic (sp?) acid the clean the inside. The acid worked great! Nice, clean, shiney metal appeared inside. I thoroughly rinsed the inside of the tank for over an hour. 3 weeks later I had my engine running. Well about 3 weeks after that, while test driving the car on the road (1/2 a tank of gas), the thing ran out of fuel (or at least felt like it)! Checked the fuel filter.....BROWN! Pulled it, and brown liquid poured out. Changed it, and a week later it was glogged again. Finally, I pulled the tank again. The inside looked worse than it did before I tried to clean it! Turns out that you can't nuetralized muractic acid with water alone, so it kept eating away at the metal. And not having a full tank of gas let air/moisture in which caused the rust. The fix? I'm not sure, but I went to a radiator shop that repaired fuel tanks and they turned me on to a process called "Renew." (I have the paperwork at home and will look for it later) Basically, they clean out your tank, nuetralize the metal, then coat the inside and outside with a fuel resistant, hard, epoxy coating and baked it in an oven for 6 hours. Carries a lifetime warranty. Cost me about $150. As I haven't really had my car back together since that point, I can't tell you how it's holding up. I can tell you that when you look inside my tank, it's clean and neat inside with no signs of rust. FWIW....
-
Well, I guess it's my turn. I just turned 30, 1 wife, 1 kid, 1 cat, 1 dog (85lb German Shepard), 1 house, 1 Z, and now down to 1 motorcycle. (I had about 8 so far) Bought my '71 and a '73 parts car back in '93. Got the '71 running and riving, but I couldn't drive it much becuase of the rust under the battery. Frame rail had a crack in it! Last time I drove my car was when we moved into our house in Jan. of '96. I drove it there and then once in the garage, it was torn apart. I have gone so far as to remove everything off this car. Took it straight down to the metal and have slowly brought it back to where it is now. Took it off the rotisserie back in Dec. Engine/trans. is back in (although I have to pull it again to replace a freeze plug). Underbody and suspension is complete and the only things left are the body and the interior. I'm working on priming and sealing the body right now. I have finally set a deadline to have this car finished-June, 2002. I have to have it driving by the time the National Convention gets here to San Antonio. I'm the only member of our Z club that hasn't ever driven their Z to a meeting! Plus I'm also the only member that brought their car to a car show on a trailer as a rolling, primered shell! I've loved Z cars since I was 5 years old. I have fond memories of rolling around on the rear deck of my Dad's '72 240 and the way to my Grandparent's house going down curvy roads at obnoxious speeds! (back before car seats were mandatory!) I had a chance at a '76 280 2+2 back in High School, but couldn't convince my parents to help front the cash. (I don't particulary care for the "hump backs", but I always did think the dual interior door handles was pretty cool!) Anyway, I plan on always having at least one Z. Just like I'll always try to have at one motorcycle. My wife claims I love the Z more than her, well I have had my Z longer! Anyway, I'ved lived in Texas all my life (never farther north than San Antonio). I can definitely say that warm weather is the best! We can drive all year long, in shorts and a t-shirt, and in flip-flops, w/o worrying about road salt, snow, we hardly ever have rain, etc.... Long live the classic Z!
-
Zlishous, 2ManyZs has that many posts because he doesn't work on his cars! Sorry Keith, I couldn't resist. Of course I'm one to talk, I haven't driven my car in over 6 years!:eek:
-
I've talked to a few places already and have even bought some sealer/primer. But I thought Carl B. had said once that bondo on bare metal is a no-no. Something about moisture still being able to penetrate. I've had a light coat of primer on my car now for awhile. I stripped all the paint off previously and put a light coat of primer to help seal out rust. (It's been garaged this whole time.) I'm sanding off the primer right now back down to the metal. I'm using a rust inhibitor called "ospho" to treat the metal, then I'm spraying the sealer. The paint shop I talked to said this process is ok and should seal up nicely. But I just wasn't sure about the bondo thing. Hope fully I can get it cleared up soon. I'm hoping to have the door sills, window/hatch channels, and the roof done by tomorrow.
-
I have my car stripped down to bare metal. And I'm getting ready to start prepping for paint. I've heard that it's not good to put "bondo" on bare metal, but to lay down a sealer/primer first, then use the bondo. How correct is this? Is so, then how do I prep the surface of the primer so that the bondo will adhere to it?
-
Well, as my project gets closer to winding down, I'm now faced with finally having to order all the window and door rubber seals. I know Motorsports and V.B. both sell rubber seal kits. I don't have any problems paying for them. But I seem to remember a thread somewhere about using the kits for a 280Z on the 240's because the seals fit better. Anybody have any suggestions? Who has been there and done that? Victoria British has three kits kisted: 240 70-73 260-280 74-6/75 280 7/75-78 I have a Series I, 1971 240Z. And I need all the rubber seals! I'm looking for suggestions here since my budget is limited and I'd hate to spend the money to find out my parts don't fit. Any and all suggestions and comments are welcome...
-
Come join us for the 15th Annual ZCCA Z Car Convention! The National Z Car Convention is rapidly approaching. The hosting club, Z-Sport of San Antonio , has prepared a ton of stuff for this years convention, June 17-21, 2002. This Convention will also coincide with the new release of the 350Z. Registration forms are now available on-line at Z-Sport So come join us in San Antonio, Texas for this year's Convention! "Ya'll come down now, ya here!"
-
Like 2ManyZ's said, start taking it off. I went so far as to even cap off the EGR valve also, but at the time I had a '73 motor and the EGR was shot anyway. Now I have an early model balance tube that doesn't require the EGR. Taking the air pump and it's various plumbing off will not be all that difficult. The hardest part will be removing the air injection tubes from the exhaust manifold. I pulled my manifold off the car, cut the tubes as close to the manifold as I could, then drilled the rest out. Later I tapped the holes for a 3/8" NPT flush pipe plug. Now you have to really look to see where the tubes went in. (Or you could always just get a header and not worry about it.) The rest of the job is just plugging up the various lines. Good luck.
-
I thought I wouldn't mess mine up either, but I still had to buy new choke nozzles because I rushed my disassembly too quickly. When ya'll work on these things, make sure you are patient and take your time. It'll definitely save you money in the long run.