


kmack
Free Member
-
Joined
-
Last visited
Everything posted by kmack
-
 THE BEST DRINKING STORY EVER From the state where drinking and driving is considered a sport, comes a story from Texas. Recently a routine police patrol parked outside a local neighborhood bar. Late in the evening the officer noticed a man leaving the bar so intoxicated that he could barely walk. The man stumbled around the parking lot for a few minutes with the officer quietly observing. After what seemed an eternity and trying his keys on five different vehicles, the man managed to find his own car which he fell into. He was there for a few minutes as a number of other patrons left the bar and drove off. Finally he started the car, switched the wipers on and off (it was a dry night), flicked the hazard flasher on and off, tooted the horn and then switched on the lights. He moved the vehicle forward a few inches, reversed a little and then remained stationary for a few more minutes as more patrons left in their vehicles. At last he pulled out of the parking lot and started to drive slowly down the street. The police officer, having patiently waited all this time, now started up his patrol car, put on the flashing lights, promptly pulled the man over and carried out a breathalyzer test. To his amazement the breathalyzer indicated no evidence of the man having consumed alcohol at all! Dumbfounded, the officer said "I'll have to ask you to accompany me to the Police station. This breathalyzer equipment must be broken." "I doubt it," said the man, "tonight I'm the designated decoy."
 -
Q: Why do Rednecks wear button-fly jeans? A: Because the sheep can hear a zipper a mile away!
-
If you have any scrap pieces of metal laying around. Try a few samples off the car to see how hard it is to do or how good it turns out. Always best to practice off the car first.
-
The absolute best way is to cut the replacement section a little longer than the original, while putting a "kink" along the overlap section. So that when you lay the repair panel under the orig. panel, the two pieces lay flat creating a nice level seam. Stitch weld it then use filler to smooth and you'll have a nice blended repair patch. Eastwood's has a tool for making that "kink", some sort of crimping tool. My Dad used to use your 2nd method when replacing rear qtr panels on cars. Use the thinnest cutting disc you can find to minimize the gap that is left after the cut. And make sure you do small stitch welds to keep from warping the metal. I would slowly weld the entire cut, then grind down smooth and fill where necessary.
-
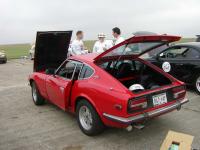
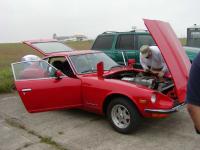
Here's another picture that shows good reflections. I have gotten wonderful comments about the paint job. And I get even greater responses when people find out that was my first paint job, ever! Read up on painting. There is lots of info out there. Use it to your advantage to learn something new and save some cash at the same time. http://www.scottgrundfor.com/pages/collector.html This website has pretty good info on painting, prepwork, and repairing paint chips.
-
I had no painting experience before I painted my car other than shooting primer, which is hard to mess up. I bought a $39 Wal-Mart spray gun, 4 in-line moisture filters from Harbor Freight ($6 ea), an air regulator for the spray gun ($6), and all my primer, sealer, and acrylic urethane paint (about $600, the paint alone was just under $200), and rented a spray booth ($35 for 24 hours). I did all the primer and sealer work, and first coat of paint myself in my garage. Along with the final prep work. The final coat was put on at the spray booth some 30 miles away. Of course I did a final prep at the booth before spraying. If you have the inclination and want to try something new, do it yourself. You'll do at least as good a job as Maaco if not better for less money. Plus you'll be more critical than Maaco will be of the work, especially the prep. And by all means, use the moisture filters. There is no quicker or easier way to ruin a paint job than to let water get into the air lines.
-
Q1: If you can "just feel" a bit of play, then think about how much air can get into the carb through that little bit of play? You should not be able to feel any otherwise, you'll run into a lean condition and you won't be able to ever egt the carbs set right. If there is any play at all, then the shafts need to be re-bushed. Q2: Expect to pay anywhere from $150-250 for a used L28 from a pick-n-pull yard or junkyard. A lot depends on the yard and the current state of the engine. If you're looking for one that's been rebuilt, expect to pay at least $600 and up depending on where the engine was rebuilt and by whom.
-
I wouldn't say that mine is high-tech. Sturdy maybe, but not really high-tech. I have seen some made out of wood 2x4's!
-
I asked because on the early 240's the inside panel beside the headlight scoops is where the front bumper mounts. I tried to use that when designing my rotisserie plans. It flexed too much side to side and I feared it would not hold the car while rotated over in a 90* position. The better way (I think) is to use the existing tow hook mounting holes on the bottom of the radiator support. They are already drilled and tapped so all you have to do is locate the holes in your mount system. My front mounts pivot from the actual bumper location, but they drop down 7" to cradle the bottom of the radiator support. See my thread on rotisserie plans for downloadable drawings that you can use to build a set of stands. I build and sell stands but the shipping to Australia would be too much. Although, I will build and ship a set to you in exchange for one of the Dashboard Restoration's new dash covers! :cheeky:
-
I know I found this kind of late, but did you get your question answered about the front mounting point for the rotisserie?
-
Hey, Did I hear someone call my name? 240Zdragon72, If you want some info on the roitsseries I build, give me a shout. I build and ship the stands straight to your door (or business if prefered). Or you can visit my new site. Vintage Rice Racing - Rotisseries Best bet is to email me with any questions. Listed on that site are a few of the people who have purchased from me. By all means, feel free to chat with them about the stands. mperdue is a member here on this site as are a few of the others. I'll be happy to answer any and all questions you may have.
-
I saw a good piece still left on the car! Don't send it to the crusher yet! The rubber foot rest is still there and in good shape! Save it before it disappears! ROFL
-
The crossmember from the '76 280Z I had looked like the one from my 240Z. I didn't specifically compare the two so I can't be certain. But I do know for a fact, that the front control arms are identical. I checked on that part. So mounting issues (w/ regard to the controls) should not be a problem.
-
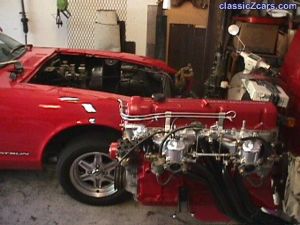 Notice the big, gaping hole in the engine bay? The rebuilt orig. engine is color matched to the body of the car. I think it turned out rather nice.
 -
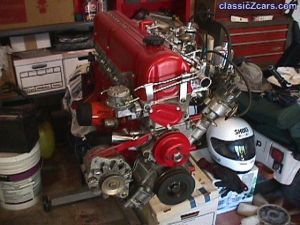 Going back with the original engine. Rebuilt and detailed for showing. (just another view)
 -
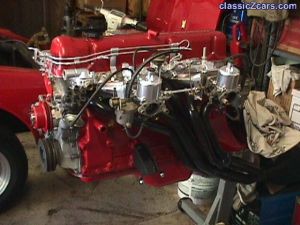 Going back with the original engine. Rebuilt and detailed for showing.
 -
I'm 31, going on 20. I have a '71 Series I. 1 wife, 1 kid, 1 dog, 2 cats. I live in San Antonio, Tx and that's the farthest north I have ever lived.
-
mdbrandy, The gear puller will work if you're replacing the bearings. If you were to save the bearings I wouldn't recommend it. Soley because a gear puller pulls from the outside edge, which will hurt the bearing. A bearing puller typically uses two plates that slide up under the bearing supporting it as it pulls. I would recommend to anybody tearing apart a tranny to go ahead and replace the bearings unless you for sure that they are in good condition. No sense in having to tear it down again later just to replace that one $15 item you took a chance on.... On the brass punch, like I said if you're careful and focus the punch on just the inside race of the bearing, you can use a steel punch. The brass is nice because you don't have to worry about hurt the shaft surface . Which can be crucial if there is a sleeve or gear that rides on the shaft after the bearing you're putting in place. Just peace of mind really. Just remember to take you time, pay attention to how things are removed, and lay them out in the order they were removed so that way you just have to follow in reverse when putting it all back together. And please try to finish in 1-2 days. I've know people that started one afternoon, then something came up and they couldn't finish the next day. They waited until the next weekend to try to finish. It's harder to remember things after a stretch of time has gone by. That's why you lay things out in order. Makes it a lot easier. Good luck on the rebuild and if you have any questions, I'll try to answer them the best I can.
-
You'll need at least the following: -typical metric wrenches, sockets, etc. -snap ring pliers -bearing puller -assortment of small diameter punches -a good brass drift punch (or if you're careful you can use steel) -hammer -bench vise (this is helpful but I tend to do it all on the floor, more room that way) I would also recommend getting a garden sprayer and a gallon of "wax & grease remover." I get the remover from a local auto paint supplier for less than $8. This is great for washing down the tranny before you start taking it apart. Get it pretty clean. Then as you start tearing it down, spray all the parts down. Makes it easier to reassemble later so the parts don't slide out of your hand. A small shop press can be used in place of a bearing puller, or a regular gear puller will work. Most likely you'll be replacing the bearings anyway, so if you tear them up getting them off, it's no big deal. I've used a small chisel the gently work the bearings off before when I didn't have a puller. Just make sure you don't hammer the shaft (that the bearing sits on) and mar the surface. You'll use the brass drift punch to seat the new bearings. ALWAYS seat new bearings by striking the inside race only! If you hit the outside race (ring), then you will hurt the bearing and it will fail prematurely. You can use a steel punch but becareful not to mar the shaft surface. Brass is a softer metal that won't harm any of the hardened steel that the shafts are made of. I don't think I left anything out. That should be about it.
-
Now, automatics are hard. You really need to know what your doing there. I've done a few, but only because I had to (work related). It wasn't fun and I wouldn't do another one, even you stuck a gun to my head! You might as well pull the trigger and put me out of my misery....:dead:
-
FWIW, I rebuilt the tranny in my Explorer this past March. Typical 5-speed Mazda tranny... I replaced the input shaft, counter-shaft, input shaft bearing, counter-shaft bearings (front & rear), front and rear seals, first and second synchros, clutch & pressure plate, and the clutch slave cylinder. It took me 2 days to drop it, rebuild it and put it back in and on the road. Total cost was less than $350. A rebuilt tranny from someone else for the Explorer was $750. So I paid myself $400 in labor for 2 days work. Not bad considering I got to play with my daughter during that time also....
-
Send me the tranny and I'll rebuild it for $200. Including parts. If you lived nearby, I'd pull it, rebuild it and install it for $750, including a new clutch! $1400-1600? You'll pay almost that much for an automatic rebuild and those are a lot harder to do than a standard. FYI, I cut my teeth on standard transmissions by having to put them back together after an engineer took them apart, w/o a book! (research facility) Standards are like a puzzle, they only go together one way and one way only. If a piece is in the wrong spot, you WILL NOT get it back togther. If this car is not your daily driver, I'd give it a shot. Even if you screw it up, you could still get another rebuilt one for about $700-$800. And you'll still be ahead of the above price. Of course that means dropping and installing the tranny yourself or with the help of some buddies. Free beer and a TV to watch the game? As long as there are no gears that need to be replaced, which is very seldom but not unheard of, then you're only looking at replacing the bearings and the synchro's. Total parts cost is less than $120 including front and rear seals. Even if you have to replace a few gears, it should still be less than $200. Some advice if you do decide to tackle this yourself: make a good sized workspace, either on the floor or on a big table. Have enough room that you can layout each piece in sequential order of how it was taken apart. Use a digital camera if you have one and document each step. It may take a while, but for a first time rebuild, it will make it all go back togther almost effortlessly. And if you can get a copy of the microfiche CD from our illustrious Mike "The Admin Guy" Gholson. It has great blow-ups of the transmissions, which are also very useful. Give it a shot, it's not that bad. I just hate to see people spend awful amounts of money on stuff that they could really do themselves very easily.
-
I have a copy of that video that I saved from a few years back. He really holds his own against that Porsche. And having had the chance to try and follow a few 911's around a track in my 240, I know how hard that can be. I must say, his last comment at the end expresses all....
-
BillD, pulling the tranny out (w/o the engine) can be done by one person. I know first hand. Put the car on jack stands high enough that you can clear the bellhousing while sliding the tranny out from underneath the car. There are 6 big bolts that hold the tranny to the engine block and 2 small bolts that bolt to the engine backing plate. 2 bolts for the clutch slave, 4 on the drive shaft, and 2 on the tranny mount. From there it just slides right out. One word of advice, drain as much of the fluid out before you un-bolt it. And don't put the fluid back in until it is bolted in place. This will make the tranny feel MUCH lighter!
-
If I remember correctly (not always a good thing), teh fill hole is on the right side of my 4-speeds. I remember crawling under the car once on the passenger side to fill the tranny... As for the noise, I agree to it being a bearing going out. My original 4-speed had the same noise. It would only get quite if the clutch was engaged or driving in 4th gear. Unfortunately, I drove it a little too long and it finally gave out. For those with 4-speeds here, be aware that typically the first bearing to fail is the rear countershaft bearing. I've seen 2 tranny fail with this same bearing. Both split the outer race along it's circumference! Very weird. As for the drain plug, get a 1/2" breaker bar. That works perfect everytime and gives you the leverage you need.

