mdbrandy
Free Member
-
Joined
-
Last visited
Everything posted by mdbrandy
-
 OK. Rats. I need to go back to school and read. Yes, you're right. I was talking about the half shafts and the diff side flanges. Rereading the original question, it's about the diff pinion and driveshaft flange. Sorry. jmortensen is right - the diff pinion flange is a huge pain to get the nuts off of, and no socket will work. 12 mm box end wrench. I use the transmission to lock the drive shaft. Turn until you can reach a nut, put car in gear and swear a lot until the nut comes off. Trans in neutral, turn shaft, car back in gear, swear some more. I have had three pieces of thin-walled steel pipe in my tool box for many years now, one of which I "squeezed" the end of so that it widened out and can fit over the end of a wrench. So sometimes, for particularly stubborn nuts, I put the box end on the nut, slip the pipe over the open end of the wrench, and now I have a much larger lever arm to work with. But if you're using the wrong size wrench anyway (1/2" is close to 12mm, but a little large - about 12.7 mm actually), you don't want to put too much torque on there, or you'll just end up rounding off the nut, as mentioned by other posters here.
 -
I just reinstalled the half-shafts on my 280Z a month ago, and in trying to figure out how to correctly torque those shaft-to-diff nuts, I came across the following technique. At full droop of the suspension (rear end off the ground), the upper nuts at the diff are more-or-less exposed to a socket. I used a 3/8" drive socket (12 mm?), and either two or three 6" (3/8" drive) extension bars to extend out far enough that I could get my 3/8" torque wrench to work. You have to rotate the shaft to a fairly specific point to get each nut exposed right to get the socket to fit, but I got it to work for all four nuts on each side. A pain in the butt, but at least I know that they are torqued correctly. On the outer (axle flange), no such luck. Box end wrenches and pull hard. This ought to work to get them off as well. Good luck.
-
$2.59 Sunday up to $2.79 Monday and Tuesday, and now at $3.19 all over town. :bandit:
-
And yet day-to-day pump prices are so volatile, and respond to events that don't even have a known impact, that it is obvious that the prices that we pay on a day-to-day basis are governed by the whims of the gas companies and not by market forces. Crude didn't go up 8% due to the storm, but our pump prices did. Pump prices jumped 0.20 when that king in Saudia Arabia died. But he hadn't actually governed in years! I submit that the overall upward trend may be supply and demand, but the daily price gouging is just that.
-
It may be a different way of measureing the Octane. I've read about the methods, but I don't remember them or the differences. I think the method here is something like (M + R)/2, but I don't remember exactly what M and R are (Motor Octane and RON?). Anyway, it might not be quite as different as you think. And a litre is 1.06 quarts, and since there are 4 quarts to a U.S. gallon, that is 3.77 litres per US gallon, which comes out to about $3.89 US per US gallon given your $1.03 US per liter. Yikes! :eek:
-
Here in Champaign, regular 87 Octane had gone to $2.79 a couple weeks ago, dropped back down to $2.59, and the storm has now given the gas companies an excuse to hike it back up to $2.79. All cars are now gassed up and waiting for it to go even higher. ChrisA, I came through Nebraska a couple weeks ago (going from Yellowstone back to Illinois), and NE had some of the highest gas prices I saw! Why is that?
-
Well, I figured it out. The toe was quite off, but that wasn't the problem. I had installed new slotted/drilled rotors from MSA. I noticed no problems with them when I installed them. However, after a lot of searching through the front end, retorquing things, readjusting wheel bearings, etc, I finally found that the right side rotor had apparently been dropped. There was about a 3/4 inch area on the inside outer edge that was a little flattened, and that had pushed a small ridge of metal away from the surface of the disc. So every time the disc rotated, it hit the pad. The ridge was small enough that under no, or low braking it didn't cause symptoms, but when hauling the car down from speed, it was carving a groove along the very outside edge of the inner pad and causing a shimmy. Had it "skim-turned" to remove the ridge, and it is fine now. Wish I could have returned it to MSA instead of paying $12 for the turning, but it has been a year since I bought it, and I already had to return them once because they sent me 240Z rotors instead of 280Z rotors. No way they'd take them back (I didn't even ask). And I couldn't prove that I didn't drop it myself anyway. So, mystery solved. And I'll remember to inspect carefully every inch of all parts I buy, whether I'm busy or not...
-
My '70 is silver, and it is paint code 901.
-
2.8 Liter, 1975-83, Inline 6 Cylinder, OHC, Carb, 280ZX; Cast #47, P90, N47; VIN #L28E; / List Price $345.00 This one is a little confusing since it says P90 mixed in there, but it appears to be an N47.
-
The bends in those hoses are kind of acute, so regular straight hose would probably kink. Always possbile that you could route something to work, though. Waiting until you get the part to see if you need them will cost you another shipping charge if you do. That's probably $8-$10 right there! If I were you, I'd take a look at them, and if they look original, then they are OLD, and probably should be replaced. If one of them ruptures, you get a footwell full of coolant in your car. Also, it is a major pain to take this stuff apart under the dash, so why do it twice for $17?
-
Hey guys. Thanks for the thoughts. I was really looking for the dynamic effects of too much toe in/out. I know that leaving it out of line will mess up the tires, and I'll get it to an alignment shop before I drive it much. But now that I have it all back together, I need to assess whether it is in good shape, or if I need to redo anything. The shimmy is only under braking, and only at higher speeds, so it's a dynamic vibration of some sort, and I suspect it will be with the rotor or caliper. But I was wondering if it was toed-out, if dynamic braking could cause any sort of weird behavior. The rotors, wheel bearings, calipers (toyota 4-piston), pads, etc. are all brand new. But that doesn't mean that I didn't mess something up... On the tie rod setup, since everything is new, I didn't measure the old ones. The Factory manual actually has a distance to set the tie rod lock nut from a flat on the tie rod body, and I set that on both sides. The wheels "look" good from the front. But It doesn't take much I suspect. Thanks.
-
Ok, so I drove my 280Z for the first time in 9 months today! Entire new front and rear suspension! Now I just have to work out the bugs. I had it up to about 60 for a stretch, and it wandered some. When braking from that speed, I had a high-speed shimmy. At lower speeds, (30-40), no shimmy. I have NOT had it aligned (just came off the jack stands about 3 hours ago). My steering wheel is also about 30 degrees off, so I didn't get things back the way they were before. But with all new tie rods (inner and outer), ball joints, bushings, etc., who knows how it was before! So anyway, if the toe is really off (either in or out), what symptoms would I expect to see?
-
Even though Nabco/Tokico is the OE supplier, they may make aftermarket versions to different specs than Nissan's. It is possible that an aftermarket "brand" changed rod specifications to allow the MC to 'more or less' fit a range of vehicles to keep price down. So Nissan's version has exactly the right rod, but an aftermarket version, even if made by the OE supplier may have a compromise rod. Just a guess.
-
I had exactly the same problem when I replaced the clutch MC on my '78 280Z a year or so ago. Bought an Autozone MC, installed it, and found that the pushrod was really short. Peeled back the boot on the original, and it didn't appear to be removable. So, I returned it, then went and bought one from Nissan (expensive, but they had it in 3 days), and it fit perfectly.
-
Excellent. Thanks. I guess I have four extra rubber washers . Good thing they were fairly cheap! And yes, I am using the original thick, flat steel washer under the nut between the nut and poly. From what I can see, when you torque it down, you are really forcing the washer down against the steel tube that goes through the middle of the bushing around the spindle pin. So you compress the bushing a little, but then hit the steel tube, and get your torque against it. I assume on the other end of that steel tube, it is caught against the strut body where the spindle pin comes through. BTW, I replaced the spindle pins, lock pins + nuts and washers, and the lock nuts on the ends of the spindle pins (as well as the poly bushings, of course). I tried to buy new washers (thick metal) for the ends of the spindle pins, but they were the only part that was NLA from Nissan. Everything else was available and I had it less than a week after ordering it. And the spindle pins were cheaper than from VB!
-
Question: on the ends of the spindle pins, there is originally a rubber washer on each end that fits between the metal washer and the bushing itself. I now have polyurethane all around. Without thinking about it, I bought 4 new rubber washers (still available from Nissan). However, I just tried to torque one of the spindle pin bolts down, and the washer just squirted out from under the metal washer (it didn't slide over, it actually bowled-up and completely out from under the metal washer so I could just lift it off). Upon reflection, the poly bushings essentially have their own pliant washer by the outside section of the poly bushing itself. So are these rubber washers now not needed? Thanks.
-
I bought most of his kits a while back, and I've been slowly going through them as I work on my 280Z. Good stuff, and the labeling is generally right on.
-
If the parking brake doesn't pull enough to engage the rear brakes, that would seem to be a problem, so you're probably looking in the right place. As to the reaction disk, it is inside the booster, and apparently it falls down inside the booster sometimes if you aren't careful when reattaching the master cylinder pushrod. It has never happened to me, and I've never looked, so all I know is what the other threads have said. Search and read if you run out of other ideas.
-
Just as a thought, search for the term "reaction disk" in the forums. I've seen a couple people complain about similar problems, and the difficulty was that they'd let the reaction disk in the vacuum booster fall out during assembly.
-
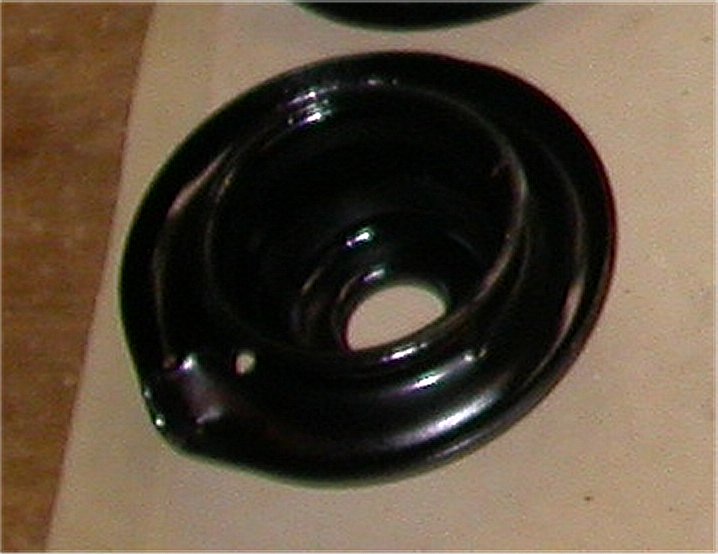
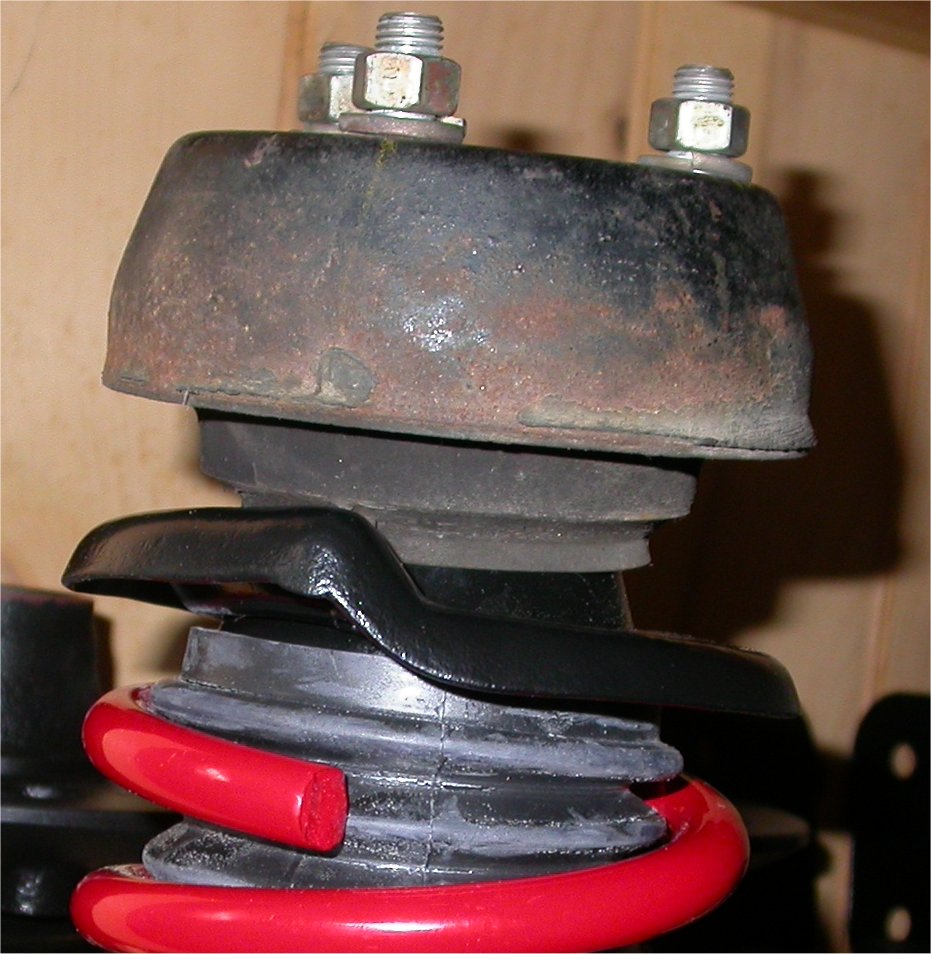
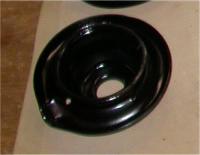
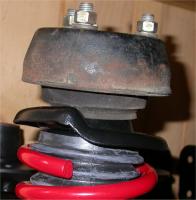
I just put a set of the OEM style strut boots on my 280Z, so FYI, I've attached two pics: one that is the underside of the upper spring seat where the boot fits around a lip, and the other with the boot installed on the strut. I haven't disassembled my 240Z struts to compare, but these are 280Z style.
-
:classic: :classic: :classic: I have a BUNCH of pictures that I'll have to get together and do something with once I get through all of this. Next is inserting the axles with the outer bearings. Maybe I should freeze them too!
-
OK. Smoothed and polished the inner hub surface where the bearing fits. Even took a little polishing bob that I had a bit of polish on and smoothed it out slick as ice. Cleaned it all out with a degreaser/cleaner. Then a little coating of grease. 3 hours in the big freezer for the bearing. Really cold. About 2 hours with the 500 Watt halogen 4 inches from the hub. Entire hub too hot to touch. 90 seconds from freezer to bearing insertion in hub. Didn't have to hit it once. It just slid in. All the way to the stop. Wow. So now, of course, I'm worried that I took too much off the hub surface, and the bearing will now be loose in the hub. But we'll see. I'll let it come to thermal equilibrium overnight and see if I can pull it out by hand. If not, then I'm home free! Thanks for the ideas guys. Saved my bacon. I want to drive my car again!
-
I actually did that after the 2nd time I took it out (put a little grease in the hub itself to "grease the skids" as it were...). Getting the stupid thing square is a definate chore. I will be sure it is all nice and clean again before I try to insert the frozen bearing again...
-
Well, that's the same situation here, but the air is usually nicely saturated, even if we can't get any of it to fall onto the plants! Maybe I could put my whole yard in a freezer and condense some water onto it when I took it out! Or water it. But that takes effort ! It's only grass!
-
Excellent idea! I have several big 500W halogen worklights. I can set one right on the A-arm, pointing into the bearing hub. Ought to raise it's temp a bit! I had already figured on using the plastic bag. The one thing that worries me is the condensation that will definately happen on the bearing after I take it out of the bag and install it in the hub (notice that positive thinking!). You know how humid it is back here in good old IL/IN! But I figure since the grease is totally packed into the bearing spaces, the condensation will only happen on the external surfaces, so hopefully it will dry easily and completely. Don't want water in the bearings! Thanks for the ideas! That's why I love this site! I'll let you know how it works out...