


siteunseen
Free Member
-
Joined
-
Last visited
Everything posted by siteunseen
-
 That's cool! Uses a little more electrical tape than what I'm used to.
 -
Having been fooling with mine these past few days, your float tangs are bent way too high. Just like mine were and there was very little gas in the float chambers. I bet you set yours the way I did, upside down resting on the pin. They were a pain getting them bent back to a normal "ramp" like they should be. I thought about buying new ones too but didn't, maybe you should? I don't have a lot to do in this life so spending hours to save a few dollars is no big deal. If you get them close to this picture they'll just be a millimeter or two off. After bending them like new ones look, here's where I was. Hard to see but it's about 2mm high in this picture.
-
Whatever you decide to do with your AFM make sure and connect the ground wire on the bottom to one of the mounting bolts. I've read where a lot of those wires aren't connected and it now they are . Here's an explanation the flaps get deformed, one way, backfiring through the intake is the main reason though. From atlanticzcars, http://atlanticz.ca/zclub/techtips/afm/sizeupgrade/index.html My '77 had a big hole where the EGR tube connected to the intake. It popped like crazy when I first drove the car if I gave it too much fuel.
-
My '72 will be 45 & my '77 40 years old next year, wu who. Better go on and celebrate tonight. HAPPY NEW YEARS everyone! Looks like Clemson will be national champions.
-
Dashpot is open to atmosphere. No hose. Green and black wires on top of intake are the coolant temp sensor and the thermotine sensor in the thermostat housing. They should be cleaned and lubed with dielectric grease. They're bullet connections and tough. Use two pairs of pliers and pull them apart. Don't grab the wire though just below where it crimps into bullet connections. The snap on clips like the injectors have a flat C looking clip that holds them in place. Use a small screwdriver on one of the sides and pop one side out. Do the other side too. Pull the top with needle nosed pliers until the plastic houseing comes loose. Be careful not to loose the clips. Look on ebay for "280z fuel injection connector kit" and you'll understand better. Those green wires with the bullet connections really need cleaning, important. Pull the brass sensors from the thermostat housing and shine those up too. You need this. Both less than $10 and would do 4 cars. CRC electronic spray cleaner and any dielectric grease.
-
I'm sorry, I understand what you're saying now. When I get mine set I can do it with water and get the measurements using water. As far as that goes, once I get mine set I'll do anything I can to help others in the future. You may get a phone call for helpful ways of doing this correctly. Measuring closure point (Fuel level in middle axis of plate-bowl) at different degrees of tilt will solve the "mystery" and give a nice curve as you do 0 degrees (23mm), 5 degrees (?mm), and 10 degrees (mm) as well as -5 degrees (?mm), and -10 degrees (mm) .
-
I noticed something while doing the first set-up and will be able to tell more tomorrow. The way these floats are made I could swear they make the level a touch higher towards the back, compensating for the motor tilt. Can you see it in this photo? Looks pretty level looking at it now. For once in my life I may be wrong!
-
I'll refer you to these post Mr Blue.
-
If the float pin holes are that wallard out I would buy new floats or bigger pins. Seems like you might could squeeze the hinge together or apart to tighten them up? If it's the OE distributor this post about worn springs inside make a lot of sense to me.
-
I think a tank liner type product on a plastic vapor tank would be a great idea. I've used Red-Kote a few times lining tanks and it works wonderfully (so far ).
-
Another good question. I overfilled mine last Sunday, had the cruise on and got a phone call. Mine did not drain under the car, maybe I should look into that? It ran right down the lower rear fender. It was even with the gas cap and after driving for an hour or so I could still see it down the filler hole. I wonder if they changed things up between our model years? Can't wait for the new year's questions I have for you all to answer for me!
-
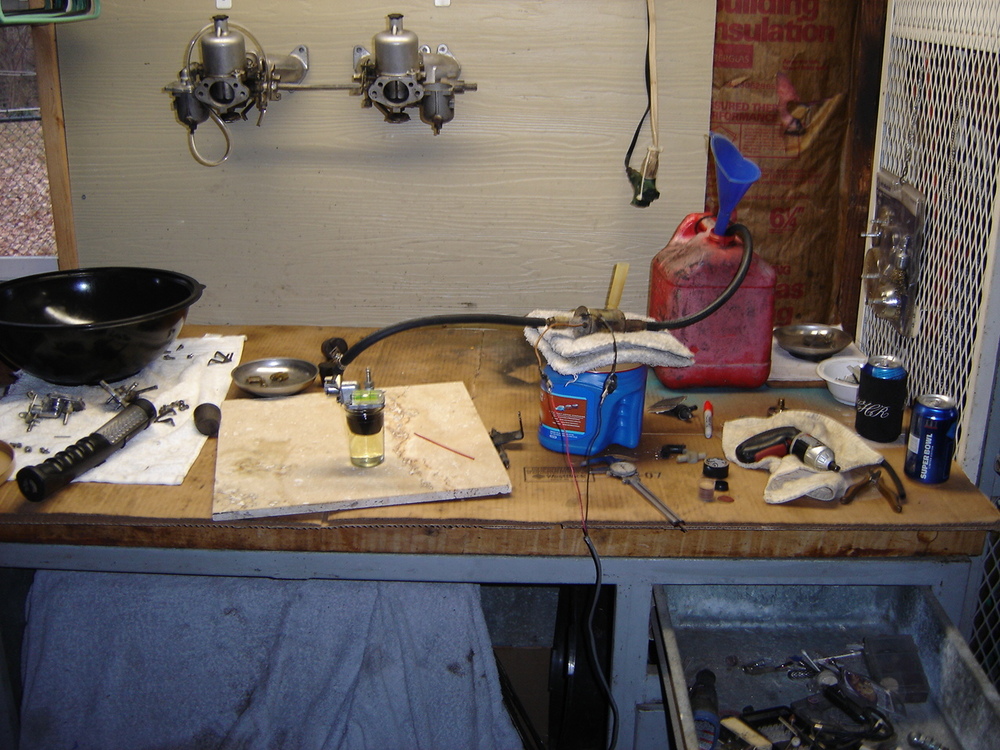
Had to take a break! There's football game on I'd like to watch. First lesson I learned today is a Sharpie marker isn't suitable for this. I used my Dremel to make a scratch in the glass all the way around. 2nd one was my work table is crookeder than my teeth. Here's what I have set-up for Sunday morning, water hose is laying beside my chair in case of a fire. If anyone could add some advice I would appreciate it. This is just from eyeballing the tang from pictures I found on the internet. Prior to matching pictures they were waaaaaaay too high, I was driving on drips of fuel. Now I'm just a few millimeters off. In the morning they'll be perfect at 23mm. Thanks for everybodies help. Cliff
-
If I'm wrong I apologize but doesn't the filler tube have an overflow hose that connects to the vapor tank? I've overfilled mine a couple of times and the fumes were much stronger inside the cabin. Wouldn't there be a small amount of liquid fuel in there until it evaporates? I've learned to be more careful and not fill it until the gas pump shuts off. Number 18 in this drawing.
-
I'm scared of that radiator fan so I always put the golf tee inside the hose end off the distributor, not the end coming off the front carb, before I crank mine. If you get those marks on the pulley facing down, you can slide under the car and paint those marks with White-Out or whatever to make them easier to see. The first one from the left is 0, it's a little bigger notch also, then 5, 10, 15, 20 etc.
-
I don't know if this will be helpful to you in any way but it's a simple trick to test the float "floatability". On the lid there is a vent/overflow hose connector. You can use those little red straws that come with aerosol cans like WD-40 to stick down that connector and then it rest on the float's roof. With that you can see if the float is moving freely. I actually left one in and watched it raise and lower ever so slightly while I revved the motor. There should be a small tang coming off the floats hinge that keeps the float from dropping beyond the wall of the float chamber. It hits the mounting "legs" where the pin goes in. If it's bent wrong it'll make getting the float back in the chamber a little tough. You can sort of eyeball the tang the pin rides on in this picture. Before I learned the "Just SUs DVD" had some old instructions that are no good with the valves they now sell my tangs were ramped up almost to the top of the pin holes. They should be way down like the picture. That connections is closest to the carb body and looks similar to this only it stands straight up, vertically.
-
I'm playing around with my float levels also, if you can call it "playing". It's a PITA to me. I rebuilt mine after watching the ztherapy video. Set the floats as they show on said video, WAY OFF! After reading the world wide web plus a little more I found where ztherapy says to not do it the way the video shows, different valves won't hold the float up to measure .55" from inverted lid to float roof like I had mine. Now the way is to let the float dangle down and slowly push up until you can't blow through the supply line. I think I finally read where it should measure somewhere between 11mm 14mm from float roof to the lid. I decided to scratch all that and put the float and lid on top of a small glass. Measure down 23mm from the inside bottom of the lid, down the glass and make a mark. Pour gas through the supply and get the floats at the 23mm line on the glass. Here's where I got the idea, thanks @Jeff G 78 Oh yeah, when you're fooling with filling the float chambers a lot, I've found that removing the plugs and taking the coil wire off works fast and best for me. Mr Warner's way also works good but I haven't removed my valve cover.
-
Backwards from the mountain goat but along the same thinking. Shorter in front, longer in the rear.
-
Your wife would have a field day with this young man.
-
On acceleration, briefly, I understand why they would do it and I never had a problem but pulling a big hill is a different story. One beautiful sunny day I got about a fourth of the way up Alabama's highest mountain and the car started running on one carb. I had to roll backwards and cut the wheel to level the car while the bowl filled back up to go further up the mountain. I did this 4 times and knew what was happening so no big deal to me but the sweet young lady that was sitting next to me got worried then a little scared she was gonna be walking home. Now if she was a little older, she would've known we could coast back down the mountain. Trade-offs, at my age I'll do anything to get up that mountain.
-
That's exactly what mine was doing, hanging on the flimsy needle. I had thought of trying to find a different float that wouldn't have to be bent to such an angle as mine was. I got so frustrated a couple of months ago I put the OE Nissans back in. Long valve in front, short in the rear. Drove it until the cold weather finally got here and started back trying the ztherapy valves. The rubber tip on the 42 year old Nissans were squashed out around the edge. Thanks again, Cliff.
-
Thank you all! I'm joining this crowd, and am DONE fooling with long ears versus short ears. Now I'll set them in small glasses the size of the float chamber and get them at 23mm down. Once that is set, I'll do 10 turns down and see where the fuel is. This is the most talked about method for getting them dead on.
-
I kept reading the same advice, "make two as one". So I made two rears.
-
Anybody know of a reason I should NOT use two rear lids? I've read until my eyes are red. I want the front and rear to use the short valves like I bought from Ztherapy. Tired of fooling with them and was about to drill the longer fronts when I remembered my extra set of carbs. Switched everything around and I can't see any difference except they both have "R" stamped on them. Please tell me if I'm overlooking something.
-
I'm guilty of "over simpifying" (thanks ZH for the new word). After a mock-up assembly of the hoses and kock valve I learned something. When that valve is closed there is nothing getting past it to the heater core from the cylinder head. So until the valve is opened up the coolant is dead headed coming off the cylinder head. No need for another valve to stop the flow of coolant through the cabin in warmer weather like I was thinking here,
-
How much better does it run? I ran k&n filters on my sport bike and they really made a difference. Did the filter help any other problems you've been having? I'm on the fence on whether to buy one. Any advice would be great! Thanks!

