Everything posted by darom
-
Found the rear strut insulator.
-
Does anybody have a used 280z rear strut insulator? I've contacted a few guys on the hybridz and locally, so far no results. I am going to call my parts dept buddy at Nissan. Out of my give-away parts my Chevy 350 block was finally picked up.
-
I think it was the same PO idiot who sold me his 76: - exhaust manifold bolted down using big a$$ machine screws (it leaked badly) - house door bell knob mounted on the side of the steering column acting as a horn button - hot ignition wire running through Bosch relay to energize the CSV (it worked without this) - 2x4 piece of wood supporting the moon roof from falling inside (I welded that ugly hole shut) - AFM ripped boot fixed with the duct tape - melted wiring on the side of the wiper motor which caused all gauges inside to fry including all relays on the RH side - brake booster had all the brake fluid inside and brakes didn't work, rear break calipers were seized - the engine sounded like a diesel - the timing chain ate away the guides and the chain tensioner fell into the oil pan - and to top it off, cheap Maaco paint job covering all the usual rust spots without any prep!
-
mjr45, tmohawk and stevej - thanks for posting the links and the picture. I am heading out to the ebay ford supplier.
-
Ptero, my 76 is doing the same thing with the reverse gear. My 5-speed is a fresh rebuilt unit, I found some posts mentioning that since there are no syncro gears for the reverse, we will hear the noise while engaging the gear. On mine, I do have to press all way down to the floor the clutch, to avoid the grinding noise. All other gears are fine. We probably both need to adjust the rod Zed is talking about.
-
mjr45, thanks! I checked Lowe's, but didn't see anything that resembled old Datsun fasteners.
-
colbydc5, what are you going to do with the fuel tank drain bolt? It is so much easier to just undo it and drain gas vs. siphoning it through the fuel filler cap :-)
-
Check your TPS, the FSM shows how to test it (very simple).
-
Mjr45, if it is not too much trouble, can you post a picture of the Ford fastener with maybe outside diameter and height measurements in mm? I will visit my local upholstery shop and try to locate these. I am using sheet metal screws now to hold my panels (painted black). Thanks!
-
mjr45, would you happen to have the Ford's part number for those pins? Thanks!
-
I like Sarah's idea - also I would have added a 10 second timer to the HORN part.
-
Fuel dampers are mechanical devices with a diaphragm inside. Once they fail, they might restrict fuel flow causing lean conditions. I found an interesting post discussing the fuel dampers on Toyotas: http://www.offroad-toyotas.com/forums/toyota-truck-4runner-archives/9491-know-what-fuel-damper-print.html Personally, I took mine off when I replaced my fuel pump.
-
Brento, when you are done with the above FPR test and if it shows an increase in PSI with the same acceleration symptoms, don't rush to get another fuel pump. Hold off until you test your fuel damper. Bypass it with a longer fuel injection rated hose, and take your car for a test ride. The fuel damper sits right above the fuel pump and very easy to access. Let us know the results.
-
Ptero, you will need the 73 Factory Service Manual, electrical part, to figure out the other wires origin. The FSM shows the color codes for the wires and also the plugs location which makes it easy to troubleshoot. You can test any relay with a voltmeter and a 12V battery. Regards!
-
Here is a nice write-up on this procedure: http://www.geocities.com/inlinestroker/seals.html
-
Cesar, welcome to the Z family! I have a 76 and now I wish I would have bought a 75 or older model to avoid the CA smog! I have had "fun" trying to pass it. It took some $$ and reading the Factory Service Manual a lot. You should download the FSM, Fuel Injection "Bible" and the colored wiring diagram for this year right away.
-
KDMatt, here is my original post re: the lean condition: http://www.classiczcars.com/forums/showthread.php?41973-TPS-smog-and-high-CO-discussion
-
The PO's Airtex E8312 on my 76 showed all healthy signs (good pressure at idle and with a starter solenoid wire disconnected test), but under load I had some extreme lean conditions and engine bucking. I replaced it with a MSD2225, although a word of caution - this pump is a pusher and shouldn't be used as a puller. I found it out later after reading MSD forums. Mine works fine for now (I will keep my fingers crossed). MSD techs advise people to properly mount them below the fuel level of the tank. I guess it works due to a relatively low fuel pressure in stock Datsuns (under 40 psi). KDMatt, put a voltmeter on your fuel pump electrical wire leads, remove the starter solenoid wire, have your assistant turn the ignition key to START and see what voltage you are getting at the pump. It should be almost exact as the battery's one.
-
Sarah, after I installed the rebuilt AFM with the stock CA lean settings, the best resistance setting I can get is to leave it alone at 0 to have my 17 in Hg. It is still a nice troubleshooting tool. Re: the idle and ignition timing - I am in the same boat: the car likes 850-900 rpms with the 14 degrees. 10 BTDC makes my car sluggish. Zed Head: you might be right about the idle enrichment. Now all of us need a vacuum gauge inside to observe it while at cruise. There was a reason why old cars used to have these gauges :-)
-
I have also added the 5k potentiometer to the CTS circuit after chasing the lean condition of my 76 for months (it turned out to be a bad fuel pump). After experimenting with different resistance settings, it seems I can't add more vacuum to the existing 17 in Hg no matter how rich the mixture becomes. Actually adding more resistance makes the vacuum go down. The AFM is a fresh rebuilt unit to match CA EPA standards. I tried 10 BTDC, 850 rpm idle, then 14 BTDC (engine runs stronger at acceleration without pinging). Btw, Sarah, thanks for the CTS mod guidance :-)
-
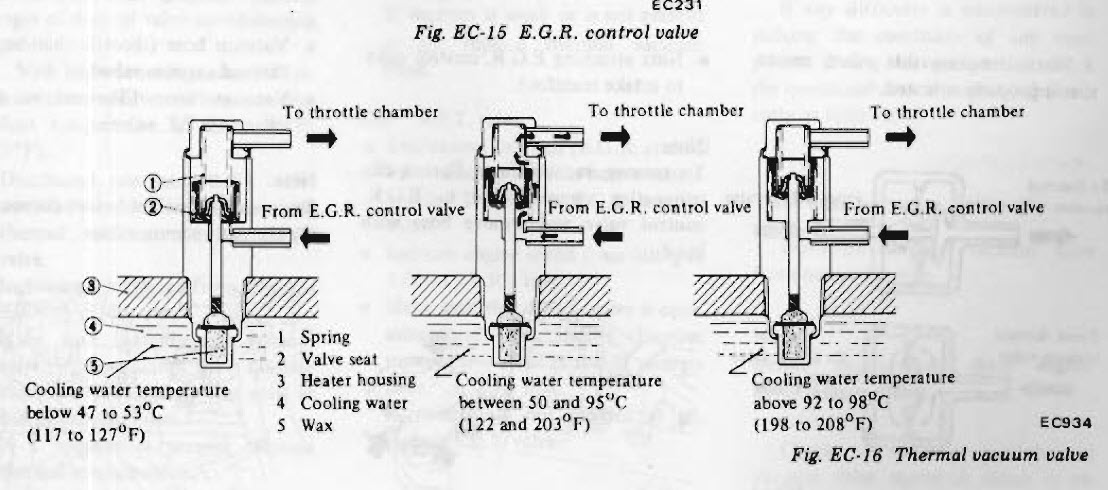
Hi FW! Thanks for checking my thread out. The tubing is indeed very small to allow for a nice water flow from the thermostat housing to the aluminum EGR thermal valve block and back to the lower radiator hose connection. I did want at some time to upgrade the pipes to a large diameter, but to me it was more work than re-routing vacuum lines :-) I didn't install any diodes when I did the 1979 alternator upgrade on my externally voltage regulated 76. I followed the atlaticz's instructions: http://www.atlanticz.ca/zclub/techtips/alternatorswap/index.html Do I need one? The car properly shuts off and the alternator does a good job charging the battery. I did re-do the brake light relay yellow wire (after the upgrade, the wire had the constant 12V with the key off and the relay was constantly energized). I connected a switched 12V to the brake relay from an unused antenna switch lead). The old 76 EGR electric solenoid was another drain - there was constant 12V present after the alternator upgrade. I didn't want to run another wire to the cabin's ignition switched lead through the relay to operate it. That's why I picked the later model ZX thermal EGR valve - it cleans up the electrical wiring nicely in the engine bay. I am not using the 1978 back pressure exhaust gas transducer since my intake/EGR exhaust doesn't have a port to connect to. Thanks! PS. After talking to my hotrod buddie, he thinks that EGR valve's threads are NPT! The threads are very close to the 1.5 metric. Or British NPT?
-
I took the plug out - it measured OD 17mm with the 1.5 thread pitch. Does M16 x 1.5 sound right? The thermostat's housing radiator hose pipe's OD is 36 mm, ID 30mm. Will a 32mm adapter be a nice tight fit? Thanks!
-
Hi guys, I converted my electrically operated EGR switch solenoid on my 76 to the 78 EGR control valve (1978 FSM, EC-11) which is temperature operated. This allowed me to get rid of the potential battery drain condition in the future (after my alternator had been upgraded to the internal voltage unit, the solenoid was constantly energized). The 78 EGR control valve is installed in the aluminum block which is located under the air regulator. The problem is the temperature in that block doesn't get more than 52-55C. I tested it with my laser thermometer. The valve doesn't open, thus it doesn't allow the vacuum to operate my EGR valve. I tested the valve in the pot, and it opens at around 65C. I would like to install the adapter in the top radiator hose and screw that EGR control valve there, then block off the thermostat housing hole for this block and get rid of the snake coolant line going to the RH side. The top radiator hose temperature would be the best source to operate that valve. What is the thread size of the 78 EGR control valve? Is the top radiator hose size 1 1/4" or 1 3/8"? Rockauto comes up with both sizes. Thank you!
-
UPDATE: I finally replaced the PO's fuel pump (it is one of the Autozone replacement pumps, Airtex). This fixed the lean condition finally! What confused me was the fact that the old pump was delivering the "prescribed" by FSM fuel pressure with the key in ON (starter solenoid disabled) position and at idle with the stock FPR. Since I couldn't verify the fuel pressure while driving, it was my last stop.
-
Resurrecting the old thread. I just fixed my 5th gear by following Sledz's advice. The shifter wouldn't completely engage the gear - thus making the shifter pop back into neutral. Thanks Sledz!!!