AZ-240z
Free Member
-
Joined
-
Last visited
Everything posted by AZ-240z
-
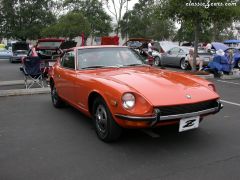
 Chris, thanks for a real good summary of the contenders in stock 240 class. that, along with Kats detail pictures gives me a good feel for the show. I had heard that Bob had done quite a bit of work on his orange center fold car, new carpet, etc., so I am sure it showed well. As to judging, your emphasis, with which I totally agree, is super clean, no dust, etc. How about patena? Would an exhaust manifold, after being restored but not powder coated, or painted with hi-temp paint, and developes that reddish, brown patena from temp exposure, suffer in judging, or be a creditable, acceptable mark of originality? Great pictures, Kats. Did you take any more detail pictures of those top three cars? I really hope that when my car is finished to my satisfaction as to originality, I can make it to the next national show, and we may have the opportunity to get together, once again. Your web site and car sets the standard for all of us who aspire for total originality. I guess I will have to immerse myself in a continuing quest for those rare, NOS parts for another year and try to forget what I just missed. Dan Original Owner/hls30-20419
 -
Go to your auto paint supply house and get a box of rope calk. Roll out strings as thin as you want to attach the moisture barrier. Do not cover the drain holes at bottom of door frame. This calk stays pliable and will not dry out. Hope this helps.
-
Thanks for following up on this post, Chris. I know that I missed a good show. Did you see, or judge, the stock 240 class cars? If so, what was the detail quality like? What surprised you most about the originality detail work on these cars? Did you see the class winner; if so, what was your overall impression of this car? Were there any good examples of stock unrestored, and restored frame up 240 cars? Were any of the stock 240 z Gold Medallion winners? Geez, I really needed to be there! Dan
-
This site has been pretty quiet about the 2006 National Convention. Did anyone attend? 26th-z, are you out there, did you judge at the show, have any pictures you can share? It was a pretty big downer when I realized that I wouldn't be able to attend. Still trying to make my '71 perfect for stock competition. It may be too soon after the convention, but it would be great to seen some good pics of the show. Dan
-
Another thought. I don't have my Z with me, right now, but why don't you just drop the A/C evaporator as it is bolted to the firewall with either 3 or 4 machine screws. Then remove the blower motor. This is fairly simple. You will, then have clear access to to hoses and heater box. Just a thought. Dan
-
Thanks ddezso, that's the picture I was trying to guide the question to.
-
I've seen a couple of these offered on ebay. I'll keep my eyes open for you. Dan
-
For a comparison picture, go to Kat's website. Look under "Original Details", and the first item is "miscellanious of interior item". Scroll down and you will find the picture. I would attach it here if I knew how.
-
I believe that the car was sold for an unknown price, and the seller cancelled the auction after selling the car. We really don't know what he sold this car for. I guess he accepted an offer that he couldn't refuse.
-
These rubber end caps were not installed on my 1/71 series 1 car when I purchased it new from the dealer, FWIW.
-
Carl, I forgot to put that in the summary of my trip to the car. The door jamb data plate had a build date of 5/70. Dan
-
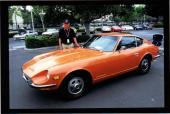
Way to go BD280Z, After seeing the car, I think you got good value for your bid. Are your plans, if a title is forthcoming, to restore this car to original? I'm in Phoenix, and would love to see the progress. Keep us updated. Dan
-
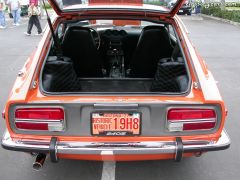
Well, I just went out to look at this car, and will give my impressions for anyone interested in bidding. The car is a numbers matching car, engine # L24-007913 and vin# hls30-04880. The head is an E-88. The passenger side floor is rusted through. It looks like the A/C evaporator, with a lot of water staining, caused the floor rust. The driver side floor looked to be pretty solid. The frame rails in the engine compartment looked to be solid. Unable to look under car as it is sitting on the frame. There is minor rust bubbling in a spot on the lower front corner of the passengers door, and on the rocker panel just in front of this door. The exhaust system appears to be original. The car looked to have been sitting in the desert for quite a long time with everything covered by pack rat nests and droppings. The interior has turned to dust althought it appeared to be totally original except for an upgraded radio. Glass is all original except for the windshield. bumpers look good but have dents and bends not visible in pictures. The tail lights are the early plastic castings but are somewhat milking from sun exposure. My overall impression is that this car is pretty original with no signs of modification anywhere except the radio. The location is a real challenge to get to with about 6 miles of rutted dirt roads. Hope this gives somewhat of a picture in a nut shell.
-
Well, I guess the bottom has fallen out on any interest in reproduction decals. I am going to forge ahead, though, and try to complete the master vac decal and will post a picture when it is completed.
-
We have discussed reproducing decals on other threads. I just wanted to post an update on my project. I have been reproducing decals for my own car and wanted to share what has been done with others interested. My only commercial interest is to help reduce my costs with these projects by offering them to other club members interested. Pictures of the three decals that I have done, so far, are posted in my gallery. Let me know what you think of the accuracy, authenticity, or use of these, and any other questions you may have. I am, currently, doing the master vac decal and may need your help and advice in duplicating the correct embossed, or stamped, numbers, but only if these decals turn out to be perfect. Thanks, in advance, for your feedback.
-
Thanks for all of the replies and interest in this decal project. I will go ahead and see what it would cost to do these master vac decals. I am estimating that I would need to sell these for about $10.00 to $15.00 each to cover my costs, but will know more about pricing once I talk to the company that will do these. If you have seen the other decals pictured in my gallery, you can see that I will not do a decal if it can't be done perfectly for my car. The master vac decal also includes some numbering which must be done with a stamped die set as seen in the original in my gallery. This shouldn't be too difficult to do. This decal, from my research, is for the 1969-71 z cars. The decal format, as seen above in Victor's picture, may have changed for later cars. I am still reseaching to see if there was any change for later cars, or if all years had the same decal format for US imported cars. I will post any new info as soon as I know the particulars. If anyone is interested in any of the other three decals shown in my gallery, please PM me with any questions, and use this thread for inquiries. Without your interest and support in projects like this, it would be impossible for me to do these decals for my car. Thanks, Dan
-
Hello Tomohawk, This is just speculation on my part, but the fuel gage sending unit is no more than a float suspended in the fuel tank. I would take a look at this first, to see if it moves freely, is not binding, or possible leaking fuel into the float, itself. The float is mounted on the end of a long wire rod, or arm and could possibly be calibrated by bending the arm slightly to adjust the signal in the sender, itself. I haven't done this, myself, but this might be a possible fix. The tank would have to be drained, then refilled with a known quantity of gas not to exceed the height of the port where the sending unit is mounted, say, a quarter of a tank. Then, remove the sending unit and make incremental adjustments to the arm until the gage reads 1/4. Again, as a disclaimer, I have not done this, and am just offering an idea which may, or may not, have any merit. Dan
-
As I am having some difficulty in attaching an image of the master vac decal that I would like to have reproduced, I have added the image to my gallery. Other pictures I just put in my gallery are those of reproduced emissions, hazzard switch, and spare tire cover decals. Dan
-
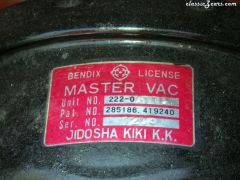 Photo of original decal from a series 1 240z
 -
I appologize for my lack of computer skills, but could someone direct me as to how to add thumbnail pics to my posts? I just uploaded some pics to my personal gallery, and the pics ended up on the home page. Hopefully they will make it to my gallery. Thanks, in advance. Dan:stupid:
-
-
-
-
-